Table of Contents >> Show >> Hide
- Why Faux Reclaimed Wood Countertops Are So Popular
- Planning Your Faux Reclaimed Wood Countertops
- Tools and Materials You’ll Need
- Step-by-Step: How to Build Faux Reclaimed Wood Countertops
- Design Tips for a Truly “Reclaimed” Look
- Pros, Cons, and Safety Considerations
- Common Mistakes (and How to Avoid Them)
- Cost and Time Expectations
- Real-World Experiences with Faux Reclaimed Wood Countertops
- Wrap-Up: Rustic Charm on a Real-World Budget
Real reclaimed wood countertops are gorgeous… and also really good at blowing up your renovation budget.
Between sourcing old beams, planing, joining, and sealing them, you can easily spend more on the counters
than on your actual stove. The good news? You can fake the look of reclaimed wood countertops using affordable
lumber, basic tools, and a weekend’s worth of elbow grease.
In this Remodelaholic-inspired guide, we’ll walk through how to create faux reclaimed wood countertops from scratch.
You’ll build a sturdy plywood base, add inexpensive boards, distress them so they look authentically old, then stain
and seal for a durable, rustic finish. We’ll also talk food-safe finishes, common mistakes, and real-world lessons
from DIYers who’ve actually lived with wood counters for years.
Why Faux Reclaimed Wood Countertops Are So Popular
Reclaimed wood has a built-in story: nail holes, knots, saw marks, and color variation that you simply don’t get
from fresh-off-the-rack lumber. Unfortunately, true reclaimed wood can be:
- Hard to source locally
- Inconsistent in size and thickness
- Warped, cracked, or hiding old finish and lead-based paint
- Surprisingly expensive once it’s milled and prepped
Faux reclaimed wood countertops solve all of that. You start with standard boards (usually pine or another softwood),
then use tools and finishes to mimic the character of old lumber. The result is:
- Budget-friendly – often under a few hundred dollars for a whole kitchen run
- Custom-sized – you cut everything to fit your exact cabinets
- Consistent and flat – easier to prep, install, and seal
- Visually “imperfect” on purpose – so everyday wear blends right in
Planning Your Faux Reclaimed Wood Countertops
Before you start ripping out your existing counters, take a few minutes to plan:
1. Decide on the Base
Most faux reclaimed wood countertop builds follow a similar structure:
- A layer of 3/4-inch plywood screwed to the cabinets as a stable base
- A top layer of solid wood boards (1×4, 1×6, or 2x material, depending on the look you want)
The plywood gives you strength and prevents seasonal movement from twisting your countertop. The visible boards on top
give you the reclaimed look.
2. Choose Your Wood Species
For a faux reclaimed look, you don’t need expensive hardwoods:
- Pine or spruce: Easy to find, easy to distress, stains nicely
- Poplar: More stable, but the grain is more subtle
- Cedar: Lots of character, but soft and very aromatic (great or terrible, depending on you!)
If you want deep grain and more durability, you can splurge on oak or maple, but most budget-friendly tutorials
use basic construction-grade pine and rely on distressing and stain to create character.
3. Pick a Color Story
Reclaimed wood is rarely one solid color. Plan on layering stains or mixing tones:
- Weathered gray + warm brown for a farmhouse look
- Medium walnut for a classic butcher-block vibe
- Darker espresso for a modern rustic feel
You can test combinations on scrap boards first. Try dry-brushing a lighter stain over a darker one, or wiping one color
on and selectively sanding it back for variation.
Tools and Materials You’ll Need
Here’s a typical supply list for DIY faux reclaimed wood countertops:
Wood and Base
- 3/4-inch plywood (for countertop base)
- 1×4, 1×6, or similar boards for the visible top layer
- Optional: a thicker front edge board to mimic a chunky slab
Fasteners and Adhesives
- Wood screws to secure plywood to cabinets
- Construction adhesive (for bonding boards to plywood)
- Brad nails or finish nails (to hold boards while glue dries)
Tools
- Circular saw or table saw
- Miter saw (for clean end cuts)
- Drill/driver
- Random orbital sander
- Clamps (very helpful for keeping boards tight)
- Tape measure, square, and pencil
Finishing Materials
- Wood filler (for nail holes)
- Sandpaper (80, 120, 220 grit)
- Pre-stain wood conditioner (especially for softwoods)
- Wood stain(s) in your chosen colors
- Topcoat: polyurethane, a hardwax oil, or a tung-oil-based finish
Optional Distressing Tools
- Hammer and nails
- Chain or heavy screws (for random dents)
- Wire brush
- Chisel for adding “old” dings and edges
Step-by-Step: How to Build Faux Reclaimed Wood Countertops
Step 1: Remove Old Countertops and Prep Cabinets
Turn off and disconnect any plumbing or appliances attached to the counters. Remove the old countertop by unscrewing it
from underneath the cabinet rails. Scrape off any remaining adhesive and check that the cabinet tops are level.
Shim low spots if necessarywood tops follow whatever is underneath them.
Step 2: Install the Plywood Base
Cut 3/4-inch plywood to match your cabinet layout, including any sink or stove openings. Dry-fit first to make sure
everything lines up. Then:
- Spread a few beads of construction adhesive on top of the cabinet frames.
- Set the plywood in place, checking for level as you go.
- Screw the plywood down from above into the cabinet rails (not all the way through the face frames).
For long runs, it’s smart to leave seams where cabinets naturally break, so the countertop can move or be removed later
if needed.
Step 3: Cut and Lay Out the Top Boards
Cut your boards to length so they run front-to-back across the plywood. Dry-lay them:
- Stagger board lengths if you want a more random reclaimed look.
- Flip boards to choose the most interesting side as the “top.”
- Arrange boards so knots and grain are visually balanced, not clumped in one corner.
Once you like the layout, lightly mark the underside or ends so you remember the order.
Step 4: Attach the Boards
Working one board at a time:
- Run a bead of construction adhesive on the plywood where the board will sit.
- Set the board in place and press firmly.
- Secure with brad nails or screws driven from the top into the plywood.
Space the boards tightlytiny hairline gaps are okay and can actually help with the reclaimed look, but you don’t
want crumb-catching canyons between boards.
Step 5: Add a Front Edge
To make the countertop look thicker, many DIYers add a front “apron” board:
- Rip or cut a board so its height matches the combined thickness of plywood + top boards.
- Glue and nail or screw it into the front edge of the plywood and face of the top boards.
This creates the illusion of a chunky slab and hides the layered construction.
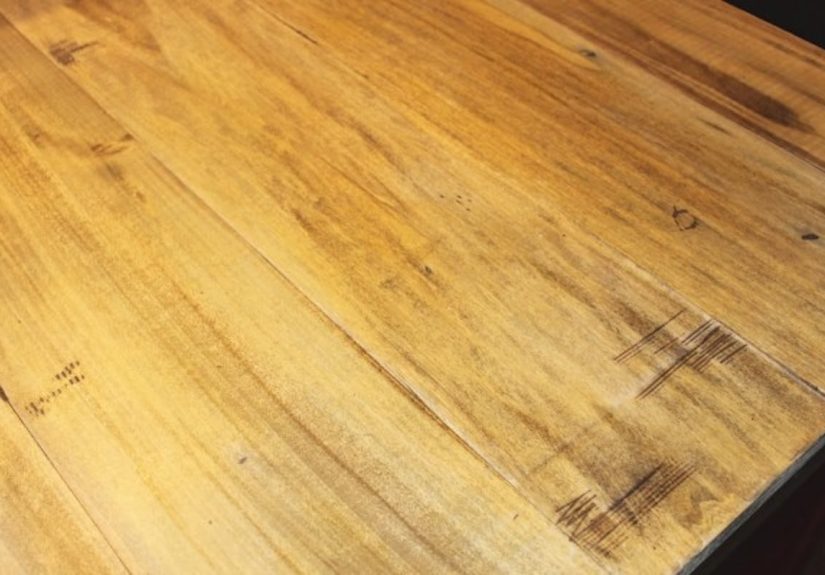
Step 6: Sand and Distress the Wood
Now comes the fun part: making new wood look old. Start by sanding:
- Use 80-grit to knock down high spots, sharp corners, and mill marks.
- Move to 120-grit for a smoother surface, then 220-grit where you want it silky.
For distressing, think “random, but not chaotic.” A few ideas:
- Lightly whack the boards with a chain for scattered dents.
- Use a hammer and nail to mimic old nail holes along “imaginary” board seams.
- Drag a wire brush with the grain to exaggerate soft grain lines.
- Round over corners with sandpaper or a rasp to mimic long-term wear.
Step back often to make sure you’re not overdoing it in one spot. The goal is “aged by time,” not “attacked by a raccoon.”
Step 7: Condition and Stain
Softwoods like pine tend to blotch when stained, so apply a pre-stain wood conditioner according to the can directions.
Once it’s dry:
- Apply your first stain color with a rag or brush, working in sections.
- Wipe off excess to keep the grain visible.
- Layer a second color in select spots (edges, knots, or boards) for variation.
- Use a clean rag to blend transitions so you don’t get harsh lines.
Let the stain dry fully. If it looks too “perfect,” you can lightly sand in a few high-wear areas (around the sink,
corners, or near the range) to expose more of the lighter wood underneath.
Step 8: Seal for Durability and Everyday Use
The topcoat is what makes or breaks your faux reclaimed wood countertops in daily life. You have three main paths:
-
Film finishes (polyurethane, certain tung-oil blends) – Very durable, water-resistant, and relatively low maintenance.
Best if you don’t plan to cut directly on the counters. -
Penetrating oil finishes (food-grade mineral oil, oil-and-wax blends) – Food-safe and easy to refresh, but require frequent
reapplication and offer less water resistance. - Hybrid hardwax oils – A middle ground: good durability, repairable, and designed for wood surfaces like countertops and tables.
Always follow the manufacturer’s instructions for drying and curing time. Many products are only considered fully
food-safe once they’ve cured for several days to weeks. Even then, treat the wood like a nice dining table: use cutting
boards and trivets, and wipe up standing water promptly.
Design Tips for a Truly “Reclaimed” Look
- Mix board widths: Use a combination of 1×4 and 1×6 boards so it doesn’t look too uniform.
- Stagger “seams”: Avoid lining up end joints; offset them for a puzzle-like, old-floorboard feel.
- Lean into imperfections: Don’t obsess over tiny gaps or knots. Those are your best friends here.
-
Coordinate with cabinets: Lighter counters pair well with dark cabinets, and vice versa.
Medium-toned “reclaimed” tops can bridge mixed finishes in an open-plan space.
Pros, Cons, and Safety Considerations
Pros
- Affordable compared with stone or true reclaimed slabs
- Custom fit to any quirky kitchen layout
- Repairable – small dents or scratches just add to the character
- Visually warm and perfect for farmhouse, cottage, or rustic-modern styles
Cons
- Not as heat-resistant as stone – hot pans still need trivets
- Requires ongoing maintenance depending on the finish
- Softwoods can dent more easily (though that’s partly the point)
- Not ideal for “splashy” areas without a good waterproof topcoat
Food-Safety Basics
If you want to prep food directly on the countertop, choose products labeled for use on food-contact surfaces once cured,
and confirm the manufacturer’s recommendations. Even with food-safe finishes, most homeowners treat wood countertops like
a butcher block island: they use separate cutting boards and avoid long-term standing water, especially around sinks and faucets.
Common Mistakes (and How to Avoid Them)
- Skipping the conditioner: Stain can look patchy and streaky on softwood. Conditioner helps even things out.
- Not sanding between coats: Light sanding between finish coats keeps drips and dust nibs from being locked in forever.
-
Rushing the cure time: Just because a finish is dry to the touch doesn’t mean it’s fully cured.
Wait the full cure window before placing appliances or decor. - Over-distressing one area: If all the “damage” is in one corner, it looks staged. Spread it around like normal wear would.
-
Ignoring movement gaps: Wood expands and contracts. Leave tiny expansion room at walls and don’t caulk everything so tight
that seasonal changes cause cracks.
Cost and Time Expectations
The exact cost depends on lumber prices in your area, but many faux reclaimed countertop projects come in under a few hundred dollars,
even for a medium-size kitchen. You’re mainly paying for:
- Plywood and boards
- Stain and topcoat
- A handful of screws, nails, and adhesives
Time-wise, expect:
- One day to remove old counters, install plywood, and attach boards
- Half a day to distress and stain
- Several days for finish coats and curing, depending on the product
Most of that “time” isn’t active work; it’s waiting for things to dry while you admire your soon-to-be rustic masterpiece.
Real-World Experiences with Faux Reclaimed Wood Countertops
It’s one thing to build faux reclaimed wood countertops; it’s another to live with them through messy cooking, kids’ science projects,
and the occasional dropped cast-iron skillet. Here are some real-world observations and lessons that tend to come up once the
honeymoon phase is over.
They Age with You (and That’s the Point)
Unlike a pristine white quartz slab, wood countertops almost invite a bit of chaos. Over time, you’ll likely notice new dings near the
dishwasher, extra wear by the coffee station, or a slightly lighter patch where someone constantly slides a cutting board.
On a high-gloss, “perfect” surface, those would feel like flaws. On a faux reclaimed top, they read as characteranother chapter in
the story you started with hammer marks and wire-brush grooves.
Many homeowners report that the counters actually look better a year or two in than they did on day one. The stain and finish mellow,
the sheen softens, and the wear blends naturally with your original distressing.
Maintenance Is Manageable, Not Overwhelming
Maintenance depends heavily on the finish you choose. Film-forming finishes like polyurethane or certain tung-oil blends usually just need:
- Regular wipe-downs with a damp cloth and mild soap
- Immediate cleanup of spills, especially oils and colored liquids
- Occasional buffing or spot touch-ups if a section gets heavily scratched
Oil-and-wax finishes are more hands-on. You may find yourself re-oiling every few weeks at first, then every month or two once the wood
is saturated. The trade-off is that refreshing the surface is as simple as wiping on more oilno sanding or stripping required.
Water Is the Main Enemy (But You Can Outsmart It)
The number one stress point for wood countertops is the sink area. Splashes, drips, and a constantly damp perimeter can break down a finish
faster than anywhere else. A few smart habits go a long way:
- Install a good bead of flexible caulk between the sink and wood
- Keep a small hand towel nearby to wipe standing water
- Touch up the finish around the sink more frequently than other sections
Some DIYers even choose a different surface entirely around the sinklike an apron-front sink or a small stone insetand keep
the faux reclaimed wood to the “dry” zones of the kitchen.
They’re a Conversation Starter
One unexpected perk: people love asking about DIY wood countertops. Guests tend to run their hands along the surface, tracing the faux
saw marks and knots, and then ask, “Where did you find the reclaimed wood?” Telling them you made it from big-box-store boards is
extremely satisfyingand often inspires their own DIY plans.
This also means your counters can quietly elevate the overall feel of your home. Even a basic kitchen instantly looks warmer and more
custom when the countertops feel like they were crafted, not just dropped in.
What Most DIYers Would Do Differently Next Time
Looking back, many people say they’d:
- Spend more time testing stain combinations on scrap boards
- Be bolder with initial distressing, knowing everyday life will tone it down
- Use higher-quality brushes and applicators for the finish to minimize streaks
- Leave better expansion gaps at walls and not seal every tiny edge with rock-hard caulk
The overall consensus? Faux reclaimed wood countertops are a high-impact, budget-friendly upgrade that feel surprisingly attainable.
They require patience, attention to detail, and a willingness to embrace imperfectionbut that’s exactly what makes them look so good.
Wrap-Up: Rustic Charm on a Real-World Budget
Creating faux reclaimed wood countertops is the kind of project that looks intimidating at first glance, then turns out to be
totally doable once you break it down into steps. You’re essentially layering good structure (plywood), simple carpentry
(boards and edge pieces), creative distressing, and thoughtful finishing into one cohesive upgrade.
If you’re craving a warmer, more character-filled kitchen but don’t want to drop thousands on custom slabs, this Remodelaholic-style
approach gives you the best of both worlds. You control the color, texture, and layout, and you end up with counters that feel
like they belong to your homenot any home.
Grab your sander, pick your stain, and don’t be afraid of a few dents and dings. In the world of faux reclaimed wood countertops,
those little imperfections are exactly what make everything look perfectly finished.


