Table of Contents >> Show >> Hide
- What “Pocket Retro Computer” Actually Means
- Choose Your Build Path (Pick the One That Matches Your Patience)
- The Core Parts (What You Actually Need)
- Three Build Blueprints (Pick One and Actually Finish It)
- Software Choices That Make It Feel Retro (Instead of “Random Electronics”)
- Power and Safety: The Unsexy Part That Keeps Your Project From Becoming a Campfire
- Assembly Tips That Save Hours
- Upgrades That Make It Feel Like a Real Little Computer
- Troubleshooting (Because You Will Troubleshoot)
- Conclusion: Your Pocket-Sized Time Machine
- Real-World Build Experience (What It Feels Like to Make One)
- SEO Tags
The modern world gave us phones that can render 3D graphics, translate languages, and remind us we “liked” a post in 2013.
And yet… a lot of us still daydream about the charm of chunky pixels, clicky buttons, and a computer that boots straight into fun.
That’s the vibe of a pocket retro computer: a small, handheld machine you can build yourself that feels like the lovechild
of an old-school home computer and a DIY game system.
The best part? You don’t need to be an electrical engineer with a lab coat and a villain laugh. With the right approach,
anyone can build onewhether you want a tiny RetroPie handheld, a microcontroller “pocket computer” that runs BASIC,
or a mini clamshell with a real keyboard. This guide walks through the simplest, most practical paths, the parts that matter,
and the mistakes that makers tend to repeat (so you don’t have to).
What “Pocket Retro Computer” Actually Means
The phrase can mean a few different builds, but they all share the same spirit: small, portable, and intentionally “retro.”
Think of retro as behavior more than agefast boot, simple interface, tactile controls, and software that feels like it came
from a time when manuals were thick and loading screens were… optimistic.
- Handheld retro gaming computer: Runs emulators and a front-end menu (classic console vibe).
- Pocket “computer” for typing/coding: A small screen + keyboard for notes, BASIC, MicroPython, or text tools.
- Hybrid: A tiny machine that can do bothgames when you’re bored, coding when you’re pretending not to be.
Choose Your Build Path (Pick the One That Matches Your Patience)
Path A: The “Most People” Build Raspberry Pi Handheld
If you want a truly flexible DIY handheld computer, a Raspberry Pi-based build is the most common route. It can run
a Linux-based system, handle a wide range of emulators, and support familiar tools (Wi-Fi, USB devices, menus, and so on).
This path is perfect if your goal is RetroPie-style retro gaming, plus the option to tinker later.
Tradeoffs: more power draw, more wiring, more “why is the screen upside down” moments.
Path B: The “Tiny and Efficient” Build Microcontroller Pocket Computer (Pico/ESP32)
A microcontroller build (like a Raspberry Pi Pico or an ESP32) is a different flavor of retro. Instead of “a tiny Linux PC,”
it’s more like “a modern chip pretending it’s 1983.” These builds boot instantly, sip power, and are fantastic for:
BASIC interpreters, MicroPython/CircuitPython projects, calculator-style apps, and simple retro gaming (including many 8-bit-era experiences).
Tradeoffs: less horsepower, fewer “one-click” emulators, and you’ll be living closer to the code.
Path C: The “Keyboard Nerd” Build Pocket Computer With Real Typing
Want the pocket-computer fantasy: clamshell design, small display, physical keyboard, and a machine that feels like a tiny PDA?
That’s doable toooften with an ESP32-S3 or Raspberry Pi-based core. This path is incredibly satisfying if writing and coding
matter more than performance-heavy emulation.
The Core Parts (What You Actually Need)
No matter which path you choose, you’re basically building the same “organism” with different brains.
Here’s the anatomy of a pocket retro computer:
1) The Brain
- Raspberry Pi (Zero/Zero 2 W or similar): Great for RetroPie-style systems and Linux flexibility.
- ESP32 / ESP32-S3: Excellent for low power + Wi-Fi; great for pocket “PDA” builds.
- Raspberry Pi Pico (RP2040): Cheap, simple, instant boot; great for “retro-ish” micro projects and simple games.
2) The Display
Displays are where “pocket” becomes real. For microcontrollers, SPI TFT screens are common because they’re compact and wiring-friendly.
For Raspberry Pi handhelds, you’ll often see small TFTs designed to mate with the Pi, or HDMI displays if you’re going bigger.
- SPI TFT (common in small builds): Great size options, but needs careful driver/library setup.
- HDMI display: Easier on a Pi, often clearer, but can increase size and power needs.
- E-ink (for typing-focused builds): Ultra-low power and readable, but refresh behavior changes the UX.
3) Controls: Buttons, D-pad, and/or Keyboard
Controls define the experience. For gaming builds, tactile buttons plus a D-pad are classic. For pocket-computer builds,
a small QWERTY keyboard turns it into a “real” typing device instead of a gadget that only beeps.
- Game controls: D-pad + A/B/X/Y + Start/Select + shoulder buttons (optional).
- Typing controls: Small QWERTY keyboard (custom PCB, off-the-shelf mini keyboard, or keypad matrix).
4) Power: Battery + Charging + Protection
Portable builds live and die by power choices. A safe pocket retro computer usually includes:
a battery, a charging method, and protection against abuse (shorts, over-discharge, overheating).
If you’re new to batteries, don’t wing this partwiring can be forgiving; lithium chemistry is not.
- Battery: Single-cell LiPo/Li-ion is common for compact builds; AA packs work for some kits.
- Charging: A charger module designed for your battery chemistry and capacity.
- Protection: Use protected cells or a protection circuit; include fusing or careful wiring practices.
5) Audio (Optional but Fun)
You can go silent, use headphones, or add a tiny speaker. Retro sound effects are half the nostalgia.
If you include audio, plan it earlyspeaker placement and amplifier wiring are easier before the case is packed like a suitcase
two minutes before checkout.
6) The Case
Your case is the difference between “pocketable” and “I built a handheld brick with vibes.” Popular approaches:
- 3D-printed shell: Most common for custom shapes and button placement.
- Laser-cut acrylic sandwich: Clean, modular, and easy to revise.
- Repurposed enclosure (tins, old gadgets): The “retro artifact” routecool, but demands careful measuring.
Three Build Blueprints (Pick One and Actually Finish It)
Blueprint 1: “Pocket Retro Handheld” (Pi + Retro Gaming Front End)
This is the classic handheld retro gaming computer build. The general idea:
Raspberry Pi + small display + buttons + battery + a friendly menu system.
Why this blueprint works: It’s heavily documented, parts are common, and you can start with a kit-style concept
and customize later.
Typical parts list (conceptual):
- Raspberry Pi (portable-friendly model)
- Small TFT or compatible display
- Button set + D-pad (tactile switches)
- Battery + charging/boost solution (as needed)
- MicroSD storage
- Case (3D print or enclosure)
Build steps (high-level):
- Prototype first: Boot the Pi on a normal screen to confirm the OS image works before you shrink it into a handheld.
- Display next: Get the handheld display working while the system is still “open” (no case).
- Controls: Wire buttons and configure input mapping so the UI is navigable.
- Power: Add your battery solution last, then test charging and run-time behavior.
- Case assembly: Only after you’ve tested everythingbecause debugging inside a sealed case is a special kind of hobbyist cardio.
Blueprint 2: “Instant-On Pocket Computer” (Pico/ESP32 + Retro Apps)
This build is more like a “modern pocket computer that cosplays as retro.” You can run:
a tiny menu, text tools, simple games, BASIC-like environments, and MicroPython scripts.
Why this blueprint works: It’s inexpensive, boots instantly, and battery life is usually far better than a Linux handheld.
Typical parts list (conceptual):
- Microcontroller board (Pico or ESP32-S3 class)
- Small SPI TFT display (or e-ink if typing-focused)
- Buttons (and optionally a small keyboard)
- Battery + charger module
- Case
Build steps (high-level):
- Flash firmware: Start with MicroPython/CircuitPython (or your preferred SDK) and confirm your board is programmable.
- Display bring-up: Run a simple “hello world” graphics test before building any interface.
- Input scanning: Add buttons/keyboard and confirm debouncing (otherwise every keypress becomes a comedy routine).
- Create a launcher: A simple menu that starts apps/games is the fastest route to “this feels like a product.”
- Power and sleep: Add low-battery handling and sleep behavior so it doesn’t drain itself in your pocket.
Blueprint 3: “Tiny Clamshell Computer” (Typing First, Games Second)
If your dream is a pocketable machine for writing, tinkering, and light retro computing, build around a keyboard.
Many makers choose a small screen + a compact QWERTY layout and use the firmware/UI to make it feel like a mini PDA.
What makes it feel retro: minimalist UI, a “home” screen, quick access to notes/BASIC/tools, and long battery life.
Software Choices That Make It Feel Retro (Instead of “Random Electronics”)
For Raspberry Pi handhelds
- Retro gaming front ends: Menu-driven systems that launch emulators and organize libraries.
- Small-footprint Linux setups: Keep boot time and background services minimal to preserve battery and responsiveness.
- Controller mapping: The “feel” is won or lost heresmooth navigation matters more than 17 extra emulator cores.
For Pico/ESP32-style pocket computers
- MicroPython/CircuitPython apps: A great match for a “tiny computer” experience.
- BASIC-like environments: Retro computing energy without requiring a museum-grade floppy drive.
- Simple emulators: Best for older systems and classic “instant fun” titles.
A quick reality check: regardless of platform, emulation legality depends on how you source your software.
Homebrew, public-domain titles, and games you legally dump from hardware you own are the safest lanes.
The internet is full of ROM packs, but “easy to find” is not the same thing as “legal to distribute.”
Power and Safety: The Unsexy Part That Keeps Your Project From Becoming a Campfire
Battery safety isn’t about fear; it’s about basic respect for energy density. A pocket build is physically constrained,
which means wires get close, cases flex, and shorts become more likely if you’re sloppy.
Practical safety habits
- Use a protection circuit (or protected cells) to reduce over-discharge and short-circuit risk.
- Strain relief your wiring: Hot glue, tape, or printed clips can prevent “wire wiggle” failures.
- Never charge unattended: It’s not dramaticit’s standard practice.
- Plan for heat: If a board runs warm in open air, it’ll run warmer in a sealed pocket case.
If you’re building a Raspberry Pi handheld, pay attention to “charge while playing” behavior. Some charging setups can get confused
if the device draws power while charging, so choose modules designed for load sharing or plan power architecture carefully.
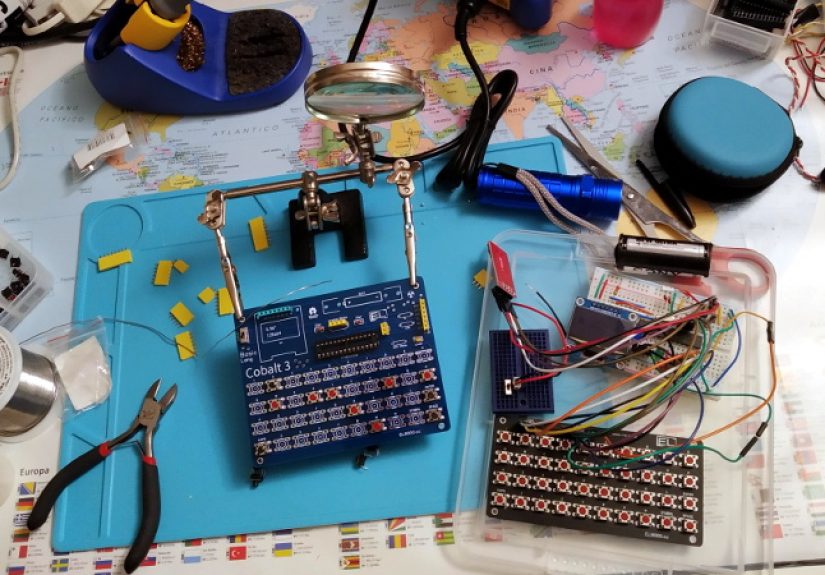
Assembly Tips That Save Hours
1) Do a “bench build” before you commit to a case
Before any screws, glue, or final wiring routes: test the full system on your desk. Get the screen stable, confirm input mapping,
and run a stress test long enough to catch power weirdness.
2) Label everything like Future You is a stranger
Use masking tape flags on wires. Take photos. Create a simple pin map. When you reopen the device after two weeks,
you’ll thank Past You for being annoyingly organized.
3) Keep the first version boring on purpose
Version 1 doesn’t need Bluetooth audio, RGB underglow, and a custom boot animation of a dancing floppy disk.
Ship a “minimum lovable build.” Then upgrade.
Upgrades That Make It Feel Like a Real Little Computer
- Instant resume: Configure sleep/wake behavior so it feels appliance-like.
- Battery indicator: A simple on-screen icon or LED saves surprise shutdowns.
- Better buttons: Switch feel matters; mushy buttons make great software feel cheap.
- A “home” UI: A launcher menu turns a pile of parts into a cohesive pocket retro computer.
- Storage discipline: Keep ROMs/apps organized so browsing is fast and pleasant.
Troubleshooting (Because You Will Troubleshoot)
Screen is blank
- Recheck voltage requirements and pin orientation.
- Confirm the correct driver/library and display resolution settings.
- Test with a known-good example sketch/app.
Buttons act haunted
- Add or adjust debouncing.
- Verify pull-up/pull-down resistors (hardware or software).
- Check for shared grounds and loose connections.
Random reboots
- Power sag is the usual suspectbattery, boost converter, or wiring gauge may be inadequate.
- Check for intermittent shorts where wires rub the case.
- Stress test with brightness and volume higher to reveal worst-case draw.
Conclusion: Your Pocket-Sized Time Machine
A pocket retro computer is one of the most satisfying “weekend-to-obsession” projects in the maker world. It blends
electronics, software, and design into something you can actually hold, use, and show off without needing a long explanation.
Whether you go with a Raspberry Pi handheld for flexible emulation or a Pico/ESP32 build for instant-on retro computing,
the winning formula is the same: start simple, test early, and let version 1 be delightfully imperfect.
Build it. Boot it. Press a button and feel that little spark of “I made this.” Then, inevitably, start planning v2because
pocket retro computers have a funny way of turning builders into lifelong tinkerers.
Real-World Build Experience (What It Feels Like to Make One)
The first “experience” most builders talk about isn’t the victory lapit’s the moment you spread parts across a desk and realize
you’ve created a tiny hardware ecosystem. A board, a display, buttons, a battery, a case, wires that look innocent now but will
soon behave like spaghetti with opinions. It feels equal parts exciting and suspicious, like adopting a robot pet from a yard sale.
Early on, there’s a small psychological win: the screen lights up. It doesn’t matter if it’s upside down, mirrored, or showing
neon test patterns that resemble a rave for ants. When the display wakes up, your brain goes, “Okay. This is a computer now.”
That’s usually followed by the second phase: controls. You press a button. Nothing happens. You press it again. Suddenly it
registers five presses, opens a menu, and selects something you didn’t mean to select. Congratulationsyour device has achieved
authentic 1980s chaos. Debouncing becomes your new favorite word.
Then comes the “pocket” part, where reality sets in. A build looks spacious on a table. Inside a case, it becomes a 3D puzzle.
Builders often learn a practical truth: wire management is not a personality trait; it’s a survival strategy. This is the stage
where taking a few photos, labeling a couple connections, and leaving slack for opening the shell later feels downright heroic.
It’s also when you discover the emotional difference between “snug fit” and “why is the battery trying to escape.”
The first successful boot inside the case is the best kind of ridiculous. The device powers on, you see a launcher or a prompt,
and suddenly you’re holding something that didn’t exist before you started. People describe it like a tiny time machine:
the UI is simple, the graphics are deliberately old-school, and everything feels directpress a button, get a response.
No notifications. No feed. No “sign in to continue.” Just you and your pocket retro computer doing what you told it to do.
Battery life becomes a surprisingly emotional metric. When a build runs for an hour, it’s proof of concept. When it runs for
several hours, it starts to feel like a real gadget. Many builders start using it in small “real life” ways: a few minutes of
gaming while waiting for something, a quick note typed in a simple text app, a short coding session that feels like writing
on a tiny, stubborn typewriter. And that’s the most fun partyour device stops being a project and becomes a habit.
Finally, there’s the universal maker ending: you finish… and immediately want to rebuild it. Not because it failed, but because
now you know what you’d do differently. Better buttons. Cleaner power wiring. A brighter screen. A nicer case. A launcher that
feels more “retro computer” and less “prototype with ambition.” That desire for version two is the real sign you succeeded.
You didn’t just build a pocket retro computeryou built a new hobby loop that fits in your pocket.


