Table of Contents >> Show >> Hide
If the phrase how to cut glass makes you picture a dramatic crash, a shower of sparkly regret, and a trip to buy replacement Band-Aids, take a breath. Cutting glass at home is absolutely doable for the right project. The trick is understanding one very important truth: you are not really “sawing” through glass. You are scoring the surface in one controlled pass, then persuading the pane to break exactly where you told it to. Glass, in other words, is less of a wrestling match and more of a negotiation.
Whether you are replacing a single-pane window, trimming a mirror for a DIY frame, or sizing glass for a craft project, the process rewards patience, prep, and a steady hand. Rush it, and you get chips, crooked breaks, and the kind of language your neighbors do not need to hear. Do it correctly, and the result is surprisingly clean, fast, and satisfying.
This guide walks you through the tools, the technique, the common mistakes, and the real-world lessons that make the difference between “nailed it” and “why is there glittering chaos on my workbench?”
What Kind of Glass Can You Cut at Home?
The best DIY candidates are standard annealed glass types such as sheet glass, plate glass, and float glass. Many mirrors can also be cut using the same score-and-snap method. These materials are the usual stars of home window repairs, picture frames, cabinet inserts, and simple decor projects.
Not every glass surface is fair game, though. Tempered glass is the big no-go. Once it has been tempered, it cannot be cut, drilled, or reshaped the usual way. Try it, and it can shatter into tiny cube-like pieces faster than your confidence disappears. Some laminated and safety glass products also need specialized tools or professional handling, especially when they are part of insulated window units, shower doors, railings, or automotive glass.
A good rule of thumb is this: if the pane has a corner stamp, safety mark, or manufacturer label and it came from a location where code often requires safety glazing, do not assume it is a simple DIY cut. Bathroom windows, shower enclosures, glass doors, and low windows near floors are often made with safety glass. When in doubt, do not play detective with your fingertips. Call a glass shop.
Tools You’ll Need Before You Start
You do not need a whole workshop that looks like a superhero lair, but you do need the right gear. Cutting glass is one of those jobs where the proper tool saves both time and heartbreak.
Basic Tools
- Glass cutter with a carbide or steel wheel
- Glass-cutting oil or light machine oil
- Metal straightedge or framing square
- Tape measure or ruler
- Marker, grease pencil, or tape for marking the cut line
- Safety glasses
- Work gloves, ideally leather or other cut-resistant gloves
- Clean rags and glass cleaner
- A rigid work surface padded with fabric, paper, or a thin blanket
Helpful Extras
- Running pliers or breaking pliers
- Rubbing stone, sharpening stone, or fine sandpaper for edge smoothing
- Masking tape to stabilize a straightedge
- Dowels or the edge of a workbench for snapping larger pieces
If you are cutting glass tile rather than a plain pane, the tool list shifts a bit. A glass-specific wet saw, glass run pliers, grozing pliers, or tile nippers can be better choices depending on whether you need long straight cuts, tiny trims, or curves.
How To Cut Glass Step by Step
1. Set Up a Stable Work Surface
Glass hates wobble. If the table flexes, the pane can crack before you even finish scoring. Use a rigid surface such as plywood on sawhorses or a sturdy workbench. Then add a thin protective layer like a clean towel, canvas, butcher paper, or an old blanket. The cushion should support the glass, not create lumps under it. If your work surface looks like a wrinkled bedspread, smooth it out first.
Before the glass ever touches the table, clear away dust, grit, screws, and mystery crumbs from old projects. Tiny debris under the pane can create pressure points, and pressure points are how calm DIY afternoons turn into expensive confetti.
2. Clean the Glass Thoroughly
Yes, really. This is not the skippable “optional prep” step that people ignore when they are feeling heroic. Dirt and grit can interrupt the cutter wheel, which leads to poor scoring and messy breaks. Spray the glass with cleaner, wipe it dry, and make sure the cutting area is spotless.
Clean glass also helps you see your mark more clearly, which sounds obvious until you try to follow a line through fingerprints and dust and suddenly discover your “straight cut” has become a modern art experiment.
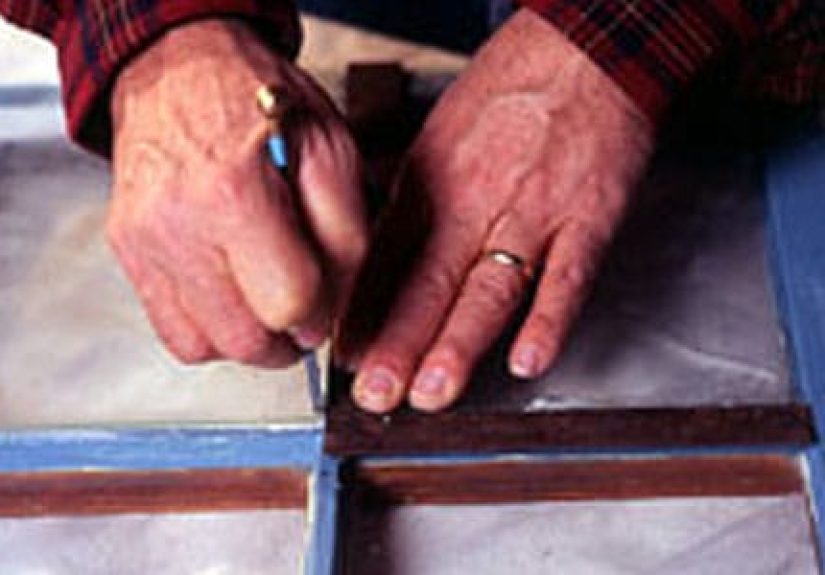
3. Measure Carefully and Mark the Cut Line
Measure twice. Then measure again because glass is not especially forgiving. Mark the start and stop points with a fine marker or grease pencil, or use a strip of tape as a visual guide. If you are cutting replacement window glass, leave a little wiggle room so the pane fits once glazing materials are added. For many simple replacements, that means ordering or cutting the pane slightly smaller than the opening.
Clamp or tape down a straightedge if needed. A shifting ruler is one of the fastest ways to create a line that starts respectable and ends in chaos.
4. Oil the Cutter and Score Once
This is the main event. Add a little cutting oil to the cutter wheel or along the cut line if your tool is not self-oiling. The oil helps the wheel roll smoothly, reduces friction, and supports a cleaner score.
Now hold the cutter firmly, usually close to vertical or at the angle recommended by the tool’s design, and pull it along the straightedge in one continuous motion. You want steady pressure, not brute force. Too light, and the score will be weak. Too heavy, and you risk flaking or crushing the edge.
The sound matters. Many DIY guides describe it as a ripping, scratching, or crackling sound. That is the sweet spot. What you do not want to do is go back over the same line again. Re-scoring is one of the classic mistakes. It weakens the control of the cut and raises the odds of a jagged break.
5. Snap the Glass Along the Score
Once the score is done, it is time to break the glass on your terms. For smaller pieces, you can often place the scored line over the edge of the work surface and apply gentle downward pressure to the overhanging side. For other pieces, the ball end of a glass cutter, running pliers, or a dowel under the score can help initiate the break.
The goal is even pressure along the scored line. You are not trying to wrestle the pane into submission. Think controlled snap, not dramatic movie stunt. If the score is good, the glass often separates with less force than beginners expect.
6. Smooth the Edge
Freshly cut glass edges are sharp enough to end the celebration quickly. Use a rubbing stone, sharpening stone, or fine sandpaper wrapped around a block to ease the edge. You are not trying to reshape the pane into a sculpture. Just dull the razor-sharp edge so the glass is safer to handle and install.
If the cut edge will be visible, spend a little extra time here. A smooth edge looks more professional and feels a lot less like a trap.
How To Cut a Mirror
Learning how to cut glass and learning how to cut a mirror are close cousins. The process is still score and snap, but mirrors can be a bit fussier because of the backing and the fact that chips are more obvious when light hits the edge.
Use the same basic method: clean the surface, mark the line, lubricate the cutter, score once, and snap carefully. For long straight mirror cuts, a table edge or thin straight support under the score can help. Then smooth the edge lightly.
If the mirror is especially thick, extra large, beveled, or already mounted to a wall, that is your cue to back away and let a pro handle it. There is brave DIY, and then there is “I just shattered a decorative statement piece.” Those are not the same thing.
How To Cut Glass Tile
Glass tile is its own little diva. It looks amazing, but it chips more easily than many people expect. Small straight cuts can be made with a scoring wheel and running pliers. For long cuts, repeated cuts, or detailed work, a wet saw fitted with a blade designed specifically for glass is often the cleaner and less stressful option.
If you are working with back-painted, textured, or thicker glass tile, always check the tile maker’s instructions. In many cases, pros cut slowly, keep plenty of water on the blade, and orient the tile to reduce chipping on the finished face. A rubbing stone can clean up the edge, but the best finish usually comes from preventing chips in the first place.
For curves, the process usually becomes a combination move: score what you can, make a series of relief cuts if using a wet saw, then trim and refine with pliers or nippers. It is a bit less elegant than straight pane cutting, but the result can still look sharp when done patiently.
Common Mistakes That Ruin a Glass Cut
Scoring More Than Once
This is probably the biggest beginner mistake. Once the score is made, that is the score. Going back over the line rarely improves it and often makes the break worse.
Using the Wrong Glass Type
If the pane is tempered, insulated, or otherwise specialized, standard DIY methods are not the answer. The right move is confirming the glass type before you start.
Working on a Soft or Uneven Surface
A glass pane supported by a lumpy towel on a folding card table is practically asking for trouble. Use a rigid, even surface.
Pressing Too Hard or Too Light
Glass cutting is a Goldilocks activity. Too hard and you damage the edge. Too soft and the score is too weak. Practice on scrap first if the final piece matters.
Ignoring Edge Safety
A clean cut is still a sharp cut. Smooth the edge before you handle or install the piece, especially if it is going into a frame, sash, or tile layout where your hands will be nearby.
When You Should Skip DIY and Call a Pro
Sometimes the smartest home-improvement move is not doing everything yourself. Professional glass shops are a great option when you are dealing with tempered glass, insulated double-pane units, large mirrors, unusual shapes, heavy tabletops, shower enclosures, laminated safety glass, or any project where a bad cut would cost more than the service fee.
That is not cheating. That is excellent judgment with fewer cuts on your hands and fewer expensive lessons on your credit card.
Real-World Experience: What Cutting Glass Actually Feels Like
Here is the part many tutorials skip: the first few times you cut glass, it feels weirdly anticlimactic. You set up this whole careful station, put on the gloves and glasses, line up the straightedge like you are preparing for a surgical procedure, and then the actual score takes about two seconds. That short little pass is what decides whether the project continues smoothly or becomes a cautionary tale.
Most beginners expect cutting glass to feel like cutting wood or tile. It does not. There is no satisfying shower of dust and no blade chewing visibly through the material. Instead, it feels more like drawing one firm invisible line with a tiny wheel. Because it feels so subtle, a lot of people assume they did not press hard enough. Then they go over the line again, and that is usually when things go sideways. One pass really is the move. Glass rewards confidence more than repetition.
Another very common experience is discovering that prep matters far more than raw courage. The cuts that go best are usually the ones where the table is rigid, the glass is spotless, and the ruler is locked in place. The cuts that go badly tend to start with sentences like, “I’m sure this folding table is good enough,” or “I don’t need to clean it again.” Famous last words, DIY edition.
There is also a surprising emotional arc to snapping the glass. New DIYers often get timid at that stage. They score the pane correctly, then barely apply pressure because they are afraid the whole sheet will explode. The irony is that hesitation can make the break less clean. Even pressure and a decisive motion are usually safer and more accurate than a shaky half-attempt. It is one of those home-improvement moments where the glass can sense fear. Or at least it feels that way.
Real projects teach small lessons quickly. Replacing a simple basement window teaches you about sizing and edge smoothing. Cutting mirror for a frame teaches you that visible edges demand more finesse. Working with glass tile teaches you humility, because that material chips just enough to remind you that “close enough” is not always close enough when grout lines and reflected light are involved.
The biggest practical takeaway from real experience is that practice pieces are worth their weight in gold. Scrap glass removes a ton of pressure. It lets you learn the sound of a good score, the feel of the right pressure, and the snap of a clean break before you move to the piece that actually matters. After two or three practice runs, the job stops feeling mysterious and starts feeling mechanical in the best possible way.
And maybe that is the most honest thing to say about learning how to cut glass: it starts out intimidating, then quickly becomes methodical. The process is not flashy. It is careful. It is repetitive. It is oddly satisfying. And once you understand that glass cutting is mostly about setup, control, and patience, it stops feeling like a nerve-racking stunt and starts feeling like one of those practical DIY skills you will use again and again.
Conclusion
If you have been wondering how to cut glass, the answer is refreshingly straightforward: choose the right glass, prep a clean and stable workspace, measure with care, score once, snap with control, and smooth the edge. That is the whole dance. The hard part is resisting the urge to rush any of it.
For standard pane glass, mirrors, and certain craft projects, cutting glass can be a totally realistic DIY skill. For tempered, insulated, laminated, oversized, or high-stakes pieces, a professional is often the smarter call. Either way, knowing the process helps you make better decisions, get cleaner results, and keep your project from turning into a sparkling disaster.


