Table of Contents >> Show >> Hide
- Why Deep-Fry a Turkey?
- Read This First: Turkey Frying Safety Rules That Aren’t Optional
- Choose the Right Turkey
- Gear Checklist: What You Need (and What You Really Don’t Want to Improvise)
- Pick the Right Oil
- Measure Oil the No-Drama Way (Prevent Overflow)
- Seasoning: Flavor Without Turning Your Turkey Into a Water Balloon
- Prep the Turkey
- Heat the Oil (Temperature = Everything)
- How to Deep-Fry the Turkey: Step-by-Step
- Doneness: Temps to Hit (and Where to Check)
- Resting, Carving, and Serving
- Troubleshooting: Common Deep-Fried Turkey Problems
- Flavor Playbook: Three Crowd-Pleaser Profiles
- Frequently Asked Questions
- Final Checklist: Your Turkey-Frying Game Plan
- Real-World Experiences: Lessons From the Driveway (So You Don’t Learn Them the Hard Way)
- Conclusion
Deep-fried turkey is the holiday flex: crackly, golden skin; juicy meat; and a cook time that feels like cheating.
It’s also the kind of cooking project that deserves respectbecause you’re combining a large bird, a large amount
of very hot oil, and the kind of optimism that makes people say, “It’ll be fine.”
This guide walks you through the whole processsetup, safety, seasoning, frying, and carvingso your biggest
drama is deciding who gets the crispiest wing (spoiler: it’s you, you earned it).
Why Deep-Fry a Turkey?
Compared to roasting, deep-frying delivers two big wins: speed and texture. Hot oil cooks fast and evenly, and it
browns the skin like it’s been training for this moment all year. Plus, your oven stays free for casseroles,
rolls, pie… and whatever else your family “just quickly” added to the menu.
Read This First: Turkey Frying Safety Rules That Aren’t Optional
Deep-frying can be done safely, but only if you treat it like a mini outdoor construction projectclear space,
stable equipment, and a plan. Here are the non-negotiables:
Set up outdoors, far from everything you like
- Fry outside onlynever in a garage, under an overhang, or on a deck.
- Place the fryer on a flat, sturdy, non-combustible surface (concrete is your friend).
- Keep kids, pets, and curious relatives at a safe distance. This is not a spectator sport.
Frozen turkey + hot oil = geyser audition
- Use a fully thawed turkey only.
- Pat it very dry inside and out. Water and hot oil do not get along.
Have the right emergency tools
- Keep a fire extinguisher rated for grease fires nearby.
- Never use water on a grease fire.
- Wear long sleeves, closed-toe shoes, and heat-resistant gloves. Yes, even if it’s “just a few minutes.”
Choose the Right Turkey
For most backyard fryers, a 10–14 lb turkey is the sweet spot. Bigger birds can be awkward to
lower safely, take longer to come back up to oil temperature, and may not fit in standard pots without risking
overflow.
Fresh vs. frozen
Fresh is easiest. If you buy frozen, budget thawing time in the fridge (this is the part everyone underestimates),
or use a cold-water thaw method if you’re in a pinch. Either way: no ice crystals, no frost, no shortcuts.
Gear Checklist: What You Need (and What You Really Don’t Want to Improvise)
- Turkey fryer setup: burner + pot (often 28–30 qt for typical birds) + stand/basket/hanger
- Thermometer for oil temperature (clip-on) and instant-read thermometer for the turkey
- Long tools: hook/lifter, long tongs, and something to steady the bird
- Heat-resistant gloves and closed-toe shoes
- Fire extinguisher (grease-appropriate)
- Sheet pan + rack (or a sturdy tray) for draining/resting
- Paper towels (you will use more than you think)
Pick the Right Oil
You want an oil with a high smoke point and a clean flavor. Common picks:
peanut oil (classic), canola, vegetable, or corn oil.
Peanut oil is popular because it handles high heat well, but consider allergies when serving guests. When in doubt,
go refined canola or vegetable oil.
Measure Oil the No-Drama Way (Prevent Overflow)
Overflow is one of the biggest risksso measuring oil correctly is the difference between “crispy turkey”
and “my driveway smells like regret.”
Water displacement method (recommended)
- Put the turkey in the pot (still wrapped or inside a clean bag).
- Add water until the turkey is covered by about 1–2 inches.
- Remove the turkey and mark the water linethis is your maximum fill line.
- Dump the water, dry the pot completely, then fill with oil to that mark (or to the fryer’s max line, whichever is lower).
Important: if your fryer has a maximum fill line, follow it. The turkey does not care about your confidence.
Seasoning: Flavor Without Turning Your Turkey Into a Water Balloon
Deep-frying already gives you great texture, so seasoning is about building flavor without adding excess moisture.
Choose one approach:
Option A: Dry brine (best flavor-to-effort ratio)
Salt the turkey (about 1/2 tsp kosher salt per pound) and refrigerate uncovered 12–24 hours. This
seasons the meat and helps dry the skin for better crisping.
Option B: Injection (big flavor, classic “fried turkey” vibe)
Use a low-water, butter-based injection with spices. Keep it simple and avoid sugary injections (sugar browns fast
and can push the skin toward “too dark, too soon”).
Option C: Rub (great aroma, easy)
Pat the turkey dry, then apply a spice rub (paprika, garlic powder, onion powder, black pepper, cayenne, thyme).
Light oiling is optional, but keep the surface dry overall.
Prep the Turkey
- Remove giblets and neck. Check for any plastic pop-up timers and remove them.
- Trim excess skin/fat near the cavity if it’s floppy or likely to snag.
- Pat completely dryinside the cavity and under any folds.
- Tuck the wings behind the back so they don’t over-brown.
- If your setup uses a hanger/stand, secure the turkey firmly before heating oil.
Heat the Oil (Temperature = Everything)
Most methods target oil around 350°F (some recipes start higher, around 375°F, then
manage the heat as the turkey goes in). Your goal is steady frying heatnot wild swings.
Pro tip
Wind and cold weather can drop oil temperature fast. Set up where the burner is sheltered (without enclosing it),
and give yourself extra time to re-stabilize the heat.
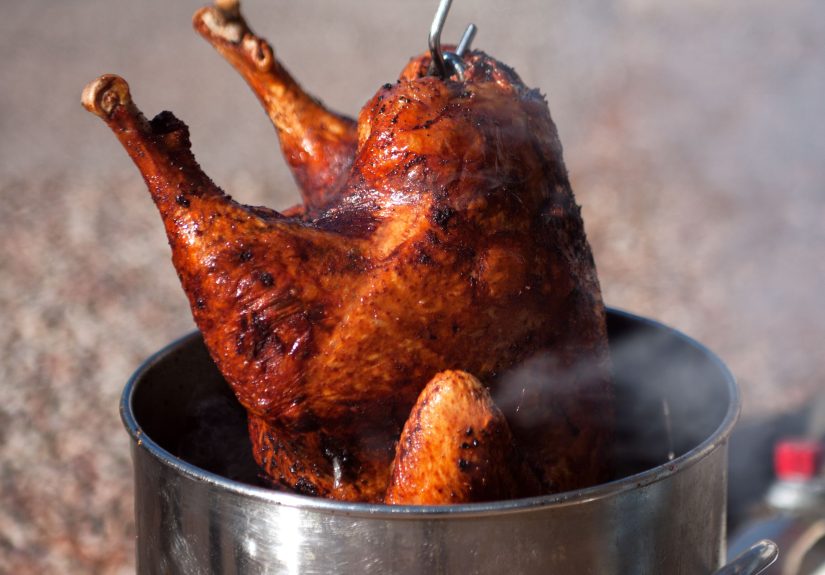
How to Deep-Fry the Turkey: Step-by-Step
- Preheat oil to about 350°F (or per your fryer instructions).
- Turn off the burner flame before lowering the turkey. (Yes, even if you’re feeling brave.)
- Slowly lower the turkey into the oil. Go steadythis should take at least a full minute, not a dramatic dunk.
- Once the turkey is fully submerged and bubbling calms, relight/turn on the burner and adjust to maintain frying temperature.
-
Fry about 3–4 minutes per pound as a starting estimate. Use time as a guide, but
temperature decides. - When you think it’s close, turn off the burner and carefully lift the turkey to check internal temps.
- Return to oil in short bursts if needed, then recheck.
Doneness: Temps to Hit (and Where to Check)
The safest approach is to cook until the thickest parts reach food-safe temperatures. Check:
- Breast: deep in the thickest part, avoiding bone
- Thigh: where the leg meets the body (dark meat often benefits from higher temps)
Many cooks aim for at least 165°F in the breast for safety, and often
175°F–180°F in the thigh for better dark-meat tenderness. Then let it rest.
Resting, Carving, and Serving
Once the turkey comes out, set it on a rack over a tray and let it rest 15–20 minutes. This helps
juices redistribute and gives the surface oil time to drain so your cutting board doesn’t look like an oil spill
training exercise.
Carving without chaos
- Remove legs and thighs first, then separate drumsticks and thighs.
- Slice breast meat across the grain for the best texture.
- Save the crunchy bits (a.k.a. the best bits) for the cook. This is law.
Troubleshooting: Common Deep-Fried Turkey Problems
“My oil temperature crashed when I added the turkey.”
Totally normal. A cold bird drops the oil temp. The fix is patience: adjust the burner and let it climb back
gradually. Don’t crank the flame to “jet engine” and walk away.
“The skin is getting too dark before the meat is done.”
Your oil is too hot, or your rub/injection has sugar. Lower the heat and keep the oil closer to 325–350°F.
Next time, skip sweet ingredients on the surface.
“I’m scared of overflow.”
Good. Fear is a useful spice. Measure oil with the displacement method, keep the turkey fully thawed and dry,
and lower it slowly with the burner off.
Flavor Playbook: Three Crowd-Pleaser Profiles
1) Cajun-ish (bold, holiday-party energy)
- Injection: melted butter + garlic + cayenne + paprika + black pepper
- Rub: paprika, onion powder, thyme, cayenne, salt, pepper
2) Garlic-Herb (classic, “everyone likes it”)
- Dry brine + rub: rosemary, thyme, sage, garlic powder, black pepper
- Finish: lemon zest mixed into softened butter for serving
3) Smoky Pepper (BBQ-adjacent, still holiday-friendly)
- Rub: smoked paprika, coarse black pepper, garlic powder, a touch of cumin
- Serve with: peppery gravy or a tangy cranberry sauce
Frequently Asked Questions
How long does it take to deep-fry a turkey?
A common estimate is 3–4 minutes per pound, but temperature control and turkey starting temp can
change the timeline. Always confirm doneness with a thermometer.
Can I reuse the oil?
Often yesif it wasn’t overheated or contaminated. Let it cool completely, strain it (fine mesh + cheesecloth is
great), store sealed, and use it soon. If it smells rancid or looks unusually dark and burned, toss it.
Can I fry in the rain or snow?
Don’t. Water near hot oil is a bad combo, and slippery ground + hot equipment is worse. Pick a clear day or choose
a different cooking method.
What about “oil-less” turkey fryers?
Infrared “oil-less” fryers can give crispy skin with less risk and less mess. They’re a different technique, but a
good option if you want the vibe without the vat of oil.
Final Checklist: Your Turkey-Frying Game Plan
- Turkey fully thawed and patted very dry
- Oil level measured (displacement method) and below max line
- Fryer outdoors, stable, clear space, kids/pets away
- Thermometers ready: oil + instant-read for meat
- Fire extinguisher nearby
- Lower turkey slowly with burner off
- Cook to temperature, rest, carve, bask in applause
Real-World Experiences: Lessons From the Driveway (So You Don’t Learn Them the Hard Way)
The first time someone deep-fries a turkey, there’s always a momentusually right after the oil starts shimmering
where the brain whispers, “This feels like a science experiment I’m not qualified for.” That voice is correct,
and it’s also your best friend. Deep-frying success isn’t about bravado; it’s about calm, boring competence.
The holiday magic comes from doing the unsexy prep work: measuring oil, drying the bird, and setting up like
you’re hosting a tiny outdoor cooking Olympics.
One of the most common “I wish someone told me” moments is how long thawing actually takes. People plan the menu,
polish the wine glasses, and then realize the turkey is still halfway to iceberg status. If you’ve ever tried to
rush thawing, you know the temptation: “It’s mostly thawed.” The fryer does not believe in “mostly.” Even a little
lingering ice can cause aggressive bubbling and splatter, and suddenly your relaxing holiday cook turns into a
stress montage. Experienced fryers treat thawing like a calendar event, not a suggestion.
Another lesson: oil temperature has feelings. Add a cold turkey, and the temp drops. Crank the burner too hard,
and it rebounds like it’s trying to win a race. The sweet spot is steady heat and small adjustments. Veteran
turkey fryers often assign one person as “the temperature adult”the one who watches the oil thermometer, nudges
the flame, and refuses to get distracted by side dishes or storytelling. If your crew is big, this is the easiest
job to delegate, and it dramatically improves results.
Then there’s the lowering processwhere patience pays in crispy dividends. People who rush the dunk end up with
bubbling chaos and extra oil sloshing. People who lower slowly look like they’ve done this a hundred times (even if
they’re trembling inside). The funny part? Slow lowering also seems to calm everyone around you. When you move
steadily, the crowd stops holding its breath and starts trusting the process. You’ll literally feel the mood shift
from “Is this safe?” to “Oh wow, we’re doing it.”
Finally, deep-frying teaches a strangely wholesome holiday lesson: the payoff is biggest when you don’t chase
shortcuts. The turkey that comes out best is usually the one that was dry-brined overnight, dried thoroughly,
cooked with stable oil temps, and rested before carvingaka the turkey that required patience at every step.
And when you slice into that juicy meat with crackly skin, you’ll understand why people become deep-fry evangelists.
Just remember to write down what workedoil level, turkey size, seasoning, timingbecause next year, you’ll be the
person everyone asks for “your method,” and it’s nice to answer with confidence instead of, “Uh… vibes?”
Conclusion
Deep-frying a turkey can be the star move of your holiday feast: fast cook time, crisp skin, juicy meat, and a
“wow” factor that makes the whole meal feel special. Do it right by focusing on safety (outdoors, stable setup,
fully thawed and dry bird), controlling oil temperature, and cooking to internal temperaturenot guesswork.
Nail those fundamentals, and you’ll serve a turkey that tastes like the holidays should: bold, comforting, and
worth gathering for.


