Table of Contents >> Show >> Hide
- What Is Catnip?
- How to Grow Catnip: 11 Steps
- Step 1: Choose the Right Growing Location
- Step 2: Prepare Well-Drained Soil
- Step 3: Decide Whether to Grow from Seed, Starter Plant, Cutting, or Division
- Step 4: Start Catnip Seeds Correctly
- Step 5: Plant Catnip After the Last Frost
- Step 6: Water Carefully While Plants Establish
- Step 7: Fertilize Lightly, If at All
- Step 8: Prune for Bushier Growth
- Step 9: Protect Young Plants from Cats
- Step 10: Harvest Catnip at the Right Time
- Step 11: Dry and Store Catnip Properly
- Growing Catnip in Containers
- Growing Catnip Indoors
- Common Catnip Problems and How to Fix Them
- Best Companion Planting Ideas for Catnip
- When to Divide Catnip
- How to Use Fresh and Dried Catnip
- Extra Growing Experience: Practical Lessons from Raising Catnip
- Conclusion
Catnip is one of those rare garden plants that can make humans feel successful, cats feel like tiny royalty, and bees feel like they found the neighborhood buffet. Also known as Nepeta cataria, catnip is a hardy perennial herb in the mint family. It grows fast, smells fresh and slightly minty, produces soft green-gray leaves, and sends up small white to pale lavender flowers that pollinators appreciate. And yes, for many cats, it creates that classic rolling, rubbing, purring, “I have discovered the meaning of life” reaction.
The good news is that learning how to grow catnip is not complicated. In fact, catnip is almost suspiciously easy. Give it sun, well-drained soil, moderate water, and a little trimming, and it will usually reward you with more leaves than your cat can responsibly appreciate. The main challenge is not keeping catnip alive; it is keeping it from becoming the mayor of the entire herb garden.
This guide walks you through 11 practical steps for growing catnip from seed, starter plants, cuttings, or divisions. You will learn where to plant it, how to care for it, when to harvest it, how to dry it, and how to keep it neat in containers or garden beds. Whether you are growing catnip for your cat, pollinators, herbal crafts, or simply because you enjoy low-maintenance plants that do not act like divas, this guide will help you do it right.
What Is Catnip?
Catnip is a perennial herb that belongs to the Lamiaceae family, the same plant family as mint, basil, oregano, thyme, and lemon balm. Like many mint relatives, it has square stems, aromatic leaves, and a talent for spreading when it is comfortable. Mature catnip plants commonly reach about 2 to 3 feet tall and can spread roughly as wide under good conditions.
The leaves are typically triangular to oval, softly toothed, and slightly fuzzy. The flowers are small but charming, usually white or pale lavender with tiny purple markings. While catnip is best known for its effect on cats, it is also useful as a pollinator-friendly herb and a relaxed cottage-garden plant.
The compound that gets most of the attention is nepetalactone, an aromatic oil found in the leaves and stems. Many cats respond to it by rolling, rubbing, sniffing, licking, or becoming temporarily playful. Not every cat reacts, and kittens often show little interest until they are older. Basically, catnip is exciting, but it is not a universal feline Wi-Fi signal.
How to Grow Catnip: 11 Steps
Step 1: Choose the Right Growing Location
Catnip grows best in a sunny spot with good air circulation. In most regions, full sun is ideal, meaning at least six hours of direct sunlight per day. In very hot climates, especially where summers are humid or afternoon sun feels like a toaster oven, light afternoon shade can help prevent stress.
Choose a place where the soil drains well. Catnip does not enjoy sitting in soggy ground. Wet roots can lead to rot, weak growth, and a plant that looks like it regrets moving into your garden. Raised beds, herb borders, and containers are excellent choices if your native soil stays heavy or wet.
Because catnip can self-seed and spread, think carefully before planting it in a small mixed herb bed. If you want a tidy garden, use a container or place catnip where you can prune it easily. If you want a casual, cottage-style planting, it can be allowed to mingle more freely.
Step 2: Prepare Well-Drained Soil
Catnip is not a picky plant, but it performs best in average, well-drained soil. It tolerates sandy, loamy, and moderately dry soil once established. It does not require rich, heavily fertilized ground. In fact, soil that is too fertile may encourage soft, floppy growth instead of sturdy stems and strongly scented leaves.
Before planting, loosen the soil to a depth of 8 to 10 inches. Remove weeds, rocks, and compacted clumps. If the soil is heavy clay, mix in compost to improve structure and drainage. The goal is not to create a luxury spa for the roots; it is simply to give them a breathable, crumbly place to grow.
For containers, use a high-quality potting mix instead of garden soil. Garden soil in pots can become compacted and poorly drained. Make sure the container has drainage holes. Catnip in a pot without drainage is not a garden project; it is a slow botanical tragedy.
Step 3: Decide Whether to Grow from Seed, Starter Plant, Cutting, or Division
You can grow catnip in several ways. Seeds are inexpensive and satisfying, starter plants are faster, cuttings are useful if you already have a healthy plant, and divisions are helpful for refreshing mature clumps.
Growing from seed is a good option if you want several plants. Start seeds indoors about six weeks before your last expected spring frost, or sow them directly outdoors after the danger of frost has passed. Catnip seeds can be slow or uneven if conditions are not right, so keep the seed-starting mix lightly moist and warm.
Starter plants are the easiest route for beginners. Buy a healthy nursery plant in spring and transplant it after the last frost. This gives you a head start and reduces the tiny-seedling anxiety phase, which is when gardeners stare at soil trays and whisper, “Are you doing anything?”
Cuttings can be taken from non-flowering stems in spring or early summer. Remove the lower leaves, place the cutting in moist potting mix, and keep it bright but out of harsh direct sun until roots form. Divisions are made by digging up a mature plant, separating rooted sections, and replanting them. This is also a useful way to control older plants that have become woody or messy.
Step 4: Start Catnip Seeds Correctly
To start catnip indoors, fill a seed tray or small pots with moist seed-starting mix. Sprinkle seeds lightly on the surface and cover them with a very thin layer of mix. Catnip seeds do not need to be buried deeply. A shallow planting helps them germinate more successfully.
Place the tray in a warm, bright location. Keep the soil evenly moist but not soaked. A clear humidity dome can help during germination, but remove it once seedlings appear so air can circulate. When seedlings develop a few sets of true leaves, thin them so the strongest plants have room to grow.
Before transplanting seedlings outdoors, harden them off. This means gradually introducing them to outdoor conditions over 7 to 10 days. Start with a protected shady spot for a short time, then slowly increase sun and outdoor exposure. Skipping this step can shock young plants, and shocked seedlings are dramatic in a very wilted way.
Step 5: Plant Catnip After the Last Frost
Plant catnip outdoors in spring after the danger of frost has passed. If using starter plants or hardened-off seedlings, set each plant at the same depth it was growing in its original container. Planting too deeply can stress the crown of the plant.
Space catnip plants about 18 to 24 inches apart. This gives them room to branch out, improves airflow, and makes harvesting easier. A tiny transplant may look lonely at first, but do not be fooled. Catnip grows with confidence. Today it is a small herb. Tomorrow it is discussing expansion plans.
After planting, water thoroughly to settle the soil around the roots. Add a light layer of mulch if desired, keeping it away from the crown. Mulch can help retain moisture and reduce weeds, especially during the establishment phase.
Step 6: Water Carefully While Plants Establish
Young catnip plants need consistent moisture while they are getting established. Water when the top inch of soil feels dry. The goal is steady moisture, not swamp conditions. Once established, catnip becomes more drought tolerant and usually needs less frequent watering.
In garden beds, deep watering is better than frequent shallow sprinkling. Deep watering encourages roots to grow downward, making the plant more resilient during dry weather. In containers, check moisture more often because pots dry out faster than garden soil.
A simple test works well: stick your finger into the soil. If it feels dry an inch down, water. If it still feels damp, wait. Plants appreciate this more than a strict calendar. A watering schedule that ignores actual soil moisture is like feeding soup to someone already holding a bowl of soup.
Step 7: Fertilize Lightly, If at All
Catnip usually does not need heavy feeding. A little compost at planting time is often enough for the season. Too much fertilizer can lead to excessive leafy growth with weaker stems and possibly less concentrated aroma.
If your soil is very poor, add a modest amount of compost or a balanced organic fertilizer in spring. Avoid high-nitrogen feeding unless the plant clearly needs it. Signs of nutrient deficiency may include pale leaves, weak growth, or poor recovery after harvesting. Even then, go lightly.
Container-grown catnip may benefit from occasional diluted feeding because nutrients wash out of pots over time. Use a gentle approach. You want a healthy herb, not a pumped-up green monster trying to bench-press the basil.
Step 8: Prune for Bushier Growth
Pruning is one of the best ways to grow fuller, neater catnip. When young plants are 6 to 8 inches tall, pinch back the growing tips. This encourages side branching and prevents the plant from becoming tall and lanky.
As the season continues, cut back stems regularly to promote fresh growth. If flowers begin to fade, shear the plant lightly to encourage another flush of leaves and blooms. Cutting back also helps reduce self-seeding, which is important if you do not want surprise catnip seedlings appearing everywhere like tiny green party crashers.
If your plant becomes floppy in midsummer, cut it back by one-third to one-half. Water afterward if the weather is dry. Catnip usually responds with fresh, compact growth.
Step 9: Protect Young Plants from Cats
Here is the funny part: the creature you are growing catnip for may also be the creature most likely to destroy it before it matures. Cats may roll on young plants, chew stems, dig around roots, or flatten seedlings into herbal pancakes.
Protect young catnip with a small wire cage, cloche, tomato cage, or temporary fencing. You can also grow the plant in a hanging basket or elevated container until it is large enough to handle attention. Once established, catnip can usually tolerate occasional feline visits, but a small seedling is no match for a cat having a spiritual awakening.
If you have outdoor neighborhood cats, container growing may be the safest option. Place pots in a protected sunny area, such as a patio, balcony, or fenced garden corner.
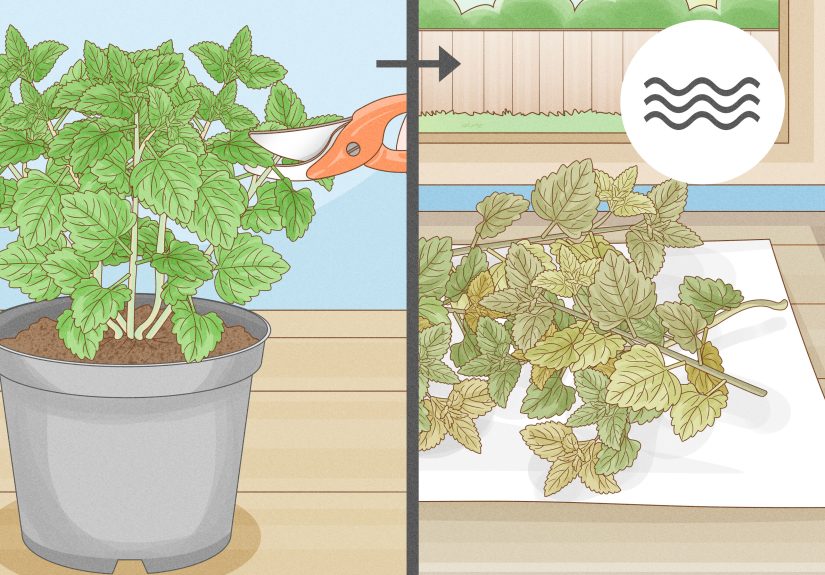
Step 10: Harvest Catnip at the Right Time
You can begin harvesting once the plant is well established and has enough growth to recover. Many gardeners wait until plants are 12 to 18 inches tall before taking a meaningful harvest. Use clean scissors or pruners and cut stems above a leaf node so the plant can branch again.
For the strongest scent, harvest in the morning after dew has dried but before the heat of the day. Leaves are often especially aromatic just before or during early bloom. You can harvest individual leaves for fresh use or cut full stems for drying.
Do not remove the entire plant at once unless you are cutting it back late in the season. Leave at least one-third of the plant intact so it can regrow. Catnip is forgiving, but it still needs some leaves to keep making energy.
Step 11: Dry and Store Catnip Properly
To dry catnip, gather stems into small bundles and hang them upside down in a cool, dry, dark place with good airflow. You can also spread leaves on a drying screen or use a dehydrator set to a low temperature. Avoid direct sunlight, which can reduce color and aroma.
When the leaves are fully dry and crumble easily, strip them from the stems and store them in an airtight container. Keep dried catnip away from heat, moisture, and bright light. A glass jar in a cabinet works well. Label it clearly unless you want someone mistaking it for oregano and making the most confusing pasta sauce of the week.
Dried catnip can be used in cat toys, sprinkled lightly on scratching posts, or saved for occasional feline enrichment. Use moderation. Cats do not need a daily mountain of catnip, and some may experience stomach upset if they eat too much.
Growing Catnip in Containers
Container growing is one of the smartest ways to manage catnip. Because catnip can spread by seed and form colonies, pots help keep it under control. Choose a container at least 10 to 12 inches wide for one plant, though a larger pot gives roots more room and dries out less quickly.
Use a pot with drainage holes and fill it with quality potting mix. Place it where the plant receives plenty of sun. Water when the top inch of mix feels dry. Container catnip may need more frequent watering than plants in the ground, especially during summer heat.
Prune potted catnip regularly to keep it compact. If roots begin circling the pot or emerging from drainage holes, repot into a slightly larger container or divide the plant. A container-grown catnip plant can live for several years with occasional refreshing.
Growing Catnip Indoors
Catnip can grow indoors, but it needs bright light. A sunny south- or west-facing window is helpful. If natural light is weak, use a grow light for 12 to 16 hours per day. Without enough light, indoor catnip becomes thin, pale, and floppy.
Indoor catnip also needs good airflow and careful watering. Let the top layer of soil dry slightly between waterings. Avoid leaving the pot in standing water. Rotate the container every few days so the plant grows evenly instead of leaning dramatically toward the window like it is trying to escape.
If your cat has free access to the plant, consider growing two pots: one for supervised nibbling and one for recovery. This keeps your cat happy and prevents the plant from being loved into retirement.
Common Catnip Problems and How to Fix Them
Problem: The Plant Looks Leggy
Leggy catnip usually needs more sun or more pruning. Move container plants to a brighter spot and pinch back stems to encourage branching. In garden beds, trim the plant after flowering to refresh growth.
Problem: Leaves Are Yellowing
Yellow leaves may be caused by overwatering, poor drainage, or nutrient stress. Check the soil before watering again. If the soil is soggy, improve drainage or move the plant to a better location.
Problem: Catnip Is Spreading Too Much
Cut off flowers before they set seed, grow catnip in a container, or pull unwanted seedlings while they are small. Regular pruning is your best defense against a catnip takeover.
Problem: Cats Keep Crushing the Plant
Protect young plants with wire cages or grow them in raised containers. Mature plants can handle some attention, but seedlings need a bodyguard.
Best Companion Planting Ideas for Catnip
Catnip fits nicely into herb gardens, pollinator borders, cottage gardens, and container collections. It pairs well with other sun-loving herbs such as thyme, oregano, sage, lavender, and chives, as long as all plants receive the drainage they prefer.
Because catnip flowers attract bees and butterflies, it can be useful near vegetable gardens where pollination matters. However, do not crowd it too tightly against smaller herbs. Catnip can become bushy, and smaller plants may lose light and airflow if it gets too enthusiastic.
For a neat design, plant catnip at the back of a herb bed or in its own pot near the garden. For a natural look, mix it with other informal perennials. Just remember: catnip has mint-family confidence. Give it boundaries unless you enjoy gardening with plot twists.
When to Divide Catnip
Catnip plants can become woody, crowded, or less attractive after a few years. Dividing helps renew growth and control size. The best time to divide catnip is spring, just as new growth begins, or early fall in mild climates.
Dig up the clump carefully and separate it into smaller rooted sections. Replant the healthiest sections at the same depth they were growing before. Water them well after transplanting and keep the soil lightly moist while they reestablish.
Division is also a good way to share catnip with another gardener, though you may want to include a friendly warning: “This plant is easy, useful, and slightly ambitious.”
How to Use Fresh and Dried Catnip
Fresh catnip can be offered to cats in small amounts, tucked into homemade toys, or rubbed on scratching posts. Dried catnip is often more convenient because it stores well and can be used throughout the year.
For cat toys, dried leaves are usually better than thick stems. Crush the leaves lightly before use to release aroma. Store extra dried catnip in a sealed jar, and keep the jar out of your cat’s reach unless you want to wake up to a suspiciously happy pet and a kitchen floor covered in green confetti.
Catnip has also been used traditionally as an herbal tea plant for humans, but anyone who is pregnant, nursing, taking medication, or managing a health condition should speak with a qualified healthcare professional before using herbs medicinally. In this guide, the focus is gardening, not medical advice.
Extra Growing Experience: Practical Lessons from Raising Catnip
One of the most useful experiences with growing catnip is learning that “easy to grow” does not always mean “maintenance-free.” Catnip is simple, but it grows best when you guide it early. The first season is the time to shape the plant. If you pinch it back when it is young, it becomes fuller and sturdier. If you ignore it completely, it may still grow, but it can become tall, loose, and awkward. Think of pruning as friendly coaching, not punishment.
Another practical lesson is that containers are not just for people with small spaces. Even gardeners with large yards often prefer growing catnip in pots because it keeps the plant manageable. A container near the patio makes harvesting easy, protects young plants from being trampled by excited cats, and prevents seedlings from popping up in places where you did not invite them. If you love tidy gardens, container catnip is your best friend. If you love wild gardens, you may still want a container unless your design theme is “surprise mint relatives everywhere.”
Watering is another area where experience helps. New gardeners often overwater herbs because they are trying to be attentive. Catnip appreciates care, but it does not want wet feet. Once established, it often performs better when the soil dries slightly between waterings. The plant may look tougher and smell stronger when it is not pampered too much. This does not mean neglect it during drought; it simply means you should water based on soil conditions rather than panic.
Harvest timing also matters. A small trim here and there is fine for fresh use, but larger harvests are best when the plant has enough growth to recover. Cutting stems in the morning usually gives you better aroma, and drying them in a dark, airy place preserves quality. If you dry catnip in a sunny window, it may look charming for a day, but the leaves can lose fragrance faster. Shade, airflow, and patience are the secret trio.
Finally, growing catnip teaches a funny truth about gardening for pets: your cat may not respect your horticultural timeline. You may imagine a lush plant, careful harvests, and adorable enrichment. Your cat may imagine immediate demolition. Protect seedlings until they are strong. Offer small amounts of harvested leaves instead of giving full access to young plants. A mature catnip plant can handle attention, but a baby plant facing a delighted cat is like a breadstick facing a toddler.
The best overall experience is to grow more than one plant if you have space. Keep one for harvesting, one for pollinators, and one as the “cat tax.” That way, everyone gets something: you get a useful herb, bees get flowers, and your cat gets supervised joy without turning your only plant into a flattened legend.
Conclusion
Growing catnip is a rewarding project for beginners and experienced gardeners alike. It is hardy, fragrant, attractive to pollinators, useful in containers, and entertaining for many cats. The most important rules are simple: plant it in sun or light shade, give it well-drained soil, water carefully while it establishes, prune it regularly, and harvest without removing too much at once.
The biggest caution is its enthusiasm. Catnip can self-seed and spread, so containers or regular deadheading are smart choices if you want control. Treat it like a cheerful garden guest who may overstay unless given clear boundaries.
With the 11 steps above, you can grow healthy catnip from seed, starter plant, cutting, or division. Keep it trimmed, dry it properly, and store it well. Your garden will gain a tough little herb, your pollinators will gain flowers, and your cat may gain a new reason to roll around like it just heard the best gossip in the animal kingdom.
Note: This article is written for general home gardening education. Always check local growing recommendations if catnip spreads aggressively in your region, and offer catnip to pets in moderation.


