Table of Contents >> Show >> Hide
- What You’re Making (And Why It’s So Fun)
- Supplies and Tools
- Plan Your Camera Box Size (The “Measure Twice, Gift Once” Part)
- Step-by-Step: Build the Box Base (Sturdy First, Cute Second)
- Turn the Box into a Camera (The Fun Costume Party Part)
- Create the Photo Album Insert (Pick Your Adventure)
- Fit, Assemble, and Finish (Where Everything Either Clicks… or You Adjust 3 Times)
- Creative Themes and Specific Examples
- Tips for a Professional Finish
- Troubleshooting (Because Paper Crafting Is 20% Magic, 80% “Why Is It Like This?”)
- Real-World Experiences and Lessons ( of “What It’s Actually Like”)
- Conclusion
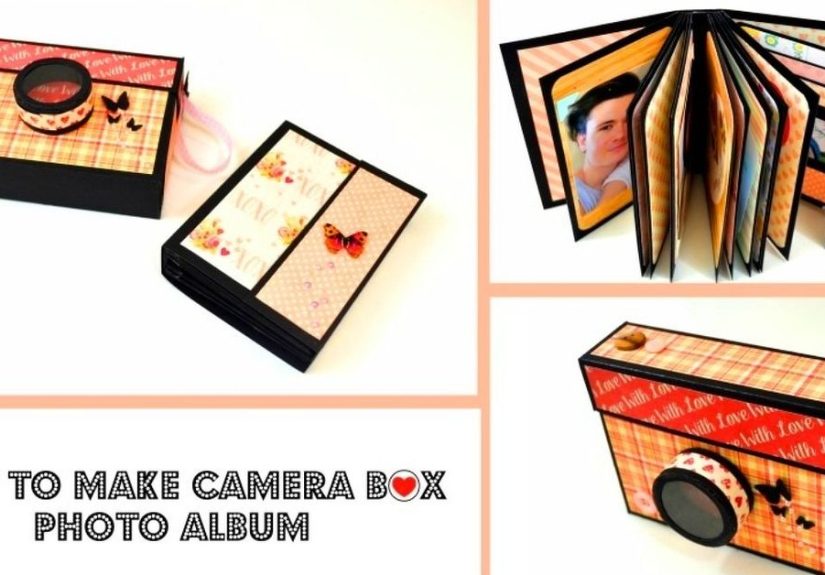
Some gifts say “I thought about you.” This one says, “I thought about you… and then I also measured, scored, re-scored, and probably got adhesive on my elbow.” A DIY camera box photo album is a paper-crafted keepsake that looks like a cute little camera on the outside, but opens to reveal a mini photo album (often a pull-out accordion or a small bound booklet) inside.
It’s part scrapbook, part gift box, part “waithow did you make that?!” And the best part: you can build it with basic paper-crafting tools, customize it for any theme (travel, birthday, baby, graduation), and scale it to fit the photo size you actually print (or the photo size your phone claims you’ll print one day).
What You’re Making (And Why It’s So Fun)
A camera box photo album usually has two key parts:
- The camera-shaped box: a sturdy paper box (often built from heavyweight cardstock + chipboard) decorated to look like a camera body with a lens, buttons, and details.
- The hidden photo album inside: either an accordion “film strip” that pulls out, or a mini bound album that fits neatly in the box.
This project is popular because it checks all the crafty boxes: it’s dimensional, interactive, customizable, and genuinely useful. Plus, it’s basically a prop for making your gift recipient squeal. (No pressure.)
Supplies and Tools
Core materials
- Heavyweight cardstock (80–110 lb) for box structure and album pages
- Chipboard (optional but highly recommended) for extra sturdiness
- Patterned paper for decorating (camera “leather,” accents, themed designs)
- Adhesives: strong double-sided tape (or tape runner), liquid glue for details
- Ribbon (pull tab, closure, or decoration)
- Photo mats (cut from cardstock) and your printed photos
Tools that make life easier
- Paper trimmer + scissors
- Scoring board + bone folder (clean folds = clean karma)
- Craft knife + cutting mat (for windows, shutters, slots)
- Circle punches (or a compass) for the lens
- Optional: corner rounder, eyelet setter, brads, magnets, foam tape
Photo-safe note (quick but important)
If you want your album to age gracefully (unlike my first attempt at bangs), choose acid-free, lignin-free, photo-safe paper and adhesivesespecially for mats that touch photos. It helps prevent yellowing and deterioration over time.
Plan Your Camera Box Size (The “Measure Twice, Gift Once” Part)
Before cutting anything, decide what goes inside:
- Photo size: 2"x3" wallet prints, 3"x4", 4"x6", or Polaroid-style
- Album type: accordion pull-out (simpler) or bound mini album (more advanced)
- Capacity: 8–12 photos (easy) vs. 20+ photos (thicker album = bigger box)
Rule of thumb: Your box’s inside dimensions should be at least:
- Width/Height: photo mat size + 1/4" to 1/2" wiggle room
- Depth: album thickness + at least 1/4"
Example: If your photo mats are 3.5" x 3.5" and you’re making a modest accordion stack, an inner cavity around 4" x 4" with a depth of 1.25"–1.5" is a comfortable starting point. You’ll decorate the outside into a camera shape, so the finished piece looks larger and more camera-like.
Step-by-Step: Build the Box Base (Sturdy First, Cute Second)
Even if the outside is a camera, the inside can be a simple, strong box. Think of it as the “skeleton” that keeps everything square and gift-worthy.
Step 1: Cut the base and lid pieces
- Choose your inner box size (example: 4" x 4" x 1.5" deep).
- Cut cardstock for:
- Base bottom (a square/rectangle panel)
- Base walls (either one long strip scored into sides, or a “plus-shaped” box template)
- Lid top (slightly larger than base bottom)
- Lid walls (slightly taller or equal height, and slightly looser fit)
Tip: If you want an easy fit, make the lid walls about 1/16"–1/8" wider overall than the base walls. Patterned paper layers also add thicknesspaper has opinions, and one of them is “I will make your lid too tight.”
Step 2: Score, fold, and assemble
- Score all fold lines crisply (don’t “kinda fold” and hope for the best).
- Fold along score lines with a bone folder.
- Use strong tape for structural seams and a touch of liquid glue for corners.
- Assemble the base first, then test-fit the lid.
Step 3: Reinforce with chipboard (optional, but makes it feel professional)
Cut chipboard panels slightly smaller than the cardstock panels and adhere them inside the lid and base (or between cardstock layers). This reduces warping and gives that satisfying “real object” feel.
Turn the Box into a Camera (The Fun Costume Party Part)
Now we decorate the lid (and optionally the base) so the finished piece looks like a camera.
Step 1: Create the camera body silhouette
- Cut a camera-shaped front panel from cardstock: a rectangle with a small “bump” on top (like a viewfinder hump).
- Layer it with patterned paper to mimic camera texture (black, gray, faux leather, or even bright retro colors).
- Adhere this panel to the top of the lid.
Design note: Keep edges clean and symmetrical. If you’re freehanding, fold a paper draft in half and cut both sides at once so the silhouette matches.
Step 2: Build the lens (instant “camera!” effect)
- Cut 3–5 circles in graduating sizes (largest to smallest).
- Stack them with foam tape between layers for dimension.
- Add a smaller “glass” circle from vellum or acetate if you want a realistic lens shine.
Step 3: Add camera details
- Shutter button: small circle or rounded rectangle
- Flash: a tiny rectangle with metallic paper
- Strap: ribbon or faux leather strip on the side
- Label plate: a small rectangle for a name, date, or “Kodak-ish” vibe (without copying brand logos)
Optional upgrade: Add a tiny “photo slot” detail on the side or frontpurely decorative, but people love a believable gadget moment.
Create the Photo Album Insert (Pick Your Adventure)
You have two popular, beginner-friendly options: Accordion Pull-Out or a Mini Bound Album. Choose based on time, tools, and how much you enjoy tiny paper engineering.
Option A: Accordion “Film Strip” Pull-Out (easiest + crowd-pleaser)
This version pulls out like a strip of memories. It’s simple, sturdy, and doesn’t require binding hardware.
Step 1: Make the accordion base
- Cut a long strip of cardstock (or tape two strips together with a reinforced seam).
- Score it into equal panels (example: 3.5" wide panels for 3" photos with borders).
- Fold in a zig-zag (mountain/valley) pattern.
Step 2: Add photo mats
- Cut mats slightly larger than your photo size (for a framed look).
- Adhere mats to each accordion panel.
- Attach photos with photo-safe adhesive or corners (so they can be swapped later).
Step 3: Add a pull tab and stopper
- Glue a ribbon to the first panel as a pull tab.
- Add a thicker “stopper” panel at the end so it doesn’t slide all the way out and escape into the couch cushions forever.
Pro tip: If you want that “film strip” vibe, add tiny square cutouts along the edges with a hole punch or scissors to mimic sprocket holes.
Option B: Mini Bound Album Insert (for the “I like structure” crafters)
If you want a book-style insert that flips like a real mini album, use a simple hinge binding method. It holds up well and allows chunky pages with pockets and flaps.
Step 1: Cut pages and hinges
- Cut several page panels (all the same size).
- Create hinge strips from cardstock: score them into narrow sections to form “tabs” that attach pages to a spine.
- Test the stack thickness before committing to a spine width.
Step 2: Build a spine and covers
- Cut chipboard covers (front/back) and a spine piece.
- Wrap them in patterned paper like a book cover (miter corners neatly).
- Attach hinge mechanism to the spine, then attach covers.
Step 3: Decorate pages with interactive elements
- Waterfall (stacked flipping photos)
- Pockets (for journaling cards)
- Flaps (hidden messages, extra photos)
- Small envelopes (ticket stubs, notes)
Reality check: Bound inserts feel fancy, but they also demand stronger adhesive and careful scoring so pages lay flat. If you’re new to mini albums, accordion first is a confidence boost.
Fit, Assemble, and Finish (Where Everything Either Clicks… or You Adjust 3 Times)
Step 1: Add an interior cradle
Inside the box base, add a cardstock liner or a simple “U-shaped” channel to guide the album insert and keep it centered. This prevents the insert from wobbling or snagging on the box corners.
Step 2: Test the slide and the lid
- If the lid is too tight, lightly sand chipboard edges, or reduce layered paper thickness near the rim.
- If the album sticks, widen the interior cavity slightly or add a smooth liner.
- If the box warps, add chipboard reinforcement and use less wet glue on large surfaces.
Step 3: Add closure (optional)
- Magnet closure: hidden under paper layers
- Ribbon wrap: cute and forgiving
- Belly band: a paper band that slides on/off
Creative Themes and Specific Examples
One camera box template can become a hundred different gifts. Here are ideas that work especially well:
Travel “Snapshots” camera
- Use map-pattern paper for the camera body
- Accordion insert = “trip timeline” with dates and locations
- Add a pocket for boarding passes or tiny souvenir notes
Birthday “Best Moments” camera
- Bright colors + confetti pattern
- Each panel: a photo + a one-line caption (“The day we laughed so hard we cried”)
- Final panel: a handwritten message card
Baby milestone camera
- Soft colors, stars, clouds
- Panels labeled: “Hello World,” “First Smile,” “First Steps,” etc.
- Add a mini envelope for a hospital bracelet photo copy or a note
Tips for a Professional Finish
Make folds crisp
Score first, fold second, burnish third. Paper behaves better when you tell it exactly where to go.
Choose the right adhesive for the job
- Strong tape for box seams and hinges
- Liquid glue for small details and layered elements
- Foam tape for dimension (lens layers, buttons)
Keep it photo-friendly
Acid-free, lignin-free, photo-safe supplies help protect prints. Also: avoid storing precious originals in harsh light, heat, or humidity. (Your memories deserve better than a sunny windowsill.)
Let layers dry flat
If you use wet glue on large panels, press under a clean book while drying to reduce warping.
Troubleshooting (Because Paper Crafting Is 20% Magic, 80% “Why Is It Like This?”)
The lid won’t fit
- Too many layers near the rimtrim mats back 1/16"–1/8" from edges.
- Score lines offre-score carefully and re-fold with a bone folder.
The album insert is bulky
- Reduce foam tape on inner pages.
- Limit heavy embellishments to the cover/top only.
- Increase box depth slightly for “chunky” designs.
The box walls bow
- Reinforce with chipboard or double cardstock layers.
- Use strong tape for seams; avoid soaking the paper with glue.
Real-World Experiences and Lessons ( of “What It’s Actually Like”)
Making a DIY camera box photo album is one of those projects that looks deceptively simple on the outsidelike, “Oh cute, a little camera!”until you realize you’re building a tiny piece of furniture out of paper. The good news: the learning curve is friendly. The funny news: your first build will teach you at least three things you didn’t know you needed to know.
First, most people discover the Great Lid Truth: if your lid fits perfectly before you decorate, it will not fit perfectly after you add patterned paper layers. Paper thickness is sneaky. Add a mat here, a decorative panel there, and suddenly your lid is acting like jeans from two summers ago. A simple fix is to build the lid just a touch roomier than you think you needor keep decorative layers slightly away from the edges where the lid slides down.
Second, crafters often learn the Adhesive Hierarchy. A tape runner is fast, but a camera box is a “structural integrity” situation. Strong double-sided tape (the kind you burnish down like you mean it) makes seams hold. Liquid glue is great for details and edges, but if you use too much on big panels, you may watch your beautiful flat cardstock turn into a wavy potato chip. The common experience is doing one large glued panel, seeing it warp, and then immediately becoming the kind of person who owns a bone folder and a stack of heavy books for pressing.
Third, there’s the surprisingly emotional moment when you start placing photos. People often assume the craft part is the “hard part,” but the photo selection is where you can lose an hour without noticing. You’ll think, “I’ll just add a few pictures,” and then it’s midnight and you’re debating whether the beach photo is better on panel three or panel four because “the vibes need a narrative arc.” (They do. Obviously.)
One experience many makers report is how satisfying it feels to include tiny journaling notes. Even one line per photosomething simple like “First day in New York,” or “We laughed until we cried”makes the album feel personal instead of just pretty. It’s also a gift to Future You, who will absolutely forget why everyone was laughing in that one picture unless you write it down.
Finally, a camera box album teaches patience in a gentle way. You’ll do a test fit, adjust one layer, test again, and suddenly you’re building like a pro. By the end, you’ll know your preferred cardstock weight, you’ll have Opinions about tape, and you’ll probably catch yourself looking at random packaging like, “That would make excellent chipboard.” Welcome. This is your life now.
Conclusion
A DIY camera box photo album is a paper craft that feels bigger than the sum of its parts: a simple box becomes a camera, and a few folded panels become a story someone can hold in their hands. Whether you choose a pull-out accordion insert or a bound mini album, the key is building a sturdy base, keeping your measurements consistent, and leaving just enough wiggle room for all those delicious decorative layers.
Start simple, personalize with photos and captions, and don’t stress if your first one isn’t museum-perfect. The charm is in the handmade detailsand the fact that you turned paper into a gift that makes people smile.


