Table of Contents >> Show >> Hide
- What Is Sea Salt Ice Cream from Kingdom Hearts?
- Ingredients for Kingdom Hearts Sea Salt Ice Cream
- How to Make Sea Salt Ice Cream from Kingdom Hearts: 13 Steps
- Step 1: Decide Whether You Want Scoops or Bars
- Step 2: Separate the Egg Yolks
- Step 3: Whisk the Yolks with Sugar
- Step 4: Warm the Milk and Cream
- Step 5: Temper the Eggs Slowly
- Step 6: Cook the Custard Base
- Step 7: Strain for Smoothness
- Step 8: Add Vanilla and Sea Salt
- Step 9: Add the Kingdom Hearts Blue Color
- Step 10: Chill the Mixture Completely
- Step 11: Churn the Ice Cream
- Step 12: Freeze as Scoops or Popsicles
- Step 13: Serve and Enjoy
- Tips for the Best Sea Salt Ice Cream
- No Ice Cream Maker Method
- Flavor Variations
- Common Mistakes to Avoid
- Food Safety Notes
- Why Sweet and Salty Works So Well
- Serving Ideas
- Experience Notes: Making Kingdom Hearts Sea Salt Ice Cream at Home
- Conclusion
If you have ever watched Roxas, Axel, and Xion sit on the Twilight Town clock tower with that bright blue ice cream bar, you already know one thing: sea salt ice cream is not just dessert. It is a tiny frozen monument to friendship, nostalgia, and the questionable life choices that begin with, “I can totally make that at home.” Good news: you can.
This guide shows you how to make sea salt ice cream from Kingdom Hearts in 13 practical steps using a creamy custard-style base, a balanced sweet-and-salty flavor, and the iconic pale blue color fans recognize instantly. The result is smooth, rich, lightly vanilla-scented, and just salty enough to make your taste buds raise one eyebrow and say, “Wait, I love this.”
The key is balance. Too little salt and you simply have blue vanilla ice cream. Too much salt and you have a dairy-based ocean accident. This recipe uses whole milk, heavy cream, egg yolks, sugar, vanilla, and fine sea salt, then freezes the mixture into either scoopable ice cream or classic popsicle-style bars. Both versions work, but the bar shape gives the strongest Kingdom Hearts energy.
What Is Sea Salt Ice Cream from Kingdom Hearts?
Sea salt ice cream is a fictional treat made famous by the Kingdom Hearts series, especially in Twilight Town scenes where characters share blue ice cream bars after long, emotional days. In the games, it is described as both salty and sweet, which sounds odd until you remember salted caramel, chocolate-covered pretzels, and fries dipped in milkshakes all exist because humans are delightfully chaotic.
In real life, sea salt ice cream usually tastes like a creamy vanilla custard with a gentle salt finish. The salt sharpens the sweetness, makes the dairy flavor pop, and gives the dessert a more complex taste than standard vanilla. The blue color is mostly for fun, but let’s be honest: without it, the ice cream would lose at least 40% of its main-character aura.
Ingredients for Kingdom Hearts Sea Salt Ice Cream
Main Ingredients
- 2 cups whole milk
- 1 cup heavy cream
- 4 large egg yolks
- 1/2 cup granulated sugar
- 1 teaspoon vanilla extract
- 1/2 teaspoon fine sea salt, plus more to taste
- 2 to 4 drops blue food coloring
- 1 tiny drop green food coloring, optional, for a teal-blue shade
Optional Add-Ins
- 1 tablespoon corn syrup or glucose syrup for a softer texture
- 1 tablespoon nonfat dry milk powder for extra body
- A pinch of blue spirulina instead of food coloring
- Flaky sea salt for finishing, used very lightly
Equipment
- Medium saucepan
- Mixing bowls
- Whisk
- Fine-mesh strainer
- Food thermometer
- Ice cream maker or popsicle molds
- Wooden popsicle sticks, if making bars
- Freezer-safe container
How to Make Sea Salt Ice Cream from Kingdom Hearts: 13 Steps
Step 1: Decide Whether You Want Scoops or Bars
Before you start, choose your final form: scoopable ice cream or popsicle-style bars. Scoops are easier if you have an ice cream maker. Bars feel more faithful to Kingdom Hearts because they look like the treat from the game. Either way, the base recipe stays the same. The only difference is how you freeze it.
Step 2: Separate the Egg Yolks
Separate 4 large egg yolks into a medium bowl. Save the egg whites for another recipe, such as scrambled egg whites or meringue. This recipe uses yolks because they add richness and help create a custard base. Egg yolks also improve texture, making the ice cream creamy instead of icy.
Step 3: Whisk the Yolks with Sugar
Add the granulated sugar to the egg yolks and whisk until the mixture looks pale, thick, and slightly glossy. This step helps dissolve the sugar and protects the yolks from curdling later. Think of it as giving the eggs a tiny pep talk before they meet the hot milk.
Step 4: Warm the Milk and Cream
In a medium saucepan, combine the whole milk and heavy cream. Heat over medium-low until the mixture is steaming and tiny bubbles appear around the edge. Do not boil it. Boiling dairy is dramatic, messy, and usually unnecessary, like bringing a keyblade to open a cereal box.
Step 5: Temper the Eggs Slowly
Slowly ladle about 1/2 cup of the warm milk mixture into the egg yolks while whisking constantly. Add another 1/2 cup the same way. This process is called tempering. It gently raises the temperature of the eggs so they blend into the custard instead of turning into sweet scrambled eggs, which is not the crossover anyone requested.
Step 6: Cook the Custard Base
Pour the tempered egg mixture back into the saucepan. Cook over low heat, stirring constantly with a spatula or whisk, until the custard reaches 160°F to 170°F and lightly coats the back of a spoon. This makes the base safer and gives the final sea salt ice cream a smooth, rich texture.
Step 7: Strain for Smoothness
Pour the custard through a fine-mesh strainer into a clean bowl. This removes any tiny bits of cooked egg and keeps your ice cream silky. It is a small step, but it makes a big difference. Smooth ice cream says “homemade masterpiece.” Lumpy ice cream says “science fair with consequences.”
Step 8: Add Vanilla and Sea Salt
Stir in the vanilla extract and 1/2 teaspoon fine sea salt. Taste carefully after the base cools slightly. The flavor should be sweet first, creamy second, and gently salty at the end. If it tastes flat, add a tiny pinch more salt. If it tastes like Poseidon sneezed in your saucepan, add a splash of milk or cream to soften it.
Step 9: Add the Kingdom Hearts Blue Color
Add 2 to 4 drops of blue food coloring. For a more game-inspired teal tone, add the tiniest dot of green food coloring. Go slowly. You want soft sky-blue, not radioactive swimming pool. If using blue spirulina, whisk it in very well so the color spreads evenly.
Step 10: Chill the Mixture Completely
Cover the bowl and refrigerate the custard for at least 4 hours, or overnight if possible. Chilling improves flavor and helps the mixture churn better. Warm ice cream base freezes slowly, which can create larger ice crystals. Cold base freezes faster and gives you a creamier result.
Step 11: Churn the Ice Cream
Pour the chilled base into your ice cream maker and churn according to the manufacturer’s directions, usually 20 to 25 minutes. The mixture should thicken to a soft-serve consistency. At this point, you can eat a spoonful for “quality control.” This is not stealing. This is culinary research with a spoon.
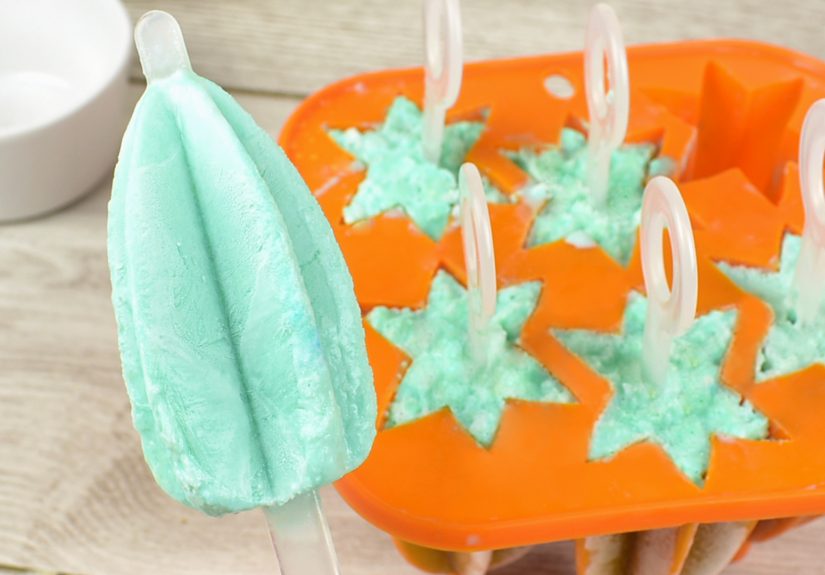
Step 12: Freeze as Scoops or Popsicles
For scoopable ice cream, transfer the churned base into a freezer-safe container, press parchment paper or plastic wrap against the surface, and freeze for 3 to 4 hours. For Kingdom Hearts-style bars, spoon or pipe the churned ice cream into popsicle molds, insert sticks, and freeze until firm, usually 6 hours or overnight.
Step 13: Serve and Enjoy
Let scoopable ice cream sit at room temperature for 5 minutes before serving. For popsicles, run the mold briefly under warm water to release the bars. Add a tiny sprinkle of flaky sea salt if you want a stronger sweet-salty finish. Then enjoy your homemade sea salt ice cream while looking thoughtfully into the distance, as required by fictional friendship law.
Tips for the Best Sea Salt Ice Cream
Use Fine Sea Salt in the Base
Fine sea salt dissolves evenly, which makes the flavor consistent. Coarse salt can leave random salty pockets. A surprise salt crystal can be fun on a pretzel, but in ice cream it feels like your dessert is trying to start an argument.
Do Not Skip the Chill Time
Chilling the custard is one of the most important steps. It lets the dairy, sugar, salt, and vanilla settle into a rounded flavor. It also gives the ice cream maker a better chance to freeze the mixture quickly, which helps create smaller ice crystals and a smoother texture.
Balance the Color Carefully
Classic Kingdom Hearts sea salt ice cream has a blue or blue-green look. Gel food coloring gives the strongest color, while liquid coloring is easier to control. Natural coloring such as blue spirulina can work, but it may create a slightly different shade and can have a mild earthy note if overused.
Use Heavy Cream for Creaminess
Heavy cream gives the ice cream body and richness. Whole milk keeps it from becoming too dense. Together, they create a balanced base that freezes well. If you use only low-fat milk, the texture may become icy. If you use too much cream, the result can feel heavy and buttery.
No Ice Cream Maker Method
No machine? No problem. After chilling the custard, pour it into a shallow freezer-safe dish. Freeze for 45 minutes, then whisk or beat the mixture vigorously to break up ice crystals. Repeat every 30 to 45 minutes for about 3 hours. The texture will not be quite as airy as churned ice cream, but it will still taste delicious.
For popsicles, the no-churn method is even easier. Pour the chilled custard directly into molds and freeze. The bars may be slightly denser than churned ice cream bars, but they are still creamy enough to satisfy your Twilight Town cravings.
Flavor Variations
Extra Vanilla Sea Salt Ice Cream
Add 1/2 teaspoon vanilla bean paste along with the vanilla extract. This gives the ice cream a deeper bakery-style flavor and tiny vanilla specks. It is less game-accurate visually, but very delicious.
Coconut Sea Salt Ice Cream
Replace 1 cup of whole milk with full-fat coconut milk. The result tastes slightly tropical and pairs beautifully with sea salt. It is not traditional, but it feels like something you would eat after a boss battle on a beach world.
Salted Caramel Swirl Version
After churning, layer the ice cream with thin ribbons of salted caramel sauce. Do not overdo it, or the caramel will overpower the delicate sea salt flavor. A little swirl is charming. A caramel landslide is another dessert entirely.
Common Mistakes to Avoid
Adding Too Much Salt at Once
Salt grows stronger after freezing because cold dulls sweetness more than saltiness. Start with 1/2 teaspoon, chill the base, taste, and adjust with tiny pinches. You can always add more, but you cannot politely ask salt to leave.
Overheating the Custard
Custard should be cooked gently. If the heat is too high, the eggs may curdle. Use low heat, stir constantly, and check the temperature. If you see small lumps, strain the base immediately. If it smells strongly eggy or looks chunky, start over.
Freezing Without Covering
Ice cream absorbs freezer smells like a gossip sponge. Cover the surface tightly before freezing. Unless you want your Kingdom Hearts dessert to taste faintly like frozen peas and last month’s garlic bread, protect it well.
Food Safety Notes
Because this recipe uses egg yolks, cook the custard base to at least 160°F. A thermometer is the easiest way to check. You can also use pasteurized eggs for extra peace of mind. Do not taste uncooked egg mixtures, and keep dairy ingredients refrigerated until you are ready to use them.
Store finished sea salt ice cream in the freezer and enjoy it within 1 to 2 weeks for the best texture. It may remain safe longer if kept frozen, but homemade ice cream can become icy faster than commercial versions because it usually has fewer stabilizers.
Why Sweet and Salty Works So Well
Salt is not just there to make food salty. In small amounts, it enhances flavor. It can make vanilla taste warmer, dairy taste richer, and sugar taste more rounded. That is why a pinch of salt appears in so many cookie, cake, and caramel recipes.
In sea salt ice cream, salt creates contrast. The first bite tastes creamy and sweet, then the sea salt appears at the finish. That little twist keeps the flavor interesting. It is the dessert version of a plot reveal, except nobody has to fight a shadow monster afterward.
Serving Ideas
- Serve as popsicles for the most authentic Kingdom Hearts look.
- Scoop into waffle cones for a creamy summer dessert.
- Pair with shortbread cookies for a sweet-salty snack.
- Serve beside warm blondies or vanilla cake.
- Add a tiny sprinkle of flaky sea salt right before serving.
Experience Notes: Making Kingdom Hearts Sea Salt Ice Cream at Home
The first time you make sea salt ice cream from Kingdom Hearts, the biggest surprise is how normal the ingredients look. There is no mysterious fantasy powder, no enchanted freezer crystal, no dramatic instruction that says “stir while contemplating your destiny.” It is milk, cream, sugar, eggs, vanilla, salt, and color. Yet somehow, once that pale blue mixture starts churning, it feels like you have unlocked a secret recipe from another world.
The most important experience lesson is patience. When you taste the warm custard, the salt may seem shy. After chilling, it becomes clearer. After freezing, it changes again. That is why seasoning slowly matters. I like to start with 1/2 teaspoon of fine sea salt, chill the base, then taste it cold before deciding whether to add another pinch. A good sea salt ice cream should not taste like someone melted vanilla ice cream into seawater. It should taste creamy, sweet, and lightly briny, with the salt arriving like a polite guest instead of kicking down the door.
The color is another fun part. Blue food coloring can go from “magical Twilight Town treat” to “cartoon plumbing fluid” surprisingly fast. Add just a couple of drops at first. If you want that soft teal look, touch a toothpick to green gel coloring and swirl in the tiniest amount. The goal is a dreamy blue, not a warning label. Natural colorings can work, but they often create a more muted shade. That is perfectly fine if you prefer a less artificial look.
Texture depends heavily on chilling and freezing. When the custard is thoroughly cold before churning, the ice cream becomes smoother. If you rush it, you may get larger ice crystals. If you are making bars, let them freeze overnight. Pulling them too early from the mold can lead to broken sticks and emotional damage. Not Kingdom Hearts-level emotional damage, thankfully, but still annoying.
Serving the bars is honestly half the fun. There is something charming about handing someone a homemade blue sea salt ice cream pop and watching them try to guess the flavor. Most people expect blue raspberry. Instead, they get vanilla custard with a salty finish. The first reaction is usually confusion, then curiosity, then a second bite. That second bite is the victory screen.
This recipe is also a great conversation starter for game nights, anime watch parties, cosplay gatherings, or summer hangouts. You can make the bars a day ahead, wrap them individually, and keep them ready in the freezer. They look playful, taste surprisingly elegant, and bring a little video game nostalgia to real life. Best of all, you do not need to be a professional chef. You just need a saucepan, a whisk, a freezer, and the courage to put salt in dessert on purpose.
Conclusion
Learning how to make sea salt ice cream from Kingdom Hearts is easier than it looks, and the result is far more interesting than ordinary vanilla. With a cooked custard base, careful salt balance, and that signature blue color, you can recreate the iconic sweet-salty frozen treat at home in either scoopable or popsicle form.
The secret is restraint: gentle heat for the custard, enough chill time for smooth texture, and just enough sea salt to make the flavor sparkle. Make it once, and you will understand why this fictional dessert became so memorable. Make it twice, and you may start looking for a clock tower to sit on. Please choose one with legal seating.


