Table of Contents >> Show >> Hide
- What Are Butterfly Pea Flowers?
- Climate and Hardiness: Set Expectations Early
- How to Plant Butterfly Pea Flowers Step by Step
- Butterfly Pea Care Basics
- Growing Butterfly Pea in Containers
- Common Problems and Practical Fixes
- Harvesting Butterfly Pea Flowers
- Using Butterfly Pea Flowers at Home
- Beginner Mistakes to Avoid
- FAQ
- Final Thoughts
- Extended Experience Section: Real-World Growing Notes (500+ Words)
If your garden could choose a party trick, butterfly pea flowers would be the friend who changes outfit colors mid-conversation and still remembers to bring snacks. This tropical vine, Clitoria ternatea, produces brilliant blue blooms that are not only ornamental but also useful in teas, natural dyes, and creative cooking. It climbs fast, flowers generously in warm weather, and adds a soft, romantic look to fences, arbors, and trellises.
This guide is built for home gardeners who want practical results: healthy vines, lots of blooms, fewer headaches, and no mystery failures. You’ll learn how to start from seed, choose the right site, water and feed without overdoing it, handle pests early, and harvest flowers for kitchen or craft use. You’ll also get real-world growing experiences and troubleshooting advice you can apply in containers, raised beds, and in-ground planting.
If you’ve ever wanted one plant that can be ornamental, edible, pollinator-friendly, and downright fun, butterfly pea flowers are an excellent choice. Let’s grow them the smart way.
What Are Butterfly Pea Flowers?
Butterfly pea is a twining vine in the legume family, loved for vivid blue flowers with pale yellow-white centers. Mature vines can reach roughly 10 to 15 feet when given support, and they bloom heavily from warm seasons into fall in suitable climates.
Gardeners love this plant for three big reasons:
- Color drama: the flowers create naturally blue infusions that shift purple-pink when acidic ingredients (like lemon) are added.
- Landscape value: fast vertical growth makes it great for trellises, fences, and privacy accents.
- Practical use: flowers and tender young parts are commonly used in culinary and dye applications.
Bonus: as a legume, butterfly pea is associated with nitrogen-fixing behavior, so it can play nicely in mixed gardens. In plain language, it doesn’t usually beg for heavy fertilizer the way some flowering annuals do.
Climate and Hardiness: Set Expectations Early
Warm-weather star, cool-weather annual
Butterfly pea thrives in heat and sun. In true warm climates, it can behave as a perennial. In cooler regions with frost, treat it as an annual or grow in containers you can protect.
Quick rule of thumb
- If your growing season is long and warm, plant directly outdoors after frost danger passes.
- If your spring is moody (cold today, hot tomorrow), start seeds indoors first and transplant once weather stabilizes.
- When nights cool significantly, growth and flowering slow down.
Think of butterfly pea as a beach-vacation vine: sunshine, warmth, and breathable soil. Give it those, and it rewards you quickly.
How to Plant Butterfly Pea Flowers Step by Step
Step 1: Start seeds at the right time
For most U.S. gardens, start seeds indoors about 6 to 8 weeks before your last frost date, or sow directly outdoors after frost risk is gone and the soil is warm. This timing gives young plants a head start without exposing them to cold stress.
Step 2: Improve germination (optional but helpful)
Butterfly pea seeds can have tough coats. Many growers increase germination speed by lightly nicking the seed coat and soaking seeds in water before sowing. This helps water penetrate the seed and reduces uneven sprouting.
Step 3: Choose the right site
Pick a location with full sun and good drainage. This vine tolerates different soil textures but performs best when roots are not sitting in soggy ground.
Step 4: Sow correctly
Sow seeds roughly 1 inch deep. For in-ground planting, use reasonable spacing so vines get airflow and room to climb. If you’re transplanting seedlings, avoid disturbing roots too much; young vines prefer a gentle move.
Step 5: Install support immediately
Don’t wait for a jungle to appear. Put in a trellis, netting, or fence support at planting time so stems naturally twine upward. Early structure prevents tangled mats later.
Step 6: Water in and mulch lightly
After planting, water thoroughly to settle soil around roots. Add a light mulch ring (not touching stems) to moderate moisture and suppress weeds.
Butterfly Pea Care Basics
Light
Full sun is the productivity engine. Less light usually means fewer blooms, longer internodes, and a more “where am I going?” vine architecture.
Water
Keep moisture consistent during establishment. After roots are developed, butterfly pea handles short dry spells better, but steady watering produces better flowering. The goal: moist, not swampy.
Soil
Well-drained soil is essential. This plant can tolerate a wide pH range, but neutral-to-slightly acidic or slightly alkaline soils often perform well in home gardens. Add compost for structure and biology rather than chasing “perfect” lab numbers.
Fertilizer
Use a light hand. Because butterfly pea is a legume, heavy nitrogen can cause leafy growth at the expense of flowers. A modest balanced fertilizer or compost-focused approach usually works better than frequent feeding.
Pruning and training
Pinch tips early for bushier growth and more flowering points. Redirect stems onto support every few days during rapid growth. Deadheading can encourage continued bloom, but leave some flowers/pods if you want seeds.
Growing Butterfly Pea in Containers
No yard? No problem. Butterfly pea can do great in pots if you build the right setup.
Container checklist
- Use a pot with strong drainage holes.
- Choose a medium-large container to avoid constant drying.
- Add a support stake, obelisk, or mini trellis right away.
- Use a loose, well-drained potting mix with compost.
- Water more often than in-ground plants, especially in heat.
Container tip: morning full sun plus afternoon airflow is excellent. In very hot regions, a touch of afternoon shade can reduce stress while keeping bloom production strong.
Common Problems and Practical Fixes
Problem: Lots of leaves, not many flowers
Cause: Too little sun, too much nitrogen, or overwatering.
Fix: Increase direct sun, reduce nitrogen-heavy feeding, and let the top layer of soil dry slightly between waterings.
Problem: Yellowing leaves and weak growth
Cause: Poor drainage or root stress.
Fix: Improve drainage, reduce watering frequency, and loosen compacted soil around root zone.
Problem: Spider mites, whiteflies, or aphids
Cause: Heat stress and low airflow can invite outbreaks.
Fix: Use a strong water spray on leaf undersides, prune dense tangles, and apply horticultural soap/oil if needed. Repeat consistently rather than overreacting once.
Problem: Fungal or rot issues
Cause: Wet foliage plus poor airflow, or chronically wet roots.
Fix: Water at soil level, space plants better, and remove badly affected tissue promptly.
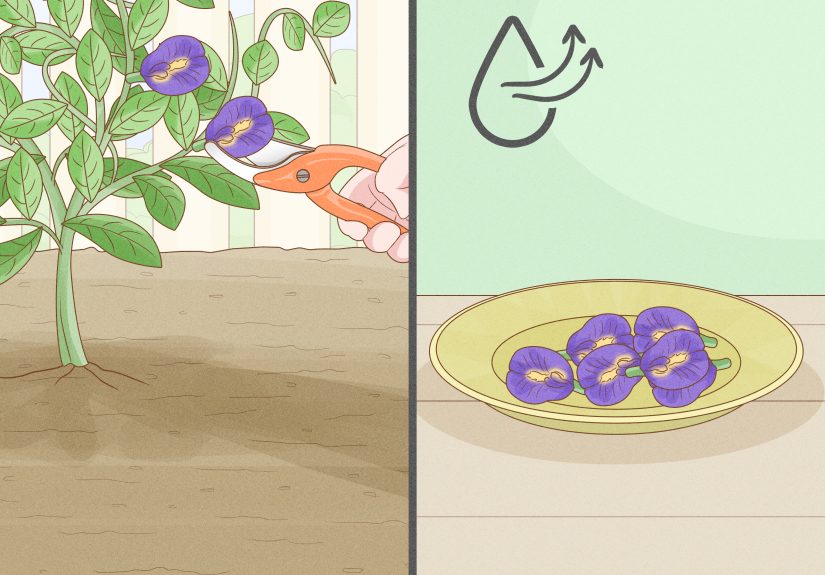
Harvesting Butterfly Pea Flowers
When to harvest
Pick fresh flowers when fully open and vibrant, preferably in the morning after dew dries. For tea and dye, color is typically best from fresh blossoms, though dried flowers are excellent for storage and convenience.
How to dry
- Rinse lightly only if needed, then pat dry.
- Spread flowers in a single layer in a shaded, airy place or use a dehydrator on low heat.
- Store fully dried petals in an airtight jar away from light and humidity.
Storage life
Properly dried flowers can keep color and quality for months. Label jars with harvest date so you rotate stock and always use your best batch first.
Using Butterfly Pea Flowers at Home
Tea and color-changing drinks
Steep dried petals in hot water for a deep blue infusion, then add lemon or lime to shift color toward purple-pink. It’s science class and tea break in one cup.
Natural food coloring
Butterfly pea extracts are used for naturally blue shades in beverages and food products. At home, you can use infusions in rice, syrups, mocktails, desserts, or noodles.
Craft and dye use
The flowers can also support natural dye projects. If you’re experimenting with fabrics or paper, test small batches first and document your pH and mordant method for repeatability.
Beginner Mistakes to Avoid
- Planting too early: Cold soil slows or stalls growth.
- Skipping support: Vines become tangled and harder to manage.
- Overfeeding nitrogen: Beautiful leaves, disappointing bloom count.
- Watering by schedule only: Always check soil moisture first.
- Ignoring airflow: Dense canopies can invite pests and disease.
FAQ
Are butterfly pea flowers hard to grow?
Not usually. They’re beginner-friendly in warm weather if you provide sun, drainage, and climbing support.
Can I grow butterfly pea flowers indoors?
You can start them indoors and even keep them in bright conditions, but they perform best with strong light and space to climb. Most growers move container plants outdoors in warm seasons.
Do they come back every year?
In frost-free or very warm regions, they may behave as short-lived perennials. In cooler climates, they’re typically grown as annuals.
Are butterfly pea flowers edible?
The flowers are commonly used in beverages and culinary coloring. As with any edible flower, use only correctly identified, unsprayed plant material grown for food use.
Final Thoughts
Butterfly pea flowers are one of those rare “looks expensive, grows practical” plants. With full sun, good drainage, and a place to climb, they can transform a plain corner into a vivid, useful garden feature. Start with seeds, support early, water wisely, and harvest often. In return, you’ll get blooms that are beautiful in the landscape and surprisingly versatile in the kitchen.
If you love plants that do more than just sit there and look pretty, butterfly pea deserves a spot in your next planting plan.
Extended Experience Section: Real-World Growing Notes (500+ Words)
What follows is a composite of real gardener patterns and outcomes from warm-climate and seasonal growers who worked with butterfly pea in backyard beds, balcony containers, and mixed edible landscapes. The goal is to show what success actually looks like week by week.
Case Pattern A: The “I planted late and still won” gardener. A grower in a warm summer zone started seeds later than planned, worried they had missed the window, and still got excellent results by focusing on three things: heat, sun, and support. Seeds were soaked overnight, planted in warm soil, and given a simple string trellis tied to a porch rail. Germination was uneven at first, but once daytime heat settled in, seedlings accelerated fast. By midseason, vines had covered a five-foot section and produced steady flushes of blooms. Biggest lesson: butterfly pea forgives calendar anxiety better than cold soil. Starting later in warm conditions beat starting earlier in chilly ground.
Case Pattern B: The balcony container experiment. A renter grew butterfly pea in a large pot with a metal tomato cage as the support core. The first month was underwhelming: lots of green, not many flowers. The fix was surprisingly simplemove the container to a spot with more direct sun and reduce high-nitrogen fertilizer. Within two weeks, buds appeared. By peak summer, blooms were harvested every other morning for tea. Biggest lesson: container placement matters more than clever fertilizer programs. Light is the first lever; feeding is the second.
Case Pattern C: The overwatering trap. A beginner planted in clay-heavy ground and watered daily “to be safe.” Leaves yellowed, lower growth stalled, and flowering lagged. Soil stayed wet too long, and roots struggled. The recovery plan included adding organic matter around the root zone, widening watering intervals, and mulching to stabilize moisture swings. Plant vigor improved gradually, and blooming resumed in the next warm stretch. Biggest lesson: butterfly pea likes moisture consistency, not constant saturation.
Case Pattern D: The pollinator-friendly fence line. One home garden used butterfly pea along a wire fence with basil and marigold nearby. The vine filled vertical space quickly, softened a plain boundary, and became a seasonal focal point. The gardener harvested flowers lightlynever stripping the whole plant at onceto keep both aesthetics and yield. Pest pressure stayed manageable due to airflow and weekly inspection. Biggest lesson: partial harvesting plus routine scouting beats emergency pest control later.
Case Pattern E: Seed saving that actually worked. A grower in a cooler region treated butterfly pea as an annual, then saved mature pods for the next year. Seeds were dried thoroughly, labeled, and stored in a cool, dry place. The next spring, seeds were nicked and soaked before sowing, and germination improved compared with untreated seed from the prior year. Biggest lesson: seed prep and storage discipline turn one successful season into a repeatable system.
Shared themes across successful growers:
- They installed support early, before vines sprawled.
- They prioritized sun exposure over fertilizer intensity.
- They watered based on soil feel, not calendar guilt.
- They harvested frequently but not aggressively.
- They adjusted quickly when plants signaled stress.
Most common regret: “I wish I had given it a better trellis from day one.” When butterfly pea gets going, it grows with enthusiasm. Upgrading support midseason is possible, but it’s a bit like trying to reorganize holiday lights in the dark. Do yourself a favor: build the structure first, then let the vine perform.
Most common surprise: how productive a single healthy plant can be. Even a modest setup can provide enough flowers for regular tea, playful drinks, and edible garnish projects. Many growers start with one plant and end the season planning three times as much space for next year.
In short, butterfly pea rewards gardeners who keep the routine simple: warm start, sunny site, airy structure, moderate feeding, and steady observation. Follow that rhythm, and this vine is less “high-maintenance diva” and more “colorful overachiever that keeps showing up.”


