Table of Contents >> Show >> Hide
- Miniature Roses 101: What You’re Actually Growing
- Before You Plant: Pick the Right Spot (and the Right Vibe)
- How to Plant Miniature Roses in the Ground
- How to Grow Miniature Roses in Pots (Patio-Friendly Perfection)
- Watering Miniature Roses: The Fastest Way to Win (or Lose)
- Fertilizing Miniature Roses: Feed the Blooms, Not the Problems
- Pruning and Deadheading: How to Keep Mini Roses Blooming Like a Machine
- Common Problems (and Fixes That Actually Work)
- How to Overwinter Miniature Roses (Without Tears)
- Growing Miniature Roses Indoors: A Reality Check (and a Game Plan)
- A Miniature Rose Care Calendar (Simple, Practical, Repeatable)
- 500+ Words of Experiences: Real-World Mini Rose Moments (and What They Teach)
- Conclusion: Tiny Rose, Big Payoff
Miniature roses are proof that good things come in small packageslike a cupcake that somehow still has frosting, sprinkles, and emotional support.
These compact rose bushes typically stay under about 2 feet tall, bloom like champs, and fit beautifully into containers, borders, raised beds,
and any sunny spot where you’d like a little “wow” without committing to a full rose empire.
The secret most people miss: miniature roses aren’t a separate “easy” plant category. They’re real roses with real rose expectations.
Give them sun, good drainage, consistent water, and basic groomingand they’ll repay you with repeat blooms that make your patio look
suspiciously like you hired a professional gardener (you didn’t; you’re just clever).
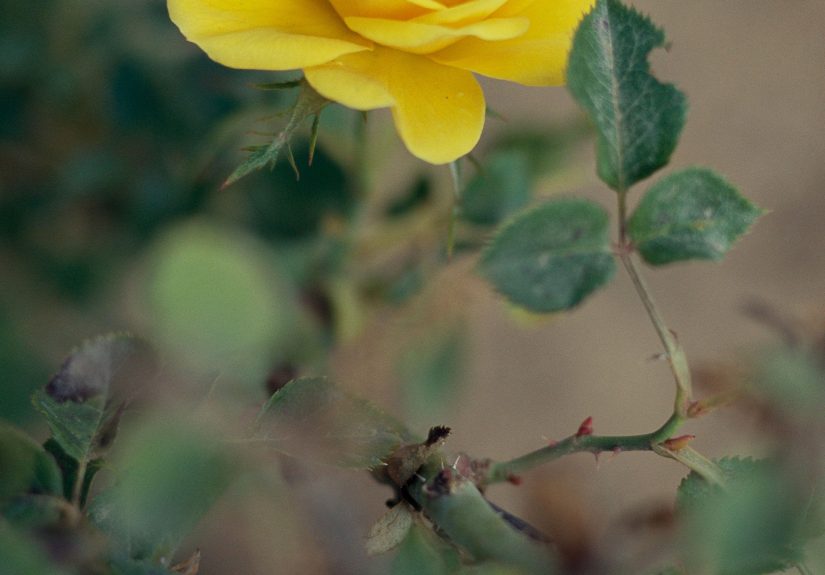
Miniature Roses 101: What You’re Actually Growing
Miniature roses (sometimes called mini roses) are bred to stay small while still producing classic rose-shaped flowers. Many are repeat bloomers,
and plenty are surprisingly tough outdoors when planted correctly. They can be grown in-ground or in containers, and some varieties can even be
kept temporarily indoorsbut they’re happiest outside where the light is strong and the air moves.
Mini rose vs. “gift shop” mini rose: same plant, different starting line
Those tiny roses sold around holidays can be perfectly viable plants, but they often arrive stressed (low light, dry air, inconsistent watering).
Think of them as roses that have been on a long road trip with no snacks. With a little recovery time and proper care, many rebound well once
acclimated to brighter light and steadier moisture.
Before You Plant: Pick the Right Spot (and the Right Vibe)
Sunlight: the non-negotiable
Aim for at least 6 hours of direct sun daily. Morning sun is especially helpful because it dries leaves earlier in the day, reducing
fungal issues. Less sun usually means fewer blooms and more disease drama. In very hot climates, a little afternoon shade can helpjust don’t
move your roses into deep shade and expect them to “figure it out.”
Airflow: roses like friends, not a crowded subway
Good airflow helps keep foliage dry and reduces problems like black spot and powdery mildew. Don’t plant miniature roses jammed against walls,
thick shrubs, or each other. Give them breathing room, and they’ll thank you by staying leafier and blooming longer.
Soil: rich, well-drained, and slightly acidic is the sweet spot
Miniature roses prefer moist, fertile soil that drains wellno soggy “wet feet.” If your soil is heavy clay or slow-draining, improve it with compost
and organic matter, or plant in a raised bed. A slightly acidic to near-neutral pH is commonly recommended for roses, and loose soil helps the root
system spread and absorb nutrients efficiently.
How to Plant Miniature Roses in the Ground
Planting is easy, but doing it well is what makes your rose bush explode with blooms instead of quietly plotting revenge.
Best planting time
In most regions, plant in spring after hard freezes are unlikely. Fall planting can work in mild-winter areas, but spring is the most
forgiving choice for beginners.
Step-by-step planting
- Water the plant first. A hydrated root ball slides out more easily and settles in faster.
- Dig a hole wider than the root ball. You want loosened soil around the roots so they expand quickly.
-
Plant slightly deeper than the nursery pot depth. Miniature roses often have a shallow root system, and planting a bit deeper can
help stability and moisture consistency. (Don’t bury the entire plantjust set the crown slightly lower than it was in the container.) - Spread or loosen roots gently if they’re circling. This encourages outward growth instead of a “root pretzel.”
-
Backfill with improved soil. Use the native soil mixed with compost; avoid creating a “potting-soil bubble” that drains differently
than the surrounding ground. - Water thoroughly. This settles soil around roots and removes air pockets.
-
Mulch 2–3 inches deep, keeping mulch a couple inches away from the stems. Mulch stabilizes soil temperature, reduces weeds, and
slows evaporation.
Spacing guidelines
Most miniature roses do well spaced about 12–18 inches apart (some varieties can go a bit wider). If you want a fuller “mini rose
hedge,” you can plant closerbut airflow decreases, so be extra attentive to disease prevention.
How to Grow Miniature Roses in Pots (Patio-Friendly Perfection)
Containers are a dream for miniature roses: you can control soil quality, move plants for better sun, and bring them into protection during extreme
weather. The trade-off is that pots dry out faster and can freeze harder in winter.
Choose the right pot
- Drainage holes are mandatory. A decorative pot with no drainage is basically a rose stress simulator.
- Size matters: choose a container that gives roots room to grow and doesn’t tip easily in wind.
- Material matters: terracotta breathes but dries quickly; plastic retains moisture; glazed ceramic looks great but can be heavy.
Use a high-quality potting mix (not garden soil)
Potting mixes drain better and reduce the risk of root rot. Look for a light, nutrient-rich mix. You can boost performance by mixing in compost,
but keep it airy so water moves through. If water sits in the pot, roots sufferand roses do not forgive soggy roots.
Container planting steps
- Add a little potting mix to the bottom.
- Set the rose so the root ball sits slightly below the rim (for watering space).
- Fill around it, firm gently, and water until it drains from the bottom.
- Mulch lightly on top to slow evaporation (optional but helpful).
Watering Miniature Roses: The Fastest Way to Win (or Lose)
The goal is consistently moist soilnot soggy, not bone-dry. Miniature roses, especially in containers, can dry out quickly during
bloom season.
How often should you water?
- In-ground: aim for deep watering about 1–2 times weekly (more during heat waves), roughly equivalent to around 1–2 inches of water per week.
- In containers: check daily in warm weather. When the soil is dry a little below the surface, water thoroughly.
Water smarter (and reduce disease)
- Water at the base, not over the leaves.
- Water in the morning so foliage dries quickly if it gets splashed.
- Avoid late-day watering that leaves leaves damp overnight.
Fertilizing Miniature Roses: Feed the Blooms, Not the Problems
Roses are enthusiastic bloomers, which means they use nutrients steadily. Fertilizer helpsbut too much can cause soft, disease-prone growth.
A moderate schedule beats a “more is more” approach every time.
A simple feeding schedule
- Start in spring when new growth begins.
- Continue every 4–6 weeks through mid-summer.
- Ease off late summer so new growth can harden before cold weather.
Use a balanced rose fertilizer or a general slow-release fertilizer labeled for flowering shrubs. If you prefer liquid feeding, dilute it and apply
after watering so roots don’t get scorched.
Pruning and Deadheading: How to Keep Mini Roses Blooming Like a Machine
Miniature roses don’t require terrifying, dramatic pruning. Think “tidy haircut,” not “buzz cut in a hurricane.”
Spring pruning (the big one)
In early springgenerally before heavy leaf-outremove dead, diseased, weak, or crossing canes. Make clean cuts just above an outward-facing bud.
Many rose guides recommend cutting at an angle to help water run off the cut surface.
Deadheading (the bloom extender)
Remove spent blooms to encourage repeat flowering and keep the plant looking fresh. A common approach is to cut the fading flower stem back to a
healthy set of leaves (often a five-leaflet leaf) or to a strong outward-facing bud.
Quick shaping during the season
If the plant gets leggy, you can trim lightly after a bloom flush. Just avoid heavy pruning late in the season, which can push tender growth right
when the plant should be winding down.
Common Problems (and Fixes That Actually Work)
1) Yellow leaves
- Most common causes: inconsistent watering, low light (indoors), nutrient imbalance, or stress after moving locations.
- Fix: stabilize watering, ensure strong sun, feed lightly during the growing season, and avoid sudden environment changes.
2) Fungal diseases: black spot and powdery mildew
Two of the most common rose issues are black spot (dark spots, yellowing, leaf drop) and powdery mildew (white powdery coating).
The best defense is a strong routine: sun, airflow, base watering, and cleanup.
- Sanitation: remove fallen infected leavesdon’t compost diseased foliage if it may survive and reinfect.
- Prune for airflow: open up the plant so leaves dry faster.
- Avoid overhead irrigation: wet leaves + warm weather = fungal party.
- Choose resistant varieties when possiblethis reduces maintenance dramatically.
If disease is recurring and severe, targeted treatments labeled for roses can help, but they work best preventatively and require consistent
application. Start with cultural fixes first; they often solve 80% of the problem.
3) Pests: aphids and “leaf skeletonizers”
Aphids love tender new growth, and some larvae (like rose slugs) can chew leaves until they look lacey. Mild infestations can often be handled
without going full “garden apocalypse.”
- Blast aphids off with a firm spray of water.
- Use insecticidal soap when needed, following the label.
- Encourage beneficial insects by avoiding unnecessary broad insecticide use.
- Remove badly damaged leaves so the plant can focus on healthy growth.
How to Overwinter Miniature Roses (Without Tears)
Overwintering depends on your climate, whether your rose is planted in-ground or in a pot, and how harsh your freezes are. The key idea:
protect the roots. In containers, roots are more exposed to freezing than they are in the ground.
In-ground winter protection
- After several frosts, add extra mulch around the base (but keep it off the canes).
- In colder zones, mound loose soil at the base for added insulation, then mulch over it.
- Avoid relying on mulch alone in “seesaw” winter climatestemperature swings can heave plants upward and expose roots.
Overwintering miniature roses in containers
- Easiest method: move the pot into an unheated garage or shed where temperatures stay cold but not brutally windy.
- Outdoor method: place the pot in a protected spot and insulate it (group pots together, wrap, or sink the pot into the ground in a sheltered area).
- Indoor option: before a hard freeze, bring a potted miniature rose inside as a temporary houseplant. Give it bright light, keep it away from drafts and heating vents, and water when the surface dries.
If you bring a plant indoors from cold outdoor conditions, do it thoughtfully. A sudden jump from chilly dormancy to heated, dry indoor air can be
stressfullike going from a quiet cabin weekend to a crowded concert with no warning.
Growing Miniature Roses Indoors: A Reality Check (and a Game Plan)
Miniature roses can live indoors for a while, but most struggle long-term without enough light and humidity. If you’re keeping one inside:
treat it like a sun-loving flowering plant, not a low-light desk buddy.
Indoor success checklist
- Light: the brightest window you have (south or west is often best). Rotate the pot regularly for even growth.
- Water: water when the surface dries; water until it drains, then empty the saucer so roots don’t sit in water.
- Humidity: improve humidity with a pebble tray or nearby water sources if your air is very dry.
- Temperature: avoid cold drafts and heat blasts; stable conditions help prevent leaf drop.
- Fertilizer: use a dilute fertilizer periodically during active growth (and don’t overdo it).
Whenever possible, plan to transition indoor minis outdoors in spring. Acclimate them gradually to sun and wind over 7–10 days (a.k.a. “hardening off”),
starting with bright shade and increasing sun exposure.
A Miniature Rose Care Calendar (Simple, Practical, Repeatable)
Spring
- Prune dead/crossing canes and shape lightly.
- Refresh mulch and start a moderate fertilizer routine.
- Watch for aphids on new growth.
Summer
- Water deeply and consistently; containers may need frequent checks.
- Deadhead spent blooms to encourage reblooming.
- Maintain airflow and watch for black spot/powdery mildew.
Fall
- Reduce fertilizing late in the season.
- Keep watering until the ground freezes (dry plants enter winter stressed).
- Clean up fallen leaves to reduce disease next year.
Winter
- Protect roots with mulch/mounding in-ground or sheltered storage for containers.
- If indoors, maximize light and avoid soggy soil.
500+ Words of Experiences: Real-World Mini Rose Moments (and What They Teach)
Below are common mini rose “experience stories” pulled from patterns gardeners report every yearbecause miniature roses are predictable in the
most relatable way: they thrive when you’re consistent, and they complain when you’re not.
Experience #1: The Grocery-Store Rescue Rose
Someone gets a miniature rose as a gift. It’s adorable, covered in blooms, and living in a tiny plastic sleeve like it’s preparing for a space mission.
For a week it looks fantastic. Then the blooms fade, leaves start yellowing, and suddenly it’s dropping petals like it’s auditioning for a dramatic role.
The “aha” moment usually comes when the gardener realizes the plant didn’t failit just ran out of runway. Those gift roses are often kept in low
light and allowed to dry out between shipping, display, and checkout. The fix is simple but powerful: move it to the brightest window or (better)
outside when weather allows, water thoroughly when the top layer begins to dry, and remove fading flowers so the plant can redirect energy.
Once the rose is out of survival mode, new healthy growth often appears within a couple weeks.
Experience #2: The Container That Dried Out in One Afternoon
Mini roses in pots look like they were born for patiosuntil the first heat wave. Gardeners often describe checking the plant in the morning, seeing
it perky, then returning after lunch to find it wilted and judging them silently. Containers heat up fast, and a blooming rose uses water quickly.
The lesson most people learn: container roses aren’t watered “on a schedule,” they’re watered based on soil moisture. A finger test a little below
the surface becomes the routine. Many also learn that a slightly larger pot, a quality potting mix, and a thin mulch layer can slow water loss
enough to keep the rose happy without hovering over it every hour like a concerned stage parent.
Experience #3: Black Spot Shows Up After Rainy Weather
Everything is fineuntil a rainy stretch arrives. Then leaves develop dark spots, turn yellow, and drop. It’s frustrating, but it’s also classic rose
behavior in wet conditions. The gardeners who turn this around usually focus less on “perfect sprays” and more on the fundamentals: watering at
the base, pruning for airflow, and cleaning up fallen leaves. A big mindset shift happens here: you don’t just treat the plant, you treat the
environment around the plant. When miniature roses are in a sunnier location with better airflow, black spot pressure often drops dramatically.
And if it’s a chronic problem, gardeners often switch to more disease-resistant varietiesone of the most underrated success strategies because
it reduces long-term maintenance.
Experience #4: The Indoor Winter Experiment
A gardener tries to keep a miniature rose blooming indoors all winter. At first it worksespecially with a bright window. Then indoor heat kicks on,
humidity drops, and the rose starts looking tired. The people who succeed long enough to enjoy it usually do a few practical things: keep the rose
away from heating vents, improve humidity (even modestly), rotate the pot for even growth, and resist overwatering. Overwatering indoors is a very
common mistake because evaporation is slower. The best indoor caretakers water thoroughly, let excess drain, and avoid leaving water in the
saucer. Many treat the indoor period as a temporary “holding pattern” until spring rather than a forever home.
Experience #5: Winter SurvivalRoots Were the Whole Story
Gardeners in cold climates often report that their in-ground miniature roses survived winter fine, but their potted ones died back hard.
That difference is usually root temperature. In the ground, soil insulates. In a pot, cold air surrounds the root ball. The most successful
container overwinterers do one of two things: move pots into an unheated garage/shed, or insulate/sink the pots in a sheltered outdoor spot.
The big takeaway: winter protection isn’t about babying the canesit’s about keeping the root system from freezing and thawing repeatedly.
Once gardeners adopt that “protect the roots first” mindset, their winter success rate climbs fast.
Conclusion: Tiny Rose, Big Payoff
Miniature roses reward consistency more than complexity. If you remember four thingssun, drainage, steady watering, and basic grooming
you’ll get a compact plant that blooms repeatedly and looks right at home in beds or containers. Add smart disease prevention (airflow + clean-up),
and you’ve got a rose that punches way above its size class.


