Table of Contents >> Show >> Hide
- Why Tin Cans Make Surprisingly Great Flower Pots
- Materials and Tools
- Step-by-Step: How to Make DIY Recycled Tin Can Flower Pots
- Step 1: Clean the can like you mean it
- Step 2: Smooth sharp edges (future-you will be grateful)
- Step 3: Add drainage holes (the most important step)
- Step 4: Prime (optional, but helps prevent rust)
- Step 5: Paint and decorate
- Step 6: Seal it (especially if the pot will live outdoors)
- Step 7: Pot your plants the smart way
- Design Ideas: Tin Can Flower Pots That Don’t Look Like… Tin Cans
- Plant Pairing Tips: What Grows Best in Tin Cans?
- Care and Maintenance
- Troubleshooting: Common Tin Can Planter Problems
- FAQ
- Experience Notes: of Real-Life Lessons From Making Tin Can Flower Pots
- Conclusion
If your kitchen is anything like mine, tin cans multiply overnight. You buy soup once and suddenly you’re running a small metal drumline.
The good news: those cans are basically pre-made, perfectly plant-sized containers just waiting to become adorable flower pots.
With a little cleaning, a few drainage holes, and some personality (paint! twine! decoupage! tiny mustaches!), you’ll have a lineup of
upcycled planters that look intentionallike you totally meant to be this crafty all along.
This guide walks you through a sturdy, good-looking, long-lasting approach to DIY recycled tin can flower pots, plus design
ideas, planting tips, and common mistakes to avoidso your plants thrive and your cans don’t turn into rusty regret.
Why Tin Cans Make Surprisingly Great Flower Pots
Tin cans (most “tin” cans are actually steel with a thin coating) are lightweight, easy to decorate, and come in convenient sizes for
everything from succulents to basil to bright little annual flowers. And because you’re reusing something you already have, you’re cutting
down on waste while saving moneytwo things that feel extra satisfying when paired with a plant that looks like it has its life together.
Best uses for tin can planters
- Small flowers: pansies, violas, marigolds, petunias (dwarf varieties), impatiens
- Herbs: basil, parsley, thyme, chives (especially on a sunny windowsill)
- Succulents/cacti: if you want low-maintenance + high-style
- Seed starting: short-term home for seedlings before transplanting
- Gift pots: add a plant tag and suddenly you’re “thoughtful”
A quick reality check (so your plants don’t revolt)
The two big issues with tin can planters are drainage and rust. Both are totally manageable:
add drainage holes, use the right potting mix, and seal/line the can if you want it to last longer. If you plan to grow edible plants long-term,
consider using a plastic nursery pot inside the decorated can (more on that below).
Materials and Tools
You can keep this project super simple or go full “craft aisle blackout.” Here’s a practical list that covers both ends of the enthusiasm spectrum.
What you’ll need
- Clean, empty tin cans (soup, beans, tomatoes, coffee cansmix sizes for a cute set)
- Can opener (smooth-edge is ideal) + dish soap
- Sandpaper or metal file (for smoothing sharp edges)
- Hammer + nail or an awl or a drill + metal bit (for drainage holes)
- Primer (spray or brush-on, optional but recommended for longevity)
- Paint (acrylic, spray paint, or outdoor enamel)
- Sealer/topcoat (clear spray sealer, polyurethane, or craft sealer)
- Potting mix (not garden soil)
- Small stones or mesh/screen (optional, to keep soil from escaping holes)
- Plants or seeds
Optional “make it cute” supplies
- Twine/jute rope, ribbon, washi tape
- Fabric scraps or burlap
- Decoupage supplies (napkins, decorative paper, Mod Podge or similar)
- Stencils, vinyl decals, paint pens
- Hot glue gun (use carefully; hot glue does not forgive)
Step-by-Step: How to Make DIY Recycled Tin Can Flower Pots
Step 1: Clean the can like you mean it
Remove the label (soaking in warm, soapy water helps) and wash the can thoroughly. Sticky residue can be removed with cooking oil, rubbing alcohol,
or a gentle adhesive remover. Dry completelypaint and moisture are not friends.
Bonus: if you’re planning to recycle any leftover cans, remember “spatula-clean” is often considered clean enough for recycling programs.
For planters, though, aim for actually cleanyour windowsill will thank you.
Step 2: Smooth sharp edges (future-you will be grateful)
Even with a smooth-edge can opener, rims can have rough spots. Use sandpaper or a metal file around the top edge and any jagged areas.
If you’re making planters with kids, this step is non-negotiable.
Step 3: Add drainage holes (the most important step)
Plants hate “wet feet.” Without drainage holes, water collects at the bottom, roots lose oxygen, and you end up hosting a tiny swamp tragedy.
Add 3–8 holes depending on can size.
Option A: Hammer + nail method
- Place a scrap piece of wood under the can.
- Use a nail and hammer to punch holes in the bottom.
- Make holes around the center and near the edges for better drainage.
Option B: Drill method
- Clamp the can (or hold firmly with gloves) on a stable surface.
- Use a metal drill bit and drill slowly.
- Deburr any sharp metal around holes with sandpaper.
Tip: If you don’t want to drill into metal at all, use the can as a decorative sleeveplace a nursery pot inside, and remove it
to water. This keeps your can prettier longer and makes plant care easier.
Step 4: Prime (optional, but helps prevent rust)
If you want your tin can flower pots to last, use a primer suited for metal. A quick coat helps paint stick and adds a protective layer.
Let it dry fully according to the label.
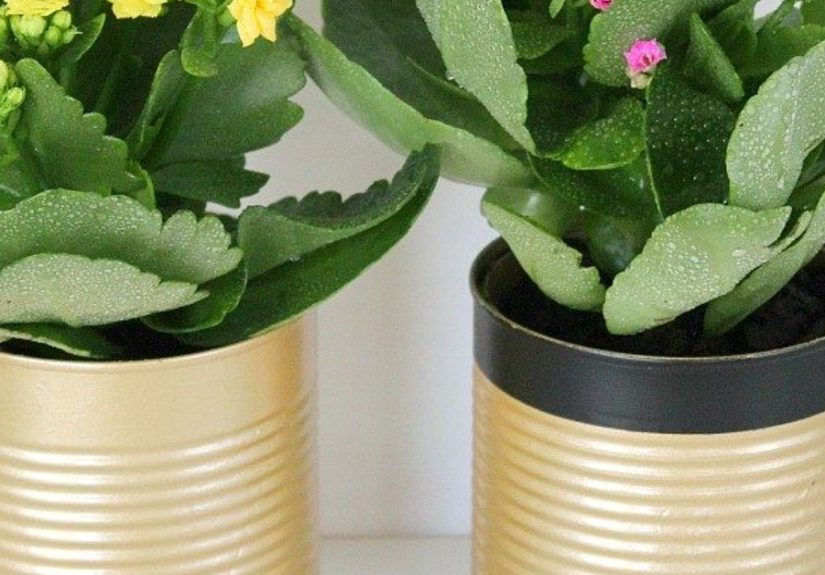
Step 5: Paint and decorate
Now the fun part: turning “bean can” into “boutique planter.” Here are a few proven looks that don’t scream “I made this at 2 a.m.” (unless you want them to).
Simple painted planters (fast + modern)
- Spray paint in light coats to avoid drips.
- Try a two-tone dip effect: paint the bottom half one color and the top half another.
- Add stripes with painter’s tape for crisp lines.
Decoupage planters (pretty + customizable)
- Paint a base coat (light colors work well under napkins/paper).
- Apply a thin layer of decoupage medium.
- Press decorative paper/napkin gently, smoothing wrinkles as you go.
- Seal with 1–2 top coats once dry.
Rustic twine wrap (cozy farmhouse vibes)
- Run hot glue in short sections and wrap twine tightly as you go.
- Finish with a small tag or mini clothespin label.
- Great for herb planters on a kitchen counter.
“Fancy” stenciled planters (aka: looks store-bought)
- Paint the can a solid base color and let it cure.
- Stencil letters (“BLOOM,” “HERBS,” “oops I did it again”) using a foam pouncer.
- Seal gently so the stencil doesn’t smear.
Step 6: Seal it (especially if the pot will live outdoors)
A clear sealer helps protect your design and slow down rust. Use an outdoor-rated clear coat if these will sit on a porch, patio, or balcony.
Apply multiple light coats and let everything cure fully before adding soil.
Step 7: Pot your plants the smart way
Skip garden soilit’s heavy, compacts easily, and can trap water in containers. Use a quality potting mix that drains well but holds enough moisture for roots.
- Cover drainage holes with a small piece of mesh, coffee filter, or screen (optional).
- Add potting mix, leaving about 1 inch of space at the top.
- Plant your flowers/herbs and gently firm the soil.
- Water thoroughly until water drains out the bottom.
Design Ideas: Tin Can Flower Pots That Don’t Look Like… Tin Cans
If you’re making a set, mixing sizes and keeping a consistent theme (colors, patterns, labels) looks more intentional. Think: “curated collection,” not “recycling bin cosplay.”
1) Windowsill herb lineup
Use matching cans with chalkboard labels: basil, thyme, mint, parsley. Keep them in a tray to catch drips. Bonus points if you pretend you’re a chef
every time you pinch a leaf.
2) Hanging tin can planters
Add two holes near the top rim, thread wire or chain through, and hang from a fence or railing. Use lightweight plants and don’t overload the can.
If watering in place is messy, lift down to water and let it drain before rehanging.
3) “Crushed” texture planters
Gently dent or “crumple” the can for an industrial-chic look, then paint it matte or metallic. It’s a great way to hide dents you didn’t plan on
making anyway. (Creative problem-solving is still creativity.)
4) Giftable mini bouquet pots
Small cans + seasonal flowers + a tag = a budget-friendly gift that looks like effort. Add a note: “This used to be soup. Now it’s joy.”
Plant Pairing Tips: What Grows Best in Tin Cans?
Tin cans are typically small containers, which means they dry out faster than big pots. Choose plants that match the can size and your willingness to water.
Best picks for small/medium cans
- Succulents: low watering needs, high style
- Herbs: especially those you harvest often
- Compact flowers: pansies/violas, dwarf marigolds, alyssum
If you want edibles, do this
For edible herbs or veggies, the easiest “safer + cleaner” method is to use your decorated can as a sleeve:
place a plastic nursery pot inside (with drainage), and remove it to water. This reduces contact between moist soil and metal,
helps prevent rust, and keeps your setup tidy.
Care and Maintenance
Watering
Water when the top inch of soil feels dry. In hot weather, small containers can need water oftensometimes daily.
Always water until it drains out, and never let the can sit in a puddle unless the plant is specifically water-loving.
Sunlight
Match plants to your light. Herbs like basil usually want bright light. Impatiens prefer shade. If your plants look scorched,
move the cancontainer gardening is basically “plants with the option to relocate.”
Fertilizer
Potting mix nutrients don’t last forever. For flowers, a balanced fertilizer every few weeks (following label directions) can keep blooms going.
For herbs, don’t overdo ittoo much fertilizer can reduce flavor.
Troubleshooting: Common Tin Can Planter Problems
Problem: Rust spots
Rust happens when moisture meets metal for long periods. Use a liner, add a protective inner coat, or treat the can as seasonal decor.
If rust appears outside, lightly sand, repaint, and reseal.
Problem: Soggy soil / sad plant
Usually a drainage issue. Confirm holes are open and not clogged. Use a lighter potting mix. Avoid packing soil too tightly.
And no, adding a thick layer of rocks at the bottom usually doesn’t “fix” drainage the way people thinkit often just reduces soil space.
Problem: Soil leaks out the holes
Add a coffee filter, mesh, or a small piece of screen over the holes before soil goes in. Easy fix.
Problem: Paint peeling
Clean and dry the can thoroughly before painting, use primer, and let paint cure. Seal with a clear coat.
If you painted over damp metal, the peeling is basically physics doing stand-up comedy at your expense.
FAQ
Can I use any tin can?
Most food cans work. Avoid cans with sharp torn rims. Larger coffee cans make great planters for bigger flowers or multiple herbs.
Do I have to make drainage holes?
If you’re putting soil directly in the can, yes. Drainage holes are the difference between a thriving plant and a tiny root swamp.
If you’re using a nursery pot insert, the can can stay hole-free.
Are tin can planters good for outdoor use?
They can be, especially if painted and sealed well. But expect more wear outdoors. If you want long-lasting outdoor planters,
treat tin cans as seasonal accents or use the nursery-pot-inside method.
Experience Notes: of Real-Life Lessons From Making Tin Can Flower Pots
The first time I made tin can planters, I thought the “hard part” would be painting. Nope. The hard part was discovering that
plants are picky about the unglamorous stufflike drainage, airflow, and not sitting in a mini bathtub 24/7. My earliest batch
looked amazing for about three days, and then the leaves got droopy in that dramatic way that says, “I am suffering, and I want you to notice.”
Once I stopped taking it personally, I learned a few lessons that made every future tin can planter way more successful.
First: hole placement matters. I used to punch one heroic hole in the center of the can like I was stamping a passport.
It drained… kind of. But water still pooled along the edges, and roots weren’t thrilled. Now I do several holes, including near the outer edge,
and it makes a real difference. Second: don’t skip smoothing. You might think, “It’s fine, it’s just a little sharp.”
That’s what people say right before they catch a finger on a burr and suddenly become extremely passionate about sandpaper.
Third: paint is not magic armor. I once painted a can, didn’t seal it, and set it outside like it was a durable outdoor fixture.
After a few rainstorms, the finish dulled, the bottom started spotting, and I realized tin cans are not secretly made of superhero metal.
If you want them outdoors, sealing helps. If you want them outdoors for a long time, an inner liner helps even more.
These days, for herbs I plan to actually eat, I often use the “decorative sleeve” method: a plastic nursery pot inside the pretty tin can.
It’s cleaner, it’s easier to water, and it keeps the can from rusting out at the bottom. Plus, if a plant struggles, you can swap it out
without dumping soil everywhere like a tiny gardening crime scene.
Fourth: small containers dry out fast. Tin cans are adorable, but they’re not roomy.
A hot sunny window can turn a small herb can into a desert by late afternoon. My workaround is grouping cans in a shallow tray
(not deep waterjust a drip catcher), using a moisture-check habit (finger test works), and choosing plants that match my schedule.
Succulents are perfect if you want “looks good, low drama.” Basil, on the other hand, is the friend who texts you six times a day if you forget to water.
Lastly: sets look better than solos. One tin can planter is cute. Five matching planters with coordinated colors and labels looks like design.
When I started doing simple themeslike matte white cans with black lettering, or decoupaged floral cans with the same ribbon trimthe whole project
leveled up. And that’s the best part: tin can planters are cheap enough that you can experiment freely. If one turns out weird, congratulations
you’ve made “art,” and the plant doesn’t care as long as it has drainage.
Conclusion
DIY recycled tin can flower pots are one of the easiest ways to turn everyday “trash” into practical, good-looking decor.
Clean the cans well, smooth sharp edges, add proper drainage, and protect your design with primer and sealer. From painted minimal planters to
decoupage showpieces and hanging herb gardens, tin cans give you endless optionswithout demanding a big budget.
Your plants get a home, your kitchen gets less clutter, and you get to enjoy that rare feeling of being both crafty and responsible.


