Table of Contents >> Show >> Hide
- Lavender in a Pot: The 30-Second Success Checklist
- Step 1: Pick the Right Lavender for Containers
- Step 2: Choose a Container That Lavender Won’t Hate
- Step 3: DIY Lavender Potting Mix (AKA “Mediterranean Hillside in a Bucket”)
- Step 4: Plant Lavender in a Container (DIY Step-by-Step)
- Step 5: Where to Put Your Potted Lavender (Sun, Heat, and Wind)
- Step 6: Watering Lavender in Pots (The #1 Mistake and How to Avoid It)
- Step 7: Fertilizer and Feeding (Less Is More)
- Step 8: Pruning Lavender in Containers (Keep It Compact and Blooming)
- Common Problems (and DIY Fixes That Actually Work)
- How to Overwinter Lavender in Containers
- Harvesting Lavender From Pots (Because You Earned It)
- Conclusion
- Real-World Experiences: What Container Lavender Growers Learn the Hard Way (So You Don’t Have To)
Lavender has a reputation: chic, fragrant, and slightly smuglike it owns a farmhouse in Provence and knows exactly
what “al dente” means. The good news? You don’t need a Mediterranean hillside to grow it. You just need a pot,
the right soil, and the self-control to not water it like a thirsty tomato.
This DIY guide walks you through everything: choosing a container, mixing a gritty lavender-friendly potting mix,
planting step-by-step, and keeping your potted lavender happy through heat, humidity, and winter. If you’ve ever
killed a plant with love (aka overwatering), lavender is here to teach you a new hobby: benign neglect.
Lavender in a Pot: The 30-Second Success Checklist
- Sun: Full sun is non-negotiable (aim for 6–8+ hours).
- Drainage: The pot must have drainage holes. Lavender hates soggy roots.
- Soil: Well-draining, slightly gritty, and not overly rich.
- Watering: Deep but infrequent. Let the mix dry down between waterings.
- Airflow: Good circulation helps prevent fungusespecially in humid climates.
Step 1: Pick the Right Lavender for Containers
Most lavender can live in a container, but some types behave better than othersespecially when winter shows up
uninvited. The trick is matching the variety to your climate and your goals (big blooms, strong fragrance, or
“please survive my patio”).
Best lavender types for pots
-
English lavender (Lavandula angustifolia): Typically the most cold-hardy and a favorite for
fragrance and drying. Popular compact cultivars for containers include ‘Munstead’ and ‘Hidcote’. -
Lavandin (Lavandula x intermedia): Often larger with lots of blooms and strong scent, but it can
need more space. Better in bigger pots. -
Spanish/French types (often L. stoechas / L. dentata): Loved for showy blooms and warm-climate
performance. In many regions, these are less cold-hardy and may need winter protection indoors.
Quick rule of thumb: if your winters are cold, start with English lavender in a pot that can be moved to shelter.
If your summers are hot and humid, prioritize airflow, sharp drainage, and consider varieties known for tolerance
(nurseries sometimes highlight these traits).
Step 2: Choose a Container That Lavender Won’t Hate
Lavender is basically an anti-swamp plant. Containers work beautifully because you can control drainage and soil
texturetwo things that are harder to “negotiate” with clay ground. The container doesn’t have to be fancy, but it
does need to be functional.
Container size: give roots room (but don’t drown them)
- New, small plants: Start with a pot around 10–12 inches wide.
- Established plants: Plan for 14–18 inches wide, especially for vigorous varieties.
- Depth matters: Aim for at least 10–12 inches deep to support roots and stability.
Material: terracotta vs. plastic vs. glazed
-
Terracotta: Breathes and helps the mix dry fastergreat for lavender, especially if you’re an
“oops I watered again” person. - Glazed ceramic: Holds moisture longer; works if your mix is extra gritty and your watering is disciplined.
- Plastic: Lightweight and affordable, but can stay wetter. Increase grit and check moisture carefully.
Drainage: the dealbreaker
Choose a pot with drainage holes. More than one hole is better. If you fall in love with a pot that has no holes,
either drill them (if the material allows) or use it as a decorative cachepot with a properly holed nursery pot inside.
Step 3: DIY Lavender Potting Mix (AKA “Mediterranean Hillside in a Bucket”)
Lavender thrives in loose, sandy, well-draining conditions. Regular all-purpose potting soil alone is often too
moisture-retentive for lavender in containers. Your mission is to create a mix that drains quickly while still
holding enough moisture for roots to establish.
DIY gritty mix recipe (easy and effective)
- 2 parts high-quality potting mix (not heavy “moisture control” formulas)
- 1 part perlite, pumice, or coarse horticultural grit
- 1 part coarse sand (builder’s sand or sharp sandavoid super-fine play sand)
Want an even simpler shortcut? Many gardeners use a cactus/succulent mix and “lighten” it further with perlite or pumice.
Whichever route you choose, you’re aiming for a texture that feels airy and gritty, not dense and sponge-like.
Soil pH: slightly alkaline is lavender’s comfort zone
Lavender generally prefers neutral-to-slightly alkaline conditions. If you suspect your potting mix trends acidic,
you can blend in a small amount of garden lime (follow label rates). Don’t overdo itthis is seasoning, not frosting.
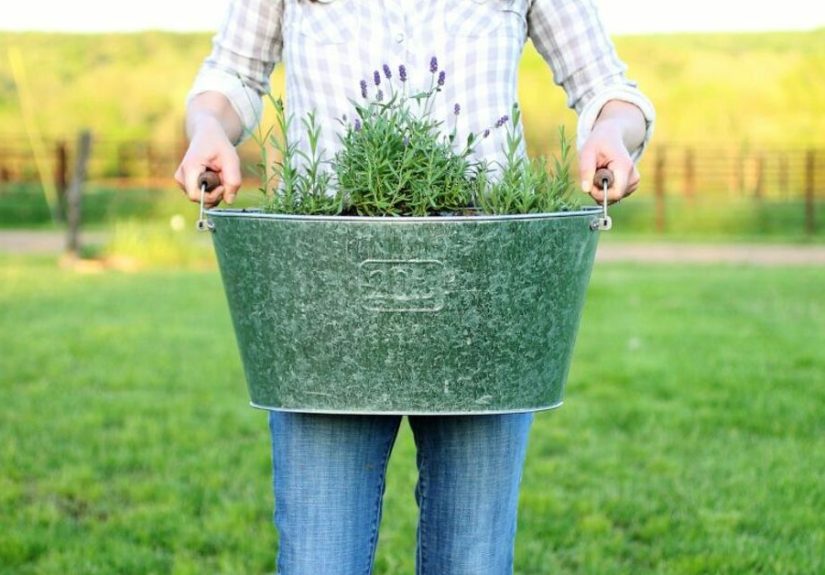
Step 4: Plant Lavender in a Container (DIY Step-by-Step)
Time to plant. This process is simple, but the details matterespecially drainage and planting depth.
DIY supplies checklist
- Container with drainage holes + saucer (optional)
- Gritty potting mix (DIY or store-bought cactus mix amended with grit)
- Lavender plant (healthy, not root-rotted)
- Hand trowel, gloves, and scissors/pruners
- Optional: garden lime, gravel (for top-dressing), and a small piece of mesh/screen
Planting steps
-
Prep the pot: If the drainage holes are large, place a small piece of mesh over them to keep mix
from washing out. Skip the old “rocks at the bottom” mythbetter drainage comes from a well-structured mix, not a rock layer. - Add mix: Fill the pot partway with your gritty mix.
-
Check the plant: Slide lavender out of its nursery pot. If roots are circling tightly, gently loosen the outer layer.
Trim obviously dead or black/mushy roots (a sign of rot). -
Set the planting height: Place the plant so the crown (where stems meet roots) sits at the same level it was growing before.
Don’t bury the crown; that’s an invitation for rot. - Backfill and firm lightly: Add mix around the root ball and press gentlysecure, not compacted.
- Water once to settle: Give a thorough watering right after planting to settle the mix. After that, let it dry down.
-
Top-dress (optional but helpful): Add a thin layer of pea gravel or small stones on top of the mix.
This can reduce splash, discourage fungus, and keep the crown drier.
Step 5: Where to Put Your Potted Lavender (Sun, Heat, and Wind)
Lavender wants bright, direct lightthink “sunbathing enthusiast,” not “cozy reading nook.” Place the pot where it receives
strong sun for most of the day. A south- or west-facing patio is often ideal.
If you live somewhere brutally hot, the plant may appreciate afternoon shade during extreme heat waves, but don’t default to shade.
Weak light usually leads to leggy growth and fewer blooms. Also: airflow matters. If humidity is high, spacing and breezes help keep
foliage dry and happy.
Step 6: Watering Lavender in Pots (The #1 Mistake and How to Avoid It)
Lavender is drought-tolerant once established, but container plants still need consistent carejust not constant wetness.
The most common reason potted lavender fails is roots staying damp for too long.
A practical watering routine
- First 2–4 weeks after planting: Water when the top 1–2 inches of the mix feel dry. Don’t follow a calendarfollow the soil.
- After establishment: Water deeply, then wait until the mix dries noticeably. In warm weather, that may mean weekly; in cooler weather, less.
- Heat wave rule: Check more often, but still water only when the mix has dried down. If your pot is in full sun and dries fast, you may water more frequently.
DIY tip: lift the pot. If it feels light, it’s probably dry. If it feels heavy, it’s still holding moisture. This “pot weight test” is surprisingly accurate
and doesn’t require advanced degrees in plant telepathy.
Step 7: Fertilizer and Feeding (Less Is More)
Lavender generally prefers lean conditions. Too much fertilizer can push leafy growth at the expense of flowersand can make the plant floppier.
If you used a quality mix, your lavender may need little to no feeding in the first season.
Simple feeding guidelines
- Skip heavy fertilizing: Avoid high-nitrogen products.
- If growth is weak: Use a light, balanced slow-release fertilizer in spring (minimal dose), or a gentle compost top-dress.
- Don’t fertilize going into winter: Late-season feeding can encourage tender growth that’s more vulnerable to cold.
Step 8: Pruning Lavender in Containers (Keep It Compact and Blooming)
Pruning is how you prevent lavender from turning into a woody, sparsely-blooming shrub that looks like it’s seen some things.
In containers, pruning also helps maintain shape and keeps plants from getting top-heavy.
How to prune without panic
- After flowering: Snip off spent flower stems and lightly shape the plant. This can encourage tidiness and sometimes additional blooms.
-
Early spring (or after new growth starts): Prune to shape and remove winter damage. Many gardeners reduce the plant by about a third,
but avoid cutting deeply into old, leafless wood that may not regrow. - Goal: Keep a rounded mound with green growth on all sides. Think “lavender pillow,” not “lavender scarecrow.”
Common Problems (and DIY Fixes That Actually Work)
Yellow leaves and drooping
Often a watering issueeither too frequent watering or a mix that stays wet too long. Fix it by letting the container dry down more between watering,
increasing grit, improving airflow, and ensuring the pot drains freely.
Root rot (mushy roots, bad smell, sudden decline)
This happens when lavender sits wet. If caught early, remove the plant, trim damaged roots, and repot in fresh gritty mix. If rot is severe, taking
cuttings from healthy stems may be the best “save.”
Leggy growth with few flowers
Usually not enough sun or inconsistent pruning. Move the pot to a sunnier spot, prune lightly to encourage branching, and avoid high-nitrogen fertilizer.
Humidity struggles (powdery mildew, poor performance)
In humid regions, lavender benefits from sharp drainage, gravel top-dressing, and spacing that allows airflow. Water at the soil level rather than overhead.
If a variety consistently sulks in your climate, consider trialing a different type that handles humidity better.
How to Overwinter Lavender in Containers
Winter care depends on the lavender type and your USDA hardiness zone. Containers expose roots to colder temperatures than in-ground plants,
so potted lavender may need protection even if that variety is “hardy” in your zone.
Overwintering options (choose what fits your climate)
- Mild winters: Leave pots outside in a sheltered spot (out of harsh wind), keep the mix on the dry side, and ensure drainage stays open.
-
Cold winters: Move the pot to an unheated garage, shed, or protected porch where it stays cool but not brutally exposed.
Provide light if possible, and water sparinglyjust enough to prevent the roots from desiccating. -
Indoor overwintering (for less hardy types): Place near a very bright window or use a grow light. Keep temperatures cooler than typical houseplants prefer,
and avoid overwatering.
DIY winter pro move: cluster pots together near a wall for extra protection and wrap containers with burlap or frost cloth if temperatures plunge.
The goal is to protect roots while keeping the crown drylavender hates cold and soggy.
Harvesting Lavender From Pots (Because You Earned It)
Harvest when several florets on the stem have opened but before they all fade. Cut stems in the morning after dew dries for best fragrance.
Bundle small bunches and hang them upside down in a dark, dry, well-ventilated place to preserve color and scent. Dried lavender is excellent for sachets,
simple crafts, and culinary use (only if you’re using varieties intended for cooking and avoiding any chemical treatments).
Conclusion
Growing lavender in containers is one of the most satisfying DIY gardening projects you can do: it smells amazing, looks elegant, and doesn’t demand
daily attentionprovided you get the fundamentals right. Choose a sunny spot, use a gritty well-draining potting mix, water with restraint, prune with
purpose, and give roots winter protection when needed. Do that, and your patio can smell like a spa without the spa membership fees.
Real-World Experiences: What Container Lavender Growers Learn the Hard Way (So You Don’t Have To)
If you ask a handful of gardeners about growing lavender in pots, you’ll hear a pattern: the plant usually doesn’t die from “lack of care.” It dies from
extra care. One of the most common experiences is the “helpful watering spiral.” The plant looks a bit droopy during a hot afternoon, so it gets
watered. The next day, it still looks tired (because lavender can droop temporarily in heat), so it gets watered again. Soon, the roots are sitting in damp
mix, oxygen disappears, and the plant starts yellowing. Many growers eventually learn to check moisture with a finger test or pot-weight test and to water
in the morning when it’s easier to read what the plant actually needs.
Another frequent lesson is that pot choice affects everything. People who switch from a moisture-holding plastic pot to terracotta often notice
fewer watering problems and sturdier growthespecially in humid climates. On the flip side, gardeners in very dry, windy regions sometimes find terracotta
dries so fast that they need a slightly larger pot or a bit more organic component in the mix to keep the plant from going bone-dry. The “best” container is
the one that matches your weather and your watering habits, and it’s normal to adjust after a season of observation.
Growers also talk a lot about the “soil revelation.” Many people start with regular potting soil because it’s convenient, and then wonder why lavender struggles.
Once they add gritperlite, pumice, coarse sand, or a cactus-mix basegrowth becomes noticeably healthier. It’s not that lavender needs fancy ingredients; it
needs the right structure. Several gardeners describe their breakthrough moment as realizing that lavender wants a mix that drains quickly, even if that
feels counterintuitive compared to how they treat thirstier container plants.
Pruning is another area where experience shapes success. Beginners sometimes avoid pruning because they’re afraid of cutting off flowers, then end up with a leggy,
woody plant that blooms only at the tips. More experienced growers tend to do light shaping after flowering and a more purposeful prune when new growth begins in spring,
keeping the plant rounded and full. The common takeaway: consistent, gentle pruning helps lavender stay compact in a pot, which is especially important on balconies where
wind can topple a top-heavy plant.
Overwintering stories are where container lavender gets dramatic. Some gardeners assume a “hardy” label means the pot can stay outside all winter, then lose the plant
after a freeze-thaw cycle because the roots in a container get colder than roots in the ground. Others bring lavender indoors to a warm room and accidentally create a
perfect storm of low light and overwatering. The more successful experiences usually involve cool-but-protected shelter (like a garage or covered porch), very bright light
if the plant is kept indoors, and minimal wateringjust enough to keep the root system from drying out completely.
Finally, many container lavender growers love the small “quality of life” upgrades that come with practice: top-dressing with gravel to keep the crown dry, placing pots
where breezes help prevent fungus, rotating the container every week or two for even growth, and planting companion pots nearby (like rosemary or thyme) that enjoy similar
sun-and-drainage conditions. The overall experience is that lavender becomes easier every seasonbecause you’re not just growing a plant, you’re learning a climate-specific,
balcony-specific, you-specific routine. And once you nail it, you’ll understand why people get a little smug about lavender. It’s not arrogance. It’s aromatherapy.


