Table of Contents >> Show >> Hide
- What You’re Fixing: The Simple Physics Behind Sash Cords
- Tools and Materials You’ll Want on Camera
- Safety and Prep (A.K.A. Don’t Let the Window Fight Back)
- Step-by-Step: How to Replace Sash Cords (Video-Style Walkthrough)
- Step 1: Open the window and locate the interior stops
- Step 2: Carefully remove the interior stops
- Step 3: Remove the lower sash
- Step 4: Remove the parting bead to access the upper sash
- Step 5: Remove the upper sash
- Step 6: Find the weight pocket doors (or access panels)
- Step 7: Retrieve the weights and remove old cord
- Step 8: Measure and cut your new cord (without guessing)
- Step 9: Thread the new cord over the pulley
- Step 10: Tie the cord to the sash weight
- Step 11: Set cord length and attach it to the sash
- Step 12: Reinstall the sashes and trim in reverse order
- Step 13: Test operation and fine-tune
- How to Make Your “How To Replace Sash Cords” Video Actually Helpful
- Troubleshooting: When the Window Still Acts Weird
- When to Call a Pro (and When to Consider Spring Balances)
- Cost, Time, and Payoff
- Extra: Real-World Experiences Replacing Sash Cords (The Part Videos Don’t Always Show)
- Conclusion
If your old double-hung window either (a) slams shut like it’s mad at you, (b) refuses to stay open, or (c) makes a dramatic “thunk” sound inside the wall,
chances are the sash cord has snapped. The good news: replacing sash cords is one of those old-house repairs that looks like wizardry on video, but is actually
a very learnable, very satisfying DIYespecially when you know what’s happening inside the jamb.
This guide is written “video-style”: clear steps, good camera angles (even if your camera is just your eyeballs), and the little details that keep you from
accidentally donating a cast-iron sash weight to the inside of your wall. Let’s get those windows gliding again.
What You’re Fixing: The Simple Physics Behind Sash Cords
Traditional wood double-hung windows use a cord-and-weight system. Each sash (top and bottom) is connected on both sides to cords that run up and over a pulley,
then down into a hidden pocket where cast-iron weights hang. Those weights counterbalance the sash so you can lift it with two fingers instead of a full-body squat.
When a cord breaks, the weight drops into the pocket. The sash loses its counterbalance and either won’t stay open or becomes hard to lift. The repair is basically:
remove sash → access weights → thread new cord → tie weight → set cord length → reattach sash.
The “video trick” is keeping everything controlled: don’t let weights free-fall, don’t yank cords like you’re starting a lawnmower, and label parts so everything
goes back where it came from.
Tools and Materials You’ll Want on Camera
Basic tools
- Utility knife (for scoring paint lines so trim comes off cleanly)
- Putty knife or thin pry tool (to protect wood while prying)
- Small pry bar and a hammer
- Screwdriver (flat and Phillipsold windows love variety)
- Pliers (for pulling nails/staples and persuading stubborn knots)
- Tape measure + pencil/marker
- Step stool or small ladder
- Shop vacuum (because old window pockets hoard dust like it’s a retirement plan)
Materials
- New sash cord (typically cotton sash cord or a high-quality cord made for sash windows)
- Optional: sash chain (a durable alternative that can work with some pulleys/weights)
- Fasteners as needed: small nails, screws, or staples (depending on how your sash attaches)
- Wax or dry lubricant for the tracks and pulleys (optional but lovely)
Choosing the right sash cord (don’t overthink it, but don’t cheap out)
Use cord sold as “sash cord” rather than generic rope. Sash cord is designed to flex over pulleys, resist wear, and keep a stable diameter. Many restorers prefer
quality cotton sash cord (often with a reinforcing core) because it ties well and behaves predictably. Ultra-stretchy cord is the enemy of a window that’s supposed
to balance.
Cord vs. chain vs. modern balances
If your goal is historic accuracy and smooth operation, cord (or chain) with the original weights is usually the best path. If you’re replacing sashes or converting
the system, modern spring balances or sash replacement kits existbut that’s a different project with different parts. For most homeowners: re-cording is the simplest
“get it working again” repair.
Safety and Prep (A.K.A. Don’t Let the Window Fight Back)
- Glass is fragile. Move the sashes carefully and set them on a padded surface.
- Weights are heavy. Keep a firm grip when you open the pocket. A falling weight can damage the jambor your toes.
- Old paint may contain lead. If your home is older, use lead-safe practices: minimize dust, avoid dry sanding, and clean thoroughly.
- Score paint lines first. Most trim damage happens because paint has glued everything together.
Pro tip: before removing anything, take 30 seconds to film (or photograph) the window from a few angles. When you’re reinstalling the stops and parting bead, that
quick reference is gold.
Step-by-Step: How to Replace Sash Cords (Video-Style Walkthrough)
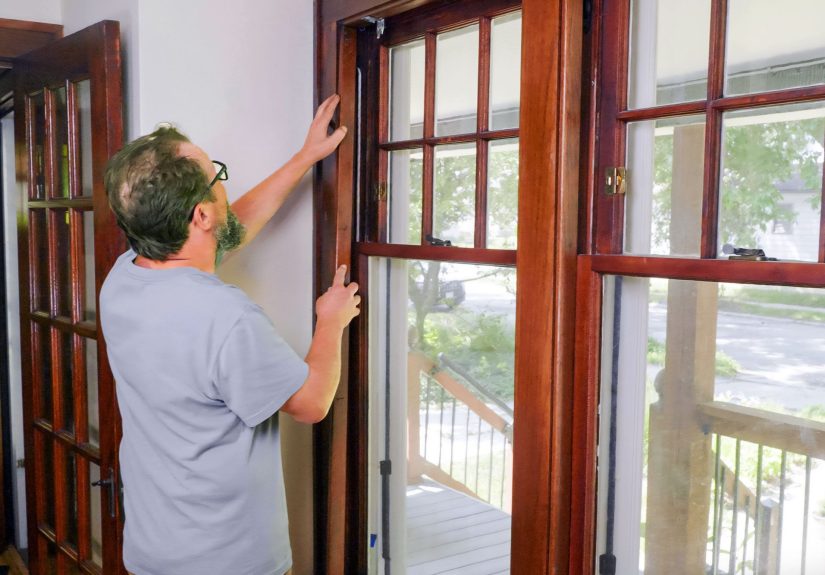
Step 1: Open the window and locate the interior stops
Interior stops are the vertical trim pieces that keep the lower sash from falling inward. Use a utility knife to score along paint lines where the stop meets the
jamb and casing. This single step prevents splintered trim and language that would get your video demonetized.
Step 2: Carefully remove the interior stops
Work a putty knife behind the stop to protect the wood, then gently pry. If nails resist, pry a little at several points instead of forcing one spot. Label the
stop (“left” / “right”) so it returns to the same side.
Step 3: Remove the lower sash
With stops off, the lower sash should swing or lift out. Some windows have sash cords attached via a knot tucked into a side groove; others use a screw, clip, or
staple. Detach both sides.
Important: If a cord is still attached but frayed, don’t just cut it and walk awaytie a temporary knot or clamp it so the weight doesn’t drop
into the pocket.
Step 4: Remove the parting bead to access the upper sash
The parting bead is the thin strip that separates the upper and lower sash tracks. It’s usually friction-fit (and often painted in place). Pry gently and try not
to snap it; replacements exist, but reusing original wood is nicer and quicker.
Step 5: Remove the upper sash
With the parting bead out, remove the upper sash the same way: detach cords on both sides and set the sash on a padded surface.
Step 6: Find the weight pocket doors (or access panels)
Many cord-and-weight windows have small rectangular access doors on the side jambs. They might be painted shut, so score paint seams and gently pry them open.
Inside, you’ll see the weights (or the space where they should be).
If you don’t see access doors, you may need to remove interior casing to reach the pocket. Don’t panicjust realize your “ten-minute video” may become a “two-coffee
video.” The process is still the same once you get access.
Step 7: Retrieve the weights and remove old cord
Pull each weight out slowly. If the old cord is still attached, remove it from the weight and the pulley path. Set the weight down gently (your floor has feelings).
Step 8: Measure and cut your new cord (without guessing)
A reliable method is to measure from the top of the pulley down to the sill and add extra for knots and attachment. If you prefer a more precise approach, you can
temporarily position the sash in the opening and mark cord length where it meets the sash attachment pointthen add a little extra for tying.
Step 9: Thread the new cord over the pulley
If an old cord is still routed over the pulley, you can use it as a “messenger”: tie the new cord to the old one and pull it through. If the cord is completely
gone, use a thin string with a small nut/washer tied to the end as a weighted leader. Feed it over the pulley and down into the pocket, then use it to pull the
sash cord into place.
Step 10: Tie the cord to the sash weight
Thread the cord through the weight’s hole (or attachment point) and tie a secure knot. Many DIYers use a figure-eight style stopper knot or a solid square knot,
as long as it’s tight and won’t pull through. Tug-test it firmly before returning the weight to the pocket.
Lower the weight back into the pocket slowly while keeping tension on the cord. Make sure the cord rides smoothly in the pulley groove.
Step 11: Set cord length and attach it to the sash
This is where videos usually zoom in. You want the cord length set so the sash can travel fully without the weight bottoming out too early or smacking the pulley.
A practical approach:
- Hold the sash near its installed position.
- Pull the cord down to the sash attachment point and mark it.
- Add enough extra length for your knot/fastener method.
- Attach the cord to the sash (knot in the side groove, screw/clip, or staplematch the original method if possible).
Repeat for the other side of the same sash. Then repeat the entire cord/weight process for the second sash.
Step 12: Reinstall the sashes and trim in reverse order
- Reinstall the upper sash first.
- Reinstall the parting bead.
- Reinstall the lower sash.
- Reinstall interior stops, leaving a tiny clearance so the sash moves freely.
Step 13: Test operation and fine-tune
Raise and lower each sash several times. Listen for rubbing, watch for cords slipping, and confirm the sash stays where you put it. If it creeps downward, the
weights may be too light (or missing). If it rockets upward, weights may be too heavy. Most original weights are sized correctly; problems usually come from missing
weights, mismatched replacements, or incorrect cord length/attachment.
How to Make Your “How To Replace Sash Cords” Video Actually Helpful
If you’re filming this repair (or just want to think like a good instructor), focus on clarity. The best DIY videos show hands, hardware, and the “why” behind the
stepnot 14 minutes of someone’s forehead and a single screw.
Best shots to include
- Close-up of scoring paint lines before prying trim
- Stop removal technique (putty knife protecting the jamb)
- Parting bead removal (slow, gentle, “please don’t break” energy)
- Weight pocket door location and how it opens
- Threading the cord over the pulley (this is the magic moment)
- Knot detail on the weight and attachment detail on the sash
- Final test: sash stays open at mid-height
What to say out loud (so viewers don’t repeat your mistakes)
- “Score paint lines first.”
- “Don’t let the weight dropcontrol the cord.”
- “Match the original attachment method if possible.”
- “Label your trim pieces so everything goes back cleanly.”
Troubleshooting: When the Window Still Acts Weird
The sash won’t stay up
- Weight is missing, too light, or disconnected.
- Cord is slipping at the sash attachment.
- Cord length is wrong and the weight is bottoming out early.
The sash is hard to move
- Paint buildup is binding the sash or parting bead.
- Pulley is dirty or seized; a little cleaning and light lubrication helps.
- Stops were reinstalled too tight against the sash.
The cord frays quickly
- Pulley edge is sharp or damaged.
- Wrong material (cheap rope or inappropriate synthetic line) is wearing faster than sash cord.
You can’t find the access door
Some windows truly don’t have a neat little door. Others have one that’s been painted so thoroughly it now identifies as “part of the jamb.” Look for a rectangular
outline on the side jamb, score the seams, and pry carefully. If there’s still nothing, you may need to remove casing to access the pocket.
When to Call a Pro (and When to Consider Spring Balances)
Call a pro if the jamb is crumbling, the sashes are rotted, the pulleys are missing, the weights are gone, or you suspect lead paint and can’t work dust-safe.
Otherwise, sash cord replacement is well within DIY range.
Spring balances and modern sash kits can be useful when you’re swapping sashes or converting the system, but they’re not required just because a cord broke.
If your goal is to preserve old windows and keep that buttery-smooth “old house glide,” new sash cords plus a tuned pulley system is hard to beat.
Cost, Time, and Payoff
Typical DIY cost is mostly cord and a few small supplies. The bigger “cost” is patienceespecially if you’re peeling painted-shut trim or dealing with brittle
parting beads. Still, the payoff is huge: windows that open easily, stay where you put them, and don’t try to guillotine your fingers.
And if you’re filming, it’s also one of those rare repairs where the before/after is incredibly satisfying. Viewers love a window that goes from “haunted” to
“smooth operator” in one afternoon.
Extra: Real-World Experiences Replacing Sash Cords (The Part Videos Don’t Always Show)
The first time you replace sash cords, you learn that old windows have personalities. Some are friendly and cooperative. Others act like you owe them money.
My favorite “experience lesson” is how much the job is about control, not strength. The window isn’t heavy in a gym sensewhat’s heavy is the surprise
factor when a weight drops and you realize your wall cavity is basically a tiny elevator shaft.
One classic moment: you open the pocket door and see decades of dust, a stray nail, and what appears to be an ancient breadcrumb from 1947. You think, “How bad
could it be?” Then you reach in and discover the weight is hiding in the back like a shy turtle. That’s when you learn the value of calm persistence: slow pull,
steady grip, and absolutely no sudden yanks. Sudden yanks are how cords whip off pulleys and weights do unplanned bungee jumps.
Another real-life detail: the trim removal is often the make-or-break part. In videos, the stop bead pops off like it’s magnetically attached. In real homes,
it’s usually welded on by paint, time, and spite. Scoring paint lines feels like a boring extra stepuntil you skip it once and peel off a chunk of wood that
instantly turns your “quick repair” into “how to fill and repaint trim.” After that, you become a scoring enthusiast. You score everything. You might even score
your sandwich out of habit.
Knot confidence is also something you build fast. The first knot you tie to a sash weight? You stare at it like it’s a suspicious email attachment. Then you do
the tug testhardand realize: this is either secure or you’re about to invent a new percussion instrument inside your wall. After a couple of windows, you start
tying knots like you’ve been doing it for years. You develop preferences. You have opinions. You become the kind of person who says, “I’m a figure-eight stopper
knot household,” which is not something you expected to happen when you woke up that morning.
There’s also a weird joy in putting the sashes back and testing them. The first lift after re-cording is pure satisfaction. The sash rises smoothly, pauses where
you leave it, and you feel like you just restored order to the universeone pulley at a time. If you’re filming, that’s your money shot: a calm, steady window
staying open at mid-height like it’s showing off.
Finally, the biggest “experience takeaway” is that sash-cord repair teaches you to respect old-house systems. They’re not fragile; they’re maintainable. They were
designed to be serviced, and once you understand them, they’re surprisingly elegant. You’re not just fixing a windowyou’re reconnecting a little piece of smart
engineering that’s been working for generations. Also, you’re preventing your window from trying to eat your fingers. That’s a win-win.


