Table of Contents >> Show >> Hide
- Why Photos Appear Sideways on Android
- How to Rotate Photos in Google Photos on Android: Quick Steps
- Step-by-Step Guide to Rotating a Photo in Google Photos
- Save vs. Save as Copy: What Is the Difference?
- How to Rotate a Photo Before Sharing It
- Can You Batch Rotate Multiple Photos in Google Photos?
- How to Rotate Screenshots in Google Photos
- How to Rotate Downloaded Images
- How to Fix the Rotate Button Missing in Google Photos
- Why the Photo Looks Rotated in Google Photos but Sideways Elsewhere
- Does Rotating a Photo Reduce Quality?
- Best Practices for Rotating Photos on Android
- Common Examples: Which Rotation Tool Should You Use?
- Google Photos Rotation vs. Android Auto-Rotate
- Should You Use Google Photos or Another Photo Editor?
- Troubleshooting: Rotation Won’t Save
- Extra Experience: What It Is Really Like to Rotate Photos in Google Photos on Android
- Conclusion
There are few tiny digital annoyances more dramatic than opening a great photo and realizing it is lying sideways like it fainted. Maybe your dog looks like he is climbing a wall. Maybe your sunset is suddenly vertical. Maybe your group selfie has everyone leaning like they are on a sinking ship. The good news is simple: learning how to rotate photos in Google Photos on Android takes less time than explaining to your relatives why every holiday photo looks like it was taken during an earthquake.
Google Photos is one of the easiest Android apps for fixing sideways, upside-down, or slightly crooked images. Whether you are using a Google Pixel, Samsung Galaxy, Motorola, OnePlus, or another Android phone, the basic process is usually the same: open the photo, tap Edit, go to the crop or rotation tools, rotate the image, and save your changes. That is the short version. This guide gives you the full version, with clear steps, troubleshooting tips, examples, and practical advice for keeping your photo library neat, shareable, and free of accidental sideways masterpieces.
Why Photos Appear Sideways on Android
Before rotating a photo, it helps to know why the problem happens. Android phones rely on camera sensors and orientation data to decide whether a picture should display in portrait or landscape mode. Most of the time, this works perfectly. But sometimes the phone is tilted, the sensor reads the angle incorrectly, the camera app saves orientation data oddly, or another app displays the image differently.
In simple terms, your photo may be correct, but the instruction telling apps how to display it may be confused. Think of it as a perfectly good sandwich with the label stuck on upside down. Google Photos can usually fix the display orientation by rotating and saving the image properly.
How to Rotate Photos in Google Photos on Android: Quick Steps
If you only need the fastest answer, follow these steps:
- Open the Google Photos app on your Android phone.
- Tap the photo you want to rotate.
- Tap Edit at the bottom of the screen.
- Tap Crop or open the crop/rotate section.
- Tap the rotate icon, usually shown as a curved arrow or rotation symbol.
- Tap it again until the photo faces the correct direction.
- Tap Save or Save as copy.
That is it. Your sideways photo has been promoted back to upright citizen status.
Step-by-Step Guide to Rotating a Photo in Google Photos
Step 1: Open Google Photos
On your Android device, open the Google Photos app. The app icon usually looks like a colorful pinwheel. If you cannot find it, swipe up to open your app drawer and search for “Photos.” Make sure you are using the Google Photos app, not just your phone’s default Gallery app, because some Android brands include their own photo apps with different buttons and menus.
Step 2: Choose the Photo You Want to Rotate
Scroll through your library and tap the image that needs fixing. You can rotate camera photos, downloaded images, screenshots, and many pictures saved from messaging apps. However, the available save options may vary depending on where the photo is stored, whether it is backed up, and whether Google Photos has permission to edit it.
Step 3: Tap Edit
Once the photo is open, look near the bottom of the screen for the Edit button. It may appear as a word or as an editing icon, depending on your app version and screen size. Tap it to open Google Photos’ editing workspace.
This is where Google Photos keeps tools for suggestions, filters, adjustments, cropping, rotation, markup, and other edits. You do not need a professional editing degree. You just need to find the rotation button and politely tell your photo to stand up straight.
Step 4: Open the Crop Tool
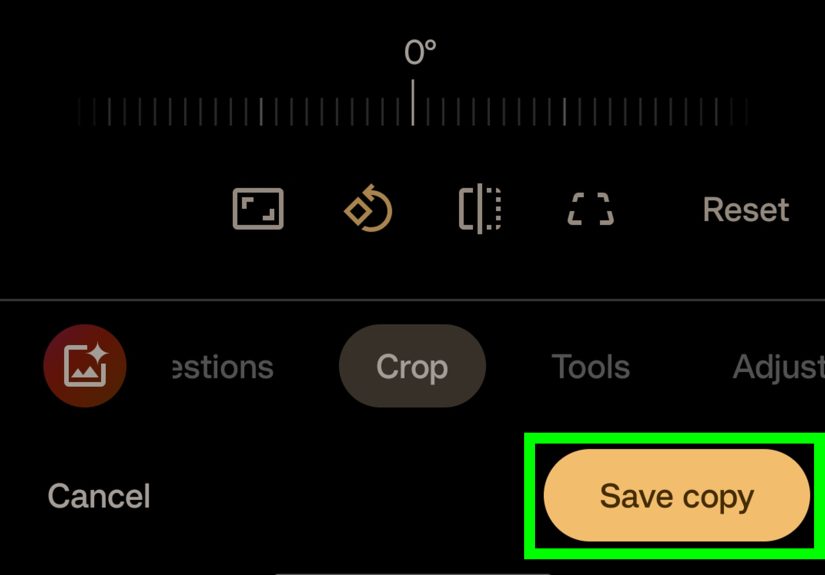
In most current versions of Google Photos on Android, rotation tools are found inside the Crop area. Tap Crop in the editing menu. If you do not immediately see the word “Crop,” swipe through the tool options at the bottom until it appears.
The crop section may include tools for trimming edges, adjusting the angle, changing aspect ratio, straightening a crooked horizon, flipping an image, and rotating it 90 degrees at a time. Google occasionally updates the editor layout, so the exact visual design can change, but the rotate feature usually stays near crop and angle controls.
Step 5: Tap the Rotate Icon
Look for a rotate symbol. It often looks like a square or arrow turning in a circular direction. Tap it once to rotate the photo 90 degrees. If the image is still not right, tap again. Four taps usually bring the photo back to where it started, which is useful if you get overly enthusiastic and spin the image like a game-show wheel.
Use this tool when a photo is sideways or upside down. For example, if a landscape photo appears vertical, one tap may fix it. If a portrait photo is upside down, two taps may rotate it 180 degrees.
Step 6: Straighten a Slightly Crooked Photo
Not every rotation problem is a full sideways disaster. Sometimes a photo is only slightly tilted. Maybe the table line slopes downward. Maybe the beach horizon looks like the ocean is draining to the left. In that case, use the straighten or angle adjustment tool inside the crop area.
Instead of rotating the picture by 90 degrees, drag the angle slider left or right until the image looks level. Google Photos may show a grid to help you line up horizons, walls, floors, or other straight edges. This is especially helpful for architecture photos, food shots, product images, scanned documents, and travel pictures.
Step 7: Save the Rotated Photo
When the photo looks correct, tap Save, Save copy, or Save as copy, depending on what appears. If you see Save, Google Photos may apply the edit to the original image while still allowing you to revert later in some cases. If you see Save as copy, the app will create a new edited version and keep the original unchanged.
Neither option is “wrong.” Saving over the original keeps your library cleaner. Saving as a copy protects the original, which is useful if you are editing an important image, a document, or a photo you may want to restore later.
Save vs. Save as Copy: What Is the Difference?
The difference matters because it affects how your photo library looks afterward. Save usually updates the selected image with your edit. Save as copy creates a second version of the same image with the rotation applied. This means you may see both the sideways original and the corrected copy in your library.
Google Photos may offer different save options depending on the type of image, whether the photo is backed up, whether it came from a shared album, and whether the edit is considered reversible. If you only get “Save as copy,” do not panic. The app is simply protecting the original or working around file-permission limits.
After saving a copy, you can delete the old sideways version if you no longer need it. Just double-check that the rotated version looks right before sending the original to digital retirement.
How to Rotate a Photo Before Sharing It
If you are about to share a photo and notice it is turned the wrong way, it is better to rotate it first in your library. Open the image, use Edit, fix the rotation, save it, and then share the corrected version.
Some Android versions and Google Photos updates may offer quick editing options during the sharing process, such as cropping or enhancing. However, for reliable rotation, the regular editor is still the safer path. It gives you more control and helps ensure the corrected photo remains in your library instead of only being changed for one sharing session.
Can You Batch Rotate Multiple Photos in Google Photos?
Google Photos is excellent for quick single-photo fixes, but batch rotation is limited. In many cases, you cannot select ten sideways photos and rotate all of them at once inside the Android app. You usually need to open each photo, tap Edit, rotate it, and save it individually.
Yes, that is mildly annoying. It is the kind of small inconvenience that makes you question your life choices while rotating vacation photos one by one. If you have many images that need the same correction, consider using a dedicated photo management tool on a computer. For everyday Android use, though, Google Photos is still convenient for fixing a few problem images quickly.
How to Rotate Screenshots in Google Photos
Screenshots can be rotated just like regular photos. Open the screenshot, tap Edit, choose Crop, tap the rotate icon, and save. This is useful when you capture something while your phone is in landscape mode or when a screenshot from a video call, game, map, or document appears sideways.
One thing to remember: screenshots may sometimes show only Save as copy. That is normal. Google Photos may create a new corrected file instead of changing the original screenshot. After saving the rotated copy, you can delete the old one if you want a cleaner library.
How to Rotate Downloaded Images
Downloaded images can also be edited in Google Photos if the app can access the folder where they are stored. If the image does not appear in your main Photos view, check Collections, On this device, or your device folders. Open the image, tap Edit, go to Crop, rotate, and save.
If Google Photos cannot edit or save the downloaded image, check your app permissions or move the file to a folder that Google Photos can access. You may also need to use your phone’s file manager or default Gallery app for certain downloaded files.
How to Fix the Rotate Button Missing in Google Photos
If you cannot find the rotate button, try these fixes:
- Update Google Photos: Open the Google Play Store, search for Google Photos, and tap Update if available.
- Look inside Crop: Rotation is often grouped with crop and straighten tools, not displayed on the first editing screen.
- Swipe the tool row: Some editing options are hidden off-screen until you swipe left or right.
- Restart the app: Close Google Photos completely and reopen it.
- Check file access: If the image is stored in a restricted folder, Google Photos may not show all editing options.
- Try your phone’s Gallery app: Samsung Gallery, Google Gallery, or another default photo app may offer a rotate button for local files.
Why the Photo Looks Rotated in Google Photos but Sideways Elsewhere
Sometimes a photo looks fine in Google Photos but sideways in another app, such as email, a website uploader, messaging software, or a social media tool. This can happen because different apps read orientation data differently. One app may respect the photo’s display instructions, while another may ignore them.
The best fix is to open the photo in Google Photos, rotate it, and save a new copy. Creating a new edited file can help “bake in” the correct orientation, making it more likely to display properly when uploaded or shared elsewhere.
Does Rotating a Photo Reduce Quality?
For normal use, rotating a photo in Google Photos should not cause a noticeable quality problem. A simple 90-degree rotation is a basic edit, and most people will not see any difference in sharpness, color, or detail. However, repeated editing and saving can sometimes affect image quality depending on file type and compression.
If the photo is important, such as a portfolio image, product picture, family portrait, or document scan, save a copy. That way, you keep the original safe while creating a corrected version for sharing, posting, or printing.
Best Practices for Rotating Photos on Android
To get better results and avoid future frustration, follow these simple habits:
- Rotate the photo before posting it online or sending it to clients.
- Use the straighten tool for small angle fixes instead of a full 90-degree rotation.
- Save a copy when editing important photos.
- Delete duplicate sideways originals only after confirming the corrected version is saved.
- Keep Google Photos updated so the editing interface stays current.
- Use backup if you want edits to sync across devices connected to your Google Account.
Common Examples: Which Rotation Tool Should You Use?
Example 1: A Sideways Landscape Photo
You took a beautiful mountain photo, but it opens vertically. Use the rotate icon once or three times until the horizon is horizontal. Then save the corrected image.
Example 2: An Upside-Down Portrait
Your friend’s portrait appears upside down. Open Edit, go to Crop, and tap rotate twice. Save the result. Your friend no longer looks like they are hanging from the ceiling. Progress.
Example 3: A Crooked Food Photo
Your coffee cup photo is almost perfect, except the table edge is slanted. Use the angle slider, not the 90-degree rotate button. Straighten the table line, crop if needed, and save.
Example 4: A Document Scan
A receipt, form, or handwritten note appears sideways. Rotate it until the text reads normally. For documents, consider cropping the edges too, so the final image looks cleaner and easier to read.
Google Photos Rotation vs. Android Auto-Rotate
Do not confuse rotating a photo with Android’s screen auto-rotate setting. Screen auto-rotate changes how your phone display turns when you physically rotate the device. Photo rotation changes the image file or its saved display orientation.
If your phone screen will not rotate, swipe down to open Quick Settings and check the Auto-rotate setting. If the photo itself is sideways, use Google Photos’ editing tools. One fixes your screen. The other fixes your picture. They are cousins, not twins.
Should You Use Google Photos or Another Photo Editor?
For most people, Google Photos is more than enough. It is already on many Android phones, it is simple, and it keeps rotation tools close to cropping and straightening. If you only need to fix orientation, crop a screenshot, or straighten a sunset, there is no need to download a complicated editing app.
However, if you need batch rotation, advanced export settings, precise compression control, or professional workflow features, a dedicated photo editor may be better. For everyday fixes, Google Photos wins because it is fast, familiar, and unlikely to make you feel like you accidentally opened airplane cockpit software.
Troubleshooting: Rotation Won’t Save
If your rotated photo does not save, try these solutions:
- Check storage space: Your phone may not have enough room to save a new copy.
- Turn on backup for the folder: Some edit options work better with backed-up images.
- Grant permissions: Make sure Google Photos has access to your photos and videos.
- Use Save as copy: If Save is unavailable, create a corrected copy instead.
- Update the app: Bugs in editing tools are often fixed through app updates.
- Clear app cache: In Android settings, clear the Google Photos cache if the editor behaves strangely.
Extra Experience: What It Is Really Like to Rotate Photos in Google Photos on Android
In real-world use, rotating photos in Google Photos on Android is one of those tasks that feels almost too simpleuntil you cannot find the button. The most common experience is this: you open a photo, notice it is sideways, tap around for three seconds, briefly wonder whether technology has betrayed you, then find the rotate option hiding inside the crop tool. Once you know where it lives, the process becomes second nature.
The biggest practical lesson is that Google Photos treats rotation as part of editing, not as a separate “fix orientation” command sitting on the main screen. That makes sense from a design perspective because rotating, straightening, cropping, and changing aspect ratio are all related. But for beginners, it can feel hidden. Many users expect a big rotate button directly under the photo. Instead, they need to tap Edit first, then Crop. After that, the tool is easy.
Another common experience is the surprise of seeing Save as copy instead of Save. This is not always a problem. In fact, it can be helpful. If you are fixing a family photo, a screenshot of a payment receipt, or a product image for a website, having the original preserved is a nice safety net. The downside is library clutter. After rotating several images, you may end up with both the corrected photo and the sideways original. The best habit is to review the new copy immediately, confirm it looks right, and then delete the old version if you no longer need it.
For small angle corrections, the straighten tool is the unsung hero. A 90-degree rotate fixes obvious orientation mistakes, but the angle slider saves photos that are only slightly crooked. Travel photos benefit a lot from this. A beach horizon that tilts by three degrees can make the whole image feel sloppy. Straighten it, crop the edges, and suddenly the picture looks intentional instead of rushed.
One more useful experience: rotate before sharing. If you send the photo first and hope the receiving app displays it correctly, you may be disappointed. Messaging apps, website uploaders, and email clients can interpret orientation differently. When the photo matters, open it in Google Photos, rotate it, save it, and share the corrected version. That extra step can prevent sideways profile pictures, crooked product listings, and document uploads that make readers tilt their heads like confused puppies.
Overall, Google Photos is a reliable tool for rotating photos on Android because it keeps the process quick, visual, and beginner-friendly. It may not be ideal for rotating hundreds of images at once, but for everyday fixes, it does the job well. Once you remember the magic pathPhoto > Edit > Crop > Rotate > Saveyou can rescue sideways images in seconds.
Conclusion
Knowing how to rotate photos in Google Photos on Android is a small skill that saves a surprising amount of frustration. Whether your image is sideways, upside down, slightly tilted, or misbehaving only when shared, Google Photos gives you simple tools to correct it. Open the image, tap Edit, go to Crop, use the rotate or straighten control, and save the result. For important images, use Save as copy to protect the original. For quick everyday fixes, rotate and move on with your life like the calm, organized photo genius you are.


