Table of Contents >> Show >> Hide
- Pick Your Surround Sound Layout (Without Overthinking It)
- Surround Sound Setup Checklist (Gear + Tools)
- Speaker Placement That Makes Movies Sound “Right”
- Front Left / Center / Front Right (the “dialogue and drama” trio)
- Surround Left / Right (the “you are inside the scene” speakers)
- Rear surrounds (only if you’re doing 7.1)
- Dolby Atmos height speakers (the “why did that helicopter feel real?” upgrade)
- Subwoofer placement (a.k.a. “why does the bass vanish in one seat?”)
- Wiring It Up Without Creating a Spaghetti Documentary
- Connect the TV and Sources (HDMI ARC/eARC Done Right)
- Receiver Setup + Calibration (Where the Magic Actually Happens)
- How To Film a “Surround Sound System Setup” Video (That Doesn’t Bore People)
- Fast Troubleshooting (When Something Inevitably Acts Weird)
- Final Tune-Up (Small Tweaks, Big Smiles)
- Conclusion
- Real-World Setup Experiences (The Stuff Guides Don’t Always Admit)
You bought the speakers. You imagined thunder rolling across your living room like a blockbuster trailer.
And then reality hit: a jungle of wires, a receiver with 47 buttons, and a subwoofer that looks like it could rent a studio apartment.
Relax. This guide walks you through how to set up a surround sound system step-by-stepplus how to turn the whole process into a
surround sound system setup video people will actually watch (and maybe even like).
The goal: clean wiring, correct speaker placement, proper receiver settings, and calibration that makes dialogue clear and explosions glorious.
In other words: less “Why is the voice coming from the ceiling?” and more “I paid for the whole soundstage, and I’m using the whole soundstage.”
Pick Your Surround Sound Layout (Without Overthinking It)
Start with the room you have, not the room you saw on YouTube with a projector, acoustic panels, and a suspicious amount of disposable income.
Most home setups fall into a few common formats.
What the numbers mean (5.1, 7.1, 5.1.2…)
- 5.1: Front Left, Center, Front Right + Surround Left/Right + 1 subwoofer.
- 7.1: Adds two rear surround speakers behind you.
- 5.1.2 / 7.1.4: The last number is height speakers for Dolby Atmos (overhead or “height effects”).
If you’re new, 5.1 is the sweet spot: big upgrade, manageable complexity, and most content supports it well.
If your couch is against the back wall, jumping to 7.1 can be tricky. If you love Atmos, aim for 5.1.2 as a realistic first step.
A quick room reality check
Your room’s layout matters more than the speaker brand name on the box. A few practical truths:
open floor plans leak bass like a sieve, hard surfaces create echo, and a sofa shoved against the back wall makes “rear” speakers mostly decorative.
You can still get fantastic resultsjust plan placement with your space in mind.
Surround Sound Setup Checklist (Gear + Tools)
Before you start moving furniture like you’re reenacting a sitcom montage, make sure you have the basics:
- AV receiver (or a surround processor/amp) that supports your layout (5.1, 7.1, Atmos, etc.).
- Speakers: L/C/R, surrounds, optional rears, optional heights.
- Subwoofer (powered, almost always).
- Speaker wire (enough length, plus a little extra because you will measure wrong once).
- HDMI cable for TV-to-receiver using ARC/eARC (if applicable).
- Tripod or stand for the calibration mic (seriouslybalanced on a throw pillow is how chaos begins).
- Painter’s tape + marker for labeling cables and marking test positions.
- Optional but great: banana plugs, a cable raceway kit, a simple SPL meter app, and patience.
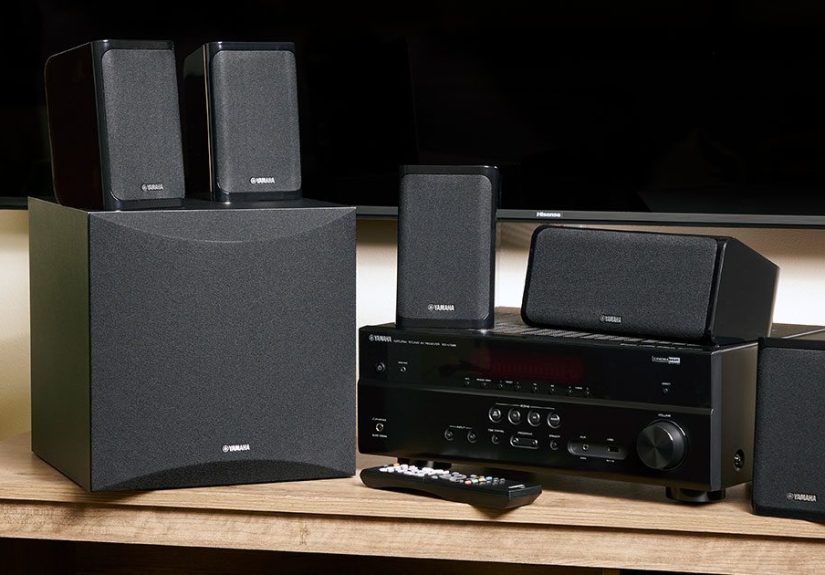
Speaker Placement That Makes Movies Sound “Right”
Great home theater speaker placement is about angles, height, and aiming sound at your main listening position.
Don’t chase perfectionchase consistency and symmetry where you can.
Front Left / Center / Front Right (the “dialogue and drama” trio)
- Front Left & Right: place them equally spaced from the TV, angled toward your main seat (a gentle “toe-in”).
- Center speaker: directly above or below the TV, aimed at ear level. This channel carries most dialoguetreat it like royalty.
- Height: tweeters roughly at seated ear level when possible (or tilt toward your ears if the speaker sits low).
If voices sound “muffled,” it’s often a center speaker that’s too low, blocked by a shelf lip, or pushed deep into a cabinet.
Pull it forward so the front face is flush with the shelf edgeyes, it matters.
Surround Left / Right (the “you are inside the scene” speakers)
- Place surrounds to the sides of your seating area (or slightly behind), not way behind like they’re plotting something.
- Mount them around ear level or a bit above for a more spacious effect.
- Aim them toward the main seating position if the speaker design benefits from it (many do).
No side wall? No problem. You can place surrounds a little behind you and angle them inward.
The goal is coverage that wraps around your listening position without sounding like one speaker is yelling from across the room.
Rear surrounds (only if you’re doing 7.1)
Rear surrounds go behind the seating area, spaced apart, aimed toward the main seat.
If the couch is pinned to the back wall, you can still do 7.1, but you’ll be making compromises:
mount higher, angle downward, and keep expectations realistic. (Physics is rude like that.)
Dolby Atmos height speakers (the “why did that helicopter feel real?” upgrade)
Height effects can come from in-ceiling speakers, on-ceiling mounts, or “Atmos-enabled” upfiring modules.
The best results typically come from speakers positioned above you (or close to it).
For 5.1.2, most people place two height speakers slightly in front of the main listening position (or use upfiring modules on the front speakers).
If you can’t cut holes in the ceiling (renters, unite), height modules can still be funjust keep the ceiling reasonably flat and reflective.
Vaulted ceilings and popcorn texture can reduce the effect.
Subwoofer placement (a.k.a. “why does the bass vanish in one seat?”)
Bass is the trickster of the audio world. You can put a subwoofer in one corner and get earth-shaking boom,
then move it two feet and suddenly it’s whispering apologies.
The classic move is the subwoofer crawl:
- Put the subwoofer at your main seat (yes, where your feet goignore the judgmental look from your pet).
- Play a bass-heavy scene or a repeating bass track.
- Crawl around the perimeter of the room, listening for the smoothest, most even bass.
- Put the subwoofer in the spot that sounded best during the crawl.
If you have a huge room or multiple seating positions, two subs can make bass more consistent across seatsbut one well-placed sub can still sound terrific.
Wiring It Up Without Creating a Spaghetti Documentary
This is the part where many people consider giving up and becoming “TV speakers people.”
Don’t do it. You deserve better.
Speaker wire basics (polarity is not optional)
Speaker wire has two conductors: positive and negative. Your receiver and speakers typically use red (+) and black (–) terminals.
Match polarity end-to-end for every speaker. If one speaker is reversed, sound can get weirdthin bass, fuzzy imaging, and general disappointment.
Routing tips that save your sanity
- Label everything before you plug it in. “Surround Right” looks the same as “Front Left” at 11:47 PM.
- Leave a little slack at both ends so you can reposition speakers later.
- Use raceways, rugs, or baseboard routes for clean cable management.
- If running wire in-wall, use in-wall rated cable and follow local electrical best practices.
Banana plugs: not required, but very satisfying
Banana plugs can make connections faster and cleaner, especially if you expect to move things around.
They’re the “quick-release wheels” of home theater wiringunnecessary until you try them, then suddenly you’re a convert.
Connect the TV and Sources (HDMI ARC/eARC Done Right)
Your receiver is the hub. Most of the time, you’ll connect your streaming box, game console, and Blu-ray player to the receiver,
then send video to the TV via HDMI. For TV apps (like built-in Netflix), ARC/eARC sends audio back to the receiver over one HDMI cable.
ARC vs eARC in plain English
- ARC: sends audio back from the TV; good for many formats, but can be limited depending on TV and equipment.
- eARC: higher bandwidth, designed to support full-quality audio formats more reliably (equipment dependent).
The key move: plug the receiver’s HDMI output into the TV’s HDMI port labeled ARC or eARC.
Then enable HDMI control/CEC and ARC/eARC settings in both TV and receiver menus.
If you skip this step, you may get “soundbar vibes” (aka audio confusion).
A simple connection order that prevents headaches
- Turn everything off.
- Connect speakers to the receiver.
- Connect sources (console/streamer/Blu-ray) to receiver HDMI inputs.
- Connect receiver HDMI OUT to TV ARC/eARC HDMI input.
- Power on TV first, then receiver, then sources.
- Enable ARC/eARC + CEC settings.
Receiver Setup + Calibration (Where the Magic Actually Happens)
Modern receivers usually include a guided setup that detects speakers, sets distances, and applies room correction.
It’s worth doingyour room is part of the system, whether you invited it or not.
Step 1: Tell the receiver what speakers you have
In the speaker configuration menu, select your layout (5.1, 7.1, 5.1.2, etc.).
Make sure each speaker is assigned to the correct terminals and that “height” channels aren’t accidentally set as rear surrounds (or vice versa).
Step 2: Set crossovers (the easiest big improvement)
Crossovers tell your system which frequencies go to your speakers and which go to the subwoofer.
Many setups perform best when small/medium speakers are crossed over to the subwoofer rather than forced to play deep bass they can’t handle cleanly.
Your receiver’s auto setup often chooses a starting point, and you can fine-tune later.
Step 3: Run room correction (Audyssey, YPAO, AccuEQ, etc.)
Room correction systems measure your room with a microphone and apply EQ, distance, and level adjustments.
The biggest tip: mic placement matters.
- Put the mic at seated ear height in the main listening position.
- Use a tripod or stand; don’t hold it in your hand (your body is an acoustic obstacle course).
- Follow the receiver prompts for multiple measurement positions around your main seat.
- Keep the room quietturn off fans, HVAC if possible, and pause the family debate about toppings.
Step 4: Do a quick reality check after calibration
- Confirm every speaker plays when you run the receiver’s test tones.
- Check that distances look reasonable (a wildly wrong distance can indicate a phase or connection issue).
- Listen to dialogue: if it’s too quiet, gently raise the center channel level a bit.
- If bass is overwhelming or missing, adjust sub level slightly and revisit placement if needed.
How To Film a “Surround Sound System Setup” Video (That Doesn’t Bore People)
If your goal is a How To Set Up a Surround Sound System Video, don’t just point a camera at the receiver and mumble,
“So… this is HDMI… I think.” Give viewers clarity, labels, and a reason to keep watching.
A simple shot list (steal this)
- Hook: 10 seconds of before/after audio reaction (even if it’s just you grinning like a proud nerd).
- Room overview: show seating position and where speakers will go.
- Speaker placement: quick pan + on-screen labels (FL, C, FR, SL, SR, Sub, etc.).
- Wiring close-ups: polarity, receiver terminals, labeling strategy.
- Receiver settings: show the speaker config screen and ARC/eARC settings.
- Calibration: mic on tripod at ear height; mention “quiet room” rule.
- Final demo: a known movie scene and a quick explanation of what to listen for.
Make it understandable without sound (yes, really)
Many people watch setup videos muted. Add short captions like “ARC HDMI port on TV” or “Run test tones now.”
Also: light your shots. Receivers live in dark cabinets and shadowsfilm them like you want people to see them.
Common video mistakes (save yourself)
- Shaky handheld receiver-menu footage (use a tripod or prop your phone).
- No labels on speakers or terminals (viewers can’t read your mind).
- Skipping calibration and jumping straight to “Now it sounds amazing!” (trust evaporates).
- Testing with random content (use a familiar scene with clear dialogue and directional effects).
Fast Troubleshooting (When Something Inevitably Acts Weird)
No sound from center or surrounds
- Verify the receiver is set to a surround mode (not pure stereo).
- Confirm your source is outputting surround audio (some apps default to stereo).
- Check TV audio output settings if using ARC/eARC.
- Run receiver test tones to confirm wiring and channel assignment.
Surrounds are too loud (or too quiet)
Surrounds should add atmosphere, not constantly scream “HELLO I AM A SPEAKER.”
Adjust channel levels slightly and re-check placement/aiming.
Bass is boomy or disappears
- Try a different subwoofer location using the crawl method.
- Lower the subwoofer gain and let the receiver handle level matching.
- Check phase settings if your sub has a phase switch/knob.
Final Tune-Up (Small Tweaks, Big Smiles)
Once everything works, you can improve it further with a few final touches:
- Toe-in your front speakers slightly until dialogue and imaging “lock” to the screen.
- Add a rug or soft furnishings if your room is echo-heavy.
- Use “night mode” or dynamic compression when you want clarity without waking the entire zip code.
- Re-run calibration if you move speakers more than a few inches or change seating position.
Conclusion
A great surround sound system setup is part science, part common sense, and part “move it two inches and listen again.”
Nail the placement, wire it cleanly, connect ARC/eARC correctly, and run calibration with the mic at ear height.
Do that, and you’ll get immersive audio that makes movies, games, and sports feel bigger than your room.
And if you’re filming a surround sound system video, focus on clarity: labels, simple steps, and a real before/after demo.
Your future viewers (and your future self) will thank you.
Real-World Setup Experiences (The Stuff Guides Don’t Always Admit)
Let’s talk about what actually happens when people set up surround sound at homebecause the glossy diagrams never show the moment you realize your
“perfect speaker location” is directly occupied by a door. Or a plant. Or a very territorial cat.
Experience #1: The “My couch is against the wall” dilemma.
This is the most common living-room reality. You want surrounds behind you, but there’s no “behind”there’s only “immediately adjacent to drywall.”
In these situations, people usually get better results by placing surrounds to the sides (or slightly behind) and mounting them a bit higher than ear level,
angled down toward the seating. It’s not a studio, but it restores the sense of envelopment without blasting one person while ignoring everyone else.
The funny part? Once the soundfield locks in, most viewers stop thinking about the compromises and just enjoy the movie.
Experience #2: The Center Channel That Starts a Family Feud.
Dialogue clarity is the number-one reason people upgrade from TV speakers. Then they set up surround sound andsurprisevoices still feel low or muffled.
Most of the time, the issue isn’t the receiver. It’s the center speaker placement: pushed too far back in a cabinet, blocked by décor, or aimed at kneecaps.
The “wow” fix is often simple: pull the center speaker to the front edge of the shelf and tilt it toward ear level.
Suddenly, everyone can understand the plot without subtitles doing cardio across the screen.
Experience #3: The Subwoofer’s Secret Hobby Is Gaslighting.
Bass behaves differently depending on where you stand (or sit). One seat has thunder. The next seat has “polite background rumble.”
People who try the subwoofer crawl for the first time usually have the same reaction: “This feels ridiculous… oh no… it works.”
The crawl helps you find a location where bass sounds smoother across the room. And once you do, you’ll wonder why you ever placed the sub based on
“it fit nicely next to the TV stand” logic.
Experience #4: Auto-Calibration Is Great… Until It Isn’t.
Room correction systems are incredibly helpful, but they’re not psychic. If the calibration mic is sitting on a couch cushion or held in someone’s hand,
measurements can be off. People who redo calibration with the mic on a tripod at proper ear height often hear an immediate improvement in balance and imaging.
Another common moment: the receiver sets the sub level too hot (or too low), and a tiny manual adjustment afterward makes everything click.
Think of auto-cal as “excellent first draft,” not “final answer delivered from the heavens.”
Experience #5: The HDMI ARC/eARC Mystery Hour.
If there’s a modern rite of passage in home theater, it’s trying to get TV apps to send surround sound back to the receiver.
The typical storyline: you plug in HDMI, it works for one day, then suddenly you’re stuck in stereo and questioning reality.
The usual fix is checking three places: the TV’s audio output (set to bitstream/pass-through when available), the receiver’s ARC/eARC setting,
and HDMI-CEC control being enabled on both devices. Once it’s stable, it feels like magic. Until the next firmware update decides to audition for a prank show.
Experience #6: Filming the setup video is harder than the setup.
Ironically, the hardest part of making a “How to set up surround sound” video isn’t the wiringit’s showing the wiring clearly.
Receivers are usually tucked into dark cabinets where camera autofocus goes to die. The creators who get the most positive feedback do two things:
add light (even a cheap lamp aimed into the cabinet helps) and add labels on-screen so viewers always know what they’re looking at.
A quick before/after clip also keeps people watching, because nobody clicks a setup video hoping for a slow zoom on the back of an AVR for 12 minutes.
The big takeaway from all these real-world moments: a surround sound system doesn’t need a perfect room to sound fantastic.
It needs thoughtful placement, correct connections, and a willingness to tweak. Treat it like tuning a recipe.
You don’t throw the whole dish away because you added slightly too much saltyou adjust, taste again, and then enjoy the meal.
Preferably with a movie that has an absurdly dramatic soundtrack.


