Table of Contents >> Show >> Hide
- Why a Gingerbread Garland Is Such a Good Winter Sewing Project
- What You’ll Need
- Pick a Design That Keeps Things Simple
- How to Make the Paper Template
- Step-by-Step: How to Sew the Garland
- The Best Stitches for a Gingerbread Felt Garland
- Easy Ways to Make Your Garland Look More Expensive
- Common Mistakes to Avoid
- Where to Hang a Gingerbread Cookie Garland
- How to Store It So You Can Use It Every Winter
- Conclusion
- Experience: What It Feels Like to Sew a Gingerbread Garland as Winter Arrives
There are two kinds of winter decorators: the ones who unpack a dozen bins before the first cold front, and the ones who light one candle, toss a blanket over a chair, and call it “seasonal styling.” This gingerbread cookie garland happily serves both camps. It is charming, affordable, beginner-friendly, and so cozy it practically whispers, “Put the kettle on.”
If you want holiday decor that feels handmade without looking like it lost a fight with a glue gun, this is a great place to start. A sewn gingerbread garland brings the sweetness of Christmas cookies to your mantel, shelf, tree, window, or entryway, but without the heartbreak of someone eating your decor by mistake. Made from felt, embroidery floss, and a little stuffing, it has that soft, nostalgic look people love when the snow starts falling and the house needs a touch of warmth.
In this guide, you’ll learn how to sew a simple gingerbread cookie garland from start to finish, even if your sewing résumé currently includes one loose button and a lot of confidence. We’ll cover supplies, template ideas, stitching methods, decorating tips, common mistakes, styling ideas, and ways to make your garland look delightfully homemade rather than accidentally chaotic.
Why a Gingerbread Garland Is Such a Good Winter Sewing Project
A simple gingerbread cookie garland checks a lot of boxes. First, it is easy. Felt is forgiving, the shapes are small, and the stitches do not need to be runway-level perfect to look adorable. Second, it is budget-friendly. You can make an entire garland from a few sheets of felt, leftover thread, and basic craft supplies. Third, it is customizable. You can keep it classic with brown “cookies” and white “icing,” or go whimsical with blush pink, cream, red, sage green, and gold.
Most important, this project captures that nostalgic winter mood people chase every year. Gingerbread shapes feel festive without being overly flashy. They pair beautifully with snowy branches, pine garlands, wood beads, twinkle lights, and vintage holiday decor. In other words, they play well with others. Your wreath will not get jealous.
What You’ll Need
- Brown felt for the cookie shapes
- White felt or white embroidery floss for icing details
- Embroidery floss in white, red, green, or any accent color you like
- Hand-sewing needle
- Sharp fabric scissors
- Paper and pencil for your template
- Pins or fabric clips
- Polyfill or cotton stuffing for a plush look
- Twine, ribbon, baker’s twine, or thin cord for hanging
- Optional: mini buttons, tiny bows, fabric glue, beads, bells, or pom-poms
If you are new to sewing, keep the supply list simple. Brown felt, white embroidery floss, stuffing, a needle, and twine are enough to make a lovely garland. Everything else is just decorative sparkle on the cookie.
Pick a Design That Keeps Things Simple
The easiest way to make this project look polished is to start with a shape that is easy to cut and repeat. A basic gingerbread person is the classic choice, but you can also sew tiny cookie hearts, stars, houses, mittens, candy canes, or snowflakes between the gingerbread figures for variation.
Best shape for beginners
A rounded gingerbread person with short arms and sturdy legs is the easiest option. Avoid very thin limbs or dramatic curves on your first try. Felt is friendly, but tiny narrow sections can still test your patience, and winter is cold enough without you muttering at scissors.
Ideal size
A template around 3 to 5 inches tall works best. That size is large enough for decorative stitching and easy handling, but small enough that a full garland still feels delicate and festive. For a mantel, 8 to 12 cookie shapes usually creates a nice rhythm. For a tree, 5 to 7 may be enough.
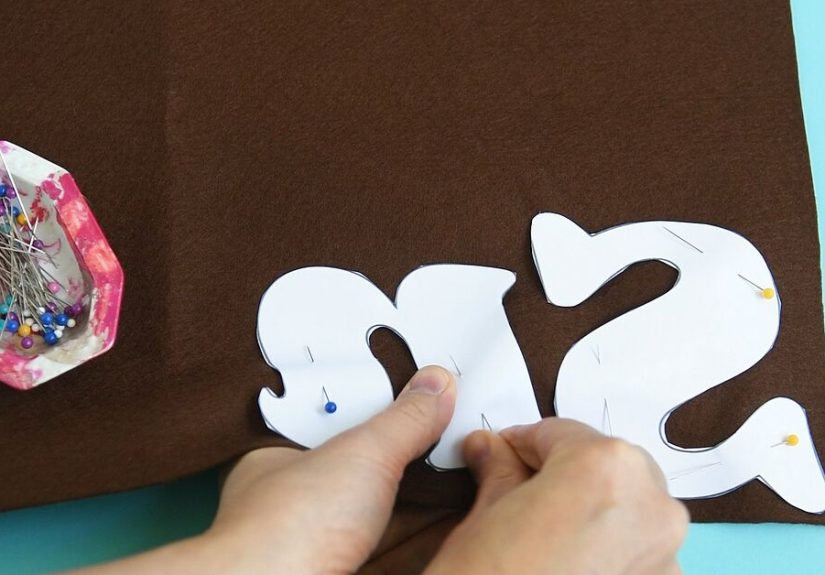
How to Make the Paper Template
Start by drawing one gingerbread cookie shape on cardstock or printer paper. Fold the paper in half before cutting if you want both sides to match neatly. Once you like the silhouette, cut it out and use it as your master template.
Do not overcomplicate this step. The beauty of a gingerbread garland is that a little imperfection makes it feel more handmade and warm. In fact, slightly uneven cookies can look more realistic, like the charming homemade batch that came from a holiday kitchen instead of a factory line.
Step-by-Step: How to Sew the Garland
1. Trace and cut your felt pieces
Place the paper template on doubled brown felt and trace around it. Cut two matching pieces for each gingerbread cookie. If you want a garland with nine cookie figures, you will need eighteen felt pieces total. Stack the pairs together as you go so your project stays organized and does not turn into a felt blizzard.
2. Add icing details to the front pieces first
Before sewing the front and back together, decorate the front piece of each cookie. This is where the fun starts. Use white embroidery floss to stitch little scalloped cuffs, wavy icing lines on arms and legs, a smile, and French knots or tiny straight stitches for eyes. You can also cut miniature hearts, bows, or buttons from felt and stitch or glue them on.
If you prefer a cleaner, more classic look, keep the details minimal. A smile, two eyes, and simple white trim are often enough. If you enjoy maximalism, go ahead and give your gingerbread people skirts, bow ties, rosy cheeks, and enough personality to qualify as holiday relatives.
3. Sew the front and back together
Place the front and back cookie pieces together. Thread your needle with embroidery floss and knot the end. Then sew around the edge using either a blanket stitch or a whipstitch. Both work well for felt. A blanket stitch gives a more decorative handmade border, while a whipstitch is quick, neat, and easy for beginners.
Leave a small opening at the top or side of each cookie so you can add a little stuffing. Use just enough filling to give the shape a soft puff. You do not want these cookies looking like they joined a holiday weight-gain challenge. Once lightly stuffed, sew the opening closed.
4. Repeat for the full garland
Continue until all your cookie shapes are finished. Lay them out in a row to check spacing, color balance, and decorative variety. This is the moment when the project starts to feel real and suddenly very cute.
5. Attach the cookies to your garland string
Cut your twine, ribbon, or cord to the desired length. Leave extra room on each end for tying or draping. Then attach each gingerbread cookie one of two ways:
- Sew a loop onto the back of each cookie and slide it onto the garland string.
- Stitch each cookie directly onto the twine with a few hidden stitches at the top.
If you want the garland to feel fuller, add wood beads, pom-poms, bells, felt stars, or tiny bows between the cookies. Keep the spacing consistent for a polished look, or vary it slightly if you want something more relaxed and whimsical.
The Best Stitches for a Gingerbread Felt Garland
Blanket stitch
This is the crowd favorite for felt ornaments and garlands because it frames the edge beautifully. It adds texture, definition, and that “yes, I absolutely made this on purpose” finish. It takes a little more time, but the payoff is worth it if you want a decorative border.
Whipstitch
This is the practical friend who shows up on time and gets the job done. It wraps over the edge and is easier for beginners to learn quickly. If your goal is to finish the garland in one cozy evening, whipstitch is your buddy.
Running stitch
Use this for decorative icing lines, attaching bows, or adding simple accents to the cookie fronts. It is easy, charming, and a great option if you want visible handmade detail without too much fuss.
Easy Ways to Make Your Garland Look More Expensive
Homemade and polished can absolutely coexist. To elevate your simple gingerbread cookie garland, focus on consistency. Use the same template for each cookie. Keep your stitch spacing fairly even. Limit your color palette. Repeat a few decorative details from piece to piece so the collection feels cohesive.
Texture also matters. Wool-blend felt often looks richer than very thin craft felt, and matte embroidery floss tends to create a softer, classic finish. Adding small wood beads between cookies can instantly make the garland feel more styled. So can using cream or natural twine instead of shiny plastic cord. Tiny details do the heavy lifting here.
Common Mistakes to Avoid
- Overstuffing: A little filling adds dimension. Too much makes your cookies look like tiny throw pillows.
- Using very thin felt: Flimsy felt can sag or wrinkle, especially on longer garlands.
- Decorating after assembly: It is much easier to stitch faces and icing on the front piece before sewing both layers together.
- Skipping layout planning: Arrange everything on a table before attaching the pieces to the cord.
- Making every cookie identical: A little variation adds charm. You want siblings, not clones.
Where to Hang a Gingerbread Cookie Garland
This garland is surprisingly versatile. Drape it across a mantel with greenery for a classic Christmas look. Hang it in a kitchen window if your holiday style leans toward baking-themed decor. Loop it along open shelving, across a mirror, over a child’s bed, or around a small entryway bench. It also looks sweet on a Christmas tree, especially if your tree has a homemade, vintage, or cottage-inspired theme.
If you are decorating a front porch or covered entry, use the garland indoors or in a protected area. Felt and embroidery floss are not big fans of snow, sleet, rain, or dramatic weather tantrums.
How to Store It So You Can Use It Every Winter
Once the season ends, wrap the garland loosely around a piece of cardboard or tuck it gently into a shallow storage box lined with tissue paper. Avoid crushing the felt shapes under heavier decor. If your cookies have beads or bows, give them a little breathing room so they keep their shape.
Label the box clearly. Future you, standing in front of holiday bins and wondering what on earth is in the “misc. winter stuff” container, will be grateful.
Conclusion
Sewing a simple gingerbread cookie garland to welcome the snow is one of those small seasonal projects that delivers far more joy than effort. It is easy enough for beginners, charming enough for serious holiday decorators, and flexible enough to match almost any Christmas style. Best of all, it brings warmth to your home in a season that can sometimes feel rushed, busy, and overly polished.
With a few pieces of felt, some embroidery floss, and one cozy afternoon, you can make decor that looks personal, festive, and timeless. Whether you hang it over a mantel, in the kitchen, or across a snowy window, this handmade garland adds the kind of softness and cheer that makes winter feel welcome. Not bad for a project inspired by cookies you cannot eat.
Experience: What It Feels Like to Sew a Gingerbread Garland as Winter Arrives
There is something oddly comforting about making a gingerbread cookie garland when the weather starts turning cold. It is not just the finished project that feels warm and nostalgic. The process itself has a calm rhythm that fits the season beautifully. You trace a shape, cut felt, choose thread, and make one tiny stitch after another while the light outside gets softer and the room grows cozier. It is the kind of craft that slows you down in the best possible way.
For many people, the experience begins with the colors. Brown felt immediately reads as gingerbread, white stitching looks like piped icing, and suddenly a flat little craft supply starts feeling like holiday magic. Even before the garland is assembled, each cookie shape has personality. One smile looks a little crooked. One bow tie sits slightly off-center. One cookie somehow ends up looking more cheerful than the others, as if it knows it is the favorite. That is part of the charm. This is not mass-produced decor. It feels alive because your hands made it.
Another lovely part of the experience is how easy it is to share. This is the sort of project you can work on alone with tea and music, or make with kids, friends, siblings, or grandparents around the table. One person can trace templates, another can cut shapes, someone else can add faces, and the most patient person in the room can tackle the edge stitching. It naturally becomes a group activity without turning into a logistical nightmare. No power tools. No sawdust. No mysterious leftover hardware. Just soft fabric, thread, and a festive mood.
The project also creates the kind of memory that tends to stick. Years later, people rarely say, “Remember that store-bought decoration I ordered online in six seconds?” They remember making something. They remember the song that was playing, the snow starting outside, the smell of cinnamon in the kitchen, or the fact that somebody insisted every gingerbread person needed tiny red buttons. Handmade holiday decor has a way of holding onto those little moments.
And perhaps that is why a simple gingerbread garland feels so right for welcoming the snow. It is not flashy. It does not need to be. It brings softness, humor, and a little homemade sweetness into a season that often moves too fast. Sewing one becomes less about craft perfection and more about creating atmosphere. By the time you hang the finished garland and step back to admire it, the room feels different. Warmer. Friendlier. More festive. Almost as if winter knocked on the door and your gingerbread cookies answered, “Come on in, but wipe your boots first.”


