Table of Contents >> Show >> Hide
- What “Never Seen Before” Actually Means
- My Design Process: From Sketch to Soft Sculpture
- Materials That Make a Plush Feel “Next-Level”
- Techniques That Make Them Look Like Nothing Else
- Examples of Stuffed Animals I Make That Break the Mold
- Durability: How I Make Sure the Weird Stuff Survives Real Life
- Toy Safety Basics (Without the Scary Lecture)
- If You Want to Make Your Own “Never-Seen-Before” Plush
- Why People Fall in Love With Unusual Stuffed Animals
- My Experiences Making Stuffed Animals You’ve Never Seen Before (Real Workshop Life)
- Conclusion
- SEO Tags
Most stuffed animals follow a familiar recipe: cute face, round belly, maybe a bow tie if they’re feeling fancy. Mine start with a different question:
What if a plush toy could surprise you? Not in a “boo!” way (nobody wants a jump-scare teddy), but in a “Wait… I’ve never seen that before”
waythe kind of delight that makes kids giggle and adults do the slow blink of wonder reserved for puppies, magic tricks, and unexpectedly good gas-station coffee.
I make handmade plush toys and soft-sculpture stuffed animals that don’t look like they rolled off a shelf in a matching set.
Think: a grumpy croissant with heroic eyebrows. A deep-sea anglerfish that’s oddly comforting. A cactus that’s emotionally supportive (and, mercifully, not pointy).
These are unique stuffed animalspart toy, part character, part “How did you even think of that?”
This article is a behind-the-scenes tour of how I design and build one-of-a-kind plushiesfrom the first sketch to the final stitchplus what makes them
durable, safe-by-design, and genuinely different. If you’re here because you love weirdly wonderful plush, want to start making your own, or you’re curious how
custom stuffed animals are born, welcome to my fluff-covered workshop.
What “Never Seen Before” Actually Means
“Never seen before” isn’t just about making something bizarre for the sake of being bizarre (though I do have a soft spot for a surprisingly dignified
blobfish). It’s about creating plush characters with original silhouettes, unexpected textures, and expressive faces
that feel alive in your hands.
1) New characters, not recycled animals
Instead of starting with “bear, bunny, cat,” I start with storytelling: a mushroom mail carrier, a sleepy toaster that dreams of bagels, a shy thundercloud
with a tiny rainbow patch. The goal is to create a plush toy you can name in five seconds because it already has a personality.
2) Texture that invites a squeeze
Fabric choices matter. I mix minky, fleece, felt, faux fur, and smooth “skin” fabrics so the toy has contrastlike a soft belly, velvet ears, and a
fuzzy “helmet” fringe. People don’t just look at these plushies; they pet them like they’re checking if a cloud is real.
3) Faces that feel sculpted, not printed
Many mass-market plush faces are embroidered by machine or printed. I love needle sculptingtight stitches that create cheekbones, brow
ridges, dimples, and “expression lines.” It’s the difference between “cute” and “how is it making eye contact with me right now?”
My Design Process: From Sketch to Soft Sculpture
A good plush design is part illustration, part engineering, and part “please don’t let the ears end up on the back of the head again.” Over time, I’ve
built a process that keeps creativity high and seam-ripping low.
Step 1: I test the idea with a silhouette
Before I pick fabric, I draw the character as a simple shadow shape. If the silhouette reads clearly from across the room, the design is strong.
This is how I avoid making a “unique plush toy” that accidentally looks like a potato with feelings (unless that’s the plan).
Step 2: I break the body into pattern pieces
Plush patterns are basically puzzles. I divide the shape into panelshead gussets, belly pieces, limb tubes, and detail patchesso the final form becomes
dimensional. When a design is truly new, I rarely get the pattern perfect on the first try. I prototype using scrap fabric, adjust curves, and re-test.
Step 3: I choose fabrics based on behavior, not just looks
Each fabric has a personality. Minky is gorgeous but slippery. Faux fur hides seams but can get bulky. Felt is precise for details but less stretchy.
I match fabric to the job: stretchy plush for rounded bodies, firmer fabric for structured snouts, and smooth cotton for internal pouches or lining.
Step 4: I build the “expression map”
This is my secret sauce: a little plan that marks where the face will be pulled in or puffed out. Eyebrows, cheeks, smile lines, eyelidsthese are
stitched with intention. I’m basically contouring, but with thread.
Materials That Make a Plush Feel “Next-Level”
The difference between an okay plush and an unforgettable one often comes down to small material choices. Here’s what I use (and why), written in normal
human language, not “fabric goblin” dialect.
Fabrics
- Minky/cuddle plush: ultra-soft, great for bodies and cheeks; nap direction matters for color and texture consistency.
- Fleece: beginner-friendly, stable, forgiving for prototypes and bold shapes.
- Felt: crisp details (teeth, patches, tiny accessories) without fraying.
- Faux fur: dramatic manes, eyebrows, monster fluff, and “this creature is majestic” energy.
Stuffing and structure
- Polyester fiberfill: classic squish; I stuff in layers and shape as I go so the face doesn’t collapse like a sad soufflé.
- Weighted pouches (optional): a small internal bag of pellets or glass beads can help a plush sit up and feel grounding.
- Interfacing/lining (select areas): adds firmness under snouts, eye areas, or accessory panels.
Details
- Embroidery floss + strong thread: for faces, sculpting, and hand-closing seams.
- Safety eyes (age-graded): sometimes used for older kids/collectors; for little ones, I prefer embroidered eyes.
- Appliqué patches: for spots, blush cheeks, “emotional support band-aids,” and storytelling details.
Workshop truth: If you’ve never vacuumed glitter off minky at 2 a.m., have you even made a plush toyor have you merely flirted with the idea?
Techniques That Make Them Look Like Nothing Else
Needle sculpting for expression
Needle sculpting is how I give plush faces depth. I stitch through specific points and pull the fabric inward to create structurelike eye sockets,
cheekbones, and a defined smile. It’s subtle, but it changes everything. A plain sphere becomes a character that looks like it has opinions about
pineapple on pizza.
Layered appliqué for “graphic” designs
Sometimes a plush is basically a drawing you can hug. For those, layered appliqué is perfect: I stack fabrics like a collagelight belly patch, darker
shadow patch, tiny highlight patchso the plush looks illustrated without printing.
Hidden seams and “clean lines” finishing
I design seam placement like a costume designer: hide seams under fur lines, place them where curves naturally break, and use ladder stitches to close
openings so they disappear. The goal is a plush that looks polished from every anglefront, back, and “child dragging it by one ear across the floor.”
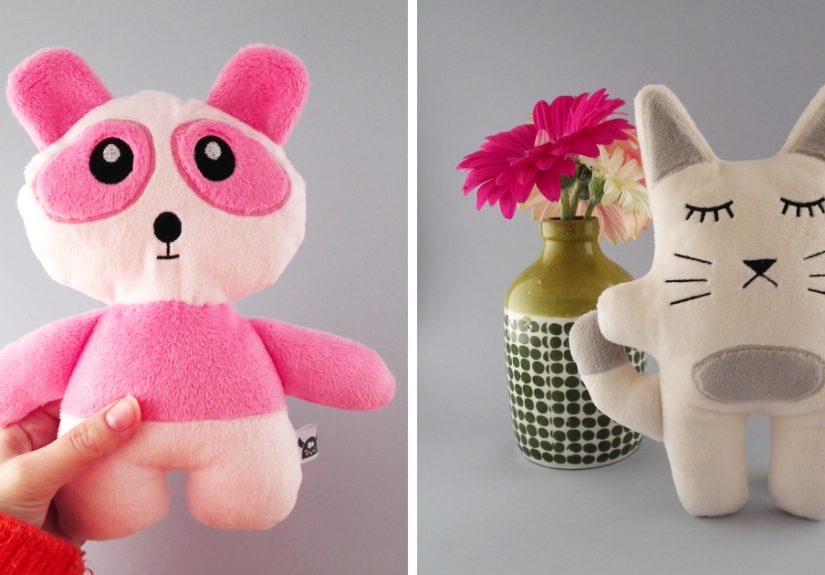
Examples of Stuffed Animals I Make That Break the Mold
To make this concrete, here are a few real-world-style examples of the kind of artisan plushies I create. These aren’t generic patterns;
they’re built around character concepts and unusual shapes.
The Grumpy Croissant Knight
A pastry-shaped plush with a tiny felt “armor” chest plate, embroidered frown, and a removable mini-sword (for display, not for toddler jousting). The
body uses minky for softness, while the armor uses felt with reinforced stitching so it holds its shape.
The Anglerfish Night-Light Buddy (Non-Electronic Version)
A deep-sea fish plush with a glowing “lure” look created using pale fabric and contrast stitching (no batteries needed). The face is needle-sculpted so
the grin feels dimensional, not flat. It’s spooky-cutelike Halloween, but cuddly.
The Emotional Support Cactus
A cactus plush that’s aggressively soft. Instead of spines, it has embroidered “prickle lines” and tiny felt flowers. It’s designed for sensory comfort,
with a lightly weighted base so it sits upright like a tiny therapist who charges in hugs.
The “Trash Panda” Raccoon with Pockets
This one has a secret: small internal pockets sized for notes, tiny treasures, or a “found shiny thing.” It’s a stuffed animal toy with interactive
features that don’t rely on plastic parts.
Durability: How I Make Sure the Weird Stuff Survives Real Life
A plush can be imaginative and still be tough. Kids don’t gently admire a toy; they love it like a tiny tornado with feelings. So I build for reality:
tugging, squeezing, occasional snack exposure, and dramatic rescues from under the couch.
My durability checklist
- Reinforced seams: stress points (arms, ears, tails) get extra stitching or backstitching.
- Secure closures: ladder stitch with strong thread; sometimes double-stitched from inside first.
- Detail testing: if a detail can be grabbed, it gets reinforced or redesigned.
- Wash-minded design: I avoid fragile add-ons for toys intended for frequent cleaning.
For collector plush (made for older kids/teens/adults), I can add more intricate trims and delicate features. For little kid plush, I prioritize
simple, robust construction and stitched features.
Toy Safety Basics (Without the Scary Lecture)
If you’re making or selling plush toys in the U.S., safety isn’t a vibeit’s a responsibility. I’m not giving legal advice here, but I can share the
common safety principles toy makers follow so plush toys are designed to reduce risk.
Age grading changes everything
A plush meant for babies and toddlers is built differently than a plush meant for ages 8+ or for collectors. The biggest difference? Small parts.
Plastic eyes, buttons, removable accessories, and certain trims can be choking hazards for young children. For the littlest ages, embroidered faces and
permanently attached details are the safer design direction.
Seam strength and attachments matter
Stuffed toys can be evaluated for how seams and attachments hold up under force. That’s why I treat seams like load-bearing architecture. If a plush has
an ear, that ear is going to experience emotional extremes.
Labeling and traceability
If you’re selling children’s products, you’ll often see requirements around traceabilityinformation that helps identify manufacturing batches and sources.
Even for small makers, building good records (materials, dates, batches) is a smart habit.
The practical takeaway for makers: design with the end user in mind, avoid risky components for younger ages, secure everything like it’s going into battle,
and keep documentation tidy. Future you will thank you. Your customers will also thank youprobably with photos of your plush being carried everywhere.
If You Want to Make Your Own “Never-Seen-Before” Plush
You don’t need a factory or a fancy studio to start. You need curiosity, patience, and a willingness to learn from the holy trinity of plush-making:
prototype, adjust, repeat.
Beginner-friendly steps
- Start with a simple base: choose a rounded creature or character with fewer pieces.
- Prototype with cheap fabric: old fleece blankets and scrap fabric are your best friends.
- Use embroidered faces first: it teaches you expression without relying on hardware.
- Control your fabric nap: keep minky pile direction consistent so colors don’t shift weirdly.
- Stuff in stages: shape the body as you go; don’t try to cram it all at the end.
How to make it truly original
- Combine two ideas: “animal + object” is a creativity cheat code (example: “owl + teapot”).
- Add a story detail: a patch, a tiny pocket, a stitched “badge,” a blush marksomething that hints at a life.
- Change the silhouette: longer limbs, asymmetry, a dramatic forehead… embrace the weird.
Why People Fall in Love With Unusual Stuffed Animals
Here’s the surprising thing: the weirder the plush, the more emotional it can become. A “perfect” teddy bear is cute, but it’s also familiar.
A one-of-a-kind plushespecially one with personalityfeels like it was made for you.
Kids use these plush characters for pretend play and comfort. Teens and adults use them as desk guardians, anxiety buddies, décor with heart, or
collector art. And because each design is different, it can mark a moment: a birthday, a tough year, a big move, a first apartment, a “hey, you survived”
milestone.
My Experiences Making Stuffed Animals You’ve Never Seen Before (Real Workshop Life)
The first time I tried to make a “never-seen-before” plush, I aimed for bold originality and landed somewhere between “alien hamster” and “sad dumpling.”
It wasn’t cute in the conventional sense. But it had something better: character. The face was slightly lopsided, the eyes looked mildly
judgmental, and the little arms were too short to be helpfulan accurate reflection of how I felt during that entire learning phase.
Over time, I learned that originality is less about being random and more about being intentional. One of my favorite commissions started as a child’s
drawing: a purple “sea dragon” with three tails, a tiny crown, and a smile that took up half its face. Translating that into fabric meant respecting the
weird proportions instead of “fixing” them. I made a pattern with extra-long tail panels, used a soft plush fabric for the body, and needle-sculpted the
cheeks so the smile looked dimensional. When the family sent a photo of the finished plush tucked into the kid’s bed like it had always belonged there,
I felt like I’d nailed the whole purpose of custom stuffed animals: turn imagination into something huggable.
The workshop reality is that plush-making is equal parts art and problem-solving. Minky fabric is gorgeous, but it sheds fluff like it’s trying to
re-decorate your floor. The first time I cut faux fur without trimming the pile from the seam allowance, the seam looked like a puffy caterpillar.
I laughed, then I cried a little, then I learned the ancient maker ritual: “Trim the fur. Trust the process.”
My biggest “aha” moment came when I realized faces are everything. I once made two identical plush bodiessame pattern, same fabric, same stuffingand
gave them different expressions. One got sleepy embroidered eyes and a soft little smile. The other got sharp eyebrows and a tiny frown. People reacted
to them like they were different species. One was “aww,” the other was “I need him because he understands my enemies.” That’s the power of thread.
I’ve also learned how much people love interactive details. A small pocket can turn a plush into a secret-keeper. A removable cape (securely attached for
older ages) can turn a blob into a hero. A stitched patch can turn a monster into a survivor. I once added a tiny “heart” inside a plushjust a small
fabric shape tucked in a pocketso the owner could “check on its courage.” That idea came from a simple question: what makes a toy feel like a companion?
And yes, there are disasters. I have sewn an arm on backwards. I have accidentally made a head gusset that turned a friendly creature into a dolphin-like
cryptid. I have stuffed a plush so firmly it could have been used as a doorstop in an emergency. But each mistake taught me something practical:
reinforce stress seams, prototype early, and never underestimate how much stuffing expands once it’s inside.
The most rewarding part is watching people connect with something that didn’t exist before. Not a mass-produced design. Not a “standard” stuffed animal.
Something personal, unusual, and oddly comforting. A plush that makes you laugh on sight, then makes you feel better on a rough day. That’s why I keep
making stuffed animals toys you’ve never seen beforebecause the world already has enough ordinary. I’m here for the soft, the strange, and the
surprisingly lovable.
Conclusion
Making truly unique stuffed animals is a blend of creativity, craft, and thoughtful construction. “Never seen before” doesn’t mean chaoticit means
designed: fresh silhouettes, expressive faces, intentional textures, and details that invite connection. Whether you’re a plush collector, a parent
looking for something special, or a maker ready to invent your own weird little cuddle creature, remember the guiding rule of my workshop:
make it lovable, then make it last.


