Table of Contents >> Show >> Hide
- Why Macrame Lawn Chairs Are Back in Style
- What You Need to Make a Macrame Lawn Chair
- Basic Knots and Weaves You’ll Use
- Step-by-Step: How to Make a Macrame Lawn Chair
- Design Ideas for Your Macrame Lawn Chair
- Comfort, Durability, and Safety Tips
- Care and Maintenance for Your Macrame Lawn Chair
- Macrame Lawn Chair | Hometalk and the DIY Community
- Real-Life Macrame Lawn Chair Experiences (Extra Tips & Lessons Learned)
- Final Thoughts
If your old metal lawn chair is looking a little sad & saggy, don’t toss it to the curb just yet. With some colorful macrame cord and a little patience, you can turn that tired frame into a boho showpiece worthy of a magazine cover (or at least your Instagram feed). Inspired by the popular “Macrame Lawn Chair” projects shared on Hometalk and across DIY blogs, this guide walks you through everything you need to know to re-create the lookand make it your favorite seat for long summer nights.
You don’t need to be a master knotter to pull this off. If you can measure, pull cord tight, and binge a podcast while you work, you’re basically qualified. Let’s talk frames, cord, patterns, and all the little tricks that keep your macrame lawn chair comfortable, sturdy, and seriously good-looking.
Why Macrame Lawn Chairs Are Back in Style
Macrame lawn chairs first hit their stride decades ago, when woven webbing and neon straps ruled every backyard. Today they’re back with a modern twist: bold cord colors, graphic patterns, and upcycled metal frames that keep old furniture out of the landfill instead of in it.
There are a few reasons DIYers keep coming back to this project:
- It’s an upcycle win. Instead of buying new patio furniture, you reuse a sturdy frame and give it fresh life with cord.
- It’s fully customizable. Choose colors that match your deck, pool, or favorite throw pillow. Go minimalist with neutrals or full-on festival with rainbow stripes.
- It’s surprisingly comfortable. The woven seat has just enough give to support you without that “I’m going to fall through any second” feeling.
- It’s long-lasting. With good cord and basic maintenance, a macrame lawn chair can handle many seasons of backyard lounging.
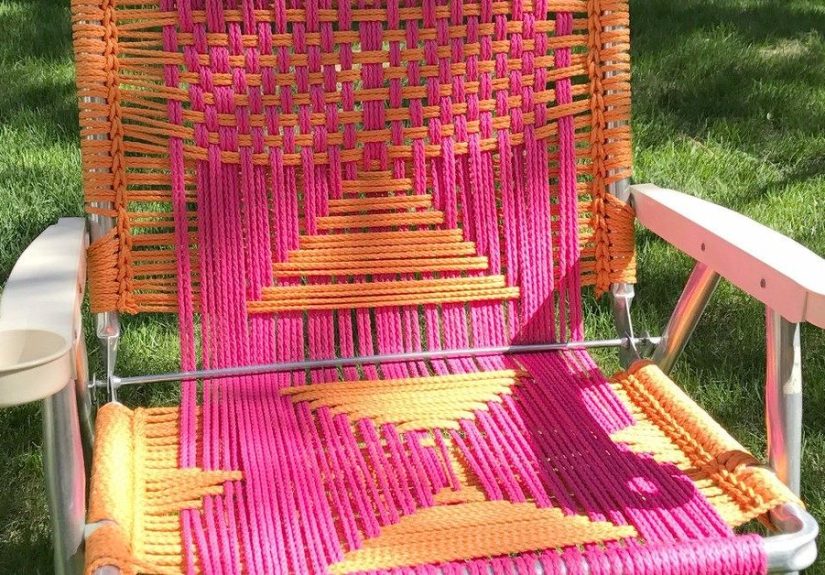
The classic Hometalk-style macrame chair shows how bold cord on a simple metal frame can instantly make your outdoor space feel more personal and inviting. It’s equal parts craft project and furniture makeover, which is why it’s so addictive.
What You Need to Make a Macrame Lawn Chair
1. The Right Chair Frame
Start with a frame that’s structurally sound, even if it looks rough. Ideal candidates are vintage metal lawn chairs or folding aluminum chairs with cracked or missing plastic webbing. You want:
- A sturdy metal frame with no wobble
- No sharp rust flakes or jagged edges where cord will sit
- A front bar and a top/back bar you can wrap cord around
Light surface rust is finejust sand it off and hit the frame with spray paint before you start weaving. If the frame flexes or feels fragile when you sit in it, skip it. Macrame can’t fix a structurally unsafe chair.
2. Macrame Cord (and How Much You Need)
For outdoor chairs, most crafters choose polypropylene macrame cord, paracord, or other synthetic rope that can handle sun and rain better than cotton. Look for cord that’s around 4–6 mm thick; thinner cord takes longer to cover the frame, while thicker cord can feel bulky.
The exact amount you need depends on your chair size and pattern, but many tutorials suggest roughly:
- 160–200 yards (145–185 m) for a basic single-color seat and back
- More if you’re doing an intricate pattern or multiple colors
Buy more than you think you’ll needrunning out of cord midway through a pattern is the DIY version of getting to the end of a row of tiles with one tile missing.
3. Helpful Tools
- Scissors or a sharp utility knife
- Measuring tape
- Lighter or heat tool (for melting synthetic cord ends)
- Optional: crochet hook, large tapestry needle, or a slim “weaving stick” for passing cord under existing rows
- Optional: painter’s tape or clips to keep rows from slipping while you work
Basic Knots and Weaves You’ll Use
You don’t need a huge knot library to make a great macrame lawn chair. A few basics will do most of the work:
Square Knot
The macrame MVP. It’s symmetrical, strong, and works beautifully for decorative bands across the top or sides of the chair. You can use rows of square knots as accents between sections of plain wrapping.
Half Hitch / Double Half Hitch
These are great for creating diagonal or curved lines in your pattern. They’re often used in hanging chairs, but you can sneak them into the lawn chair design for a more intricate look.
Lark’s Head / Cow Hitch
This knot is ideal for attaching cord to the top or bottom bars before you start weaving. It’s quick, secure, and keeps cords aligned.
Continuous Wrap or Chain Stitch Style Weave
Many modern macrame lawn chair tutorials rely on a looping or chain-like technique where the cord passes up and down between the top and bottom bars, forming vertical “rungs” you later weave through horizontally. Once you find your rhythm, it becomes almost meditative.
Step-by-Step: How to Make a Macrame Lawn Chair
Step 1: Strip and Prep the Frame
- Remove any old webbing or fabric on the chair. Cut it off carefully and discard.
- Inspect all welds, joints, and bars. Tighten screws if your chair folds.
- Sand rusty spots and wipe the frame clean.
- Spray paint if desired and let it dry completely before adding cord.
Step 2: Plan Your Pattern
Before you tie a single knot, decide how you want the finished chair to look:
- Solid color for a clean, modern look
- Stripes by switching colors midway across the seat or back
- Checkered pattern by alternating over–under sequences with two colors
- Ombre by blending shades from light at the top to dark at the bottom
It helps to sketch your idea or look at inspiration photos before committing. Changing your mind halfway through is totally allowedjust know you may be doing some strategic un-weaving.
Step 3: Create the Vertical Cords
- Face the chair from the front.
- Tie your cord securely to one side of the front bar with a square knot or clove hitch.
- Bring the cord up behind the back of the chair and over the top bar, creating the first vertical cord.
- Loop the cord back down behind the chair and over the front bar again.
- Pull everything tight. You’ve now created two vertical strands (front and back) with one long length of cord.
- Repeat this “around the bottom bar, up to the top bar” motion, stacking cords tightly side by side, until the entire seat and back width are filled with vertical cords.
Keep tension consistent as you go. If the cords are too loose, the chair will sag. Too tight, and you’ll swear the chair is fighting back.
Step 4: Weave the Seat Horizontally
- Attach a new length of cord near the bottom left or bottom right of the seat area.
- Weave over and under the vertical cords across the seat using your chosen pattern.
- Wrap the cord around the side bar, then bring it back across the seat, alternating the over–under sequence on the way back.
- Use a crochet hook or stick to help pass the cord through tight areas.
- After every few rows, push the horizontal cords down to keep them snug and evenly spaced.
The tighter and more consistent your weaving, the more supportive the seat will feel. Once you reach the top of the seat area, tie off the cord securely and melt the end (for synthetic cord) so it won’t fray.
Step 5: Weave the Backrest
Repeat the same technique on the back section above the seat. You can match the seat pattern, flip the colors, or create a different design entirely for a two-part look. Just be sure the transitions at the bend between seat and back are neat and comfortable against your lower back.
Step 6: Finish and Clean Up the Details
- Trim excess cord, leaving a short tail where you tie off.
- Melt synthetic cord ends and press them into hidden spots on the underside of the chair so they don’t scratch skin or snag clothing.
- Give the seat a gentle press test: sit down carefully, shift your weight, and check for any spots that feel too loose or uneven.
- If a row sags, untie that section and redo it more tightly rather than trying to ignore it. Your future self will thank you.
Design Ideas for Your Macrame Lawn Chair
Bold and Graphic
Use two sharply contrasting colorslike black and white, or teal and mustardand create wide stripes across the seat and back. It gives your chair a modern, almost beach-club feel.
Boho Neutrals
Stick with sand, taupe, cream, and warm gray. Neutrals are forgiving outdoors, coordinate with almost everything, and make your plants and accessories pop.
Rainbow Fun
If the chair will live near a kids’ play area or a pool, go all-in with rainbow rows. It’s cheerful, hides minor dirt, and makes the chair instantly recognizable as “the fun seat.”
Pattern Play
Once you’re comfortable with basic weaving, experiment with diamonds, chevrons, or checkerboards. You can follow charted patterns from macrame chair tutorials or invent your own by alternating over–under sequences every few rows.
Comfort, Durability, and Safety Tips
- Check weight limits. Most vintage lawn chair frames are strong, but if metal is thin or corroded, avoid heavy use.
- Use outdoor-friendly cord. Synthetic cords handle moisture and UV better than cotton and are easier to clean.
- Mind the edges. Make sure no cut cord ends or melted blobs are where bare legs or fingers will rest.
- Store smart. When not in use, keep your chair under a covered porch or inside a shed to extend its life.
- Test as you go. Sit on the chair for short stretches before calling it finished. If you feel too much sag, add more verticals or tighten horizontals.
Care and Maintenance for Your Macrame Lawn Chair
Macrame lawn chairs are surprisingly low-maintenance if you treat them well.
- Regular cleaning: Brush off leaves and dirt, then wipe the cord with a mild soap-and-water solution. Rinse lightly and let it dry in the shade.
- Sun exposure: UV rays can fade bright colors over time. Rotate chairs occasionally and store them during peak off-season to slow fading.
- Quick repairs: If a cord snaps or frays, don’t waitreplace that section before stress spreads to neighboring cords.
- Off-season storage: In winter or rainy seasons, fold or stack your chairs indoors if possible. Less exposure equals more years of use.
Macrame Lawn Chair | Hometalk and the DIY Community
The “Macrame Lawn Chair” idea really took off because it sits at the sweet spot of DIY: it looks impressive but is absolutely doable at home. Crafters love sharing before-and-after photos, talking about how many yards of cord they used, comparing color choices, and trading tips for tricky corners or saggy spots.
Projects like the Hometalk-inspired macrame chair have also opened the door for variations: macrame garden chairs, bright paracord lounge chairs, and even matching hanging chairs and plant hangers. Once you’ve mastered one chair, chances are high you’ll start eyeing every bare frame as your next canvas.
Real-Life Macrame Lawn Chair Experiences (Extra Tips & Lessons Learned)
Reading tutorials is helpful, but the best advice often comes from people who’ve actually wrestled a mountain of cord around a metal frame. Here are some lived-in lessons and “I wish I’d known that earlier” moments that echo through macrame lawn chair communities.
It Takes Longer Than You Think (But It’s Worth It)
Most DIYers estimate a simple macrame lawn chair can take anywhere from 3 to 6 hours, depending on the pattern and how often you stop to admire your work (or untangle cord). The first time, you’ll move slower, double-checking your over–under pattern and pulling cords tight. By the second chair, you’re faster and more confidentand probably planning a matching pair.
The key is to treat it like a relaxing project, not a race. Put on a podcast or playlist, grab a drink, and give yourself permission to spread the work over a couple of evenings. A rushed chair tends to have uneven tension and more mistakes. A patient chair? That’s the one people end up fighting over at family gatherings.
Color Choices Make a Big Difference
Many people start with a bold, bright colorlike teal or coralthinking they’ll love the drama. Then they realize the chair competes loudly with every other thing on the patio. Others go too safe with plain gray and later wish they had added a stripe or accent section.
A good compromise is to pick a main neutral (gray, charcoal, tan, or white) and add a secondary accent for stripes or bands (mustard, navy, blush, or olive). This keeps the chair flexible as your decor changes, but still gives it personality. If you’re nervous, mock up a quick color combo using yarn or string on a scrap of cardboard before committing yards of cord to the real thing.
Tension Is Everything
Every macrame lawn chair veteran has a story about the “beautiful but saggy” first attempt. When you’re weaving, the chair is upright and the cords feel tight. Then someone sits, and suddenly the seat dips several inches lower than expected.
To avoid this, many people:
- Pull vertical cords tighter than feels natural, knowing they’ll relax a bit under weight.
- Test the seat after every few horizontal rows by pressing down with their hand or gently sitting for a second.
- Redo any obviously loose rows right away instead of hoping they’ll “tighten up later” (they won’t).
It’s normal to redo a section or two. Think of it as part of the process, not a failure.
Unexpected Perks (Beyond a Cute Chair)
Macrame lawn chair projects are more than just decor. People often mention side benefits:
- Stress relief: The repetitive looping and weaving is surprisingly calminglike a bigger, more dramatic version of knitting.
- Skill-building: Once you’re comfortable reading patterns and managing tension on a chair, other macrame projects (plant hangers, wall hangings, small stools) feel much less intimidating.
- Conversation starter: Guests almost always ask, “Where did you get that chair?” Saying, “Oh, I made it,” never gets old.
Some DIYers even turn their new skills into side hustles, making custom chairs for friends, local markets, or online shops. The combination of a practical item and an obviously hand-crafted surface gives each piece a higher perceived value than a typical big-box patio chair.
What People Would Do Differently Next Time
If you ask experienced makers what they’d change if they could redo their first macrame lawn chair, you’ll hear a few recurring themes:
- Buy better cord: Higher-quality cord weaves more smoothly, knots more cleanly, and looks nicer long-term.
- Paint the frame first: A fresh coat of paint under the macrame makes the whole project look more intentional and finished.
- Plan the pattern: Wing-it energy is fun at first, but planned stripes or blocks generally look more polished.
- Make two: One custom chair is fun. A matching pair instantly makes a seating area feel designed, not random.
The main takeaway from real-world experiences? A macrame lawn chair isn’t just a project you finishit’s a piece you live with. You notice how it feels on a cool evening, how it dries after a quick rain, and how often you pick that one spot on the patio because “your chair” is there. Once you’ve experienced that, it’s hard to go back to plain webbed seats again.
Final Thoughts
Transforming a faded lawn chair into a macrame masterpiece is one of those projects that looks intimidating until you start. Then it becomes a soothing, almost addictive, rhythm of loops and knots. Inspired by the classic “Macrame Lawn Chair | Hometalk” style, you can build something that’s comfortable, durable, and unmistakably yours.
So dig that old frame out of the shed, pick some cord in colors that make you smile, and give it a try. Worst case, you gain some knotting skills and a funny story. Best case, you end up with the most popular seat in your yardand a strong urge to make “just one more” macrame lawn chair.


