Table of Contents >> Show >> Hide
- Why a Bubble Fountain Is Such a Smart Backyard Project
- What a Budget Bubble Fountain Actually Needs
- How to Build a Bubble Fountain in an Afternoon
- How to Keep the Cost Down
- Common Mistakes That Turn a Cute Fountain Into a Backyard Headache
- Maintenance Tips for a Fountain That Still Looks Good Next Month
- Design Ideas to Make a Cheap Fountain Look Custom
- Is a DIY Bubble Fountain Worth It?
- Experience and Lessons Learned From Building a Budget Bubble Fountain
- SEO Tags
If your yard feels a little too quiet, a little too flat, or a little too “something is missing here,” a bubble fountain might be the upgrade that fixes all three. It adds movement, soft sound, and a polished garden look without demanding a giant budget, a masonry crew, or a full-blown identity crisis in the outdoor aisle of the home center.
The best part is this: a simple bubbling fountain is one of the most approachable DIY water features you can build. In its easiest form, it is basically a watertight planter, a submersible pump, some tubing, and a clever way to hide the guts under decorative stone. That means you can get the look of a custom yard feature without building a pond, wrestling with complicated plumbing, or spending your entire Saturday pretending you enjoy digging holes.
Now for one honest note before we start: some fountain styles really can be finished in an afternoon, especially container-style builds. More elaborate bubbling rock or buried-reservoir versions may take a full day or even a weekend. So if your goal is fast, affordable, and satisfying, the smartest move is to build a simple container bubble fountain first and save the grand estate-garden version for another day.
Why a Bubble Fountain Is Such a Smart Backyard Project
A bubble fountain hits a sweet spot that few yard projects manage. It looks more expensive than it is, takes up less space than a pond, and feels more custom than a store-bought statue fountain. Because the water recirculates, you are not installing new plumbing lines. Because the reservoir is compact, maintenance is manageable. And because the water moves, the whole setup feels alive even in a tiny patio corner.
There is also a design advantage here. A bubbling fountain works in almost any style of yard. Want a cottage-garden vibe? Use a glazed ceramic pot and rounded river rock. Prefer something modern? Choose a simple dark planter with a clean bubbling stone on top. Going for rustic? An urn-style planter with pebbles and creeping plants gets you there fast.
And yes, the sound matters. A good bubble fountain creates just enough white noise to soften street sounds, barking dogs, or your neighbor’s commitment to leaf blowers. It is the backyard equivalent of dimming the lights and pretending you absolutely have your life together.
What a Budget Bubble Fountain Actually Needs
For the fastest and most affordable version, think container fountain, not “mini Versailles.” You do not need an elaborate basin or expensive carved stone. A typical budget-friendly build uses:
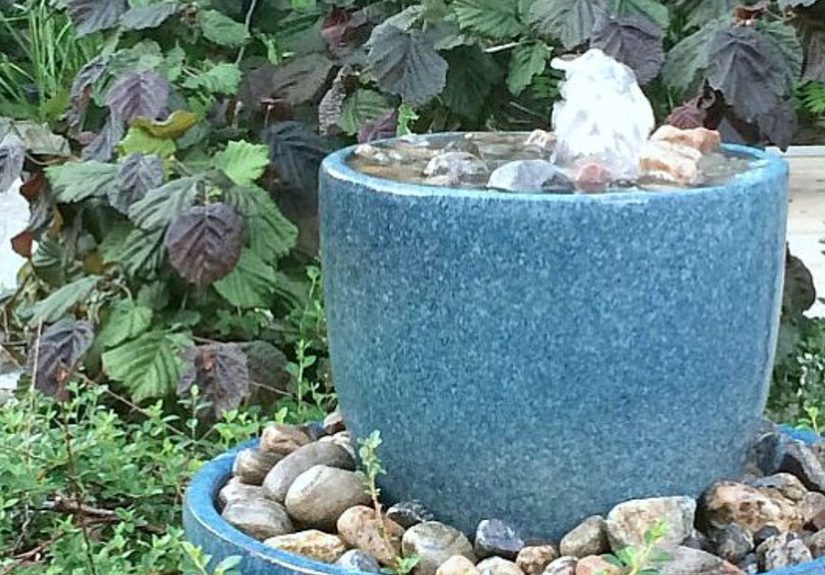
1. A watertight container
A large ceramic planter, resin pot, or sturdy outdoor container works well. Bigger containers are usually better because they hold more water, which means less refilling and a little more forgiveness on hot days. If your pot is porous or has drainage holes, you will need to seal it properly.
2. A small submersible pump
This is the heart of the fountain. The pump pulls water from the container and pushes it up through tubing so it can bubble out at the top. For a simple pot fountain, you do not need a monster pump. You just need one rated for fountains and outdoor use.
3. Tubing or a bubbler kit
The tubing connects the pump to the fountain outlet. Some kits make this almost ridiculously easy, which is wonderful news for anyone whose plumbing experience ends at “I once tightened something under the sink.”
4. A support structure
Many simple DIY fountains use an upside-down bucket, plastic nursery pot, or riser inside the container. This supports the top layer while leaving room below for the pump and water reservoir.
5. Decorative rock, pebbles, or a top feature
This is what turns a hidden little pump system into something stylish. You can use polished stones, river rock, glass pebbles, or a drilled stone cap. The decorative top hides the mechanics while allowing water to bubble up and spill back down.
6. Outdoor-safe electrical access
Your fountain should sit near a properly protected outdoor power source. This is not the moment for sketchy cords and optimistic thinking. Water and electricity need respect, not vibes.
How to Build a Bubble Fountain in an Afternoon
If you want the easiest version, here is the practical path.
Step 1: Choose the right spot
Pick a level location near a GFCI-protected outdoor outlet. A patio, deck edge, garden bed, or front entry corner can all work beautifully. Try to place the fountain where you can hear it from a seating area or from inside the house through an open window. If possible, avoid the hottest all-day sun, since extreme heat can speed evaporation and encourage algae.
Step 2: Prep the container
If your planter has drainage holes, seal the ones you will not use. Some DIYers run the power cord through one opening and seal the remaining holes with plugs and waterproof caulk. If the container material is porous, add a water-safe sealant inside. This is the not-glamorous step that keeps your pretty weekend project from becoming a weird slow leak.
Step 3: Create the hidden support
Place an upside-down bucket, nursery pot, or other sturdy riser inside the container. Drill or cut openings so the power cord can pass through and water can move freely. This support will hold your top layer and prevent heavy stones from crushing the pump.
Step 4: Set the pump
Place the submersible pump inside the container, usually near the center or beneath the support. Connect the tubing and test the length before you cover anything up. Make sure the cord exits cleanly and safely.
Step 5: Add the fountain top
This can be a saucer, a drilled stone, a decorative bowl, or a pebble-covered platform. The goal is simple: the water comes up through the center, bubbles gently, then spills back into the reservoir below.
Step 6: Hide the mechanics with stone
Cover the visible top area with washed river rock, pebbles, or decorative glass. Washed stone matters more than people think. If you dump dusty gravel straight in, your fountain can look cloudy enough to qualify as soup.
Step 7: Fill with water and test
Add water until the pump is fully submerged. Then turn it on and watch the flow. Adjust the pump, nozzle, or stone arrangement until the bubbling effect looks and sounds right. A gentle bubble is often better than a dramatic geyser, unless your goal is to soak nearby furniture and frighten songbirds.
How to Keep the Cost Down
If “budget” is your love language, here is where the savings happen.
Reuse what you already have
An old glazed planter, leftover river rock, a nursery pot, or a clean 5-gallon bucket can all become part of the build. The less you buy new, the more impressive you get to sound when guests compliment it.
Choose a simple design
A container bubble fountain is cheaper than a buried basin, cheaper than a multi-tier fountain, and definitely cheaper than calling someone who says things like “hardscape consultation fee.”
Skip fancy materials at first
Start with affordable decorative stone and a basic fountain pump. You can always upgrade the surface look later with better rock, a nicer pot, or a sculptural bubbler top.
Buy for function, not drama
You do not need the biggest pump on the shelf. A smaller fountain usually looks and sounds better with a moderate flow. Oversized pumps waste money and can create splash-out, which leads to constant refilling.
Common Mistakes That Turn a Cute Fountain Into a Backyard Headache
Letting the pump run dry
This is the big one. Always keep the pump submerged. Hot weather, wind, and enthusiastic splashing can drop the water level faster than you expect.
Ignoring level ground
If the base is not level, the water may collect unevenly, splash out, or expose the pump. Take two extra minutes to level the setup. Future You will be smug and grateful.
Using the wrong electrical setup
Outdoor fountains need proper power protection. Use outdoor-rated equipment and a GFCI-protected outlet. This is one of those details that is deeply boring right up until it becomes extremely important.
Making it too shallow
A tiny reservoir may look sleek, but it can require constant topping off. A slightly larger pot is usually worth it for easier maintenance.
Forgetting about cleaning
Leaves, dust, algae, and slimy mystery bits happen. A fountain is easier to enjoy when you accept from day one that it is not self-cleaning magic.
Maintenance Tips for a Fountain That Still Looks Good Next Month
Good news: a bubble fountain is fairly low-maintenance when compared with larger ponds or waterfalls. Still, it needs some routine attention.
Top off water regularly
Check the water level every few days in warm weather. Evaporation is real, and splash loss adds up.
Remove debris before it breaks down
Leaves, petals, and mulch can clog the pump or cloud the water. Scoop them out before they turn into fountain stew.
Clean the pump and stones
Every so often, unplug the fountain and rinse the pump housing and prefilter. Give the visible stones a quick scrub if algae starts building up.
Keep water moving
Moving water is one reason fountains are more appealing than stagnant containers. It can also make the feature less inviting for mosquitoes than still water. If water ever sits without circulation, address it quickly.
Winterize if needed
In cold climates, drain and protect the fountain before freezing temperatures crack the container or damage the pump. If you live somewhere warm, you still may want to deep-clean the setup seasonally.
Design Ideas to Make a Cheap Fountain Look Custom
You do not need luxury materials to make a fountain look polished. You need a little restraint and a little styling.
- Use one dominant material: all river rock, all black pebbles, or one consistent stone tone looks intentional.
- Surround the fountain with plants: low grasses, creeping thyme, sweet potato vine, or ferns soften the edges beautifully.
- Match the pot to your house: modern homes love clean shapes; cottage gardens love weathered urns; Mediterranean spaces adore terracotta.
- Add nighttime drama: a nearby solar spotlight can make even a simple fountain look expensive after dark.
- Keep scale in mind: a compact fountain can be perfect in a small yard. Bigger is not always better. Sometimes bigger is just wetter.
Is a DIY Bubble Fountain Worth It?
Absolutely, especially if you choose the right version. A simple container fountain gives you the charm of moving water, the visual appeal of a custom garden accent, and the satisfaction of building something useful in a single afternoon. It is approachable, adaptable, and easy to personalize.
More importantly, it gives your yard a focal point. Even a tiny patio starts feeling more layered and intentional when water is involved. Birds may notice it. Guests will definitely notice it. And you will notice how much more pleasant your outdoor space feels when it has a gentle bubbling soundtrack instead of dead silence and distant traffic.
So no, you do not need a massive budget to build a backyard feature that feels special. You just need a solid pot, a safe power source, a modest pump, and the courage to believe that a bucket hidden under rocks can somehow become landscaping. Because weirdly enough, it can.
Experience and Lessons Learned From Building a Budget Bubble Fountain
The funniest thing about building a bubble fountain is that it starts out feeling almost too simple. You gather a pot, a pump, a bucket, and some rocks, and suddenly you are standing in the yard thinking, “Surely this cannot be a real landscape project.” Then you turn it on for the first time, hear that soft bubbling sound, and immediately become the kind of person who says things like, “The garden feels more peaceful now.” It happens fast.
One of the most common experiences people have with a first fountain build is underestimating how important the container size is. A smaller pot may look cute in the store, but once the pump is inside, the support is in place, and the stones are added, the water reservoir can shrink dramatically. The result is more refilling, more fussing, and more muttering. A larger pot usually feels like the smarter choice within a day or two.
Another lesson is that “budget” works best when it does not become “random.” Reusing materials is a great idea, but the best-looking fountains still have some visual discipline. Matching stone colors, choosing one pot style, and keeping the fountain shape simple tends to look more expensive than mixing every leftover garden item into one heroic experiment.
Then there is the issue of water flow. Nearly everyone expects the first test run to be perfect. Nearly everyone is wrong. Sometimes the pump is too strong, sometimes the tubing needs adjustment, and sometimes the rocks redirect water in bizarre ways. This is normal. The sweet spot often comes after a few rounds of minor tinkering. Once dialed in, the fountain usually sounds better, splashes less, and holds water longer.
Maintenance also teaches a few truths. A fountain near trees will collect debris faster than expected. A fountain in intense sun may need topping off more often. A fountain placed where people actually sit and relax, however, tends to earn its keep quickly. The sound becomes part of the space. It softens noise, makes the yard feel cooler, and creates the kind of atmosphere that makes even a folding chair feel a little upscale.
And perhaps the best experience of all is how a small project can change the way a yard is used. People linger longer near water. They notice nearby plants more. Birds may stop by. Even a simple DIY bubble fountain has a way of making the yard feel finished, like the space now has a point of view instead of just grass and good intentions. For a project that can be built on a modest budget, that is a pretty excellent return.


