Table of Contents >> Show >> Hide
- What “Tara Wall-Mounted Lavatory Faucet” Usually Means
- Why Go Wall-Mounted in the First Place?
- Key Specs That Make Tara… Tara (and Why You Should Care)
- Planning the Rough-In: The “Measure Twice, Tile Once” Section
- Water Efficiency and Compliance: What 1.2 GPM Signals
- Finishes and Style: Making Tara Work in Real Homes
- Installation Reality: What Your Plumber Wants You to Know
- Daily Use: Comfort, Ergonomics, and Accessibility Notes
- Care and Maintenance: Keep It Gorgeous Without Overthinking It
- Quick Buying Checklist: A 60-Second Sanity Scan
- Conclusion: Is the Tara Wall-Mounted Lavatory Faucet Worth It?
- Real-World Experiences & Lessons Learned (A 500-Word Reality Check)
If your bathroom vanity could talk, it would probably ask for less clutter, fewer toothpaste drips, and a little more
“architectural moment.” Enter the Tara wall-mounted lavatory fauceta wall-mounted icon that feels
like it belongs in a boutique hotel, a thoughtfully renovated historic home, or the kind of powder room that makes
guests suddenly start washing their hands for the full 20 seconds.
This guide breaks down what the Tara wall-mounted setup is, why designers love it, what the specs actually mean in
real life (splash, reach, and regret prevention), and how to plan the rough-in so you don’t end up with water
launching into orbit like a tiny indoor fountain show. We’ll also cover water efficiency, compliance basics, finish
options, and maintenanceplus a long “real-world experiences” section at the end, because wall-mount faucets are
gorgeous… and also extremely honest about your planning skills.
What “Tara Wall-Mounted Lavatory Faucet” Usually Means
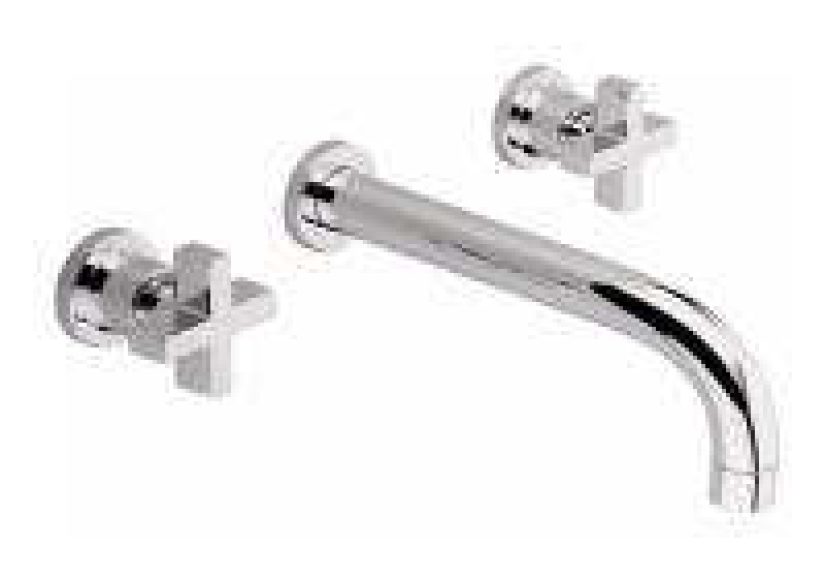
“Tara” most commonly refers to Dornbracht’s Tara design seriesrecognizable for its crisp geometry and classic,
symmetrical vibe. In wall-mounted lavatory form, you’re typically looking at a three-hole wall-mounted
lavatory mixer (spout + two handles) installed on the finished wall above the sink, with the plumbing and
rough-in components concealed inside the wall cavity.
The appeal is immediate: the deck (countertop) stays cleaner, the faucet reads like part of the architecture, and
you can pair it with everything from a traditional undermount to a modern vessel bowl. The catch? Wall-mounted
faucets demand early decisions: spout projection, sink dimensions, handle spacing, finished wall thickness, and
service access all matterbecause once tile goes up, physics becomes your project manager.
Why Go Wall-Mounted in the First Place?
Pros (AKA Why Designers Keep Doing This)
-
Cleaner countertop: With no faucet base on the deck, you wipe the counter without doing the
“around-the-faucet” dance. -
More visual breathing room: Wall-mount faucets can make small vanities feel less crowded and
more deliberate. -
Flexible height: You can position the spout for a vessel sink or a shallower basinif you plan
correctly. -
High-end look: Wall-mounted fixtures tend to read “custom,” even when the rest of the bathroom
is behaving modestly.
Cons (AKA The Fine Print Your Tile Installer Wishes You’d Read)
-
Rough-in precision matters: If the spout lands too far out (or not far enough), splash happens.
If it lands too high, splash happens louder. -
Service can be harder: Repairs may require accessing in-wall components. Planning a service
route is not optional; it’s adulthood. -
More labor + coordination: Plumbing and tile work must align. Your faucet does not care that
your contractor “usually eyeballs it.”
Key Specs That Make Tara… Tara (and Why You Should Care)
A commonly specified Tara wall-mounted three-hole lavatory mixer configuration includes practical details that
directly affect daily use:
- Spout projection: about 9-1/2 inches (how far it reaches from the wall into the sink).
- Flow rate: limited to 1.2 gallons per minute (gpm) (water-saving without feeling like a sad trickle).
- Stream type: typically an aerated (air-enriched) stream for a softer feel and less splash.
- Lead-free designation: designed to meet lead-related requirements for plumbing products.
- Handle + spout holes: the wall penetrations and trim dimensions are standardized for the system’s valves and spout.
Translation: Tara’s projection is generous (great for many basins), the 1.2 gpm flow supports water-conscious
builds, and the aerated stream helps reduce splashassuming you don’t mount it like a garden hose pointed at the
basin rim.
Planning the Rough-In: The “Measure Twice, Tile Once” Section
Wall-mounted lavatory faucets are won or lost in the planning phase. The rough-in components sit behind the
finished wall, and your final spout position is the result of framing, wall build-up (cement board, waterproofing,
tile thickness), and the rough valve depth settings. Tara wall-mounted systems commonly specify a rough-in depth
range (the acceptable distance between the rough and the finished wall plane). In plain terms: if your wall ends up
thicker than expected, your trim may not fitor it may fit in a way that feels like it’s clinging on for emotional
support.
1) Start with the sink, not the faucet
Choose the sink model (or at least the sink dimensions) before finalizing the faucet placement. For comfortable
everyday use, you typically want:
-
The water stream to land roughly near the center of the drain area (not on the back wall of the
sink and not on the front lip). -
Enough vertical clearance to wash hands without knuckle-banging the spout, but not so high that the stream
accelerates into splash city.
2) Match projection to basin depth
Tara’s ~9-1/2″ projection is often a sweet spot for many standard basins, but it’s not universal. A very shallow
wall-hung sink might need a shorter projection; a deep vessel bowl may want a different spout position and height.
If you’re mixing a wall-mounted faucet with a vessel sink, treat it like a first date with seating assignments:
plan where everyone’s going to land before you show up.
3) Decide your mounting height with a splash test mindset
A common planning mistake is setting height based on “looks right on the elevation drawing.” Better: set height
based on where water will hit. Designers often recommend thinking in terms of the distance from the spout outlet to
the sink’s water impact areanot just centerlines. If you can, mock it up: mark the wall, hold a template, or use a
cardboard jig. It’s low-tech, but it’s also how you avoid high-tech regret.
4) Don’t ignore finished wall thickness
Tile assemblies add up: substrate + waterproofing + thinset + tile thickness. Rough-in valves need to be set to
land within their allowable depth once the final surface is complete. Get the tile spec early and confirm the build
with your installer. Your faucet trim will not accept “the tile was thicker than we thought” as a valid excuse.
5) Plan service access like a responsible future-you
While some wall-mounted systems are designed with robust components, plumbing is still plumbing. Consider where
access could happen if a cartridge or valve needs service. In some bathrooms, access is possible from the opposite
side of the wall (a closet, adjacent room, or removable panel). This is one of those “nobody wants to think about it
now, everybody wants to have it later” decisions.
Water Efficiency and Compliance: What 1.2 GPM Signals
A 1.2 gpm lavatory faucet flow rate is a strong indicator you’re in modern water-efficiency
territory. In the U.S., flow rates and labeling programs have evolved: many older faucets flowed higher, while
newer high-efficiency specifications have pushed the market toward lower maximum flow without wrecking performance.
WaterSense and what it means for your bathroom
The EPA’s WaterSense program is widely used to identify water-efficient fixtures. WaterSense-labeled bathroom sink
faucets historically focused on reducing flow versus older “standard” faucets, and updates to specifications have
increasingly emphasized high-efficiency options. In practical terms: a 1.2 gpm lavatory faucet is
designed to conserve water while still supporting everyday tasks like handwashing and toothbrushing.
Green building programs (LEED and friends)
If you’re working with a green building goal (or you just like the idea of saving water without feeling deprived),
efficient lavatory faucets can support indoor water use reduction strategies. Lavatory faucets are one of the easier
fixture categories to improve without compromising comfortespecially when paired with an aerated stream.
Lead-free: what the phrase actually points to
“Lead-free” in plumbing has a specific regulatory meaning in the U.S. for products that convey water for human
consumption, based on limits for lead content in wetted surfaces. Separately, standards like NSF/ANSI/CAN 372 define
technical requirements and calculations used to verify lead content limits. For a homeowner, the takeaway is simple:
you want a faucet that’s designed and certified for modern lead-related requirementsespecially in spaces where
people brush teeth, rinse mouths, and fill cups.
Finishes and Style: Making Tara Work in Real Homes
Tara’s geometry can swing classic or contemporary depending on finish and pairing. Some popular directions:
Classic bright finishes
Chrome is the timeless choice: it reads clean, works with most tile, and tends to be forgiving in
busy bathrooms. If you’re trying to make the faucet “disappear” into the room, chrome is your stealth mode.
Warm metallics and statement looks
Warmer finishes (including gold-toned options) can turn Tara into jewelry for the wall. In a powder room with
moody wallpaper or stone, a warmer finish can look intentional and elevated. Just remember: with great shine comes
great fingerprint responsibility.
Matte and dark finishes
Matte black and darker metallics can look modern and architecturalespecially with pale stone, concrete, or
high-contrast tile. If you go dark, keep cleaning habits realistic: water spots show up differently depending on
finish texture and lighting, so choose a finish that matches how you actually live, not how you live on your
Pinterest board.
Installation Reality: What Your Plumber Wants You to Know
This is the part where the faucet stops being a “product” and becomes a “project.”
Here are the most common success factors for wall-mounted lavatory installations:
Use proper blocking and stable mounting
Wall-mounted fixtures need solid support behind the wall. That often means wood blocking between studs and careful
alignment so the trim sits flush and stable. If the wall flexes, the faucet will eventually complainusually at a
time when you’re hosting people.
Confirm valve spacing and alignment before closing the wall
With three-hole wall-mounted sets, handle alignment matters visually and ergonomically. Confirm spacing, level, and
plumb before you close up the wall. A faucet that’s 1/8″ off-level will stare at you forever like a crooked picture
frame you can’t unsee.
Pressure expectations: don’t confuse flow rate with weak performance
Flow rate (gpm) is not the same as “pressure.” A well-designed 1.2 gpm aerated faucet can feel plenty functional
for lavatory tasks. If your home has pressure issues, that’s a separate plumbing conversationbut don’t assume a
lower gpm equals “bad faucet.” It often equals “your water bill quietly thanks you.”
Daily Use: Comfort, Ergonomics, and Accessibility Notes
Good bathroom design is the kind you don’t noticebecause it works. Wall-mounted faucets can support accessibility
goals when controls are operable with one hand and don’t require tight grasping, pinching, or twisting, and when
placement makes sense for reach. Lever handles are often easier to operate than knobs for a broad range of users.
Even if you’re not designing specifically for accessibility, these guidelines tend to align with “this feels nice
to use.” Which is the highest compliment a bathroom can receive.
Care and Maintenance: Keep It Gorgeous Without Overthinking It
-
Clean gently: Use mild soap and water, then dry with a soft cloth. Avoid abrasive cleaners that
can dull finishes over time. -
Descale the aerator if needed: If flow becomes uneven, mineral buildup may be the culprit.
Carefully remove and clean per manufacturer guidance. -
Watch the wall joint: Keep an eye on caulk lines and wall penetrations so moisture doesn’t sneak
behind the trim. -
Don’t ignore drips: A small drip can be a simple service item if addressed earlyfar easier than
waiting until it becomes a “surprise feature.”
Quick Buying Checklist: A 60-Second Sanity Scan
- Sink chosen? Confirm depth and drain location.
- Projection makes sense? Stream should land near the drain area.
- Height planned? Comfortable clearance, minimal splash.
- Wall build-up known? Tile thickness confirmed before rough-in depth is set.
- Service access considered? Closet panel, backside wall, or strategy in place.
- Finish matches your lifestyle? Honest answer only.
- Flow rate meets your goals? Water efficiency, local requirements, comfort.
Conclusion: Is the Tara Wall-Mounted Lavatory Faucet Worth It?
If you want an elevated, architectural lookand you’re willing to plan the rough-in with real measurements instead
of vibesTara wall-mounted lavatory setups can be a knockout choice. The generous projection and efficient flow
target a modern sweet spot: functional daily use with a cleaner countertop footprint and a design-forward presence.
The best part is how it changes the “feel” of the vanity area. The sink becomes a focal point, the wall reads more
intentional, and the whole space looks less like a utility corner and more like a designed room. Just remember: wall
mounting rewards planning. It’s not difficultit’s just allergic to improvisation.
=====================
500-WORD EXPERIENCE ADD-ON
=====================
Real-World Experiences & Lessons Learned (A 500-Word Reality Check)
Let’s talk about what actually happens when people choose a Tara wall-mounted lavatory faucet (or any high-end
wall-mount setup) during a remodel. The story usually begins with a beautiful inspiration photo and the phrase,
“It’ll be so much easier to clean.” This is trueeventually. But first, there’s the part where the plumbing has to
land in exactly the right place, inside a wall that may contain studs, vent stacks, electrical lines, insulation,
and (in older homes) the occasional surprise that feels like it was installed by a raccoon with a hammer.
One common experience is the “template moment.” Someone (ideally the designer or plumber, sometimes the homeowner
holding a tape measure like it’s a magic wand) realizes that the spout projection and sink shape have to work
together. If the sink is shallow, that generous projection can send water too close to the front edge. If the faucet
is set too high because it “looked balanced” on the wall, the aerated stream can still splashespecially on
flatter-bottomed basins. The fix is almost always the same: mock it up, mark it out, and aim the water stream where
hands naturally go. Fancy design, meet basic physics.
Another real-world theme is “tile thickness amnesia.” During rough-in, the wall is open and everyone feels powerful.
Then tile selection happens, or waterproofing gets upgraded, or the installer suggests a thicker substrate for
flatter walls. Suddenly, the finished wall is thicker than expected. When the trim goes on, things may still work
but fit becomes tighter, or alignment looks slightly off. The best projects avoid this by deciding wall materials
early and confirming build-up thickness before the plumber sets final valve depths. Boring? Yes. Effective? Also yes.
People also discover the joy of the clean countertop. Once installed, wall-mounted faucets really do make daily
wipe-downs easier. There’s no faucet base collecting grime, no crusty ring where water sits, and less clutter
competing with soap and toothbrushes. In powder rooms, this can make even a small vanity feel like a boutique moment.
In primary baths, it’s a subtle luxury: fewer obstacles during the morning rush.
The “service access” conversation often arrives laterusually when someone reads a forum thread at 11 p.m. and
suddenly wonders how repairs work. The experience here varies. Some setups are straightforward with accessible
components; others are more involved if in-wall parts require access. The best remodels plan a quiet escape hatch:
a closet-side panel, removable access from the backside wall, or at least a realistic understanding of what would
happen if a cartridge needs attention years down the road.
Finally, there’s the finish choice reality. Chrome tends to be the low-drama friend: it works everywhere and doesn’t
bully you with water spots. Dark finishes look incrediblebut in certain lighting, they may show mineral traces or
fingerprints faster. The most satisfied homeowners choose the finish they’ll actually maintain, not the one that
looks best in staged photos taken right after a professional cleaning crew leaves.
Bottom line: the Tara wall-mounted lavatory faucet experience is overwhelmingly positive when the team treats
placement like engineering (with aesthetics), not like decoration (with hopes and prayers). Plan carefully, and you
get a faucet that feels permanently “designed.” Rush it, and you get a very expensive splash tutorial.


