Table of Contents >> Show >> Hide
- What a Weathered Metal Magnet Board Is (and Why It’s Weirdly Satisfying)
- Plan First: The 5 Choices That Decide Whether You’ll Love It
- Materials and Tools
- How to Build a Weathered Metal Magnet Board
- Step 1: Choose the right metal (aka: pick something magnets will actually like)
- Step 2: Cut and de-burr like a responsible adult
- Step 3: Prep the backing board so the whole piece stays flat
- Step 4: Attach the metal to the backing (the “no rattles, no regrets” method)
- Step 5: Create the weathered look (choose your adventure)
- Step 6: Seal it (because “weathered” should not mean “crumbly”)
- Step 7: Frame it so it looks like décor, not a sheet from the HVAC aisle
- Step 8: Mount it safely and level (your future self will thank you)
- How to Use a Weathered Metal Magnet Board Like a Pro
- Magnet Tips That Save You From “Why Does Nothing Stick?” Rage
- Care, Safety, and “Don’t Learn This the Hard Way” Notes
- Troubleshooting Common Issues
- Conclusion: A Board That Organizes and Actually Looks Good
- Real-World Experiences With a Weathered Metal Magnet Board (the Part Nobody Mentions Until After)
- SEO Tags
There are two kinds of homes: the ones where important notes live in a neat little system, and the ones where the “system”
is a pile of mail that migrates around the kitchen like it’s paying rent.
A weathered metal magnet board is the peaceful middle grounda place where reminders, photos, recipes,
permission slips, inspiration clippings, and “do not forget this again” lists can land safely… and look ridiculously good doing it.
Think of it as a magnetic command center with a little swagger: real metal, real magnets, and a finish that says,
“Yes, I have my life together,” even if your calendar says otherwise.
In this guide, you’ll learn what makes a magnet board actually work (spoiler: not all metal is created equal),
how to get that weathered look without turning your wall into a science fair project,
and how to style it so it feels like décornot a bulletin board that wandered out of an office breakroom.
What a Weathered Metal Magnet Board Is (and Why It’s Weirdly Satisfying)
A magnet board is simply a sheet of ferrous metal (steel) mounted to a backing and often framed,
so magnets can hold lightweight items in place. The “weathered” part is the finishanything from a soft, aged patina
to a rustic, rusty look that feels like it came from an old workshop, a reclaimed barn door, or your favorite antique store aisle.
The appeal is practical and aesthetic: it keeps clutter off counters, makes daily tasks visible,
and adds texture to a space. Unlike cork boards, it won’t crumble. Unlike whiteboards, it doesn’t scream “meeting at 3 p.m.”
(unless that’s your vibe, in which case: respect).
Plan First: The 5 Choices That Decide Whether You’ll Love It
1) Location: where will it earn its keep?
A weathered metal magnet board shines in high-traffic zones:
entryways (keys + mail + reminders), kitchens (menus + shopping lists),
home offices (content calendars + sticky notes), and craft rooms (tools + inspiration).
Pick a wall you naturally look atbecause the best system is the one you actually use.
2) Size: go big enough to be useful
Too small, and it becomes a magnet parking lot. Too big, and it becomes a “museum of paper.”
A good rule: if you want it to replace countertop clutter, aim for at least poster-size.
For a family command center, think wider than you think you need.
3) Magnet strength: the hidden deal-breaker
If you want to hold heavier items (thick invitations, small notebooks, stacks of coupons),
use stronger magnets (often rare-earth/neodymium) and avoid unnecessary layers over the metal.
Decorative finishes are greatbut thick wood overlays, extra padding, or heavy coverings can reduce hold.
4) Finish: real rust, faux rust, or “aged but tidy”?
Real rust looks incredible, but it needs sealing so it doesn’t shed onto your fingers or your paper.
Faux weathering can look just as convincing and is easier to control.
You can also use reclaimed-looking metal panels for instant character.
5) Mounting: this is not the time for vibes-only hanging
Metal + backing + frame can be heavier than it looks. Plan to anchor into studs,
use appropriate wall anchors, or build with a French cleat for stability.
If you’re making a large board, secure mounting is part of the projectnot an optional accessory.
Materials and Tools
Here are flexible options so you can build with what’s available and stay within budget.
Materials
- Steel sheet (galvanized steel sheet/flashing is common and easy to find)
- Backing board (plywood, MDF, or a sturdy wood panel)
- Frame (picture frame, DIY trim frame, or reclaimed molding)
- Fasteners (short screws, construction adhesive, or both)
- Finish supplies (paint and glaze, or patina solution for real weathering)
- Clear sealer (clear coat spray, polyurethane, or a purpose-made metal/patina sealer)
- Hanging hardware (D-rings, heavy-duty picture hangers, French cleat, or keyhole hangers)
Tools
- Tape measure, pencil, level
- Drill/driver
- Tin snips or metal cutting shears (or have the store cut the sheet)
- Sandpaper or a sanding block
- Work gloves and safety glasses
- Paintbrushes, foam brushes, or rags (depending on finish)
How to Build a Weathered Metal Magnet Board
Step 1: Choose the right metal (aka: pick something magnets will actually like)
You want steelnot aluminum, not copper, not “mystery metal that looked cool in the clearance aisle.”
Galvanized steel sheets and flashing are popular for DIY magnet boards because they’re widely available and easy to cut.
If you’re aiming for real rust, note that galvanized steel is designed to resist corrosion, so it won’t rust the same way
bare steel does. For true rust patina, use plain steel and then seal it well.
Step 2: Cut and de-burr like a responsible adult
If your sheet isn’t already the right size, cut it carefully. Wear gloves and eye protection, and don’t rush.
Fresh-cut metal edges can be sharp enough to turn your DIY into a surprise audition for a bandage commercial.
After cutting, lightly sand edges to remove burrs and dull the sharpness.
Step 3: Prep the backing board so the whole piece stays flat
Cut your backing to the same size as the metal. If you’re framing the board,
make sure the assembly thickness fits the frame depth. Sand the backing and, if you want,
paint it a dark color so any tiny gaps at the edges don’t stand out.
Step 4: Attach the metal to the backing (the “no rattles, no regrets” method)
You have two solid options:
-
Screws: Pre-drill small holes near the edges and use short screws to secure the metal to the backing.
Keep screw heads neat and evenly spaced for an intentional look. -
Adhesive + weights: Apply construction adhesive (compatible with metal and wood),
then clamp or weight the metal until fully cured. This gives a cleaner face with no visible fasteners.
For larger boards, a combination of adhesive and a few discreet screws near corners can help prevent warping over time.
Step 5: Create the weathered look (choose your adventure)
Option A: “Real Weathered” (rust patina) on bare steel
If you’re going for authentic rust: work in a well-ventilated area, protect your surfaces, and use gloves and eye protection.
Degrease the steel first so the patina develops evenly.
A common DIY approach uses household ingredients to encourage oxidation; the key is thin layers and patience.
Let the surface rust develop gradually rather than flooding it all at once.
Pro tip: Rust rarely looks perfect on the first pass. You build depth by repeating light applications,
letting it dry between rounds, and stopping when the color feels rich (not flaky).
Option B: Faux weathering (paint that looks like it has a backstory)
Faux finishes are ideal if you want the look of weathered metal without loose rust.
Start with a dark base (charcoal, iron gray, deep brown), then layer on lighter metallic tones using dry brushing or sponging.
Add a little warm brown and muted orange in small amounts to mimic oxidation.
The secret is unevenness: let some areas stay dark, let others catch “wear,” and don’t blend everything to perfection.
Real weather is rude and inconsistentcopy that energy.
Option C: Reclaimed-style metal
If you find decorative tin panels, ceiling tile-style sheets, or salvaged metal with natural character,
you can skip most finishing and simply clean, stabilize, and seal. This gives you instant texture with less guesswork.
Step 6: Seal it (because “weathered” should not mean “crumbly”)
Sealing matters even if you love the raw look. Without a sealer, rust can transfer onto paper and fingers,
and even painted finishes can scuff with constant magnet movement.
Use a clear coat appropriate for metal, and test on a small area first.
Expect some visual changeclear coats can deepen color and increase shine.
If you want a flatter, more subtle look, choose a matte or satin finish.
Step 7: Frame it so it looks like décor, not a sheet from the HVAC aisle
A frame instantly upgrades the board. You can:
use a thrifted picture frame (remove glass and backing),
build a frame from trim boards,
or repurpose old molding for extra character.
Paint the frame black for modern-industrial, stain it warm for farmhouse, or go bright if you want “rustic but fun.”
Step 8: Mount it safely and level (your future self will thank you)
For small to medium boards, heavy-duty picture hangers or D-rings can work well.
For large boards, consider a French cleat system or screw directly into studs.
Use a levelbecause a crooked command center quietly mocks you every time you walk past it.
How to Use a Weathered Metal Magnet Board Like a Pro
Entryway “drop zone” that stops the paper pile
Add labeled magnets for keys, a “to mail” corner, and a spot for weekly reminders.
Use stronger magnets for thicker envelopes and store spare magnets in a small magnetic cup or tin.
Kitchen planner without the fridge takeover
If your refrigerator isn’t magnetic (many modern ones aren’t),
a magnet board restores the classic “stick it where I’ll see it” magic.
Use it for meal planning, grocery lists, school schedules, and recipes you keep meaning to try.
Home office storyboard (especially if you live by deadlines)
Turn it into a visual workflow: “Ideas,” “Drafting,” “Editing,” “Published.”
Add magnetic labels for projects, keep research notes visible,
and move items along as tasks progress. It’s satisfying in a way spreadsheets could never understand.
Craft room tool and inspiration wall
Magnetic boards are great for small metal tools (scissors, rulers, tweezers) when paired with magnetic strips or containers.
You can also pin fabric swatches, paint chips, and inspiration clippings for ongoing projects.
Magnet Tips That Save You From “Why Does Nothing Stick?” Rage
- Choose stronger magnets if you plan to hold more than a single sheet of paper.
- Keep the surface smoothheavy texture can reduce contact and cause slipping.
- Avoid thick coverings over the metal (like thick fabric or layered boards) if you want strong hold.
- Use rubber-coated magnets if you want less scratching and a quieter “snap.”
Care, Safety, and “Don’t Learn This the Hard Way” Notes
Working with sheet metal means respecting sharp edges and using basic protective gear.
Wear gloves when cutting and handling fresh-cut metal, and wear eye protection when cutting or drilling.
If you create a rust patina, seal it so it won’t rub off onto hands or paper.
Keep chemical processes ventilated and away from pets and kids.
And if you’re mounting a larger board, use proper anchors or studsgravity is patient, but it never forgets.
Troubleshooting Common Issues
“My board looks too shiny after sealing.”
That’s commonmany clear coats deepen color and add sheen. Next time, test a matte or satin finish.
You can also experiment with a light scuff sand (very gentle) and recoat with a flatter topcoat.
“The rust looks flaky and dusty.”
You may have pushed oxidation too fast or too thick. Brush off loose rust, let it dry completely,
and seal with thin coats. For future projects, build patina slowly with light applications.
“My magnets are weak.”
Swap to stronger magnets, reduce layers between magnet and metal,
and confirm you used steel (not aluminum). Also note: thick paint buildup can reduce grip a bit.
“The sheet is warping.”
Use a sturdier backing, add a few more attachment points, and avoid heavy moisture exposure during finishing.
Adhesive plus evenly spaced screws along edges can help keep the sheet flat.
Conclusion: A Board That Organizes and Actually Looks Good
A weathered metal magnet board is one of those rare DIY wins that checks all the boxes:
it’s functional, customizable, surprisingly affordable, and it makes your space feel more intentional.
Whether you go for true rust patina, a faux-aged paint finish, or reclaimed-style metal,
the key is planning the size, picking the right metal, and sealing it so it stays beautiful in real lifenot just on day one.
Make it bold. Make it practical. Make it the place where your important stuff goes to live a calmer, less crumpled existence.
Your counters will thank you. Your future self will definitely thank you.
Real-World Experiences With a Weathered Metal Magnet Board (the Part Nobody Mentions Until After)
The first time you hang a weathered metal magnet board, you feel like a person who has “systems.” Not just hopes and good intentions,
but an actual physical station where life can be sorted into categories. Then reality shows up with a stack of mail, a kid’s art project,
a grocery list written on the back of a receipt, and a coupon that expires in six hours. This is where the magnet board earns its keep.
In real homes, it becomes a living, shifting map of what matters this week.
One of the best surprises is how quickly it replaces countertop clutter. I’ve seen people start with “just a few reminders”
and then graduate to a full “entryway command center” in a weekend: key hooks nearby, a small basket under it, and a set of strong magnets
that act like tiny bouncers“This paper is allowed to stay. That paper needs to leave.” The board doesn’t solve everything,
but it makes the mess visible in a way that encourages action. When you can see the reminder, you’re more likely to do the thing.
When you can’t see it, it becomes part of the “paper ecosystem” and evolves into a fossil layer.
Another real-life lesson: the finish you love in your head might not be the finish you love in daily use.
Super powdery, heavily rusted looks are gorgeous… until you brush against them and your fingers look like you’ve been auditioning
for a role as “Victorian chimney sweep #3.” That’s why sealing isn’t optional. Even a matte sealer can slightly darken rust,
and that can feel like a betrayal at first. But once you see that your white paper stays white and your hands stay hand-colored,
you’ll make peace with it. The best-looking board is the one you can actually touch without consequences.
The magnet situation also gets real fast. Cute souvenir magnets from travel? Great for a postcard or a single photo.
But the day you try to hold a thick invitation, a folded permission slip, and a couple of receipts all at once,
you’ll discover which magnets are decorative and which magnets mean business. Most people end up with a “magnet hierarchy”:
a handful of strong workhorse magnets for real tasks and a few fun ones for flair. And once you find a magnet you truly love,
you will guard it like it’s the last slice of pizza.
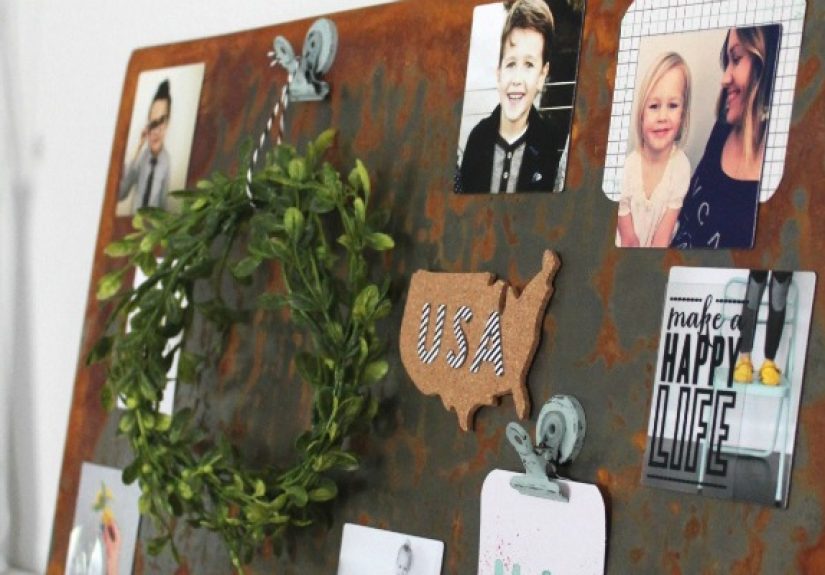
The most satisfying experience might be the way a weathered metal magnet board becomes personal over time.
At first, it’s just a tool. Then it holds a photo you keep meaning to frame, a ticket stub you didn’t want to lose,
a small drawing that makes you smile, and a note that reminds you to call someone you care about.
It slowly turns into a “mini gallery of real life,” and somehow that makes the everyday tasks feel less annoying.
Even the boring stufflike bills or schedulesfeels a bit more tolerable on a board that looks like it has character.
It’s organization, yes. But it’s also a little daily stage where your life gets to be seen and handledone magnet at a time.


