Table of Contents >> Show >> Hide
- What Makes Trim “Craftsman” Style?
- Before You Start: Plan Like a Pro (Even If You’re in Weekend Mode)
- Tools and Materials You’ll Likely Need
- Core Layout Rules for Craftsman Trim (Windows and Doors)
- How to Install Craftsman Window Trim (DIY)
- How to Install Craftsman Door Casing (DIY)
- Common DIY Mistakes (and How to Avoid Them)
- Practical Example: A Simple, Beginner-Friendly Craftsman Window Trim Build
- DIY Experience Notes and Real-World Lessons (Extended)
- Conclusion
If your windows and doors currently look like they were finished with a shrug, Craftsman trim is one of the best DIY upgrades you can make. It adds clean lines, visual weight, and a custom-built look without requiring advanced woodworking wizardry. The best part? Craftsman-style trim typically uses square cuts and layered parts, so you can skip a lot of fussy mitered corners and still end up with a result that looks expensive.
In this guide, you’ll learn how to install Craftsman window trim and Craftsman door casing step by step, including planning, measuring, cut strategy, assembly, installation, and finishing. I’ll also cover common mistakes, real-world tips, and what to do when your walls are doing that “I’m not straight, surprise!” thing.
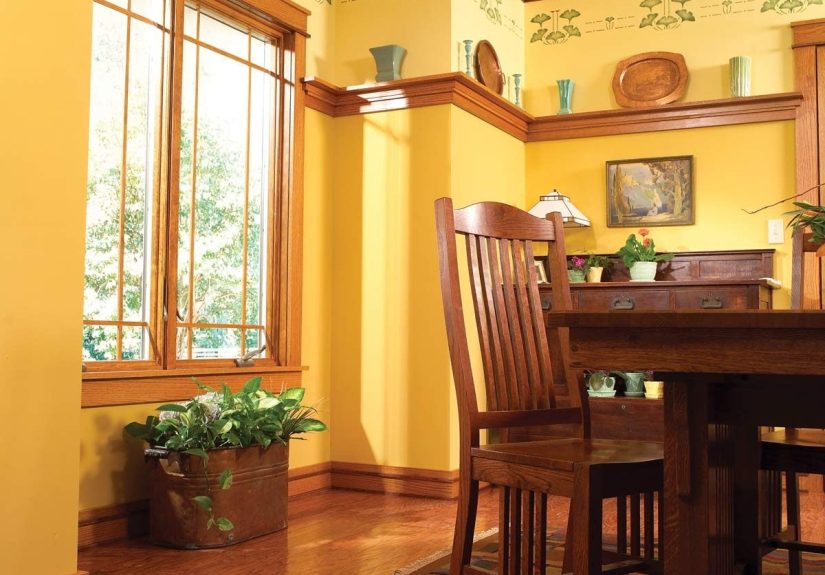
What Makes Trim “Craftsman” Style?
Craftsman trim is known for its simple, substantial, square-edged look. Instead of thin, ornate profiles with mitered corners, Craftsman trim usually features:
- Flat stock boards (often 1x material)
- Square or butt joints instead of miter joints
- A wider head casing/header piece
- Layered top details (cap, fillet, stop, or other trim accents)
- For windows: a stool and apron assembly for a classic built-up look
Translation: it looks crisp, intentional, and timeless. Also, it’s very forgiving for DIYers because straight cuts are easier to measure, mark, and repeat.
Before You Start: Plan Like a Pro (Even If You’re in Weekend Mode)
1) Match the house, not just the Pinterest board
Craftsman trim looks best when it relates to the rest of your interior trim. Check your baseboards, existing door trim, and window trim in nearby rooms. You don’t need a perfect match, but you do want a consistent visual languagesame paint color, similar thickness, and comparable trim scale.
2) Choose paint-grade vs. stain-grade materials
For most DIY projects, paint-grade trim is the easiest and most budget-friendly choice. Finger-jointed pine and primed MDF are common options. MDF paints beautifully and stays very straight, but it doesn’t love moisture and creates fine dust when cut. Solid wood is great for durability and stain finishes, but it can cost more and may require more board sorting to find straight pieces.
3) Check wall and jamb conditions
Trim installation is half carpentry, half negotiation with the wall. Before cutting everything, check:
- Whether the jamb is proud, flush, or recessed relative to drywall
- Whether the wall bows around the opening
- Whether the existing sill (for windows) needs replacement
- Where studs or framing are located for secure nailing
4) Decide your reveal size
A reveal is the visible strip of jamb you leave showing between the inside edge of the trim and the inside edge of the jamb. This small detail makes a huge difference in how clean the installation looks. Common reveal sizes for interior trim are around 1/8 inch to 1/4 inch. Pick one reveal and stay consistent across the whole opening.
Tools and Materials You’ll Likely Need
Tools
- Tape measure
- Combination square (great for consistent reveals)
- Pencil or marking knife
- Miter saw (for straight cuts and any optional detail cuts)
- Brad nailer (16- or 18-gauge) and compressor
- Jigsaw (for window stool cutouts/notches)
- Level (2-foot and/or 4-foot)
- Stud finder
- Pry bar and utility knife (for trim removal)
- Caulk gun
- Putty knife
- Sander or sanding sponge
- Drill/driver (optional, helpful for screws in stubborn areas)
Materials
- Flat stock boards (common choices: 1×4, 1×5, 1×6, 1×2)
- Optional cap/stop/cove/fillet trim for built-up Craftsman header details
- Wood glue
- Brad nails (various lengths, typically 1" to 2")
- Trim-head screws (optional for extra holding power)
- Paintable caulk
- Wood filler or spackle (depending on the hole/gap)
- Primer and paint (or stain + clear coat if stain-grade)
Pro tip: Buy a little extra trim. Not because you’re bad at thisbecause walls are weird and one bad cut can turn a board into “future paint stir stick.”
Core Layout Rules for Craftsman Trim (Windows and Doors)
Use reveal lines
Mark your reveal lines on the jamb before installing anything. A combination square makes this fast and consistent. These lines act as your visual guide so your trim doesn’t wander as you nail.
Dry-fit whenever possible
Hold pieces in place before nailing. This helps you catch small errors, wall irregularities, and measurement drift before they become a “creative design decision.”
Mark directly on the workpiece when you can
For many trim cuts, especially around existing openings, direct marking is more accurate than measuring and transferring numbers. If you can hold it in place and mark it, do that.
Build header assemblies off the wall
If your Craftsman design includes a built-up header (frieze board + cap + fillet/stop), assemble it on a workbench first, then install it as a unit. It’s cleaner, faster, and much less frustrating than juggling small pieces on a ladder.
How to Install Craftsman Window Trim (DIY)
Step 1: Remove old trim (if needed)
Score the caulk line with a utility knife before prying off old trim. This helps protect drywall paper and paint. Use a pry bar carefully and work slowly. If the existing stool is too shallow or too short for your new design, remove it too.
Step 2: Mark reveal lines on the window jamb
Use your combination square to mark a consistent reveal all the way around the jamb. Many DIYers like 3/16 inch for a nice crisp look, but 1/8 inch also works well. The important part is consistency.
Step 3: Make and fit the window stool
The stool is the horizontal shelf-like trim piece at the bottom of the window opening (what people casually call the sill inside). For a Craftsman look, it typically projects beyond the side casings and forms “horns” on both ends.
- Measure the window opening and decide how far you want the stool to overhang each side.
- Cut the stool blank (often 1×6, depending on your design depth).
- Mark the notches/L-cuts needed so the stool slips into the opening and extends out at both ends.
- Test fit, trim as needed, then install.
If the wall or opening is out of square, scribing the stool to the wall can dramatically improve the fit. Tiny gaps can be caulked later, but a good fit now means a cleaner finished look.
Step 4: Install side casings
Cut the left and right side casings to fit between the stool and the bottom of the future header assembly (or top flat casing piece, depending on your design). Align each piece to your reveal lines and nail it in place.
Nail strategy matters: use shorter brads into the jamb area and longer brads into wall framing where available. If a spot won’t sit tight because the wall dips, a trim-head screw into a stud can save the day.
Step 5: Build the top header assembly
This is where Craftsman trim gets its signature look. A common approach is a wide flat board (frieze/header) with one or more trim pieces attached above or below it (cap, fillet, stop mold, etc.).
Build the header on a bench:
- Cut the main header board to span the top and align with the outer edges of the side casings (or your planned overhang)
- Cut cap/fillet pieces to match your design
- Glue and pin-nail the pieces together
- Let the assembly set up briefly if needed
Then place the assembly on top of the side casings, center it, check level, and nail it securely. Prebuilding this assembly makes the whole project feel less like a circus act.
Step 6: Install the apron and lower details
The apron is the horizontal piece under the stool. Some Craftsman styles add a cove or stop detail between the stool and apron for extra depth. Measure between the outside edges of your side casings (or your lower trim stack, depending on design), cut the apron, and install.
If you’re using small return pieces or decorative details, glue helps a lot. Small parts can shift under nail-gun pressure, so clamp when needed.
Step 7: Fill, caulk, sand, prime, and paint
The install is the fun part. The finish work is what makes it look professional.
- Fill nail holes with wood filler (or lightweight spackle for certain painted applications)
- Fill larger drywall-to-trim gaps as needed
- Sand smooth
- Prime cut ends, filled areas, and raw edges
- Caulk seams where trim meets wall/jamb
- Paint 2 coats for a clean, durable finish
Don’t skip priming cut edges. Even pre-primed trim needs help where you cut it.
How to Install Craftsman Door Casing (DIY)
Craftsman door casing is very similar to window trim in spirit: square cuts, clear proportions, and a stronger top presence. You can build a simple version (flat stock only) or a built-up version with a cap and fillet.
Step 1: Mark reveal lines on the door jamb
Mark your reveal along both side jambs and across the head jamb. A consistent reveal makes the casing look intentional and keeps hinge-side operation clear.
Step 2: Cut and install side casing legs
For classic Craftsman/butt-joint casing, the side pieces get straight cuts at the top (not miters). Measure from the floor (or top of plinth block if using one) to the underside of the planned head casing. Cut both legs and test fit.
Set each leg on the reveal line, check plumb, then nail. If the floor is uneven, scribe the bottom edge or use plinth blocks for a cleaner transition to baseboard.
Step 3: Cut and install the head casing
Cut the head casing with straight cuts so it sits on top of the side legs (butt joint style). This is the hallmark move that gives Craftsman door trim its clean, sturdy appearance.
Center the head casing over the side legs, align with the reveal, level it, and nail it off. At this point, you already have a clean Craftsman-style casing, even without extra top layers.
Step 4: Add optional Craftsman header build-up
Want more visual weight? Add a fillet strip and cap on top of the head casing, or use a wider built-up head assembly. This is especially effective on taller ceilings and plain rooms that need architectural detail.
Keep the proportions balanced:
- Side legs and head casing should feel related in width
- The top cap should project slightly beyond the head casing
- Symmetry matters more than exact brand-specific dimensions
Step 5: Finish the casing
Fill nail holes, caulk seams, sand, prime, and paint just like window trim. Check the top corners and side-to-wall seams carefullydoor casing gets eye-level attention every time someone walks through the room.
Common DIY Mistakes (and How to Avoid Them)
1) Inconsistent reveals
This is the most common trim issue. Fix: mark reveal lines first and actually use them. Your future self will thank you.
2) Measuring everything with a tape only
Tape measures are great, but direct marking is often more accurate for trim. Especially on older homes where openings are rarely perfect.
3) Nailing without checking framing
You can nail trim to drywall and make it look attached… until it isn’t. Use a stud finder and aim for framing whenever possible.
4) Skipping test fits
One dry-fit can prevent three recuts and a dramatic speech in the garage.
5) Rushing finish work
Fancy trim + bad caulk = still bad. Take your time on filling, sanding, and paint prep. That’s where “DIY” becomes “Did you hire this out?”
Practical Example: A Simple, Beginner-Friendly Craftsman Window Trim Build
If you want a straightforward design, try this popular formula:
- Stool: 1×6
- Side casings: 1×4
- Header/frieze: 1×4 or 1×6 (depending on scale)
- Top cap/detail: 1×2 or small stop/cap molding
- Apron: 1×3 or 1×4
This setup gives you the Craftsman look without requiring specialty profiles. You can always add more detail later once you get comfortable.
DIY Experience Notes and Real-World Lessons (Extended)
One of the most common experiences people have with Craftsman trim is being surprised by how fast the carpentry part goes once the layout is figured out. The first opening takes the longest because you’re making design decisions, checking proportions, and learning your process. By the second or third window or door, you usually hit a rhythm: mark reveals, cut, dry-fit, nail, move on. That “assembly line” feeling is where this project becomes genuinely fun.
Another very real experience: the wall will win at least one round. On paper, the trim design is perfectly square and symmetrical. In an actual house, you may discover a bowed drywall edge, a jamb that isn’t perfectly flush, or a window opening that is slightly wider at the bottom than the top. This is not a failure. This is home improvement. The trick is learning when to correct with a scribe, when to shim behind the trim, and when a neat bead of paintable caulk is the right finishing move.
A lot of DIYers also notice that finishing takes longer than expected. Installing the boards feels productive because the room transforms immediately. Filling nail holes, sanding, priming, and caulking can feel slow by comparison. But this stage is what creates the professional result. A well-installed trim job with sloppy finish work still reads as “unfinished.” A decent install with excellent finish work often looks fantastic from normal viewing distance. If time is tight, prioritize patience in the prep and paint stages.
There’s also a confidence jump that happens during this project. Once you successfully trim out one window or door, other upgrades suddenly feel less intimidating. Baseboards, crown transitions, built-ins, and even custom casing details stop feeling like mystery work and start feeling like repeatable steps. Craftsman trim is a great bridge project between beginner DIY and more advanced finish carpentry because the cuts are mostly square and the results are highly visible.
Cost-wise, many people find this project delivers strong visual impact for the money. Paint, caulk, and filler add up, but the trim itself is often still far less expensive than replacing windows or doors to improve a room’s look. It’s the classic “high-impact, medium-effort” upgradeespecially when you compare before-and-after photos. Rooms that once looked flat or builder-basic suddenly feel intentional and finished.
Finally, expect your measuring style to improve. Trim work teaches accuracy in a practical way. You start paying attention to reveals, grain direction, overhangs, and how a sixteenth of an inch can matter at a visible joint. You’ll probably also become the kind of person who mutters, “I should have marked this directly,” at least once. Congratulations. That’s growth.
Conclusion
Installing Craftsman window trim and Craftsman door casing is one of the best DIY upgrades for adding character to a home. You get a custom look, forgiving cut patterns, and a huge visual payoff without needing master-level carpentry skills. Focus on consistent reveals, careful measuring (or better yet, direct marking), clean assembly, and patient finish work. Start with one window or one door, build your process, and the rest of the house gets a lot less scary.
In short: square cuts, solid plan, good caulk, and a little patience. That’s the recipe. And maybe coffee. Definitely coffee.


