Table of Contents >> Show >> Hide
- What Are Applesauce Ornaments, Exactly?
- Supplies You’ll Need
- The Dough Formula (Plus How to Nail the Texture)
- Rolling and Cutting Woodland Animal Shapes
- Drying Methods That Keep Ornaments Flat
- Woodland Decorating Ideas That Look Intentional
- Seal and Store Them So They Last
- Kid-Friendly Crafting and Safety Notes
- Step-by-Step: Five Woodland Animal Ornament Ideas
- Common Problems (And Fixes That Save Your Sanity)
- Woodland Animal Applesauce Ornaments: Real-World Crafting Moments (About )
- Conclusion
If your ideal winter vibe is “cozy cabin in the woods” but your actual vibe is “I own one throw blanket and a very loud household,”
woodland animal applesauce ornaments are your sweet spot. They’re rustic, they’re charming, they smell like cinnamon-spiced nostalgia,
and they turn a basic Christmas tree into something that looks like it belongs in a snow globe curated by a tiny forest interior designer.
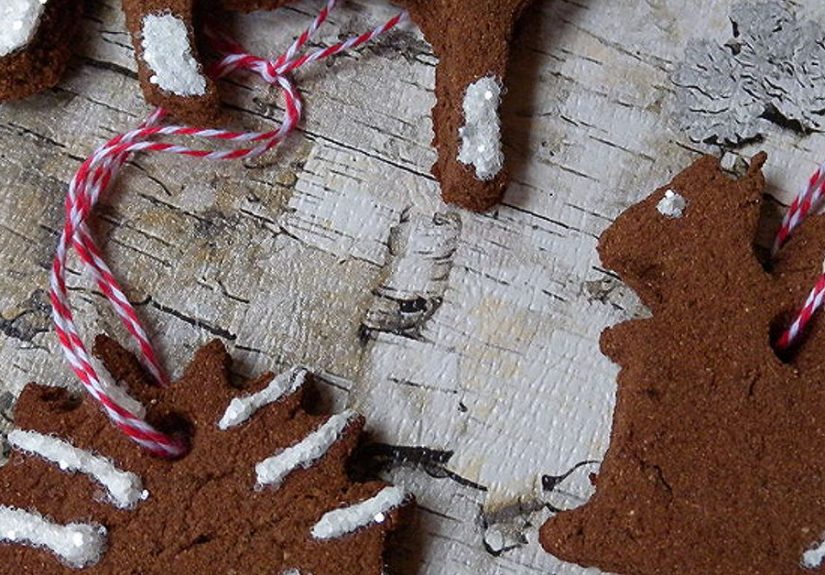
This guide walks you through making cinnamon-applesauce dough ornaments shaped like foxes, owls, deer, bears, and other forest friends.
You’ll get a dependable dough formula, two drying methods, decorating ideas that don’t scream “third-grade art room” (unless you want that),
and troubleshooting for the classic issues: cracking, curling, sticking, and that one ornament that mysteriously becomes a potato.
What Are Applesauce Ornaments, Exactly?
Applesauce ornaments are a classic DIY: you mix ground cinnamon with applesauce to form a fragrant dough, roll it out, cut shapes,
and dry them until hard. The result is a lightweight ornament that smells amazing and looks perfectly at home on a woodland-themed
Christmas tree, a garland, a wreath, or a gift tag that says, “I’m thoughtful,” even if you made it while watching a baking show.
One important note: these are not edible. Even if you use food-based ingredients, once they become “craft items,” they belong
in the category of “things that smell delicious but will absolutely disappoint your teeth.” (Also, if you add glue for durability, definitely don’t eat them.)
Supplies You’ll Need
Ingredients
- Ground cinnamon (the inexpensive kind is totally finethis is not a taste test)
- Unsweetened applesauce (smooth applesauce is easiest to work with)
- Optional: white school glue (for extra durability), ground cloves (for scent), cornstarch (for dusting)
Tools
- Mixing bowl + spoon (or your hands, if you enjoy living dangerously)
- Rolling pin
- Parchment paper (highly recommended for rolling)
- Cookie cutters or paper templates + a butter knife/craft knife (adult help for kids)
- Drinking straw or skewer (for the hanging hole)
- Baking sheet + parchment (for oven drying), or a wire rack (for airflow)
Optional Decorating Supplies
- Acrylic paint, paint pens, or metallic markers
- Twine, ribbon, or thin jute cord
- Mini pom-poms (tails!), tiny felt scraps (ears!), buttons (cute, but use caution with small kids)
- Clear sealer: Mod Podge, clear acrylic spray, or brush-on clear coat
The Dough Formula (Plus How to Nail the Texture)
A dependable starting ratio
The “right” ratio varies because applesauce thickness and cinnamon grind can differ by brand. A reliable starting point is:
about 1 cup cinnamon to 3/4 cup applesauce, then adjust. Some crafters prefer equal parts by volume; both approaches work if you
end up with the correct dough texture.
What the dough should feel like
You’re aiming for a dough that feels like playdough: pliable, not crumbly, not sticky. It should roll without gluing itself to everything
you’ve ever loved. When you press it with a fingertip, it should hold the dent without oozing applesauce.
Quick fixes
- Too sticky: add cinnamon a tablespoon at a time. Let the dough rest 5 minutes so the cinnamon absorbs moisture.
- Too dry/crumbly: add applesauce a teaspoon at a time. Go slowthis dough changes mood quickly.
- Cracking while rolling: it’s too dry or rolled too thin. Add a tiny bit of applesauce and keep thickness around 1/4 inch.
- Want sturdier ornaments: add 1 tablespoon of white school glue. This can help them hold up better in humid climates.
Rolling and Cutting Woodland Animal Shapes
Best thickness for strong ornaments
Roll the dough between two sheets of parchment paper to about 1/4 inch thick. Thinner ornaments dry faster, but they’re more likely to warp
or snap. Thicker ornaments look adorable… and take forever to dry (and can crack if the outside dries too fast).
Option A: Use cookie cutters
If you have woodland cookie cutters (deer, fox, bear, owl), greatpress firmly and lift straight up. If the cutter sticks, dust it lightly with cinnamon
or cornstarch.
Option B: Use simple paper templates (no fancy tools required)
For woodland animals, you can make clean silhouettes using basic shapes:
- Fox face: a rounded triangle with two smaller triangles for ears
- Owl: an oval with two tiny ear tufts (or keep it round for a “snowy owl” vibe)
- Deer head: an oval + a narrower snout, with antlers drawn separately (or keep it simple with a fawn face)
- Bear: a circle with two half-circle ears
- Mushroom/acorn: an oval + cap shape (perfect as woodland “filler” ornaments)
Cut your template from cardstock, place it on the dough, and trace around it with a butter knife. Peel away excess dough carefully.
Add woodland details without turning it into a messy science experiment
- Use a toothpick to draw feather lines on an owl belly.
- Press a fork lightly for “fur” texture on a fox tail or bear belly.
- Make a tiny leaf stamp by pressing a real leaf gently into the dough (don’t press too deep).
- Keep details shallow so they dry evenly and don’t create weak points.
Don’t forget the hanging hole
Use a straw to punch a hole about 1/2 inch from the top. If your animal has ears, punch between them. If it’s an acorn, punch through the “cap.”
Re-punch the hole after drying if it shrinks slightly.
Drying Methods That Keep Ornaments Flat
Method 1: Air-dry (best for preventing over-browning)
Place ornaments on a parchment-lined tray or wire rack. Let them dry at room temperature for 24–72 hours depending on thickness and humidity.
Flip them once or twice a day for even drying. Air-drying is slower but very forgiving.
Method 2: Oven-dry (best when you need ornaments today)
Bake low and slow on a parchment-lined baking sheet at a low temperature (many recipes land somewhere in the 150–200°F range).
Check periodically and flip once to reduce curling. The goal is “dry and hard,” not “holiday potpourri charcoal.”
- Tip: If your oven runs hot, choose the lower end of the temperature range and extend time.
- Tip: Cool fully before decorating or sealing; warm ornaments can trap moisture under paint or sealer.
Woodland Decorating Ideas That Look Intentional
1) The minimalist forest look
Leave ornaments their natural cinnamon color and tie them with jute twine. Add one simple detail:
a white paint pen nose on a fox, tiny dots for an owl’s eyes, or a few etched lines for antlers. It’s giving “Scandinavian cabin,”
not “glitter tornado.”
2) Painted faces (cute, not creepy)
Acrylic paint works well once ornaments are fully dry. Keep faces simple: dots, tiny triangles, and soft blush circles.
If your deer starts to look like it’s judging your life choices, you’ve added too much eyebrow.
3) Mixed-media accents
- Felt ears: glue tiny felt triangles behind a fox head for dimension.
- Pom-pom tail: perfect for bunnies and foxes.
- Acorn caps: add a real acorn cap as a topper (sealed, so it doesn’t shed).
- “Snow” effect: dry-brush white paint on edges for a frosted look.
4) Woodland color palette that actually works
Stick to a small palette: cream, warm white, charcoal, muted green, rust, and a little gold. If you want sparkle, use it like salt:
a pinch. Not a blizzard.
Seal and Store Them So They Last
Why sealing matters
Cinnamon dough ornaments can absorb humidity over time. Sealing helps reduce moisture pickup, keeps the surface cleaner, and can prevent
softening or odd smells in storage.
Sealing options
- Mod Podge (brush-on): easy to apply, dries clear. Use thin coats.
- Clear acrylic spray: fast and even coverage (spray outdoors or in a well-ventilated area).
- Brush-on clear coat: good for detailed ornaments, but avoid thick layers.
Storage tips
- Store in a dry container with tissue paper between layers.
- Add a small packet of silica gel (the “DO NOT EAT” packet that lives in shoe boxes) for extra moisture control.
- Label the box “NOT COOKIES” if you live with snack-optimists.
Kid-Friendly Crafting and Safety Notes
- Not edible: treat them as crafts, not foodespecially if glue or sealer is used.
- Cinnamon can irritate: some people get sensitive skin. Wash hands after crafting.
- Small parts: buttons, beads, and tiny pieces can be choking hazardsuse age-appropriate decorations.
- Pets: keep ornaments away from curious chewers. “Woodland animals” should not become “dog snack.”
Step-by-Step: Five Woodland Animal Ornament Ideas
1) Fox Face Ornament
- Cut a rounded triangle (or teardrop shape) for the head.
- Add two small triangle ears at the top (attach by pressing seams gently).
- Use a toothpick to draw a simple smile line and a small triangle nose.
- After drying, paint the inner ears cream and add tiny black eyes with a paint pen.
- Seal once paint is fully dry.
2) Owl Ornament
- Cut an oval shape (or a rounded blobowls are forgiving).
- Press a fork gently in a “V” pattern for feather texture.
- Poke two eye indents with the end of a straw.
- After drying, highlight feather texture with a light dry-brush of white or tan paint.
- Add a tiny beak triangle with paint or marker.
3) Deer Head Ornament
- Cut an oval for the face and pinch slightly at the bottom for a snout.
- For antlers: either keep it simple (two branching lines etched with a toothpick) or cut separate antlers and attach carefully.
- Add a small nose dot and two eye dots (keep them wide enough apart so the deer looks friendly, not haunted).
- Optional: paint antlers gold for a “festive woodland” vibe.
4) Bear Face Ornament
- Cut a circle and add two small half-circle ears at the top.
- Press a small oval snout area lightly with your finger for a raised “muzzle.”
- After drying, paint the muzzle a lighter shade and add a tiny black nose.
- Keep eyes simple dots; bears don’t need eyeliner.
5) Mushroom or Acorn “Forest Filler” Ornament
- Mushroom: cut a stem + cap silhouette, then draw gill lines underneath the cap with a toothpick.
- Acorn: cut an oval and add a curved “cap” line on top.
- Paint the cap a deeper brown or add a light dusting of cinnamon on wet Mod Podge for texture.
Common Problems (And Fixes That Save Your Sanity)
My ornaments cracked
Cracks usually happen when the dough is too dry or the ornaments dry too quickly. Keep thickness around 1/4 inch, add a touch more applesauce,
and use lower heat if oven-drying. Tiny cracks can be “woodland texture” (the forest is not known for flawless skin).
They curled like potato chips
Curling often comes from uneven drying. Flip them during air-drying or mid-bake. A wire rack can help airflow, and parchment prevents sticking.
They’re still soft in the middle
That’s a “needs more drying time” situation. Return to low heat or let them air-dry longer. Sealing before fully dry can trap moistureso resist the urge.
They stuck to the counter
Roll between parchment sheets, and dust lightly with cinnamon or cornstarch if needed. Wax paper is often more trouble than it’s worth here.
The smell faded
Scent naturally softens over time. Storing ornaments in a sealed container helps, and you can also add a small sachet of cinnamon sticks to the storage box
(separate from ornaments so nothing rubs off).
Woodland Animal Applesauce Ornaments: Real-World Crafting Moments (About )
If you’ve never made woodland animal applesauce ornaments before, here’s what usually happens in real life (a place where dough is sticky, pets have opinions,
and someone always asks if it’s edible). First, the cinnamon hits the air like an instant holiday mood switch. It’s the scent equivalent of putting on fuzzy socks.
People who were “just walking through” suddenly drift into the kitchen like forest creatures lured by magic. Someone will say, “It smells like Christmas in here,”
and someone else will reply, “It smells like I want a cinnamon roll,” which is true, but not helpful.
Next comes the dough personality test. Some batches behave like perfect playdoughsmooth, cooperative, and oddly satisfying. Other batches act like they’re
auditioning for a drama series called Sticky: The Countertop Chronicles. This is normal. Applesauce thickness varies, cinnamon varies, and humidity
varies (sometimes by the hour, because weather enjoys plot twists). The best “experienced crafter” move is to add cinnamon slowly and let the dough rest for a few
minutes before deciding it’s hopeless. Dough needs time to absorb moisturekind of like people need time to absorb the fact that glitter is forever.
Once rolling starts, you’ll notice that woodland shapes are surprisingly forgiving. A fox face doesn’t have to be symmetrical to be adorable. An owl can be an oval,
a circle, or a blob with ambition. Deer antlers might come out elegant, or they might come out looking like a small shrubbut honestly, woodland decor is all about
celebrating nature’s randomness. If you’re crafting with kids, the “forest friends” will quickly develop names, backstories, and probably a rivalry. (A bear named
Mr. Snuggles will absolutely claim he’s the manager of the tree.)
Drying is where patience meets reality. Air-drying feels wholesome and calm, like a rustic lifestyle magazine. Oven-drying feels like a deadline. In group craft
sessions, people tend to peek at the ornaments every 12 minutes as if staring makes water evaporate faster. It doesn’t, but it does build suspense. The good news:
even “imperfect” ornaments look charming once they’re hung. Slight texture? Rustic. Tiny crack? Woodgrain. A weirdly chubby owl? A well-fed owl. The woodland theme
is basically a permission slip to stop chasing perfection.
Decorating is usually the most fun part because it’s where personalities show up. Minimalists go for twine and a single painted nose. Maximalists try to give the
fox eyelashes and a scarf. Someone always wants “just a little sparkle,” which is how craft projects begin their transformation into disco wildlife. The best outcome
happens when you choose one or two details per animaleyes and a nose, feather lines, a blush cheekand let the cinnamon color do the heavy lifting. When you finally
hang them up, you get that specific satisfaction that only handmade ornaments bring: they’re not just decorations, they’re tiny time capsules. Next year, you’ll pull
them out, smell the cinnamon again, and immediately remember who made the slightly crooked deerand why it’s your favorite.
Conclusion
Woodland animal applesauce ornaments are the perfect mix of simple and special: a few basic ingredients, a cozy cinnamon scent, and just enough creative freedom
to make every fox, owl, and deer feel like its own little character. Keep your dough workable, roll to a sturdy thickness, dry low and slow, and seal them for
longer lifethen lean into the rustic charm. The forest doesn’t do perfect, and neither should your ornaments.


