Table of Contents >> Show >> Hide
- What You Need Before You Start
- Way #1: Make a Classic Poof Deco Mesh Wreath
- Way #2: Make a Ruffle Deco Mesh Wreath
- Way #3: Make a Curl-and-Ribbon Deco Mesh Wreath
- How to Choose the Right Method
- Tips for Making Your DIY Deco Mesh Wreath Look Better
- How to Hang and Store a Deco Mesh Wreath
- Real-World Experiences Crafters Often Have with Deco Mesh Wreaths
- Conclusion
If your front door has been looking a little too polite, a deco mesh wreath can fix that. It is bold, fluffy, festive, and just dramatic enough to say, “Yes, I do have a glue gun, and I know how to use it.” The beauty of a deco mesh wreath is that it looks impressive without demanding expert-level crafting skills. You do not need to be the kind of person who owns seventeen kinds of ribbon scissors. You just need a wreath form, some mesh, a handful of twist ties or chenille stems, and a willingness to embrace a little controlled chaos.
This guide walks you through three easy ways to make a deco mesh wreath: the classic poof method, the textured ruffle method, and the extra-fancy curl-and-ribbon method. Each one creates a different look, so whether you want something simple for everyday decor or a wreath that practically introduces itself to the neighbors, you will have a method that fits.
Better yet, these wreath techniques are easy to customize for every season. Swap in red and green for Christmas, orange and black for Halloween, pastels for spring, patriotic colors for summer, or neutrals if you prefer your decor to whisper instead of sing karaoke. However you style it, a DIY deco mesh wreath is one of the quickest ways to add texture, color, and personality to your front door.
What You Need Before You Start
Before diving into the three methods, gather a few basic supplies. You do not need every craft gadget in the universe. This is wreath-making, not a NASA launch.
- Wire wreath form, usually 14 to 18 inches
- Deco mesh in your chosen colors or patterns
- Chenille stems or pipe cleaners
- Sharp scissors
- Ribbon for bows or accents
- Hot glue gun for signs or lightweight decorations
- Optional add-ons such as faux florals, ornaments, picks, or a wooden sign
A quick tip before you begin: decide whether your wreath is for a front door, interior wall, mantel, or party display. That choice affects how full you want it, how much embellishment it needs, and how durable it should be. A sheltered front porch can handle a fuller, more decorative design. A narrow hallway? Maybe do not build a wreath large enough to require its own zip code.
Way #1: Make a Classic Poof Deco Mesh Wreath
The classic poof deco mesh wreath is the easiest starting point for beginners. It creates that full, fluffy, cloud-like look people usually picture when they think of a mesh wreath. If you want a fast win, this is it.
Best For
Beginners, seasonal wreaths, holiday decor, and anyone who wants a big look without complicated steps.
How It Looks
This method creates rounded “poofs” of mesh around the wreath form. The finish is soft, full, and cheerful. It works especially well with two alternating colors.
How to Make It
- Prep the frame. Attach chenille stems around the wire wreath form, spacing them evenly. Most crafters place them around the outer and inner rings so the wreath looks balanced and full.
- Secure the starting end. Take the end of your deco mesh and twist it into the first tie. Leave a small tail and tuck it to the back.
- Create the poofs. Measure out a short section of mesh, pinch it, and twist it into the next tie. Repeat all the way around the form. Try to keep your poofs a similar size so the wreath looks intentional rather than mildly startled.
- Add a second color if desired. Once the first layer is done, weave in a second color the same way. Alternating colors adds depth and makes the wreath feel more polished.
- Finish the end. Tuck the final end of mesh into the last tie and secure it neatly behind the frame.
- Add embellishments. Top it off with a bow, a sign, faux flowers, or holiday picks.
Why This Method Works
The poof wreath is forgiving. If one section is a little bigger than another, nobody is calling the Craft Police. The fullness of the mesh hides small mistakes, and the finished wreath looks wonderfully abundant on a door. It is also one of the best options for people making a wreath for the first time because it teaches you how the mesh behaves without forcing you into precise cutting or shaping.
Pro Tip
Use wider deco mesh for a bolder look, or fine-weave mesh if you want cleaner folds and less fraying. If your wreath starts looking flat, gently fluff each poof with your hands before hanging it.
Way #2: Make a Ruffle Deco Mesh Wreath
If the poof wreath is the easygoing cousin, the ruffle deco mesh wreath is the one who arrived wearing earrings and a plan. This method adds more texture and shape, making the wreath look a bit more structured and decorative.
Best For
People who want more texture, seasonal wreaths with strong color contrast, and crafters who enjoy a slightly more detailed look.
How It Looks
Instead of long continuous poofs, this method uses cut pieces of mesh gathered into ruffles. The result is layered, textured, and slightly more sculpted.
How to Make It
- Cut your mesh. Cut the deco mesh into equal strips. Keeping the pieces consistent helps your wreath look fuller and more balanced.
- Create the ruffle shape. Lay one strip flat, then gather it lengthwise down the center until it forms a tight ruffle or fan-like bunch.
- Attach to the frame. Place the gathered center into a chenille stem and twist tightly to hold it.
- Repeat around the wreath. Continue attaching ruffles all the way around the form. You can alternate colors every other tie or create blocks of color for a more graphic style.
- Fill gaps. If the frame still shows through, add a second layer of ruffles between the first ones.
- Add a focal point. Finish with a large ribbon bow, faux flowers, berries, or a decorative sign in the center or lower portion.
Why This Method Works
Ruffles create strong visual texture, so even a simple color palette looks rich and interesting. This technique is especially good for themed wreaths. For example, orange, cream, and burlap-toned mesh can create a gorgeous fall wreath, while red, white, and blue ruffles make a festive patriotic version. Because the mesh is cut into smaller pieces, this method also gives you more control over placement and color distribution.
Common Mistakes to Avoid
- Cutting uneven strips and ending up with a lopsided look
- Twisting ties too loosely so the ruffles slip out of place
- Overloading the wreath with large decorations that flatten the texture
The sweet spot is balance. Let the ruffles do the heavy lifting, then use your embellishments as the final flourish, not the entire personality of the wreath.
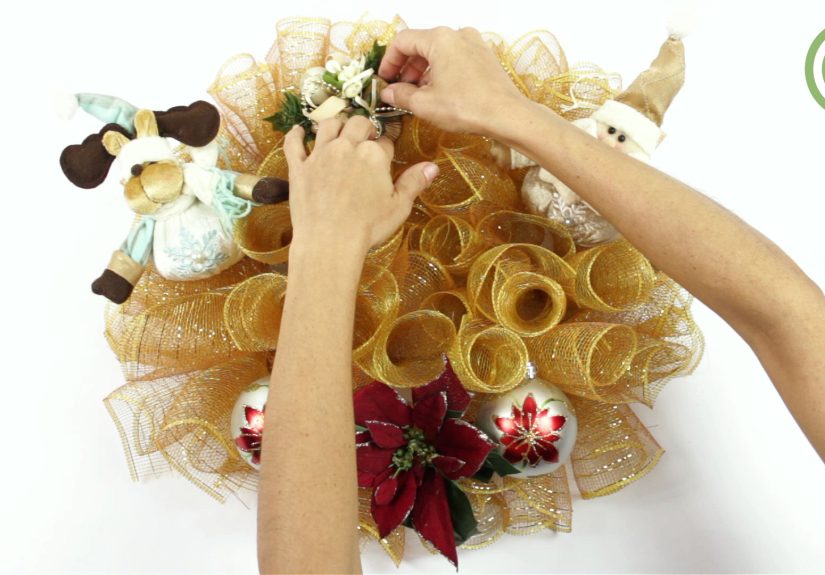
Way #3: Make a Curl-and-Ribbon Deco Mesh Wreath
This third option is for anyone who looks at a basic wreath and thinks, “Nice, but what if it had more flair?” The curl-and-ribbon deco mesh wreath combines rolled mesh pieces with ribbon tails, giving you a design that feels playful, layered, and delightfully overachieving.
Best For
Holiday wreaths, giftable wreaths, party decor, and anyone who loves a highly decorated front door.
How It Looks
The mesh is cut into shorter strips and rolled into curls. These curls are combined with ribbon tails and secured to the frame in bunches. The effect is lively, detailed, and wonderfully dimensional.
How to Make It
- Cut the mesh into strips. Use evenly sized pieces so your curls look uniform.
- Roll the curls. Each strip will naturally curl from both ends inward. Let it do its thing. Sometimes the mesh understands the assignment better than we do.
- Cut ribbon tails. Cut ribbon into matching lengths and dovetail the ends for a polished finish.
- Create bundles. Pair a couple of mesh curls with one or two ribbon tails. Pinch them together at the center.
- Attach each bundle. Place the bundle into a chenille stem and twist to secure.
- Repeat around the frame. Continue until the wreath is full and evenly covered.
- Add a centerpiece. This method looks fantastic with a sign in the middle, a monogram, or a bold top bow.
Why This Method Works
This is one of the best ways to create a designer-style wreath without needing advanced skills. The curls add movement, while the ribbon introduces pattern, contrast, and softness. It also gives you endless room for customization. You can make it playful, elegant, rustic, whimsical, or gloriously over-the-top depending on your materials.
Style Ideas
- Christmas: Red, green, gold mesh with plaid ribbon
- Spring: Pastel mesh with floral ribbon and faux tulips
- Summer: Lemon-yellow and white mesh with striped ribbon
- Fall: Orange, brown, and cream mesh with burlap-style ribbon
- Everyday front door decor: Neutral mesh with black-and-white ribbon and a wooden welcome sign
How to Choose the Right Method
If you are wondering which technique to try first, here is the easy answer:
- Choose the poof method if you want the fastest, fluffiest beginner wreath.
- Choose the ruffle method if you want stronger texture and a more structured look.
- Choose the curl-and-ribbon method if you want a fuller, more decorative wreath with lots of personality.
There is no wrong choice here. The best deco mesh wreath is the one that fits your style, your season, and your patience level on any given afternoon.
Tips for Making Your DIY Deco Mesh Wreath Look Better
Even a simple wreath can look polished if you pay attention to a few small details.
- Stick to a clear color palette. Two or three colors usually look more intentional than seven competing shades yelling over each other.
- Vary the texture. Mix shiny mesh with matte ribbon or faux greenery for depth.
- Fluff as you go. Deco mesh likes to flatten when handled. Keep reshaping it.
- Hide the mechanics. Tuck tails, rotate ties to the back, and cover visible frame sections.
- Do not overcrowd it. A wreath should look full, not like a craft store exploded politely on your door.
How to Hang and Store a Deco Mesh Wreath
Once your masterpiece is done, hang it in a way that protects both the wreath and your door. Over-the-door hangers work well, and ribbon hanging methods can add an extra decorative touch. If you do not want to make holes, hidden hooks or removable hanging options are usually the easiest path.
For storage, place the wreath in a large plastic bag, wreath box, or roomy bin so the mesh does not get crushed. Avoid stacking heavy items on top unless your long-term goal is to create a “formerly circular” wreath. A little storage care goes a long way toward keeping the mesh fluffy and the ribbon crisp for next season.
Real-World Experiences Crafters Often Have with Deco Mesh Wreaths
One of the funniest things about making a deco mesh wreath is how it can look wildly unimpressive in the middle of the process. At first, it is just a wire frame, a pile of mesh, and a growing suspicion that maybe you should have bought one instead. Then, somewhere around the halfway point, it starts to come alive. That moment is part of the experience almost every crafter shares: the project looks awkward until suddenly it does not.
Many beginners also discover that deco mesh has a personality. It curls when you do not expect it to, flattens when you wish it would behave, and occasionally catches on scissors, rings, or your sleeve like a clingy party guest. The good news is that this is normal. In fact, the people who end up making the prettiest wreaths are usually the ones who stop fighting the material and start shaping it with patience. A little fluffing, adjusting, and re-twisting can make a huge difference.
Another common experience is learning that color matters more than quantity. A lot of first-time crafters assume that adding more ribbon, more signs, more flowers, and more picks will automatically make the wreath better. Usually, it just makes the design feel crowded. The most attractive deco mesh wreaths often come from a simpler formula: one main mesh color, one supporting color, a ribbon pattern that ties everything together, and one clear focal point. That restraint is hard at first, especially when the craft aisle is whispering, “Buy the glitter pumpkins too.” Stay strong.
Crafters also tend to remember the first wreath they made that actually looked store-worthy. It is oddly satisfying. There is something deeply rewarding about hanging a finished wreath on the door and realizing you made something big, cheerful, and genuinely welcoming with your own hands. It turns the wreath from “just decor” into a little piece of personal creativity. Guests notice it, neighbors comment on it, and suddenly you are the person who “makes those cute wreaths.” Congratulations. There are worse reputations to have.
Seasonal decorating becomes easier after that first success. Once you understand the basic wreath form and how mesh attaches, it gets much simpler to switch themes. A crafter who starts with a spring wreath often comes back for a summer version, then a Halloween one, then a Christmas wreath, and before long there is a suspicious amount of ribbon stored in labeled bins. This is how the hobby sneaks up on people. One wreath becomes four. Four becomes a closet situation.
There is also a practical side to the experience. People learn quickly that where the wreath hangs matters. A covered front door helps preserve the shape and color much better than a fully exposed spot that deals with direct sun, hard rain, or wind. Storage matters too. A beautifully made wreath can come out next season looking fantastic if it was stored with enough space to breathe. If not, it may emerge looking like it had a rough year emotionally.
In the end, the biggest experience most crafters report is confidence. The first wreath teaches technique. The second teaches style. By the third, you are making design choices on purpose, mixing textures, adjusting fullness, and deciding exactly where the bow should go instead of guessing. That is the fun of deco mesh wreath making: it is approachable enough for beginners but customizable enough to keep getting better every time you do it.
Conclusion
Making a deco mesh wreath is one of those rare DIY projects that gives you a big visual payoff without requiring elite crafting powers. Whether you choose the classic poof method, the textured ruffle method, or the lively curl-and-ribbon method, you can create a wreath that feels personal, festive, and surprisingly polished. Start simple, keep your color palette focused, fluff everything, and remember that wreath-making is supposed to be fun. A little mess is part of the magic.
If your first wreath is not perfect, that is fine. It still beats a bare front door. And your second one will probably be even better.


