Table of Contents >> Show >> Hide
- Table of Contents
- A Smart Budget Game Plan
- The 38 Budget Kitchen Remodeling Ideas
- Category 1: The “Free (or Almost Free) Glow-Up”
- Category 2: Paint & Cabinets (Big Impact, Small-ish Budget)
- Category 3: Hardware & Plumbing (Small Swaps, Luxury Feel)
- Category 4: Lighting (The Secret Weapon)
- Category 5: Backsplash & Walls (Big Visual Payoff)
- Category 6: Counters, Floors, and “Workhorse” Surfaces
- Category 7: Storage & Function (Because Pretty Kitchens Still Need to Work)
- Avoid These “Budget Busters”
- Real-World Experiences & Lessons (Extra)
Want your kitchen to look “custom” without taking out a second mortgage (or selling a kidney on Facebook Marketplace)?
Good news: a budget kitchen remodel is mostly about smart, visible upgradespaint, lighting, hardware, and function
not ripping everything out like you’re auditioning for a demolition show.
Below are 38 low-cost, high-impact kitchen remodeling ideasmany DIY-friendlythat can make your space feel cleaner,
brighter, and way more expensive than it was yesterday.
A Smart Budget Game Plan
Before you buy anything, decide what “better” means for your kitchen. Is it more storage? Brighter lighting? Cleaner
surfaces? Less chaos? The cheapest remodel is the one that fixes your real pain points instead of chasing random trends.
Three rules that keep costs low (and sanity high)
- Keep the layout if it works. Moving plumbing, gas, or major electrical can turn a “weekend upgrade” into a “why do I live here?” saga.
- Spend where hands touch. Faucets, pulls, lighting, and organizers change daily life more than pricey finishes you only admire from across the room.
- Plan for surprises. Set aside a contingency (even small projects find weird drywall, mystery wiring, or that one cabinet door with a grudge).
Where the money usually goes
In many kitchen remodel budgets, cabinets and labor are major cost drivers. That’s why painting, refacing selectively,
and DIY-friendly upgrades can deliver a big “after” photo without the big invoice.
The 38 Budget Kitchen Remodeling Ideas
Category 1: The “Free (or Almost Free) Glow-Up”
-
Declutter the countertops like you’re staging a home. Put away rarely used gadgets, corral daily items on a tray, and let your counters breathe. The kitchen instantly looks larger and more “designed.”
-
Deep clean and degrease everything. Cabinets, backsplash, range hood, and even light fixtures collect grime that dulls your whole kitchen. A true deep clean can make “old” look “maintained.”
-
Re-caulk and touch up grout. Fresh caulk at the counter/backsplash line and brightened grout can make surfaces look newly installedeven if they’re older than your email password.
-
Organize drawers with dividers. A $10–$30 organizer can feel like a remodel every time you open the drawer and don’t have to fight the whisk for dominance.
-
Add shelf risers and under-shelf baskets. Cheap add-ons double usable space in cabinets and pantries, making your current storage work harder without new cabinetry.
-
Swap outlet covers and switch plates. Yellowed or mismatched plates quietly make a kitchen look dated. Fresh, matching covers are a tiny change with surprising polish.
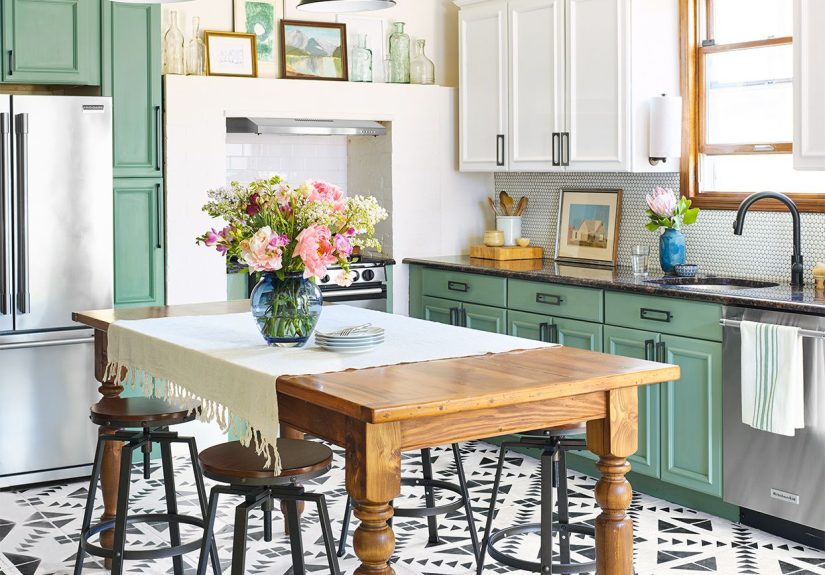
Category 2: Paint & Cabinets (Big Impact, Small-ish Budget)
-
Paint the walls in a clean, modern neutral. If your kitchen feels dim, choose a lighter shade. If it feels flat, pick a warm white or soft greige that plays nicely with your cabinets and flooring.
-
Paint your cabinets instead of replacing them. If the boxes are solid, paint can deliver the biggest transformation per dollar. Prep well (clean, sand, prime) for a finish that holds up to real life.
-
Go two-tone on cabinets. Keep uppers light and make lowers moodier (or paint the island a standout color). It adds depth and a “designer planned this” vibe.
-
Add DIY Shaker-style trim to flat cabinet doors. A little trim + paint can turn basic slab doors into classic Shaker style for far less than buying new doors.
-
Paint or replace the toe-kick and baseboards. Scuffed toe-kicks make a kitchen look tired. Fresh paint (or simple replacement) cleans up the “bottom edge” of the whole room.
-
Add crown molding or a simple top trim above cabinets. Even a basic trim can make stock cabinets look taller and more custom. Bonus: it helps hide uneven ceiling lines.
-
Replace only the worst cabinet doors. If most doors are fine but a few are damaged or warped, swap those only. It’s a targeted fix that protects your budget.
-
Remove a couple of upper cabinet doors for “open shelving” without building anything. Paint the inside, display simple dishes, and stop there. (Yes, stop. We’re not trying to dust 47 decorative jars.)
Category 3: Hardware & Plumbing (Small Swaps, Luxury Feel)
-
Upgrade cabinet pulls and knobs. New hardware is one of the easiest ways to modernize your kitchen. Choose a finish that works with your faucet and lighting so it looks intentional.
-
Use a hardware “template” to install perfectly. A cheap drilling template keeps pulls aligned. Crooked hardware screams DIYin the wrong way.
-
Add soft-close bumpers (or hinges if feasible). Soft-close feels high-end. If full hinge replacement is too much, inexpensive bumpers still reduce slams and noise.
-
Upgrade to a pull-down kitchen faucet. This is a daily-use upgrade that improves function and style. A good-looking faucet can make a sink area feel “new” even if nothing else changes.
-
Replace the sink if yours is shallow or stained. A deeper single-bowl sink is a quality-of-life upgrade (hello, sheet pans). Look for budget-friendly drop-in or simple undermount options.
-
Add an under-sink water filter (or a filtered faucet attachment). It’s a practical upgrade that can reduce clutter from bottled water and add “thoughtful” functionality.
-
Coordinate the “little metal things.” Matching (or intentionally mixing) finishes for the faucet, cabinet hardware, soap pump, and any visible accessories makes the kitchen feel planned, not patched.
-
Replace a tired garbage disposal or fix the one you have. A loud, struggling disposal makes the whole kitchen feel older. Sometimes the best budget move is replacing the annoying thing you notice every day.
Category 4: Lighting (The Secret Weapon)
-
Replace the main ceiling light fixture. Builder-grade lighting dates a kitchen fast. A new fixture is a style upgrade you feel immediatelylike changing the kitchen’s “mood settings.”
-
Add under-cabinet LED strips. Task lighting makes counters more useful and kitchens more inviting. Many options plug in, stick on, and don’t require an electrician.
-
Install a dimmer switch. Dimmers are cheap, high-impact, and make your kitchen feel more expensive at night. (Also: fewer harsh “why is my life like this?” shadows.)
-
Swap bulbs to higher-quality light. Choose bulbs with warm-to-neutral color temperature and good color rendering so food and finishes look better. Bad lighting can make a nice kitchen look sad.
-
Add a plug-in pendant or sconce where you need task light. Over a sink, coffee station, or dark cornerplug-in options can deliver style without rewiring.
Category 5: Backsplash & Walls (Big Visual Payoff)
-
Try peel-and-stick backsplash tile. Great for rentals or micro-budgets. Prep the wall well, measure carefully, and start from a level line so it reads “custom,” not “craft time.”
-
Tile only the focal area (like behind the range). If your backsplash square footage is small, you can choose a nicer tile without blowing the budgetstrategic splurging at its finest.
-
Use beadboard or a simple panel backsplash. Painted beadboard can give cottage or classic charm and is often cheaper and faster than full tile.
-
Install a one-piece backsplash panel. A single sheet (solid-surface or similar) can be easier for DIYers than tile and delivers a clean, modern look with fewer grout lines.
-
Upgrade the range area with a metal or heat-safe backsplash section. Even a small, durable panel behind the stove adds a professional feel and protects the wall from cooking chaos.
Category 6: Counters, Floors, and “Workhorse” Surfaces
-
Add butcher block to one area for warmth. You don’t have to replace all counters. A butcher-block section (like on an island or coffee bar) adds texture and a high-end, curated look.
-
Refresh counters with budget-friendly laminate. Modern laminate comes in surprisingly convincing patterns and is typically more affordable than stoneespecially when you keep the layout the same.
-
Use a temporary countertop wrap (vinyl/contact paper) for a short-term makeover. Ideal for rentals or “I need this to look better by Saturday” moments. It’s not forever, but it can be a great bridge.
-
Install click-lock luxury vinyl plank (LVP) flooring. LVP can be durable, water-resistant, and DIY-friendly. It’s a fast way to update the biggest surface in the room without tile labor costs.
-
Add a washable runner (or two). This is the simplest “floor upgrade” when replacement isn’t in the budget. A runner softens the space, hides wear, and adds color instantly.
Category 7: Storage & Function (Because Pretty Kitchens Still Need to Work)
-
Create a coffee bar or beverage station. Use a small counter section, cart, or reclaimed shelf. Group mugs, coffee, and supplies so mornings feel smootherand your kitchen feels intentionally designed.
Note: If you’re thinking, “Wait, that’s only one item in Category 7,” you’re rightand it’s because the first six categories already included
several storage upgrades (dividers, risers, open shelving, and more). The point is to improve function without making the kitchen look like a store display.
Avoid These “Budget Busters”
- Moving plumbing/electrical “just because.” Layout changes often trigger permits, patching, and labor costs.
- Replacing good cabinets due to cosmetic issues. If the cabinet boxes are sturdy, paint + hardware can be the smarter move.
- Choosing trendy finishes with no plan. Pick a simple palette and repeat it (lighting + hardware + faucet) so the kitchen feels cohesive.
- Skipping prep on paint projects. A rushed cabinet paint job chips fast and becomes “expensive” when you redo it.
Real-World Experiences & Lessons (Extra)
Here’s what homeowners commonly report after doing budget kitchen upgradesespecially the kind that look small on paper,
but feel huge once you live with them. Consider this the “I wish someone told me this before I started” section.
1) The cheapest upgrade often changes the entire vibe. People are frequently shocked by how much a kitchen improves after two “boring”
tasks: decluttering and deep cleaning. It sounds like advice your grandma would give (because it is), but it works. Once counters are clear and cabinet
faces aren’t sticky, the kitchen suddenly looks brightereven before paint, tile, or hardware enters the chat.
2) Cabinet painting is 80% prep and 20% patience. The stories tend to follow a pattern: the first attempt feels easy until the finish
starts scratching, peeling, or showing grease stains. Then comes the realization: degreasing, sanding/scuffing, and priming aren’t “extra steps,” they’re
the whole game. When people slow down, label doors, and let coats cure properly, the results look dramatically more professional.
3) Lighting is the undercover hero. Many kitchens have one overhead light that turns the room into a bright interrogation scene.
Homeowners who add under-cabinet lighting, a warmer bulb temperature, or a dimmer often describe it as “the kitchen finally feels cozy” moment.
It’s also one of the few upgrades that improves both how the kitchen looks and how it functionsespecially for chopping, cooking, and cleaning.
4) Small, repeated choices read more “high-end” than one big splurge. People often expect one expensive item to carry the whole remodel
(a fancy faucet, a pricey pendant, or a “statement” tile). What typically looks more polished is repeating a few consistent details: the same metal finish
on the faucet and hardware, matching (or intentionally coordinated) lighting, and a paint color that works with the flooring. Cohesion is what makes a
budget kitchen feel intentional.
5) Temporary solutions can be totally validif you name them. Peel-and-stick backsplash, countertop wrap, or a washable runner can be
fantastic “bridge upgrades.” The best experiences happen when homeowners treat these as a smart phase, not a forever promise. Done carefully, the kitchen
looks better right now, and the household can save for a longer-term upgrade later without living in a space that feels unfinished.
6) Function upgrades beat “pretty only” upgrades. The changes people appreciate most after a few months are often practical: drawer
dividers, shelf risers, better task lighting, and a sink/faucet setup that’s easier to use. A kitchen that works better feels like a remodel every day,
even if the cabinets are still the same ones from five owners ago.
7) The best budget remodel has a stopping point. Many homeowners say the hardest part isn’t doing the upgradesit’s knowing when to stop.
A kitchen can start to feel cluttered again if every “gap” gets filled with decor. The biggest lesson: pick a few hero improvements, keep surfaces
functional, and let the room breathe. That’s the part that looks expensive.


