Table of Contents >> Show >> Hide
- Why a Wrapping Paper Christmas Tree Is the Holiday Hack You’ll Reuse Every Year
- What You’ll Need (and What You Can Totally Improvise)
- Step 1: Pick Your Tree Style and Size
- Step 2: Build a Cone Base That Won’t Flop Over
- Step 3: Prep the Wrapping Paper Like a Pro (Without Becoming One)
- Step 4: Wrap, Layer, and Stick It Down (Bottom-Up, Like Real Trees)
- Step 5: Top It Off and Style It for Maximum Holiday Bragging Rights
- Troubleshooting: Quick Fixes for Common “Oops” Moments
- Fun Variations (Same 5 Steps, Different Personalities)
- How to Store Your Wrapping Paper Christmas Tree (So It Survives Next December)
- Conclusion
- Experience Notes: What You Learn After Making a Few Wrapping Paper Trees
Want a Christmas tree that’s cute, compact, and doesn’t shed needles like a stressed-out porcupine? Meet the wrapping paper Christmas tree: a fast, budget-friendly holiday craft that turns leftover gift wrap into a tabletop “tree” you can style a dozen different waysminimalist, glam, kid-friendly, or “I hot-glued this at midnight and it still looks expensive.”
This guide walks you through 5 quick and easy steps to make a DIY wrapping paper Christmas tree that actually stands up straight, looks intentionally designed (not “arts-and-crafts ambushed me”), and can be customized for centerpieces, mantels, shelves, teacher gifts, or small-space holiday decor.
Why a Wrapping Paper Christmas Tree Is the Holiday Hack You’ll Reuse Every Year
- It’s fast: One tree can take 10–30 minutes depending on how fancy you get.
- It’s affordable: You can use leftover wrapping paper, recycled cardboard, and basic supplies.
- It’s small-space friendly: Perfect for desks, dorms, apartments, and “I love Christmas but I also love floor space.”
- It’s endlessly customizable: Change paper patterns, textures, toppers, and sizes for a whole forest.
What You’ll Need (and What You Can Totally Improvise)
Core supplies
- Wrapping paper (1–2 sheets depending on tree size; thicker paper is easier to work with)
- Tree base: foam cone, papier-mâché cone, cardstock/poster board cone, or a DIY cone made from cardboard
- Adhesive: hot glue (fast), double-sided tape (clean), craft glue (budget)
- Scissors (or a paper trimmer for super straight strips)
- Optional: ruler, pencil, bone folder (or an old gift card for creasing)
Decor upgrades (choose your level of extra)
- Ribbon, twine, mini ornaments, buttons, sequins, pom-poms
- Glitter (use responsibly… or accept that it becomes a lifestyle)
- Mini LED fairy lights (battery-powered)
- Star topper (paper, felt, wood, or a “borrowed” gift bow)
Step 1: Pick Your Tree Style and Size
Before you cut anything, decide what kind of wrapping paper tree you’re making. This matters because it changes how you prep the paper and how you attach it.
Popular styles (all beginner-friendly)
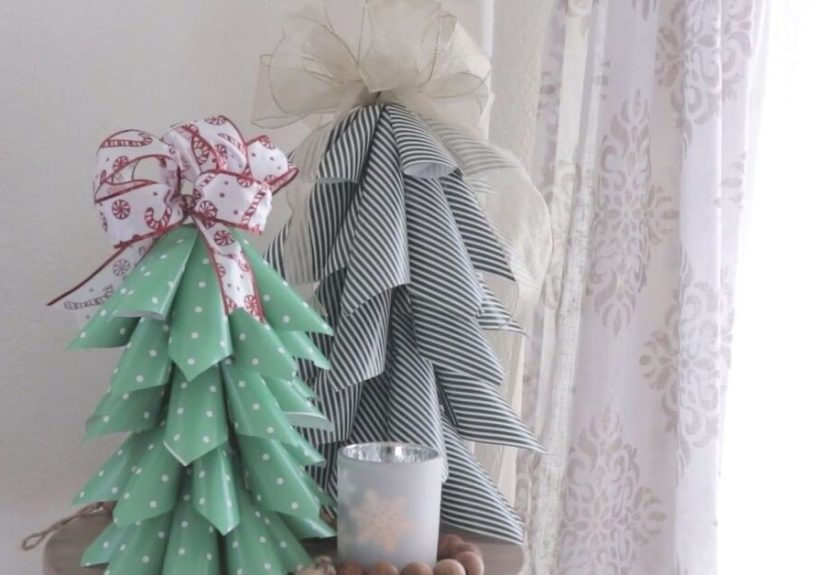
- Smooth wrap: One clean sheet wrapped around a conesleek and modern.
- Layered “branches”: Strips, scallops, or fringe layered bottom-to-topclassic and forgiving.
- Textured twist: Pleats, rosettes, or folded loops for a designer look.
- Wall tree: A flat tree silhouette taped to the wallgreat for tight spaces.
Quick sizing cheat sheet
- Mini (6–8 in): gift topper or desk buddy
- Medium (10–14 in): shelf or mantel decor
- Large (16–24 in): centerpiece “statement” tree
Pattern tip: Small prints (dots, tiny stars) look “tree-like” up close. Big bold patterns read more modern. Metallics and matte papers photograph beautifully (aka: your tree is now an influencer).
Step 2: Build a Cone Base That Won’t Flop Over
A great paper cone Christmas tree starts with a stable cone. You can buy foam or papier-mâché cones, but you can also DIY one in minutes.
Option A: Store-bought cone (fastest)
- Foam cone: light, easy, ideal for hot glue
- Papier-mâché cone: sturdier, great for tape or decoupage
Option B: DIY cone from cardstock or poster board (cheap and sturdy)
- Cut a large quarter-circle out of cardstock/poster board (bigger quarter-circle = taller cone).
- Roll it into a cone and overlap the edges until you like the shape.
- Secure the seam with tape or hot glue.
- Stand it up and trim the bottom edge so it sits flat.
Option C: DIY cone from a paper plate (kid-friendly and surprisingly stable)
- Cut one slit from the edge to the center of the plate.
- Overlap the cut edges to form a cone.
- Tape or staple it in place, then trim the bottom to level it.
Stability tip: If your cone feels top-heavy, glue it onto a cardboard circle “base” (like a tiny pizza box situation), or add a small weight inside (a few coins taped down work).
Step 3: Prep the Wrapping Paper Like a Pro (Without Becoming One)
This is where your tree goes from “cute craft” to “wait… you made that?” Pick one paper-prep method below. They all work with the same 5-step framework.
Method 1: Smooth wrap (clean and modern)
- Roll the cone on your wrapping paper to estimate how much you need.
- Cut a piece large enough to cover the cone with a 1–2 inch overlap at the seam.
- Lightly crease the paper where it will meet the cone’s base and tip so it conforms neatly.
Method 2: Layered strips (most forgiving)
Cut strips that will become “branches.” You’ll attach them from bottom to top with a slight overlap. The easiest sizes:
- Mini/medium trees: strips about 1 to 2 inches tall
- Larger trees: strips about 2 to 3 inches tall
Method 3: Fringe (instant festive texture)
- Cut strips 2–3 inches tall.
- Snip fringe cuts up the strip, leaving about 1/2 inch uncut at the top.
- Optional: curl fringe with scissors for a softer “branch” effect.
Paper reality check: Some wrapping paper is thin and springy. If it keeps fighting you, back it with plain cardstock (tape it on the reverse side) or use double-sided tape instead of liquid glue to avoid warping.
Step 4: Wrap, Layer, and Stick It Down (Bottom-Up, Like Real Trees)
Now the fun part: turning your cone into a DIY Christmas decoration that looks like it belongs on a holiday magazine cover (or at least on a respectable shelf).
If you chose smooth wrap
- Run double-sided tape (or a thin line of hot glue) along the cone seam area.
- Start at the seam and press the paper onto the cone, smoothing outward as you go.
- Work slowly around the cone to prevent wrinkles.
- At the bottom, fold excess paper inward and glue/tape it inside the cone.
- At the top, twist or trim excess paper and secure it (it’ll be hidden by the topper).
If you chose layered strips or fringe
- Start at the bottom edge of the cone.
- Attach your first strip around the base using hot glue dots or double-sided tape.
- Overlap the next strip slightly above the first (about 1/4 to 1/2 inch).
- Keep layering upward, shortening strips as the cone narrows.
- For fringe: fluff it out as you go so it doesn’t get flattened.
Pro-looking trick: Stagger your seams. If every strip ends in the same place, your tree will have a “zipper.” A charming zipper, but still.
Adhesive guide (choose your craft personality)
- Hot glue: fastest, strongest, best for textured layers (watch your fingers)
- Double-sided tape: clean, no dry time, perfect for smooth wrap
- Craft glue: budget-friendly, but use sparingly to avoid ripples
Step 5: Top It Off and Style It for Maximum Holiday Bragging Rights
This step is where your wrapping paper Christmas tree gets its personality. Think of it as the difference between “tree” and “TREE.”
Easy topper ideas
- Mini star cut from cardstock or glitter paper
- Gift bow (yes, the kind from the drawer of mystery bows)
- Paper rosette or folded paper ornament
- Wood bead + skewer “finial” for a modern look
Decor ideas that take under 5 minutes
- Wrap thin ribbon like garland (secure with tiny tape pieces)
- Add mini ornaments with glue dots
- Brush on a little glue and dust with glitter (lightlyunless you enjoy vacuuming)
- Use sticker “ornaments” for a kid-friendly version
Display tip: Group 3 trees of different heights together for instant “designer holiday vignette.” Odd numbers are basically interior design’s love language.
Troubleshooting: Quick Fixes for Common “Oops” Moments
1) My paper wrinkled like it’s mad at me
- Use double-sided tape instead of wet glue.
- Work in smaller sections.
- If it’s already wrinkled: add a ribbon garland or extra layer to hide it (crafting is 40% fixing, 60% pretending it was intentional).
2) My cone won’t stand straight
- Trim the bottom edge again while the cone is sitting upright.
- Glue it to a cardboard circle base.
- Add a few coins inside as weight.
3) The seam is obvious
- Cover with ribbon, twine, or a vertical “garland.”
- For layered trees, stagger seams and add a final narrow strip over the seam line.
Fun Variations (Same 5 Steps, Different Personalities)
1) The “Leftover Wrap” Scrap Tree
Use mismatched scraps as layered strips. The result looks playful and surprisingly high-endlike patchwork, but festive.
2) The Wall-Mounted Wrapping Paper Tree
If you’re short on floor space, cut a large tree silhouette from wrapping paper and mount it with removable adhesive dots. Add paper ornaments, photos, or holiday cards for a functional, interactive wall tree.
3) The Glowing Tree Luminary
Make a paper cone and set it over a battery LED tealight. Use thicker paper (or double up) and add simple cut-outs for soft light patterns. No real flamesholiday magic without the fire department.
4) The Kid-Friendly Sticker Tree
Wrap a cone, then let kids decorate it with foam stickers, paper circles, or pom-poms. It’s fast, safe, and keeps little hands busy while adults do important thingslike hiding the good snacks.
How to Store Your Wrapping Paper Christmas Tree (So It Survives Next December)
- Dust first: a soft paintbrush works great between fringe layers.
- Store upright if possible: a tall box keeps the topper safe.
- Or store in a bin: place trees in a plastic tub with tissue paper cushioning.
- Avoid heat and humidity: paper + moisture = sad tree.
Conclusion
A wrapping paper Christmas tree is one of those crafts that feels almost too easyuntil you see how polished it looks on a mantel, in a centerpiece, or lined up as a mini “forest” on a shelf. With a sturdy cone, the right adhesive, and a simple layering method, you can make holiday decor that’s affordable, customizable, and genuinely fun to create.
And the best part? You’ll finally use that leftover wrapping paper you’ve been guarding like it’s rare treasure. (Which, during December, it basically is.)
Experience Notes: What You Learn After Making a Few Wrapping Paper Trees
Most people start their first wrapping paper Christmas tree thinking, “How hard can it be? It’s literally paper.” Five minutes later they discover that paper has opinions. It curls when it wants, wrinkles when you blink, and somehow finds hot glue with the accuracy of a heat-seeking missileusually aimed at your fingertip. The good news is that after one or two trees, you pick up a few “craft instincts” that make every next tree faster and better-looking.
First: wrapping paper thickness matters more than pattern. Thin bargain wrap can be gorgeous, but it’s more likely to ripple when you use liquid glue. If you love the print but hate the crinkles, treat it like a fancy outfit: give it structure. Back it with cardstock, or switch to double-sided tape so you’re not adding moisture. Many crafters end up reserving thin paper for layered strips or fringe (because texture hides a multitude of sins) and using thicker paper for smooth-wrap trees.
Second: your “branch” shape controls the vibe. Straight strips look modern and graphic. Scalloped edges feel traditional and soft. Fringe reads playful and extra festive. If you’re making several trees, mixing textures creates a more styled look than making them all identical. A smooth metallic tree next to a fringed plaid one feels intentionallike you hired a tiny interior designer who gets paid in cocoa.
Third: the bottom edge is the real make-or-break detail. If the cone wobbles, nothing else matters. The quickest improvement you can make is trimming the base while the cone is standing upright, rotating it slowly and snipping tiny bits until it sits flat. This feels fussy, but it’s the difference between “holiday decor” and “holiday decor that face-plants when someone walks by.” Adding a cardboard base circle is the next-level move: it stabilizes the tree and gives you a clean finish.
Fourth: seams don’t need to disappearjust get promoted to “design feature.” Instead of battling an obvious seam, cover it with ribbon, twine, or a vertical garland line. The seam becomes a purposeful detail, and suddenly your tree looks like it came from a boutique craft shop where everything is “handmade” and also suspiciously perfect.
Finally: you’ll get faster if you batch your steps. When making multiple trees, cut all strips first, then fringe all strips, then attach. It sounds small, but it saves time and keeps your spacing consistent. By the third tree, you’ll probably start experimentingadding mini ornaments, using sticker “baubles,” or mixing patterns. That’s when this craft stops being a one-off project and becomes a yearly tradition: a low-effort way to make your space feel festive, personal, and a little bit proud-of-yourself.


