Table of Contents >> Show >> Hide
- Why This DIY Wooden Lantern Looks Store-Bought
- Choose the Right Materials Before You Touch the Saw
- Tools and Materials
- A Simple Lantern Formula That Works
- How to Build a DIY Wooden Lantern That Looks High-End
- Finishes That Make a Wooden Lantern Look Expensive
- Common Mistakes That Ruin the Look
- Where to Use Your DIY Wooden Lantern
- Conclusion
- Real-Life Experience: What Making a Wooden Lantern Actually Teaches You
- SEO Tags
There are two kinds of DIY projects in this world: the ones that scream, “I made this with confidence and a coupon,” and the ones that quietly sit on a shelf looking expensive enough to make guests ask where you bought them. This DIY wooden lantern is firmly in the second category. It has the warm, tailored look of boutique decor, but it is absolutely a project you can build yourself without needing a master carpenter badge, a fancy workshop, or a dramatic montage soundtrack.
The secret is not magic. It is proportion, clean cuts, thoughtful finishing, and knowing when to stop adding “just one more cute detail.” A well-made wooden lantern decor piece looks high-end because the lines are simple, the finish is smooth, and the styling feels intentional. In other words, this is less “chaotic craft corner” and more “small-batch home store with suspiciously expensive candles.”
If you want a rustic lantern DIY project that can work on a mantel, dining table, entryway console, covered porch, or wedding-style centerpiece, this build hits the sweet spot. It is customizable, beginner-friendly, and polished enough to pass the “Wait, you made that?” test.
Why This DIY Wooden Lantern Looks Store-Bought
Let’s be honest: plenty of homemade decor projects are cute from six feet away and slightly concerning up close. The difference between “homemade” and “artisan-looking” usually comes down to three things.
1. Clean geometry
Lanterns look expensive when the frame is balanced. Even spacing, straight edges, and matching proportions do a lot of heavy lifting. A simple rectangular body with a slightly thicker base and top creates that polished retail look.
2. A finish that looks intentional
Raw wood can be beautiful, but unfinished wood often reads like “mid-project.” A stain, paint wash, matte black treatment, or sealed natural finish gives your lantern a complete, deliberate feel. Translation: it stops looking like lumber and starts looking like decor.
3. Restraint
Yes, you could add rope, beads, a tag, faux moss, three bows, and a tiny metal bird. But you probably should not. High-end lantern styling usually leans simple: one beautiful finish, one strong silhouette, one good candle, done.
Choose the Right Materials Before You Touch the Saw
The best lantern woodworking project starts with the right wood. You do not need rare hardwood flown in by a woodland wizard. You just need a material that fits your finish and where the lantern will live.
Best wood options
Pine is affordable, easy to find, and great for beginners. It works especially well if you want a stained farmhouse look or lightly distressed finish. Poplar is a smart choice if you plan to paint your lantern because it has a smoother, cleaner look. Cedar is the overachiever of the bunch for covered outdoor use because it handles moisture better and naturally brings a more premium look.
If your goal is an outdoor wooden lantern for a porch or patio, cedar is a strong pick. If your goal is an indoor farmhouse lantern centerpiece, pine or poplar will do the job beautifully.
What to use for the “light”
Here is the non-dramatic but important advice: a battery-operated LED pillar candle is the easiest, safest, and prettiest option for most decorative lanterns. It gives you the cozy glow without worrying that your tablescape is plotting against you. If you insist on a real candle, use a proper glass insert, make sure there is plenty of clearance, and never leave it unattended. Gorgeous decor is good. Accidental fire drill is not.
Tools and Materials
- 1×2 or 1×3 wood boards for the frame
- Thin wood strips or square dowels for vertical supports
- Wood glue
- Brad nails or small finish nails
- Miter saw or hand saw with miter box
- Clamps
- Sandpaper in 80, 120, 180, and 220 grit
- Wood filler
- Stain, paint, or wood conditioner plus stain
- Clear protective finish for durability
- Optional: small handle, metal ring, glass sleeves, rubber feet
- LED candle for styling
If you are a beginner, do not let that list scare you. Most of this is standard DIY gear, and the lantern itself is just a tidy little frame build. Think of it as furniture’s less intimidating cousin.
A Simple Lantern Formula That Works
You can make your lantern any size, but a great starting point is about 7 to 8 inches wide and 14 to 18 inches tall. That size looks substantial enough to feel decorative without turning into a wooden apartment building.
A clean design usually includes:
- A square or rectangular base
- Four vertical corner supports
- A framed top
- Open sides or faux window-style crossbars
- An optional top handle for a classic lantern shape
If you want a more modern look, keep the lines straight and skip extra trim. If you want farmhouse charm, add an X-detail on the sides or use a warm walnut or weathered oak finish.
How to Build a DIY Wooden Lantern That Looks High-End
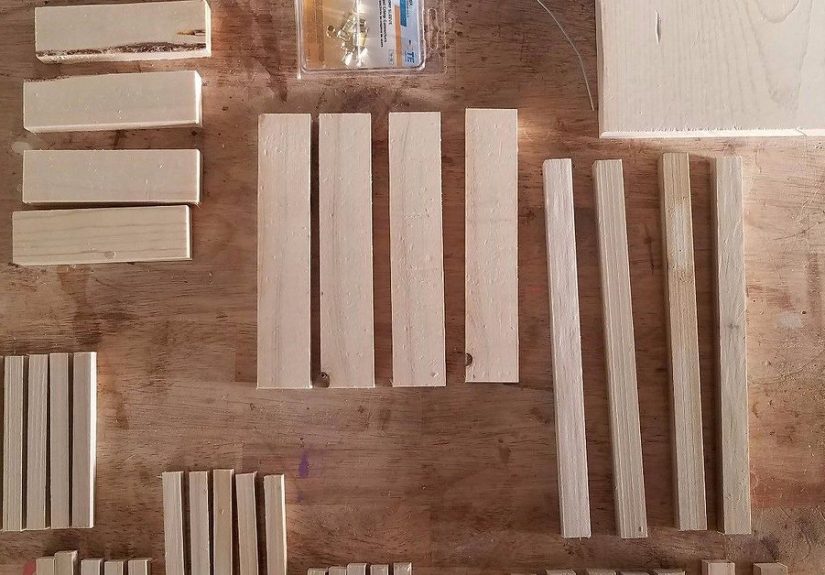
Step 1: Cut every piece before assembly
Measure twice, cut once, and resist the powerful human urge to “just eyeball it.” Cut your base pieces, top frame pieces, and vertical supports first so you can dry-fit everything before gluing. This is where you catch small mistakes before they become permanent personality traits.
Step 2: Sand early, not just at the end
Sand the individual pieces before assembly, especially the inside edges that will be harder to reach later. Start with 80 or 120 grit if the wood is rough, then move to 180. Finish with 220 grit if you want that smoother, more refined touch. Sand with the grain, not like you are trying to erase the board from existence.
Step 3: Build the base and top frame
Assemble the base into a square or rectangle. Then build a matching top frame. Use wood glue and brad nails for strength and cleaner alignment. Check for square as you go. A crooked lantern has a very specific handmade look, and that look is called “oops.”
Step 4: Attach the corner supports
Secure your four vertical supports to the base first, then attach the top frame. This creates the lantern body. Work on a flat surface and clamp when possible so the structure stays aligned.
Step 5: Add side details
You can leave the sides open for a minimalist look or add thin crosspieces for extra dimension. Windowpane-style grids feel classic. X-details feel farmhouse. Slim horizontal slats feel a little more modern. Keep the spacing even. High-end style loves symmetry.
Step 6: Fill tiny gaps
Use wood filler sparingly on nail holes or small seams. Once it dries, sand again lightly. This step sounds boring because it is boring, but it is also one of the main things that makes your lantern look store-bought instead of weekend-rushed.
Step 7: Apply the finish
If you are staining softwood, a wood conditioner can help the color go on more evenly. For a natural wood look, use a clear matte or satin topcoat. For a modern finish, black paint with a soft satin sheen looks sharp. For a rustic look, try medium walnut, weathered gray, or a whitewashed treatment followed by a protective coat.
Let the finish dry fully between coats, and lightly sand between coats if needed. That extra patience is annoyingly worth it.
Step 8: Style it like you bought it from a fancy shop
Place an LED pillar candle inside. Add a glass hurricane sleeve if you want a layered, upscale look. Then style around it, not on top of it. A little greenery, a tray, or a stack of books is enough. When in doubt, less fuss looks more expensive.
Finishes That Make a Wooden Lantern Look Expensive
Natural and Scandinavian
Use a pale stain or clear matte sealer on smooth wood. Pair with a white candle and simple greenery. This look is clean, airy, and quietly expensive.
Rustic farmhouse
Go with warm brown stain, visible grain, and maybe a lightly distressed edge. Add a cream LED candle and eucalyptus or dried stems. Cozy level: aggressive.
Modern black
Paint the lantern matte or satin black and keep the silhouette crisp. This style works beautifully on entry tables, patios, and holiday displays because it feels tailored all year.
Weathered vintage
Layer paint and stain, then sand edges gently to reveal dimension. The goal is character, not “this fell out of a truck.” A little aging goes a long way.
Common Mistakes That Ruin the Look
- Using warped wood: no finish on earth can make bent lumber look elegant.
- Skipping sanding: rough edges instantly read as unfinished.
- Over-decorating: the lantern should be the statement, not the victim of a craft supply avalanche.
- Choosing the wrong candle size: a tiny tealight inside a giant lantern looks lonely.
- Ignoring scale: the lantern should fit the table, shelf, or porch where it will live.
Where to Use Your DIY Wooden Lantern
This is one of those rare projects that can move around your house and still look like it belongs.
Entryway
Place one large lantern by the door or two matching ones on a console. It makes your home look put together before anyone even sees your junk drawer situation.
Dining table
A pair of medium lanterns can anchor a tablescape without blocking conversation. That is ideal, because dinner guests generally like to see each other.
Mantel
Layer lanterns with frames, small vases, or seasonal stems for a balanced display. Different heights work best.
Covered porch or patio
Use cedar or a durable finish if the lantern will live outside. Add flameless candles for ambience that does not require babysitting.
Conclusion
A beautiful DIY wooden lantern is not about copying some expensive store display piece board for board. It is about understanding what makes decor look polished: strong proportions, thoughtful materials, smooth prep, and a finish that feels complete. Once you nail those basics, the project starts looking less like a craft and more like something you would proudly spot on a shelf with a wildly unreasonable price tag.
The beauty of this build is that it can lean modern, rustic, minimal, farmhouse, or seasonal depending on your finish and styling. Make one and it looks intentional. Make two and it looks curated. Make three and suddenly you are the person who “just makes things,” which is honestly a pretty fun reputation to have.
Real-Life Experience: What Making a Wooden Lantern Actually Teaches You
The first time you build a wooden lantern, you think the hardest part will be cutting the wood. It is not. The hardest part is realizing that tiny details matter a lot more than they seem like they should. A lantern is a simple object, which means there is nowhere for sloppy work to hide. If one side is slightly off, you notice it. If the stain goes blotchy, you notice it. If the candle inside looks too small, somehow you also notice it from across the room like your house is personally judging you.
But that is also why this project is so satisfying. It teaches you to slow down in the best possible way. You start paying attention to grain direction, to how a corner meets another corner, to how a satin finish feels different from a matte one, and to how much more expensive a project looks when you sand properly instead of announcing, “Eh, that’s good enough.” Wooden lanterns are basically tiny professors of patience.
One of the biggest lessons is that finishing changes everything. Before stain or paint, the lantern can look plain, even a little underwhelming. Then you apply a warm walnut stain or a soft black paint, and suddenly the whole project develops manners. It stands up straighter. It looks intentional. It stops resembling spare parts and starts resembling decor. That transformation is probably the most fun moment in the whole process.
Another real-life discovery is that styling matters almost as much as building. A good lantern with the wrong candle can look awkward. A simple lantern with the right LED pillar candle, a glass insert, and a little greenery can look straight-up designer. It is oddly empowering to realize that “expensive-looking” often comes from proportion and presentation, not from using exotic materials or spending a fortune.
And then there is the practical side. A handmade lantern is one of those decor pieces that earns its keep. It moves from season to season without complaining. In spring, it works with eucalyptus. In summer, it looks great on a porch. In fall, add leaves or mini pumpkins nearby. In winter, it suddenly becomes the star of the cozy show. Very few DIY projects are this flexible. A wooden lantern quietly adapts, which is more than most people can say about their throw pillows.
Most of all, making a wooden lantern teaches you that polished DIY is not about perfection. It is about care. Straight cuts help. Smooth sanding helps. Good finishing definitely helps. But the real thing that makes it feel special is the attention you put into the piece. Guests may think you bought it, and that is flattering. You will know better. You will know it started as a few boards, some glue, and a slightly unreasonable desire to make your home look more expensive than your budget had planned. And honestly, that may be the best part.


