Table of Contents >> Show >> Hide
- Why Replacing Bathroom Tile Can Be Easier Than You Think
- Before You Remove Anything, Choose the Easiest Replacement Strategy
- Tools and Materials That Make the Job Easier
- How to Replace a Single Bathroom Tile the Easy Way
- How to Replace Bathroom Floor Tile Without Making It Miserable
- Replacing Shower or Bathroom Wall Tile the Smart Way
- Common Mistakes to Avoid When Replacing Bathroom Tiles
- Easy Design Choices That Make Tile Replacement Look Better
- When Tile Replacement Is a DIY Job and When to Call a Pro
- What Replacing Bathroom Tile Is Really Like: Practical Experience and Lessons Learned
- Conclusion
Note: Clean HTML body only, English content only, and no extra citation artifacts for web publishing.
Bathroom tile has a funny way of aging. One day it looks “classic,” and the next day it looks like your bathroom time-traveled from 1997 and forgot to come back. The good news? Replacing bathroom tiles does not always require a full demolition scene worthy of an action movie. In many cases, the easiest path is a smart, targeted update: swap one broken tile, retile one wall, refresh a worn floor, or replace the most visible section and leave the rest of the room alone.
If you approach the job with the right plan, replacing bathroom tile can be one of the most satisfying upgrades in the house. It improves appearance, protects wet areas, and can make a tired bathroom feel cleaner, brighter, and much more current. The trick is to choose the easiest replacement method for your situation, prep the surface properly, and avoid the classic mistakes that make tile jobs go sideways.
This guide breaks down easy ways to replace bathroom tiles, whether you are dealing with one cracked wall tile, a scuffed floor, or a shower surround that has seen better decades. No fluff, no dramatic “you must gut the room” speech, and no mysterious contractor jargon designed to make you feel like you need three certifications and a wizard hat just to hold a grout float.
Why Replacing Bathroom Tile Can Be Easier Than You Think
Many homeowners assume tile replacement means ripping everything out down to the studs. Sometimes that is true, especially when there is water damage, a failing substrate, or a leaking shower system. But often, tile replacement is much more manageable. If the surrounding tile is sound, the substrate is stable, and the moisture situation is under control, you may be able to replace only the damaged or outdated area.
The easiest jobs usually fall into one of these categories:
- Single-tile replacement: Best for one cracked or chipped tile.
- Partial wall replacement: Great when one section around a vanity, tub, or niche looks rough.
- Floor tile refresh in the same footprint: Easier when you keep the room layout and tile size close to the original.
- Cosmetic upgrade with simple patterns: Subway tile, stacked tile, and larger-format floor tile tend to be more forgiving than busy mosaics.
The simplest jobs share one thing in common: they do not fight the room. If you keep plumbing where it is, stick with a straightforward layout, and do not ignore moisture problems, the work becomes much more realistic.
Before You Remove Anything, Choose the Easiest Replacement Strategy
1. Replace a Single Broken Tile
If the rest of the installation is in good shape, replacing one tile is usually the fastest and cheapest fix. This works especially well on bathroom walls and floors where only one or two tiles are cracked. It is the closest thing tile repair has to a “small but mighty” project.
2. Retile a Small Section Instead of the Whole Room
If an entire shower wall or floor area looks dated, damaged, or badly stained, replacing just that section may be the sweet spot. This gives you a visible upgrade without turning your bathroom into a construction zone for two geological eras.
3. Keep the Layout Simple
The easiest way to replace bathroom tiles is to avoid complicated patterns. Straight-set, stacked, and classic brick patterns are easier to install, easier to align, and easier to cut around obstacles. Fancy diagonal layouts can look great, but they also have a talent for increasing math, waste, and muttering.
4. Use the Same Tile Size When Possible
If you are patching or replacing part of an existing tiled area, matching the original tile size and thickness makes life much easier. It helps the new tile sit flush with the old installation and reduces awkward transitions.
Tools and Materials That Make the Job Easier
You do not need a warehouse full of equipment, but the right tools matter. For most bathroom tile replacement jobs, you will want safety glasses, gloves, a utility knife, grout saw or oscillating tool, hammer, cold chisel, putty knife or scraper, notched trowel, spacers, level, bucket, sponge, thinset mortar or the correct tile adhesive for the application, grout, and matching silicone caulk for corners and changes of plane.
For floor or larger wall jobs, a tile cutter or wet saw may be necessary. If you are not comfortable with power tools, silica dust, or wet-area waterproofing, it is smart to have a qualified adult or a licensed pro handle the cutting or the shower prep. Confidence is great. So is not turning a weekend project into a cautionary tale.
How to Replace a Single Bathroom Tile the Easy Way
Single-tile replacement is the easiest place to start because it teaches the basics without requiring a full-room retile. The goal is to remove the damaged tile without cracking the good ones around it.
Step 1: Remove the Grout Around the Damaged Tile
Carefully score and remove the grout surrounding the bad tile using a grout saw, utility knife, or oscillating tool. This step matters more than people think. If you skip it or rush it, you can chip adjacent tiles and upgrade a small repair into a larger “learning opportunity.”
Step 2: Break the Tile from the Center
Tap the center of the damaged tile and work outward gently. Starting in the middle reduces the risk of forcing pressure against the surrounding tile edges. Remove the broken pieces slowly and do not rush just because the first chunk came out and now you feel invincible.
Step 3: Scrape Off Old Mortar
Once the tile is out, scrape away old adhesive or thinset until the surface is smooth, clean, and sound. The new tile needs a flat substrate, not a lumpy archaeological site of past adhesive choices.
Step 4: Dry-Fit the New Tile
Before applying mortar, test-fit the new tile. Make sure it sits evenly and aligns with neighboring tiles. This is the moment to discover a sizing issue, not after the adhesive is already curing and your stress level is writing its own memoir.
Step 5: Set the Tile
Apply the appropriate mortar or adhesive, press the tile into place, and use spacers if needed to maintain even joints. Check that it sits flush and level with the surrounding tile. Wipe away excess mortar before it hardens.
Step 6: Grout and Caulk the Right Areas
After the mortar cures according to the product instructions, grout the joints. Where tile meets a tub, shower pan, countertop, corner, or any change of plane, use a flexible matching silicone caulk instead of grout. Grout is strong, but flexible joints are what keep movement from turning into future cracks.
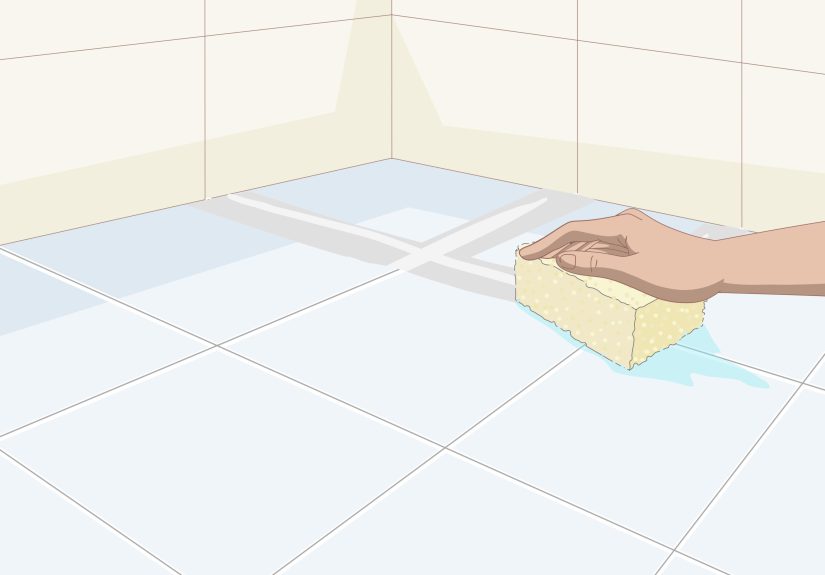
How to Replace Bathroom Floor Tile Without Making It Miserable
Bathroom floor tile replacement is more involved than swapping one wall tile, but it is still manageable when you prepare properly.
Start with the Subfloor
The easiest tile installation is the one that begins on a flat, solid surface. If the floor has movement, rot, or soft spots, new tile will not fix that. It will simply fail in a newer, shinier way. Remove damaged underlayment, repair uneven areas, and use the proper tile backer or membrane where needed.
Lay Out the Tile Before Mixing Mortar
Dry-lay a few rows and snap layout lines so you know where the cuts will fall. A smart layout avoids skinny slivers at the walls and gives the room a balanced look. This step feels boring until it saves you from a final row of tiles that look like chewing gum strips.
Work in Small Sections
Spread thinset only over the area you can tile before it skins over. Press each tile into the mortar with a slight twisting motion and use spacers to keep joints consistent. Periodically lift a tile and check coverage, especially in wet areas where proper mortar contact matters.
Leave a Perimeter Gap
Do not jam floor tile tight against the walls or tub. Leave a small expansion gap at the perimeter, then cover or finish it appropriately. Tile installations move slightly with temperature and humidity changes, and they appreciate a little room to breathe.
Replacing Shower or Bathroom Wall Tile the Smart Way
Wall tile replacement can be very straightforward outside wet zones, but shower walls deserve extra respect. In a dry bathroom wall area, tile can go over a sound, clean, flat substrate. In a shower, the waterproofing system matters just as much as the tile itself.
Check for Moisture Problems First
If there is a leak, soft wallboard, musty smell, or visible water damage, solve that problem before installing tile. New tile over a bad wet wall is like putting a tuxedo on a plumbing problem.
Use Cement Board or a Proper Tile Backer in Wet Areas
In shower surrounds and other high-moisture areas, use the right substrate and waterproofing system for the application. Tile and grout are not the waterproof layer by themselves. That job belongs to the membrane or approved waterproof assembly behind or beneath the tile.
Install from a Level Starting Point
On shower walls, many installers begin from a level ledger board and start with the second row so the cuts at the bottom can be adjusted if the base is not perfectly level. It is a simple trick that produces a cleaner result and prevents the first row from telegraphing every little dip and rise.
Mix Tiles from Multiple Boxes
Even tiles with the same label can vary slightly in shade. Mixing tiles from several cartons during installation helps the final wall look intentional and balanced instead of striped by accident.
Common Mistakes to Avoid When Replacing Bathroom Tiles
Ignoring Surface Prep
Tile replacement gets dramatically easier when the substrate is clean, dry, sound, and flat. Skip prep, and the rest of the project becomes one long apology to your future self.
Using the Wrong Setting Material
Not every adhesive works for every tile or location. Bathroom floors, shower walls, porcelain tile, and large-format pieces can require specific mortars or installation methods. Read the tile and mortar manufacturer instructions before you start. “I assumed it would be fine” has launched many unnecessary do-overs.
Grouting Every Joint
Corners, wall-to-floor transitions, tub edges, and other changes of plane should generally get flexible sealant, not regular grout. This one detail helps reduce cracking and makes the installation more durable.
Forgetting About Waterproofing
In dry bathroom areas, missing waterproofing may not be a disaster. In a shower, it absolutely can be. If you are replacing tile in a wet zone, think beyond the pretty surface.
Rushing the Cure Time
Many tile products allow grouting after about 24 hours, but cure times vary. Some grout and sealers also require additional wait time before sealing or full water exposure. Always follow the product label. The bathroom may look finished before it is ready, which is a rude but important fact.
Easy Design Choices That Make Tile Replacement Look Better
If you want the project to feel easier and look more polished, choose materials that help you out a little.
- Large-format floor tile can reduce grout lines and make a small bathroom feel bigger, as long as the substrate is properly leveled.
- Subway tile remains popular because it is versatile, affordable, and beginner-friendly.
- Matte finishes often hide water spots and smudges better than super-glossy tile.
- Light grout with light tile creates an airy look, while contrasting grout highlights the pattern more boldly.
- Simple edge trim or clean caulk lines can make a modest tile job look surprisingly custom.
When Tile Replacement Is a DIY Job and When to Call a Pro
Replacing one or two tiles, a backsplash-style vanity wall, or a small bathroom floor can be reasonable for a patient DIYer. But call a professional if you find major water damage, wall rot, uneven floors, shower pan issues, or a situation that requires extensive cutting around plumbing and fixtures. A pro is also wise when waterproofing must be rebuilt in a shower. There is no shame in outsourcing the parts of the project that can turn one loose tile into a very expensive rain feature.
What Replacing Bathroom Tile Is Really Like: Practical Experience and Lessons Learned
One of the most interesting things about replacing bathroom tile is that the project rarely feels hard in the way people expect. Most first-timers imagine the tiling itself will be the nightmare, but the real challenge is usually the prep work, the waiting, and the patience. Removing old grout carefully, scraping down old mortar completely, checking whether the wall is actually flat, and stopping to dry-fit a tile before setting it are the unglamorous steps that make the finished result look professional.
Homeowners often say the biggest surprise is how much better the room looks even after a partial replacement. A single cracked tile can make an entire shower or floor feel worn out. Once that one damaged tile is gone, the bathroom immediately feels cleaner and more intentional. The same thing happens when people replace only the most visible area, such as the wall behind a vanity or the floor inside a small powder room. It is not a full remodel, but visually it can feel close enough to count.
Another common experience is learning that tile is less about speed and more about rhythm. The people who have the best results are not always the fastest. They are the ones who get into a steady pattern: test-fit, spread mortar, set tile, check spacing, clean excess, step back, repeat. There is a weirdly satisfying moment when the pattern starts lining up and the room suddenly looks like it belongs in the “after” photo instead of the “before” file that nobody wanted to open.
Then there is grout, which tends to humble everybody at least once. Many DIYers go into tile replacement feeling pretty confident, only to discover that grout cleanup requires timing and restraint. Too soon, and you pull grout from the joints. Too late, and you are scrubbing haze like you have personally offended the tile gods. Almost everyone who replaces bathroom tile comes away with a renewed respect for the humble sponge.
People also learn quickly that bathroom tile replacement is partly a design project and partly a moisture-management project. In a dry area, the job may feel mostly cosmetic. In a shower, it becomes obvious that the tile is only the visible layer of a much larger system. That realization tends to separate the quick cosmetic fixes from the long-lasting upgrades. The prettier tile is nice, but the confidence that water is being controlled correctly is even better.
Finally, there is the emotional arc of the whole thing, which is more dramatic than it has any right to be. Day one is optimism. Day two is dust, puzzle-solving, and several trips to the hardware store for items you were absolutely sure you already had. Then comes the turning point: the new tile goes in, the grout lines look crisp, the caulk is neat, and suddenly you are standing in your bathroom admiring a wall like it is fine art. That little burst of pride is a real part of the experience. Replacing bathroom tiles is one of those projects that rewards patience with something you can see every single day.
In other words, the easiest way to replace bathroom tiles is not necessarily the fastest shortcut. It is the method that keeps the scope realistic, the prep careful, the waterproofing appropriate, and the design simple enough to execute well. Do that, and even a modest tile project can make your bathroom feel fresher, smarter, and far more expensive than it actually was.
Conclusion
Replacing bathroom tile does not have to mean a complete bathroom overhaul. In many cases, the easiest solution is the smartest one: replace a single cracked tile, retile a small section, keep the layout simple, and focus on clean prep and proper installation. If you respect the substrate, use the right mortar and grout, and remember that wet areas need real waterproofing, you can get a durable result that looks polished instead of patched together.
Whether you are refreshing a floor, reviving a shower wall, or rescuing one lonely cracked tile from eternal embarrassment, bathroom tile replacement is one of the most effective ways to improve both style and function. Plan carefully, work patiently, and let the room do what every bathroom deserves to do: look clean, stay dry, and stop reminding you of outdated design choices every morning before coffee.


