Table of Contents >> Show >> Hide
- First, what’s a “Besser block” in the U.S.?
- Decide what kind of garden edge wall you’re building
- Before you dig: 5 minutes of planning that can save you 5 hours of grumbling
- Tools and materials checklist
- Step-by-step: Build a low cinder block (CMU) garden edge wall
- Step 1: Dig a trench that matches your wall’s job
- Step 2: Build the base (this is where walls are bornor ruined)
- Step 3: Set guides and dry-fit your first course
- Step 4: Place the first course and obsess over level (just this once)
- Step 5: Stack additional courses (running bond is your friend)
- Step 6: Add drainage gravel and fabric as you go (especially for raised beds)
- Step 7: Finish the top (caps, coping, or a neat final course)
- Retaining wall upgrades (when the wall is holding back real pressure)
- Common mistakes (so you don’t accidentally build modern art)
- Design ideas that look intentional (and not like leftover construction materials)
- Real-world experiences and lessons DIYers keep repeating (so you don’t have to)
- Conclusion
If you’ve ever looked at your flower bed and thought, “This could use a crisp little border… and maybe a bit more
authority,” you’re in the right place. A low garden edge wall made from concrete blocks (aka “cinder blocks,”
aka “CMUs,” aka “Besser blocks” in some circles) is one of those DIY projects that feels oddly empowering.
Like you just unlocked a new adult skill: lining things up… on purpose.
This guide walks you through planning, prep, drainage, and construction optionsfrom simple dry-stacked edging
to mortar-set mini-walls that laugh in the face of shifting soil. We’ll keep it practical, a little funny, and very
focused on building something that stays straight long after your enthusiasm fades.
First, what’s a “Besser block” in the U.S.?
In American English, a Besser block is essentially a cinder blocka hollow concrete block used in building.
The term traces back to the Besser Manufacturing Company (founded in Michigan), and the name stuck in some usage.
In the U.S., you’ll more commonly hear concrete block, cinder block, or concrete masonry unit (CMU).
Quick block-sizing sanity check
Standard CMUs are often described as 8 x 8 x 16 inches “nominal.” That “nominal” part matters: the actual block
is typically slightly smaller so mortar joints can bring the finished module back to neat increments.
For example, an “8x8x16” is commonly about 7 5/8 x 7 5/8 x 15 5/8 inches in reality.
Decide what kind of garden edge wall you’re building
“Garden edging wall” can mean a few different things, and the right build method depends on what the wall needs to do:
- Pure edging (no real soil pressure): 1–2 courses high, mostly decorative, separating mulch/stone/lawn.
- Raised bed border: typically 2–4 courses high, holding a modest amount of soil in place.
- Mini retaining wall: holding back a slope or grade change; drainage matters a lot more.
For a low edge wall, you can often use a well-compacted crushed-stone base and dry-stack or lightly mortar.
Once you start holding back a slopeor going talleryour wall starts acting like a retaining structure.
That’s when base thickness, embedment, drainage, and (sometimes) local permitting move from “nice to have”
to “please don’t ignore me.”
Before you dig: 5 minutes of planning that can save you 5 hours of grumbling
1) Check codes, HOA rules, and utility lines
Many areas have permit thresholds based on wall height and location. And before any digging, call 811
to locate utilities. Hitting a line is the kind of surprise party nobody enjoys.
2) Mark the layout and measure like a professional (or at least like someone trying)
Use marking paint, a garden hose, or string lines to map your edge. Straight lines are easiest; gentle curves are doable,
but you’ll want smaller blocks or more cuts to keep it clean. Measure:
- Length of the wall
- Finished height (how many courses)
- Transitions (steps, corners, ends)
3) Decide: dry-stack, mortar-set, or “dry-stack + surface bonding cement”
Here’s a quick way to choose:
- Dry-stack (blocks stacked without mortar): faster, easier, great for low edging, relies on a perfect base.
- Mortar-set: more traditional masonry; stronger connection between blocks; more skill and more mess.
-
Surface bonding cement: a hybrid where blocks can be stacked, then coated to lock things together.
Useful for small walls where you want extra rigidity without full mortar joints.
Tools and materials checklist
You don’t need a fancy setup, but you do need the right basics:
Materials
- Concrete blocks/CMUs (or landscape retaining wall blocks)
- Crushed stone or paver base (angular, compactableavoid pea gravel for the leveling layer)
- Landscape fabric (to separate soil from drainage gravel)
- Drainage gravel (clean gravel behind walls that retain soil)
- Concrete adhesive (for caps/top course, if desired)
- Optional: mortar mix, rebar, core-fill grout/concrete, capstones
Tools
- Shovel, trenching spade, rake
- Hand tamper or plate compactor (rent one if your wall is long)
- Level (a long level + a small torpedo level is a great combo)
- Rubber mallet
- String line + stakes
- Chisel/hammer (especially for interlocking landscape blocks with flanges)
- Safety gear: gloves, eye protection; a respirator and hearing protection if cutting block
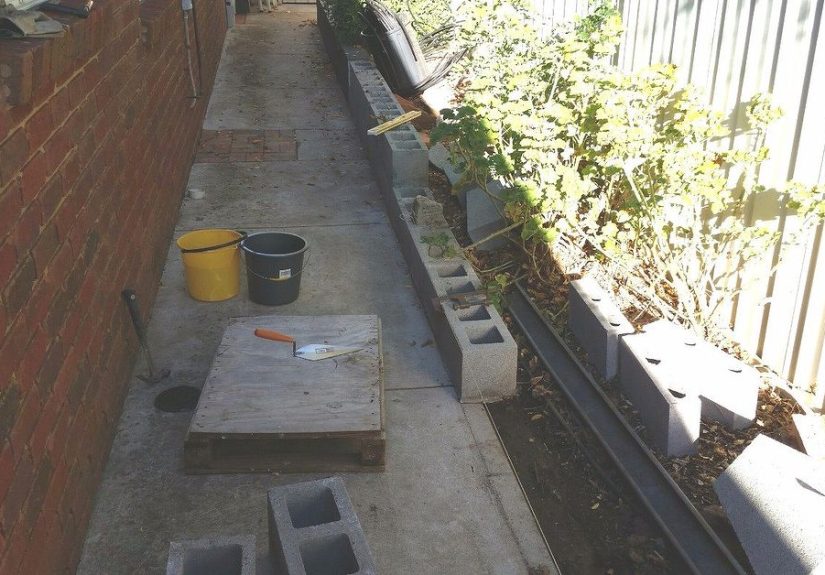
Step-by-step: Build a low cinder block (CMU) garden edge wall
This method works best for edging and raised beds up to a few courses high. If you’re holding back a slope or building taller,
scroll down to the “Retaining wall upgrades” section.
Step 1: Dig a trench that matches your wall’s job
A stable wall starts with burying part of the first course and creating a base that won’t settle unevenly. A common DIY approach:
- Trench width: about twice the block width gives you working room and drainage space.
-
Trench depth (edging): often enough to bury the first course about halfway, plus room for base material.
For some systems, a shallow trench around 4–6 inches plus base is typical for the first courseadjust based on your block height and site.
The real rule: your first course must sit on a firm, level foundation. Depth changes with climate (frost), soil type, and whether the wall retains soil.
Step 2: Build the base (this is where walls are bornor ruined)
Compact the native soil at the bottom of the trench. Then add a layer of crushed stone or paver base, spread evenly, and compact again.
For low landscape walls, you’ll often see a few inches of paver base used. For retaining wall systems, best-practice guides frequently call for a
thicker leveling pad (commonly around 6 inches of well-compacted material) and extending beyond the front and back of the units.
Don’t rush leveling. The first course is your truth-teller: if it’s off, the rest of the wall will faithfully reproduce that mistake like a copy machine
set to “chaos.”
Step 3: Set guides and dry-fit your first course
Use stakes and a string line to keep the face straight. Dry-fit the first row so you can:
- Confirm spacing and alignment
- Plan cuts at ends/corners
- Make sure the wall looks intentional (not like it wandered into place)
Step 4: Place the first course and obsess over level (just this once)
Start at the lowest point if your yard slopes. Place each block, check level side-to-side and front-to-back, and adjust by tapping down or adding base
material under low spots. For interlocking landscape retaining blocks, you may need to knock off the rear flanges on the first course so it sits flat.
Take your time. A careful first course makes the rest of the build feel almost relaxingwhich is suspicious, but true.
Step 5: Stack additional courses (running bond is your friend)
Stagger joints like brickwork (running bond). That means the vertical joints don’t stack straight up. For a clean pattern,
you’ll typically start every other course with a half block (cut block) to offset seams.
Keep the tops clean: sweep off grit between courses so blocks seat properly. If you’re using adhesive for cap blocks or a final “locking” course,
follow the adhesive directions and keep the surfaces dust-free.
Step 6: Add drainage gravel and fabric as you go (especially for raised beds)
Water is the silent bully of outdoor walls. When soil gets wet, it gets heavier and pushes harder. Even for a small raised bed edge,
give water a path to move away:
- Place landscape fabric behind the wall to keep soil from clogging the gravel.
- Backfill directly behind the blocks with clean gravel to create a drainage zone.
- For walls that actually retain a slope or stay wet, consider a perforated drain pipe at the base, sloped to drain out.
For “true” retaining wall systems, guides often call for a dedicated gravel zone behind the wall and careful drain placement.
For garden edging, you don’t need to over-engineerbut you do want to avoid trapping water behind the blocks.
Step 7: Finish the top (caps, coping, or a neat final course)
Cap blocks make the wall look finished and help keep the top course stable. If you cap it:
- Dry-fit caps first
- Apply concrete adhesive (often recommended for top courses/caps)
- Press and align carefully, keeping overhang consistent
Then backfill your bed, tuck fabric neatly, and plant. Congratulations: you now have a border that looks like it pays taxes on time.
Retaining wall upgrades (when the wall is holding back real pressure)
If your “garden edge” is also holding back a slope, here are upgrades that dramatically improve durability:
Upgrade 1: Thicker, wider leveling pad (and better stone)
Retaining wall best practices commonly specify a well-compacted leveling pad using angular crushed stone (often noted as “minus” stone)
and recommend avoiding rounded pea gravel in that leveling layer. Many systems call for a pad thickness on the order of several inches
(commonly around 6 inches) and extending beyond the unit’s toe and heel, so the blocks aren’t balancing on a narrow strip.
Upgrade 2: Drain pipe with slope to daylight
Place a perforated drain pipe at the base behind the wall, surrounded by clean gravel, and slope it so gravity carries water away.
Wrap the gravel zone with fabric to reduce clogging. If you can’t drain to daylight, you may need another discharge plandon’t just bury a pipe and hope.
Upgrade 3: Step-backs and reinforcement for taller walls
Many retaining wall block systems are designed to step back slightly as they rise, improving stability. Taller walls may require geogrid reinforcement
and engineering. If you’re approaching the “this could injure someone if it fails” category, consult local codes and a qualified pro.
Upgrade 4: Mortar-set CMU wall with footing, rebar, and filled cores
If you’re building with standard CMUs and want a sturdier mini-wall:
- Pour a concrete footing that’s appropriately sizedcommonly wider than the block and below frost depth where required.
- Set vertical rebar in the footing at planned locations (especially at corners/ends).
- Lay CMUs with mortar, keeping joints consistent and courses level.
- Fill reinforced cores with grout/concrete where rebar runs for extra strength.
For garden edging, that’s often more muscle than you needbut it’s an option when you want “permanent.”
Common mistakes (so you don’t accidentally build modern art)
“My wall leans after the first rain.”
Usually: poor base compaction, trapped water, or backfill pushing while it’s saturated. Fix by improving drainage gravel behind the wall, rebuilding the base,
and ensuring the first course is embedded and level.
“The blocks are wavy, and now I can’t unsee it.”
Waviness almost always starts in course one. Take the time to re-level early. Your future self will thank youand your neighbors will stop politely squinting.
“White powdery stuff is showing up.”
That’s often efflorescence (salts migrating to the surface). It’s common with masonry exposed to moisture. Improve drainage and allow drying; gentle cleaning may help,
but the long-term fix is keeping water from soaking the wall repeatedly.
Design ideas that look intentional (and not like leftover construction materials)
- Raised vegetable bed border: 2–3 courses high, capped, with gravel drainage behind.
- Modern edging line: single course, half-buried, dead-straight with a string line and crisp gravel on one side.
- Curved herb bed: use shorter units or cut blocks; keep courses low and consistent.
- Paint or stain (carefully): use masonry-appropriate coatings and expect touch-ups over time.
- Capstone upgrade: a contrasting cap instantly makes a basic wall feel “designed.”
Real-world experiences and lessons DIYers keep repeating (so you don’t have to)
If you read enough homeowner stories about block garden edging walls, the same “aha” moments pop up again and againusually right after someone
says, “It’ll probably be fine.” Here are the experiences people tend to have in the wild.
1) The Level Is Not Optional. Many DIYers start confidently, place a few blocks, step back, and think, “Looks straight enough.”
Then they stack the second course and suddenly their border is auditioning to be a wave pool. The lesson: spend most of your energy on the
first course. You can cheat a tiny bit later with minor adjustments, but you can’t “decorate” your way out of a crooked foundation.
The most common regret is not using a string line and not checking level front-to-back, not just left-to-right.
2) Base Material Choice Changes Everything. People often discover the hard way that rounded gravel behaves like marbles when you
try to level heavy blocks on it. Those who switch to angular crushed stone/paver base usually report a night-and-day difference: it compacts,
it locks together, and it stays where you put it. The “experience” here is less dramatic but very satisfying: tamp, check, tamp againand the
blocks stop rocking like they’re testing your patience.
3) Water Pressure Is Sneakier Than It Looks. A border that seems purely decorative can still get bullied by water if soil stays wet,
sprinklers hit the same spot every day, or mulch and dirt clog the space behind the wall. DIYers frequently report that the “mystery bulge”
appears after a season of heavy rain, not immediately. The fix stories are consistent: add a gravel drainage zone, use landscape fabric to keep
fines from filling the gravel, and don’t trap water behind the blocks. Once drainage is addressed, the wall suddenly behaves like it’s finally
being treated fairly.
4) Cutting Block Feels Like a Whole Separate Hobby. The first time someone tries to cut a CMU, they realize two things:
(a) concrete dust is not a seasoning, and (b) ear/eye/respiratory protection is worth it. Many people end up adjusting the design to reduce cuts:
shorter runs, fewer tight curves, or using half blocks strategically. A practical takeaway from these experiences: plan your layout so the “ugly cuts”
land in less-visible spots, and dry-fit before you commit.
5) The Best Finish Is the One That Matches Your Maintenance Personality. Some homeowners love the raw industrial look of exposed
block. Others paint it, veneer it, or cap it so it looks polished. The repeated experience is that caps are the easiest “upgrade for the effort”:
they clean up the look, give you a comfortable top edge, and help lock the top course in place. People who skip caps often circle back later,
especially if the top course gets bumped by mowers, feet, or enthusiastic gardening.
In short: the projects that feel easy at the end usually aren’t the ones with the fanciest blocksthey’re the ones where the builder took base prep
and drainage seriously. The good news? Once you’ve done one short wall the right way, the rest of the yard starts looking suspiciously “fixable.”
Conclusion
A Besser/cinder block garden edge wall is one of the best “weekend warrior” upgrades you can makeclean lines, better bed definition, and a
satisfying sense that your landscaping now has boundaries. Build it like it’s going to see weather (because it will), focus on the base like it’s
the entire project (because it basically is), and give water an escape route so your wall doesn’t spend the next few years slowly leaning into chaos.


