Table of Contents >> Show >> Hide
- First: Know What You’re Cleaning (Because Enamel Is Not “Paint”)
- The Golden Rules Before You Start Scrubbing
- Your Step-by-Step Cleaning Playbook (Pick the Method That Matches the Mess)
- Scenario A: Everyday cleanup (the “normal dinner” situation)
- Scenario B: Stuck-on food that laughs at your sponge
- Scenario C: Burnt-on stains (time for the baking soda simmer)
- Scenario D: Stains that won’t budge (baking soda paste overnight)
- Scenario E: Metal marks (the gray “why did I use a fork?” streaks)
- Scenario F: The “last resort” cleanser (Bar Keepers Friendused correctly)
- Scenario G: “Can I just toss it in the dishwasher?”
- Cleaning the Lid, Knob, and Exterior Without Regret
- Preventing “Hard Mode” Messes (So Cleaning Stays Easy)
- Quick FAQ
- Real-World Experiences (The Part Where Your Dutch Oven Teaches You Lessons)
- The “I baked bread and now the bottom looks like a campfire story” moment
- The “tomato sauce ring of doom” (aka the sauce you swear you stirred)
- The “caramel escaped” incident
- The “why is it sticky even though it’s clean?” confusion
- The “gray streaks” after stirring with metal
- The “I used the dishwasher once and it looks a little dull” worry
- The “I stored it damp and now the rim looks suspicious” lesson
- Conclusion
Enameled cast iron is basically the overachiever of cookware: it can braise, bake, simmer, sear, and look cute doing it.
Then you flip the lid andsurpriseyour “cute” pot now wears a burnt-on scarf of tomato sauce and a mysterious ring
that looks like a crop circle.
The good news: most cleaning problems on Le Creuset and other enameled cast iron are solvable with warm water, patience,
and a few pantry staples. The even better news: you don’t need to treat your Dutch oven like it’s a fragile museum artifact.
You just need the right method for the right messand a short list of things you absolutely shouldn’t do (looking at you,
metal scouring pads).
First: Know What You’re Cleaning (Because Enamel Is Not “Paint”)
Enameled cast iron is cast iron coated with a smooth, glass-like enamel layer. That enamel is what makes cleanup easier
than traditional bare cast iron. You can use dish soap. You don’t have to “season” the cooking surface the way you would
with raw cast iron. And you can focus on removing stuck-on food and stains without worrying that you’re stripping away a
prized layer of seasoning.
But enamel has two enemies:
- Thermal shock (sudden temperature swings) that can crack or chip enamel.
- Abrasive tools and harsh scrubbing that can scratch or dull the finish over time.
The Golden Rules Before You Start Scrubbing
1) Let it coolseriously
Don’t dunk a hot pot into cold water and don’t fill a hot pot with cold water. That sudden temperature change is a classic
way to damage enamel. If you’re in a hurry, let it cool on a trivet or burner (heat off), then move to warm water when it’s safe.
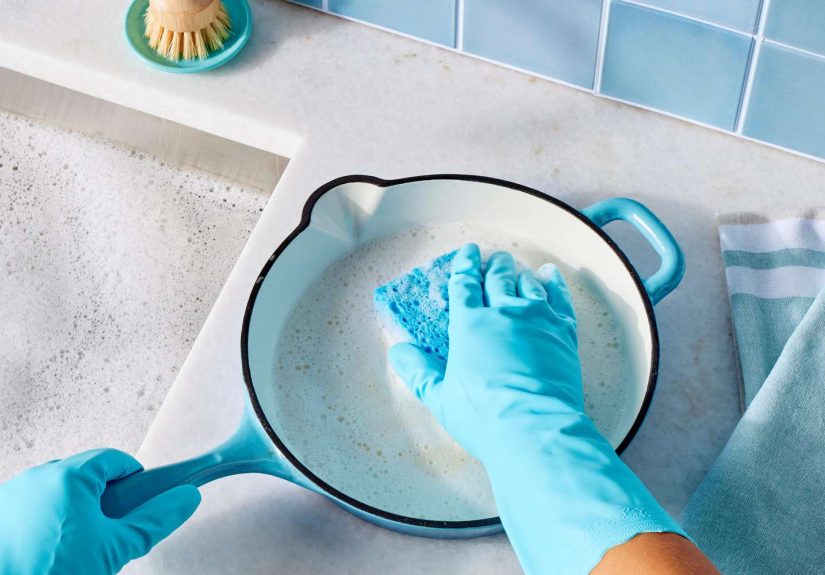
2) Start gentle: warm water + dish soap + soft sponge
Your default cleaning routine should be boringin a good way. Warm water, mild dish soap, and a soft sponge or nylon brush
handle most messes without drama.
3) Avoid metal pads and aggressive abrasives
Metal scouring pads, steel wool, and very abrasive cleaners can scratch or compromise the surface. Enameled cookware is tough,
but it’s not “invincible against sandpaper.”
4) Dry thoroughly (the rim matters)
Many enameled cast iron pieces have exposed cast iron along the rim. The enamel interior won’t rust, but that rim can if it stays wet.
Towel-dry promptly and store in a dry place.
Your Step-by-Step Cleaning Playbook (Pick the Method That Matches the Mess)
Scenario A: Everyday cleanup (the “normal dinner” situation)
- Let cookware cool to room temp.
- Rinse with warm water to loosen residue.
- Wash with mild dish soap and a soft sponge or nylon brush.
- Rinse well and dry completely.
If you do this consistently, you’ll prevent most “stain mysteries” from ever forming a conspiracy in your pot.
Scenario B: Stuck-on food that laughs at your sponge
When something is baked on (burnt rice, caramelized sauce, the remains of last night’s “I’ll just simmer it on high” experiment),
soaking is your best opening move.
- Fill the pot with warm, soapy water.
- Let it soak 15–30 minutes (or longer if the mess is stubborn).
- Use a non-scratch sponge, nylon pad, or plastic scraper to lift softened bits.
- Wash, rinse, and dry.
Scenario C: Burnt-on stains (time for the baking soda simmer)
Baking soda is a gentle powerhouse for enamel. It can help loosen burnt residue without the scratch risk of aggressive scrubbers.
This method is especially helpful for dark, stuck-on patches on the interior.
- Add warm water to cover the stained area.
- Stir in 1–2 tablespoons (or a few big spoonfuls) of baking soda.
- Bring to a gentle simmer for about 8–10 minutes.
- Turn off heat, let it cool, then use a wooden spoon, nylon scraper, or soft brush to lift residue.
- Wash with dish soap, rinse, and dry thoroughly.
If you’ve got a “legendary burn,” repeat the simmer once more rather than escalating straight to harsh tools.
Scenario D: Stains that won’t budge (baking soda paste overnight)
For stubborn discoloration or grime on the interior or exterior, try a paste:
- Mix baking soda with a few drops of water to form a thick paste (think frosting, not soup).
- Spread over stained areas.
- Let it sit for several hours or overnight.
- Wipe and scrub gently with a non-scratch sponge, then wash as normal.
This approach works well when you need timenot forceto do the heavy lifting.
Scenario E: Metal marks (the gray “why did I use a fork?” streaks)
Metal utensils can leave gray marks on enamel even if the enamel isn’t damaged. These marks are often removable with a dedicated
enameled cast iron cleaner or a mild cleanser used correctly. If you want to prevent them, switch to silicone, wood, or other non-metal tools.
Scenario F: The “last resort” cleanser (Bar Keepers Friendused correctly)
For truly stubborn stains, oil residue, and marks, Bar Keepers Friend (BKF) is commonly recommended for enameled cast iron
but it should be used gently, with a soft sponge, and followed by thorough rinsing.
- Wet the surface.
- Sprinkle a small amount of BKF cleanser (or make a light paste with water).
- Gently scrub small areas in circular motions with a nonabrasive sponge.
- Rinse very well and dry completely.
Safety note: Don’t mix BKF with other cleaners, vinegar, or baking soda. Keep it simple: BKF + water + rinse.
And if you’re ever unsure about your cookware’s coating, test a small spot first.
Scenario G: “Can I just toss it in the dishwasher?”
Some enameled cast iron is labeled dishwasher-safe, but hand washing is usually the better long-term habit. Frequent dishwashing
can dull the enamel finish over time. If you do use the dishwasher occasionally, make sure the rack supports the weight and let the
drying cycle finish before you open the door.
Cleaning the Lid, Knob, and Exterior Without Regret
Glass lids
Treat glass lids like… glass. Avoid sudden temperature changes and skip abrasive pads. Warm soapy water and a soft sponge
are usually enough.
Knobs and handles
Some knobs (especially specialty finishes) and wooden handles need gentler care. When in doubt, hand wash the lid and knob
with non-abrasive dish soap and a soft sponge.
Exterior enamel
For normal splatters, use warm soapy water. For baked-on grease (hello, roasted chicken), use a baking soda paste.
Avoid scraping with metal toolsthose can leave marks or chips on edges over time.
Preventing “Hard Mode” Messes (So Cleaning Stays Easy)
Use lower heat than you think you need
Enameled cast iron retains heat extremely well, so cooking on low to medium is usually plenty. Overheating can lead to stuck-on food
and stubborn oil residue that’s harder to clean later.
Don’t preheat empty on high for a long time
If you need to preheat, do it gradually and avoid cranking the burner like you’re trying to signal airplanes.
Steady heat is your friend; scorching heat is your future cleaning project.
Oil wisely
Oils and fats can polymerize into a sticky residue when overheated. If you notice a tacky film after cooking, a baking soda simmer
or a gentle cleanser can help reset the surface.
Store it dry (and don’t trap moisture under the lid)
Make sure everything is fully dry before storage. If you live somewhere humid, storing with the lid slightly ajar (or with a towel between)
helps prevent moisture buildup.
Quick FAQ
Is discoloration always a problem?
Not necessarily. Light staining is common, especially on light-colored interiors. If the surface is smooth and intact, it’s often cosmetic.
Clean for hygiene and functionnot because your pot needs to look brand new for a photo shoot.
My interior is blackshould I try to “whiten” it?
Some pieces have darker enamel interiors by design. Even light interiors can darken with use. Focus on removing stuck-on residue and
rancid oil smells; don’t fight every shade change like it’s a personal insult.
What if I see chips or cracks?
If enamel is chipped and raw cast iron is exposed in cooking areas, be cautious. Chips can worsen over time, and exposed iron can rust.
Consider contacting the manufacturer’s customer support for guidance and warranty info.
Real-World Experiences (The Part Where Your Dutch Oven Teaches You Lessons)
In a lot of kitchens, enameled cast iron becomes the “do-everything pot,” which is great… until it becomes the “do-everything cleanup”
too. Here are some common experiences people run intoplus what usually fixes themso you can spend less time scrubbing and more time
eating the food you actually meant to make.
The “I baked bread and now the bottom looks like a campfire story” moment
Baking bread at high heat is a classic way to end up with dark marks, especially if flour or oil bakes onto the enamel. The first instinct is
to go full brute force. But the smarter move is usually the baking soda simmer. People often find that a gentle simmer loosens the burnt layer
enough that a wooden spoon or nylon scraper can lift it without scratching. The big takeaway: let chemistry and heat do the work, not your biceps.
The “tomato sauce ring of doom” (aka the sauce you swear you stirred)
Tomato sauce loves to splatter and then bake onto the sidewalls. The ring looks dramatic, but it’s usually manageable. Many cooks learn a simple
routine: soak with warm soapy water first, then switch to a baking soda paste for anything that remains. If you catch the stain early, it’s almost
always easierlike cleaning a spill before it becomes a historical landmark.
The “caramel escaped” incident
Sugar goes from “not quite done” to “tiny lava situation” fast. When caramel burns onto enamel, it can feel like it fused with the pot. The trick
many people discover is patience: hot (not cold) water soak, then a baking soda paste left to sit. Overnight paste time is basically your pot’s
therapy sessionit helps loosen the burnt sugar so you don’t have to attack it with anything sharp.
The “why is it sticky even though it’s clean?” confusion
This one surprises people: the pot can look clean but feel tacky. That sticky feel is often overheated oil residuebasically oil that’s baked into a thin
film. The fix is usually a baking soda simmer, which lifts the residue, followed by regular dish soap. People often realize they were using higher heat
than necessary; enameled cast iron holds heat so well that “medium” often behaves like “high” in thinner pans.
The “gray streaks” after stirring with metal
Metal utensil marks can look scary, like the enamel is scratched. In many cases, they’re just metal transfer. People typically learn two things:
(1) silicone and wood tools prevent the problem, and (2) a gentle cleanser (or a brand-approved cleaner) can remove marks when they happen.
The emotional lesson is also important: your pot isn’t ruinedit’s just telling you it prefers a silicone spatula.
The “I used the dishwasher once and it looks a little dull” worry
This shows up when someone tries the dishwasher and later notices the shine isn’t as glossy. Many brands allow dishwashing, but frequent cycles can
dull enamel over time. In real life, people often settle into a compromise: hand wash most of the time, dishwasher only when life gets chaotic.
If the pot still cooks beautifully (and it probably does), the finish change is usually cosmeticnot a performance failure.
The “I stored it damp and now the rim looks suspicious” lesson
The enamel interior doesn’t rust, so it’s easy to forget the rim can. Lots of people learn this the annoying way: they towel-dried “most of it,”
put the lid on, and trapped moisture right where the rim meets air. The fix is straightforward: dry thoroughly, and store in a dry placeoften with the
lid slightly ajar to prevent moisture buildup. It’s a small habit that prevents a surprisingly common headache.
If there’s one theme in these experiences, it’s this: enameled cast iron responds best to calm, repeatable methodssoak, simmer, paste, gentle scrub
rather than extreme tools. Your goal isn’t to “win” against the stain in one furious battle. Your goal is to keep the enamel smooth and intact for years
while still enjoying the fact that this pot can braise short ribs and bake bread like it was born for it.
Conclusion
Cleaning Le Creuset and enameled cast iron cookware is mostly about matching the method to the mess. For daily cleanup, keep it simple: let the pot cool,
wash with warm soapy water, rinse, and dry thoroughly. For burnt-on residue, give baking soda a chance to shineeither as a gentle simmer or a paste that
works while you sleep. And for the truly stubborn stuff, use a trusted cleanser carefully and rinse well. Treat enamel like the glassy coating it is:
tough, practical, and happiest when you skip the abrasives and avoid extreme temperature swings.


