Table of Contents >> Show >> Hide
- Why Convert an ATX Power Supply in the First Place?
- What an ATX Lab Supply Can and Cannot Do
- Before You Start: The Important Safety Stuff
- What You’ll Need
- Know Your ATX Wire Colors
- Step-by-Step: How to Convert an ATX Power Supply to a Lab Power Supply
- Do You Need a Dummy Load?
- How to Make It More Like a Real Bench Supply
- Common Mistakes to Avoid
- Troubleshooting Your Converted Supply
- Is Converting an ATX PSU Worth It?
- Real-World Experiences and Lessons From ATX Bench Supply Builds
If you’ve ever looked at an old desktop computer power supply and thought, “You know, that beige box deserves a second career,” you’re not alone. Converting an ATX power supply to a lab power supply is one of the most practical DIY electronics projects around. It’s affordable, useful, and oddly satisfying. Instead of sending a perfectly good PSU into retirement, you can turn it into a bench-friendly source of 3.3V, 5V, and 12V power for hobby electronics, LED strips, fans, microcontroller projects, and more.
Better yet, an ATX power supply can deliver a lot of current. That makes it far more capable than the average random wall adapter hiding in your junk drawer. The catch? It’s not a true bench supply. It does not magically become a fancy variable lab unit with silky smooth knobs, current limiting, and the personality of a precision instrument. It becomes a sturdy, fixed-voltage workhorse. Think pickup truck, not luxury sedan.
In this guide, you’ll learn how to convert an ATX power supply to a lab power supply safely, what parts you need, how the wiring works, what mistakes to avoid, and when this conversion is brilliant versus when it’s just a very confident bad idea.
Why Convert an ATX Power Supply in the First Place?
The biggest reason is value. A spare ATX PSU already contains regulated DC outputs, built-in protection features, a cooling fan, and enough current for many common electronics tasks. If you already have one, your budget is suddenly smiling.
The second reason is convenience. Instead of hunting for separate adapters for 12V fans, 5V logic boards, and 3.3V modules, you can bring those voltages to front-panel binding posts and keep them all in one place. Suddenly your bench looks a lot less like a spaghetti accident.
The third reason is learning. This project teaches you how desktop power supplies behave, how rails are distributed, how switching supplies turn on, and how to make electrical connections that are actually organized. That last part is rarer than it should be.
What an ATX Lab Supply Can and Cannot Do
What it does well
An ATX-converted lab supply is great for powering:
- 12V fans, pumps, relays, and automotive accessories
- 5V microcontrollers, USB gadgets, and logic circuits
- 3.3V development boards and sensors
- LED strips and test fixtures
- Buck converter modules for adjustable outputs
What it does not do well
It is not a full replacement for a real bench power supply. Most ATX units do not offer adjustable voltage from the front panel, and they do not behave like a proper constant-current lab supply. If you accidentally short your prototype, the PSU’s protection circuitry may help save the power supply, but it may not be as gentle with your circuit as a quality bench supply with user-set current limiting.
In plain English: it’s excellent for powering projects, but it’s not always the best first choice for debugging delicate boards, tiny sensors, or anything that would prefer not to be blasted with “available current: yes.”
Before You Start: The Important Safety Stuff
First rule: do not open the metal case of the power supply unless you are qualified to work around mains-voltage electronics. The dangerous side of the unit is inside, and the capacitors can store energy even after it’s unplugged. For this project, you only need to work with the low-voltage output wiring outside the enclosure.
Second rule: unplug the supply before cutting, stripping, soldering, or rerouting wires. This is not the moment for “I’ll just be careful.” That sentence has launched many regrettable adventures.
Third rule: insulate everything. Use heat-shrink tubing, proper terminals, strain relief, and a sturdy enclosure or faceplate. Exposed conductors on a high-current DC source can turn a small mistake into a large, smoky opinion.
Fourth rule: fuse your outputs if you want a friendlier bench tool. The PSU may protect itself, but adding output fuses helps protect your projects and wiring too.
What You’ll Need
- An ATX power supply in working condition
- Binding posts or banana jacks
- A power switch for PS_ON control
- Wire cutters and wire strippers
- Soldering tools or crimp connectors
- Heat-shrink tubing or electrical insulation
- A multimeter
- Optional fuses or fuse holders
- Optional voltmeter, USB module, or buck converter module
- A case, panel, or 3D-printed faceplate if you want it to look less “garage wizard”
Know Your ATX Wire Colors
Classic ATX power supplies are usually color-coded, and knowing those colors makes this project much easier:
- Yellow = +12V
- Red = +5V
- Orange = +3.3V
- Black = Ground / COM
- Green = PS_ON
- Gray = PWR_OK
- Purple = +5V standby
- Blue = -12V on many older/classic units
Two quick warnings here. First, not every modern supply includes every legacy rail, so verify yours with a meter. Second, some newer systems use ATX12VO-style supplies, which are a different animal. If your PSU is a 12V-only design, do not expect the classic mix of 3.3V and 5V rails from the main connector. In that case, your conversion plan needs to change before your confidence does.
Step-by-Step: How to Convert an ATX Power Supply to a Lab Power Supply
Step 1: Test the PSU Before You Build Anything
Before you mount a single binding post, confirm that the power supply works. On a standard 24-pin ATX connector, the PSU turns on when the green PS_ON wire is connected to ground. That means you can momentarily jumper the green wire to a black wire and power up the unit for testing.
Use a multimeter to verify the output voltages. Check 12V, 5V, and 3.3V. Also verify the standby rail if you plan to use it. Do not rely on the fan alone. Some modern power supplies have semi-passive or zero-RPM behavior, so a non-spinning fan does not always mean the unit is dead.
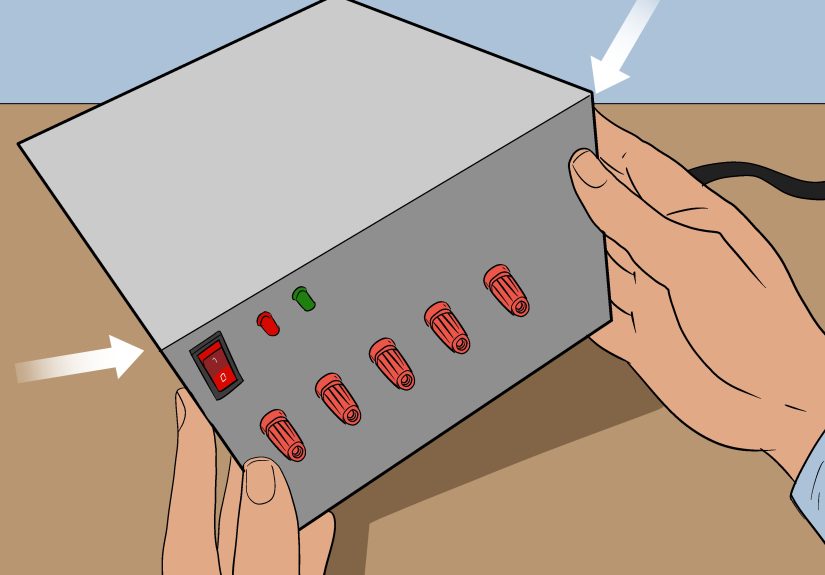
Step 2: Plan Your Front Panel
Decide which outputs you actually want on the front. A practical layout usually includes:
- One or two ground terminals
- One +12V terminal
- One +5V terminal
- One +3.3V terminal
- An on/off switch connected to PS_ON
- An optional LED power indicator
Some builders also add a dedicated standby terminal, a USB charging module, or a buck converter fed from the 12V rail for adjustable 9V, 6V, or 5V outputs. That last option is particularly smart because it gives your homemade bench supply a little more flexibility without pretending it suddenly graduated into a laboratory aristocrat.
Step 3: Bundle Wires by Rail
ATX power supplies often provide multiple wires for the same voltage rail. That is a feature, not clutter. Those multiple wires share current across the harness, so when you bring a rail out to a binding post, it’s wise to combine several wires of the same color instead of trusting one lonely conductor to carry the party.
For example, you might combine several yellow wires for the 12V output, several red wires for 5V, several orange wires for 3.3V, and multiple black wires for ground. Trim away unused wires only after you’ve confirmed you truly don’t want them.
Step 4: Wire the Power Switch
The simplest switch arrangement is to connect the green PS_ON wire to ground through a front-panel switch. Flip the switch, the PSU wakes up. Flip it off, the main rails shut down. It’s a nice, clean setup and feels much more civilized than re-jumpering wires every time you need power.
If you want a power indicator, you can add an LED with an appropriate resistor to one of the live rails. Many people use the standby rail for a “mains present” indicator and the main rails for an “outputs on” indicator. That way the box tells you whether it is sleeping or actually working.
Step 5: Install Binding Posts
Mount your banana jacks or binding posts securely in the case or front panel. Label them clearly. This is not the place to trust memory, because all power-supply wiring looks obvious until six months later when all you remember is that yellow was “probably something cheerful.”
Keep wire runs short, neat, and mechanically secure. Use ring terminals, ferrules, or solid soldered joints where appropriate. Tug-test everything. If a wire can come loose from a light pull now, it will absolutely do so later in the least convenient moment possible.
Step 6: Add Fuses and Extras
Inline fuses or fused binding posts are a very good upgrade. The ATX power supply may have over-current and short-circuit protection, but individual output fuses make your converted unit more useful on the bench. They can help prevent melted leads, fried modules, and that specific smell electronics make when they decide they no longer support your goals.
Useful extras include:
- A digital voltmeter panel
- A USB output module
- A buck converter for adjustable lower voltages
- A 12V automotive socket
- An electronic fuse or current-limited DC-DC module
Step 7: Test Again Under Load
Once everything is wired, test each output with a multimeter again. Then test with actual loads: a fan on 12V, a USB tester or small dev board on 5V, maybe a sensor board on 3.3V. Watch for voltage sag, instability, heat buildup at terminals, or wires getting warmer than they should.
This is also the moment to confirm polarity labels. Reversing labels on a homemade bench supply is the kind of mistake that turns a proud weekend project into a very educational Tuesday.
Do You Need a Dummy Load?
This is where older tutorials and newer power-supply standards stop being best friends.
Many classic guides recommend adding a power resistor as a dummy load, usually across the 5V rail, because some older ATX supplies regulated poorly without a minimum load. That advice was common for good reason on older units.
But here’s the modern reality: many newer ATX power supplies do not require a permanent dummy load to operate safely. In fact, current ATX guidance explicitly expects power supplies to tolerate a no-load condition without damage or hazardous behavior.
So what should you do? Start without a dummy load. Test the outputs. If the supply starts reliably and the voltages stay stable, congratulations, you just avoided installing a resistor that mostly converts your electricity budget into decorative heat. If your specific unit behaves badly with no load, then add a properly rated resistor only after calculating the power dissipation and mounting it where heat is not a surprise guest.
How to Make It More Like a Real Bench Supply
If you want this conversion to be more than fixed rails on banana jacks, the secret sauce is usually a DC-DC converter module.
A buck converter connected to the 12V rail can create adjustable outputs for 9V, 6V, 5V, or other lower voltages. Some modules include current limiting, digital displays, and onboard cooling. That can dramatically increase the usefulness of your ATX conversion.
Just remember: the quality of the converter matters. A bargain-bin module with mysterious labeling and a confidence-inspiring amount of hot glue is not automatically your friend. Choose one rated for the voltage and current you actually need, and set it up with a meter before connecting sensitive gear.
If you routinely work on prototypes that need careful current limiting, consider adding a dedicated CC/CV module or simply keeping a true bench supply nearby for delicate jobs. There is no shame in admitting that one tool can’t do everything. That’s why workshops end up looking like power-supply adoption centers.
Common Mistakes to Avoid
Using the wrong kind of PSU
Not every power supply that came from a computer behaves like classic ATX. Verify the connector type and rails before building around assumptions.
Trusting color codes without testing
Color codes are helpful, but a multimeter is better. Always verify outputs.
Running high current through a single wire
Combine multiple wires from the same rail and use hardware that can handle the load.
Skipping output fuses
The PSU may survive a fault. Your project might not.
Using it like a precision instrument
It’s a strong fixed-output supply, not a magical all-purpose lab unicorn.
Opening the PSU case
Unless you are trained for mains-side repair, leave the enclosure alone.
Troubleshooting Your Converted Supply
The PSU won’t start
Check that the AC switch is on, confirm PS_ON is being pulled to ground, and verify the unit actually works before the conversion. Also remember that a fan not spinning is not always proof of failure on modern models.
The voltages are wrong
Measure directly at the terminals, then again closer to the PSU harness. Bad connections, thin jumpers, or mislabeled posts are common culprits.
The supply shuts down under load
You may be drawing too much current from one rail, creating a short, or stressing a poorly wired output connection. Inspect fuses, terminals, and wire bundling.
The PSU works, but your project resets
That often points to startup transients, insufficient decoupling, poor grounding, or using a fixed rail where a regulated converter would be smarter.
Is Converting an ATX PSU Worth It?
Absolutely, as long as you understand what you’re building. If you need lots of 12V, 5V, and 3.3V current for hobby work, an ATX conversion is one of the best low-cost bench upgrades you can make. It’s practical, educational, and surprisingly durable when done well.
If you need precision voltage adjustment, accurate current limiting, low-noise performance, or protection for fragile prototypes, buy or keep a proper bench supply too. The smartest setup is often both: an ATX lab supply for the heavy lifting and a real bench unit for the fussy stuff.
That’s the sweet spot. Let the ATX supply handle the muscle. Let the precision supply handle the drama.
Real-World Experiences and Lessons From ATX Bench Supply Builds
One of the most common real-world experiences with this project is that the first version usually works, but the second version is the one people are proud of. Version one tends to be functional in a “yes, technically that is electricity” kind of way. The binding posts are slightly crooked, the labels look like they were made during a power outage, and one wire is always a little shorter than it should be. Then the supply gets used for a few weeks, and the lessons start rolling in fast.
A frequent lesson is that good terminals matter more than people expect. Cheap binding posts can loosen, spin, or heat up under load. Builders often discover that the power supply itself is perfectly capable, but the weak point is the hardware on the front panel. Upgrading the posts, tightening all fasteners, and using better crimp terminals often makes the whole unit feel more professional overnight.
Another common experience is confusion around the fan. Plenty of builders think they made a wiring mistake because the fan only twitches or doesn’t spin continuously. Then they discover the PSU has a semi-passive cooling mode. That realization is usually followed by equal parts relief and mild annoyance. The fix is simple: stop judging the entire power supply by fan drama alone and start measuring rails with a multimeter.
Older online advice also leads many people to install a large dummy load resistor immediately. Sometimes that helps, especially with older supplies. But sometimes the resistor just sits there getting hot enough to warm the neighborhood while the PSU would have behaved fine without it. A better real-world approach is to test first and only add a load if the specific unit actually needs one.
Builders who get the most use out of an ATX conversion often add one smart upgrade: a buck converter on the 12V rail. That turns the supply from “handy fixed rails” into “surprisingly flexible bench helper.” It becomes much easier to power 9V gear, dial in 5.1V for USB experiments, or feed a lower-voltage project without juggling extra adapters.
There’s also a pattern in how these supplies are used. Most people don’t end up using them for every project. Instead, they become the go-to tool for high-current, fixed-voltage tasks: testing fans, LED strips, relays, routers, pumps, amplifiers, and development boards with known power requirements. For fragile analog circuits or expensive prototypes, many builders still reach for a true current-limited bench supply. That’s not failure. That’s maturity with fewer burned parts.
And perhaps the most universal experience of all: once someone builds one ATX bench supply, they immediately start spotting every old desktop computer as “potential future equipment.” It is the electronics equivalent of suddenly seeing sourdough starter in every jar. You’ve been warned.


