Table of Contents >> Show >> Hide
- What “Best Pot Roast” Actually Means (So We’re Not Arguing With the Meat)
- Pick the Right Cut (This Is 80% of Success)
- The Gold-Standard Method: Dutch Oven Pot Roast (Oven Braise)
- Liquid Logic: Make a Sauce That Tastes Like You Worked Harder Than You Did
- Keep the Braise Gentle (Because Boiling Is How You Bully Beef)
- Turn the Pot Liquid Into Gravy (Without Lumps or Regret)
- Common Pot Roast Problems (And How to Fix Them Like a Calm Adult)
- Alternative Methods (When You Want Pot Roast but Also Want to Do Other Things)
- Serving Ideas That Make Pot Roast Feel Brand-New
- Food Safety (Because Delicious Is Great, and Safe Is Also Great)
- of Pot Roast “Experience” (The Stuff You Learn After Making It a Few Times)
- Conclusion
Pot roast is the culinary equivalent of a warm blanket that also happens to taste like beefy victory. Done right, it’s fork-tender, deeply savory, and surrounded by vegetables that didn’t get cooked into a sad, beige memory.
Done wrong… well, let’s just say you’ll suddenly develop a passionate interest in “creative uses for gravy.”
This guide teaches you how to cook the best pot roastthe kind that slices (or shreds) like a dream, makes a silky sauce without weird lumps, and leaves your kitchen smelling like someone’s grandma just won a cooking show.
We’ll focus on the most reliable method: a Dutch oven braise in the oven. I’ll also include smart shortcuts and fixes so you can rescue the roast even if life (or your oven) gets chaotic.
What “Best Pot Roast” Actually Means (So We’re Not Arguing With the Meat)
The best pot roast isn’t about fancy ingredientsit’s about turning a tough cut into tender meat while building big flavor in the liquid.
That happens when you combine three things:
- Time + gentle heat (to melt connective tissue into luscious gelatin)
- Browning (for deep, roasted flavor)
- A balanced braising liquid (to keep everything moist and make a sauce you’d happily drink with a spoon)
Pick the Right Cut (This Is 80% of Success)
Pot roast is a cooking method, not a single cut of beef. The best results come from cuts with marbling and connective tissuethey start tough, but after a slow braise they turn tender and juicy.
Best Overall: Chuck Roast
If you want the classic “fall-apart, rich, beefy” pot roast, choose beef chuck. It has enough fat and collagen to stay moist and create body in the sauce.
Look for a 3–5 lb chuck roast with good marbling (thin white streaks of fat throughout).
Great, But Different: Brisket
Brisket can make an amazing pot roast with a slightly different vibe: meatier slices and a distinct grain.
It’s fantastic if you like carving neat portions, but it may take longer to tenderize depending on thickness.
Works in a Pinch: Round Roast
Round (top or bottom round) is leaner. It can still be tasty, but it’s less forgivingmeaning you need extra attention to moisture and don’t want to overcook it into dryness.
If round is what you’ve got, consider more braising liquid and a careful doneness check.
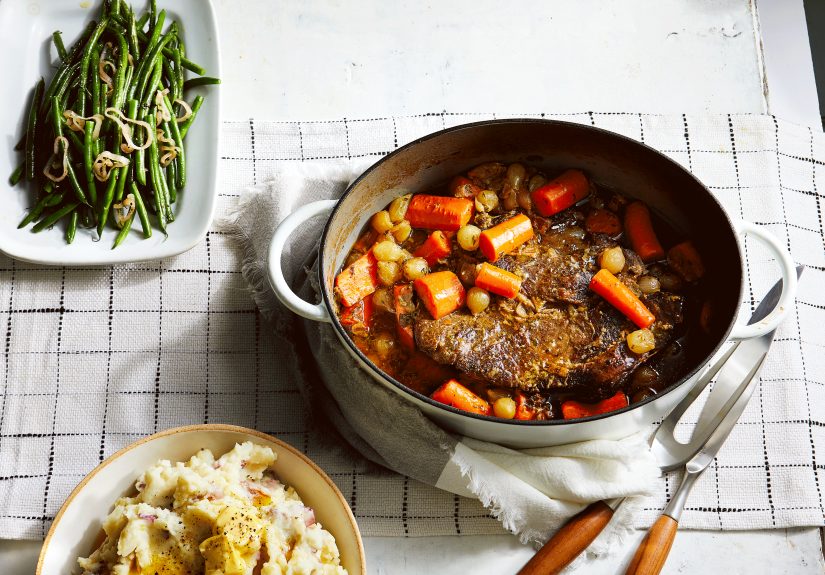
The Gold-Standard Method: Dutch Oven Pot Roast (Oven Braise)
This is the most consistent way to get a pot roast that’s tender, flavorful, and not mysteriously dry.
The oven provides steady, all-around heatlike a spa day for tough beef.
Pot Roast Blueprint (Ingredients You Actually Need)
- Beef: 3–5 lb chuck roast
- Salt + pepper: the non-negotiables
- Aromatics: onion + garlic (carrots/celery optional but helpful)
- Tomato paste: small amount, huge payoff
- Braising liquid: beef broth/stock (wine or beer optional)
- Herbs: bay leaf, thyme/rosemary
- Vegetables: carrots + potatoes (added at the right time)
Step-by-Step: How to Cook the Best Pot Roast
-
Salt it early (optional but excellent).
If you have time, salt the roast generously (about 1 to 1½ tsp kosher salt per pound) and refrigerate it uncovered for 8–24 hours.
This seasons the meat more deeply and helps it brown better. If you’re cooking today, don’t panicjust salt it well right before searing. -
Preheat the oven.
Set your oven to 300°F for an ultra-gentle braise (my favorite for tenderness).
A range of 275–325°F works, but 300°F gives you a sweet spot: steady simmer, less risk of drying, and great texture. -
Pat dry and sear like you mean it.
Dry the roast thoroughly with paper towels (surface moisture is the enemy of browning).
Heat 1–2 Tbsp oil in a Dutch oven over medium-high heat until shimmering. Sear the roast on all sides until deeply brownedabout 3–5 minutes per side.
This step builds the “roasty” flavor that makes pot roast taste like pot roast. -
Build the flavor base (your vegetables’ audition).
Lower heat to medium. Add chopped onions (and carrots/celery if using) with a pinch of salt.
Cook until softened and lightly browned, scraping up browned bits as they release.
Add minced garlic and cook 30 seconds (just until fragrant, not burnt). -
Tomato paste + deglaze = instant upgrade.
Stir in 1–2 Tbsp tomato paste and cook it for 1 minute to darken slightly.
Add ½–1 cup wine/beer (optional) or extra broth, and scrape the pot to dissolve the browned fond.
Those bits are flavor gold, not “burnt stuff.” -
Add braising liquid (not a swimming pool).
Return the roast to the pot. Add beef broth until the liquid reaches about ⅓ to ½ of the way up the roast.
You’re braising, not boiling. Add bay leaf and a few thyme/rosemary sprigs. -
Cover and braise.
Cover with a tight-fitting lid and move to the oven.
Cook for 3 to 4 hours for a 3–4 lb roast. Larger roasts can take 4–5 hours.
Start checking around the 3-hour mark. -
Add potatoes and carrots at the right time.
If you add potatoes and carrots at the beginning, they can turn into mushy overachievers.
Add them when the roast is about 60–90 minutes from donewhen it’s already getting tender, but not fully finished. -
Know when it’s done (don’t trust the clock).
The roast is done when a fork slides in easily and the meat can be pulled apart with gentle pressure.
If it still feels tight or chewy, it’s not “overcooked”it’s under-tenderized. Give it more time. -
Rest the roast.
Remove the roast to a plate and tent loosely with foil for 15–20 minutes.
This helps juices redistribute so the meat stays moist when sliced or shredded.
Liquid Logic: Make a Sauce That Tastes Like You Worked Harder Than You Did
The braising liquid is doing two jobs: keeping the roast moist and turning into your gravy/sauce.
Here’s how to make it taste rich instead of watery.
- Use broth/stock as the base. If you use low-sodium, you can season more precisely.
- Optional booze: red wine brings depth; beer brings toastiness; both add complexity when simmered.
- Umami boosters: a spoonful of tomato paste is classic; a splash of Worcestershire or soy sauce can deepen beef flavor (use lightly).
- Silky body trick: a small amount of unflavored gelatin can make the sauce feel restaurant-level without tasting “gelatin-y.”
Keep the Braise Gentle (Because Boiling Is How You Bully Beef)
The goal is a lazy simmer, not a rolling boil. If your pot roast cooks at too high a temperature, the meat fibers tighten and squeeze out moisture.
That’s how you get “tender-ish but weirdly dry,” which is the saddest kind of confusing.
Tip: If your Dutch oven tends to simmer too aggressively, crack the lid slightly or lower the oven temp to keep things calm.
Turn the Pot Liquid Into Gravy (Without Lumps or Regret)
You’ve already made a flavorful liquid. Now give it a glow-up.
- Strain (optional): For a smooth gravy, strain out solids. For rustic, keep it as-is.
- Defat: Spoon off excess fat or use a fat separator.
- Reduce: Simmer liquid for 5–15 minutes to concentrate flavor.
-
Thicken (choose one):
- Flour slurry: whisk 1–2 Tbsp flour with cold water, then whisk into simmering liquid.
- Cornstarch slurry: whisk 1 Tbsp cornstarch with 1 Tbsp water, add to simmering liquid until glossy.
- Mashed veg hack: mash a few potatoes/carrots into the liquid for natural thickness.
- Finish: Taste and adjust salt, pepper, and a tiny splash of vinegar/lemon for brightness.
Common Pot Roast Problems (And How to Fix Them Like a Calm Adult)
“My pot roast is tough.”
Almost always: it needs more time at gentle heat. Keep braising and check every 20–30 minutes.
Tough doesn’t mean “done.” It means “still negotiating.”
“It’s dry even though it was in liquid.”
Two usual suspects: (1) the oven was too hot and the liquid boiled, or (2) the roast is too lean.
Next time: go with chuck, lower the temp (300°F), and keep liquid at ⅓–½ height.
“My gravy tastes flat.”
Add salt (carefully), then add acid (a few drops of vinegar or lemon) to wake it up.
If it’s still bland, reduce it longerconcentration is flavor.
“My vegetables turned to mush.”
Add carrots and potatoes later. They only need about 60–90 minutes in the braise to get tender.
Alternative Methods (When You Want Pot Roast but Also Want to Do Other Things)
Slow Cooker Pot Roast
Slow cookers are convenient, but they don’t brown wellso you’ll get better flavor if you sear the roast and sauté onions first.
Cook on LOW for 8–10 hours or HIGH for 4–6 hours, depending on size.
Instant Pot / Pressure Cooker Pot Roast
Great for speed, but the sauce can taste less developed unless you sear and deglaze properly.
A typical 3–4 lb chuck roast takes about 60–80 minutes at high pressure plus natural release.
Add potatoes and carrots after pressure cooking (or cook them separately) if you want better texture control.
Serving Ideas That Make Pot Roast Feel Brand-New
- Classic: over mashed potatoes with extra gravy
- Cozy: over buttered egg noodles
- Sandwich mode: pile shredded beef on rolls with horseradish mayo
- Taco night twist: shred the beef, reduce sauce, and serve with pickled onions
- Leftover genius: chop beef into hash with potatoes and onions, crisped in a skillet
Food Safety (Because Delicious Is Great, and Safe Is Also Great)
Pot roast makes fantastic leftovers, but follow basic food safety rules:
- Don’t leave cooked food sitting out for long periods. Refrigerate promptly.
- Store leftovers in shallow containers so they cool faster.
- Use refrigerated leftovers within a few days, or freeze for longer storage.
- Reheat leftovers until steaming hot throughout.
of Pot Roast “Experience” (The Stuff You Learn After Making It a Few Times)
If you’ve never made pot roast before, here’s what the experience usually feels like in real kitchensbecause recipes can be weirdly silent about the emotional journey
of staring into an oven like you’re waiting for a text back.
First: pot roast teaches patience. It’s not a “set a timer and declare victory” dish. The clock is a suggestion; tenderness is the truth.
You’ll check at three hours and think, “It’s done,” then you’ll poke it and the roast will respond by being stubborn.
That’s normal. Tough cuts don’t become tender by hitting a specific timethey become tender when connective tissue slowly breaks down.
Once you’ve felt the difference between “still tight” and “fork slides in like butter,” you’ll never trust time alone again.
Second: the smell changes as the roast gets close. Early in the cook, it smells like browned beef and onions.
Later, the aroma gets rounder and sweeteralmost like the vegetables and meat have signed a peace treaty and decided to work together.
That’s often the moment people start “just checking” the roast more frequently, which is kitchen code for “hovering.”
Third: the sauce is where you win hearts. A good pot roast sauce tastes like concentrated comfortsalty, savory, and a little sweet from onions and carrots.
The best part is that you don’t have to invent a sauce from scratch; you’re basically refining what the roast already created.
When you reduce it and whisk it into something glossy, you’ll understand why some people care more about gravy than dessert.
Fourth: vegetables have personalities. Potatoes are sturdy and will hang in there, but they can soak up liquid like tiny edible sponges.
Carrots can go from “perfectly tender” to “baby food adjacent” if you leave them too long.
This is why adding vegetables later feels like a chef secret, even though it’s just basic timing.
Finally: leftovers are half the point. Pot roast often tastes even better the next day because the flavors have had time to mingle.
You’ll open the fridge and find a pot of beefy, gelatin-rich goodness that reheats beautifully.
That’s when you start making plans: sandwiches, tacos, rice bowls, maybe a quick stew with extra veggies.
In other words, pot roast isn’t just dinnerit’s a weekend project that pays rent all week.
Conclusion
The best pot roast comes down to a few reliable moves: choose chuck, season boldly, sear deeply, braise gently, and don’t rush tenderness.
Add vegetables at the right time, finish the sauce with intention, and you’ll get a roast that tastes like classic comfort foodonly better.
If you ever doubt yourself, remember: pot roast rewards calm confidence and a slightly longer cook time. Much like life, but with gravy.


