Table of Contents >> Show >> Hide
- What Does It Mean to Crimp a Wire?
- Tools and Materials You Need
- How to Choose the Right Crimp Connector
- Step-by-Step: How to Crimp a Wire Properly
- Step 1: Turn off power and inspect the wire
- Step 2: Cut the wire cleanly
- Step 3: Strip the insulation
- Step 4: Check the stripped strands
- Step 5: Place the terminal in the correct crimp die
- Step 6: Insert the wire fully
- Step 7: Squeeze the crimper fully
- Step 8: Remove and inspect the crimp
- Step 9: Perform a tug test
- Step 10: Finish the connection
- Common Types of Wire Crimps
- Common Crimping Mistakes to Avoid
- How to Tell If a Crimp Is Good
- Example: Crimping a Ring Terminal on a 16 AWG Wire
- When You Should Re-Crimp Instead of “Making It Work”
- Practical Experiences and Lessons From Real-World Crimping
- Conclusion
If you have ever stared at a loose wire, a lonely terminal, and a crimping tool that looks like it belongs in a medieval dentist’s office, welcome. You are in the right place. Crimping a wire is one of those skills that seems absurdly simple until your connection slips, overheats, or pulls apart at the worst possible moment. Then it becomes very clear that “squeeze and hope” is not a professional method.
The good news is that learning how to crimp a wire is not rocket science. It is more like kitchen science: use the right ingredients, measure carefully, and do not freestyle the important parts. A properly crimped wire creates a secure mechanical connection and a reliable electrical path, which is exactly what you want whether you are fixing a car stereo, wiring a trailer, building a control panel, or finishing a DIY electronics project.
This guide walks you through the process step by step in plain American English, with practical tips, common mistakes to avoid, and examples that make the whole thing a lot less mysterious.
What Does It Mean to Crimp a Wire?
Crimping is the process of compressing a metal connector around a stripped wire using a purpose-built tool. The pressure deforms the connector so it grips the conductor tightly. When done correctly, the result is a connection that is strong, stable, and electrically efficient.
In everyday terms, crimping lets you attach a terminal, butt splice, ferrule, or pin to a wire without turning the project into a soldering drama. It is widely used in automotive wiring, marine systems, appliances, low-voltage work, networking, industrial controls, and countless repair jobs.
That last part matters: crimping is not one-size-fits-all. A ring terminal for a car battery cable is not crimped the same way as a small connector pin for an electronics harness. The exact tool, die shape, strip length, and amount of force all depend on the terminal and wire you are using.
Tools and Materials You Need
1. The correct wire
Start by knowing your wire gauge and type. Stranded wire is common for crimped terminals because it is flexible and usually works best with many crimp connectors. Always match the connector to the wire size, not to your optimism.
2. The right terminal or connector
Common choices include ring terminals, spade terminals, butt connectors, disconnects, ferrules, and specialty pins. Many insulated terminals in the U.S. follow a color system: red, blue, and yellow typically correspond to different wire gauge ranges. That color coding is helpful, but read the package anyway. Packaging has saved many projects from becoming modern art.
3. A wire stripper
You need a clean strip without nicking or cutting strands. A dedicated wire stripper is far better than using a knife and a prayer.
4. A crimping tool
This is the star of the show. Use a crimper designed for your connector style. Some crimpers are made for insulated terminals, others for non-insulated terminals, open-barrel terminals, ferrules, coax connectors, or heavy cable lugs. A ratcheting crimper is usually the best choice for beginners because it helps deliver a full, consistent crimp cycle.
5. Optional but smart extras
Heat shrink tubing, a multimeter, and a small pull tester or at least your own steady tug can help verify that the finished connection is worth trusting.
How to Choose the Right Crimp Connector
Before you touch the tool, match three things: the wire gauge, the terminal type, and the crimp tool profile. If one of those is off, the finished crimp may look acceptable while secretly plotting your future inconvenience.
Use a ring terminal when the wire will be secured under a screw or stud and should stay put. Use a spade or fork terminal when easy removal matters. Use a butt connector to join two wires end to end. Use a ferrule when you want to terminate stranded wire neatly for insertion into a screw clamp terminal. Use specialty crimp pins only with the connectors and tooling made for them.
If the wire is copper, use a connector rated for copper conductors. If the application involves aluminum or mixed conductor materials, you need the properly marked connector for that use. In household or code-governed electrical work, choose listed connectors suitable for the application and environment.
Step-by-Step: How to Crimp a Wire Properly
Step 1: Turn off power and inspect the wire
This may sound obvious, but obvious things are the most frequently ignored. If the wire is part of a live circuit, disconnect power first. Then inspect the wire. If the end is burned, oxidized, bent, or frayed, cut it back to clean conductor.
Step 2: Cut the wire cleanly
Use a proper cutter so the wire end is square and neat. A jagged end makes insertion harder and can lead to stray strands escaping the barrel like tiny copper rebels.
Step 3: Strip the insulation
Strip only as much insulation as the terminal requires. There is no universal strip length that works for every connector. Too little exposed conductor and the wire may not seat fully. Too much and you leave bare conductor exposed outside the terminal, which is both sloppy and risky.
A good target is to strip enough so the conductor reaches the full barrel without sticking far past where it should. The insulation should generally come right up to the terminal’s insulation support or barrel entrance.
Step 4: Check the stripped strands
Look closely at the exposed wire. If strands are cut, mashed, or missing, cut the end off and strip it again. Missing strands reduce conductor area and weaken the connection. Twisting the strands lightly can help keep them together, but do not overdo it into a hard little spike.
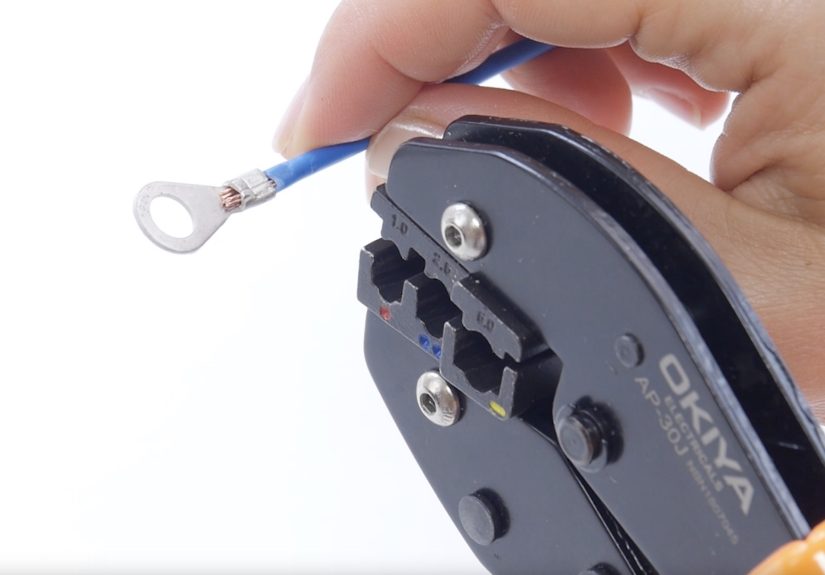
Step 5: Place the terminal in the correct crimp die
Open the crimper and position the terminal in the correct slot or die nest. Many tools are marked by gauge or color. For insulated terminals, match the connector color to the die marking. For non-insulated or specialty terminals, use the die specified by the terminal manufacturer.
With many ratcheting crimpers, you can lightly close the handles so the terminal stays in place while you insert the wire. That is a handy third hand, and unlike your actual third hand, it comes with the tool.
Step 6: Insert the wire fully
Push the stripped wire into the terminal barrel until it bottoms out or reaches the proper stop point. The insulation should sit close to the barrel entry. No strands should be sticking out from the sides. If even one strand escapes, remove the wire and start again. It is easier to redo one crimp than diagnose one mysterious electrical fault later.
Step 7: Squeeze the crimper fully
Now compress the tool firmly and evenly. If you are using a ratcheting crimper, continue squeezing until the ratchet releases. Do not stop halfway because your hand got tired or because the tool “looked close enough.” A partial crimp is the wiring equivalent of leaving your front door almost locked.
For larger lugs or heavy-duty connectors, follow the tool and connector instructions carefully. Some connectors require multiple compressions in a particular sequence along the barrel.
Step 8: Remove and inspect the crimp
After crimping, remove the connector and inspect it from all sides. The barrel should be compressed neatly and centered in the correct area. The connector should not be cracked, severely deformed, or sliced through. The wire insulation should be supported if the connector design includes an insulation grip.
On many good crimps, the wire should feel locked in place with no wobble. In certain open-barrel systems, visual signs such as proper conductor brush, bell mouth, and the absence of cut strands are part of inspection. In plain English, it should look intentional, tidy, and secure, not like it lost a bar fight.
Step 9: Perform a tug test
Give the wire a firm pull. Not a dramatic movie-scene yank, but a real check. The wire should not pull out or shift. In production environments, professionals use pull testing and other inspection methods to verify crimp quality. For home projects, a careful tug test is a practical first pass.
Step 10: Finish the connection
If needed, add heat shrink tubing or use a heat-shrink connector for extra strain relief and environmental protection. Then install the terminal onto the stud, screw, block, or mating connector as intended.
Common Types of Wire Crimps
Insulated crimp terminals
These are common in automotive and DIY electrical work. They are beginner-friendly and often color-coded by wire gauge.
Non-insulated terminals
These are popular where space is tight or where additional insulation such as heat shrink will be applied later. They often require more attention to tool and die choice.
Open-barrel terminals
Used in many wiring harnesses and connectors. They require a specific open-barrel crimp tool and usually create separate crimps for the conductor and insulation support.
Ferrules
These are used to terminate stranded wire for insertion into terminal blocks. They help keep strands together and can make control-panel wiring cleaner and more reliable.
Compression lugs
These are for larger cables, such as battery, grounding, or power distribution applications. They typically require heavier tools and may need several compressions depending on the lug design.
Common Crimping Mistakes to Avoid
Using the wrong tool
Pliers are not a crimp tool. Neither is “whatever metal thing is nearby.” If the terminal manufacturer recommends a certain crimper style, use it.
Choosing the wrong connector size
A terminal that is too large will not grip properly. One that is too small may damage the conductor or never seat correctly.
Stripping too much or too little insulation
This is one of the most common errors. The right strip length matters more than people think.
Damaging the wire strands
Nick the strands and you weaken both the mechanical hold and the electrical path.
Failing to complete the crimp cycle
If the tool uses a ratchet, let it complete the cycle. Stopping early leads to inconsistent crimps.
Skipping inspection
A crimp is not finished when you squeeze it. It is finished when you inspect it and confirm it is secure.
How to Tell If a Crimp Is Good
A good crimp usually has these signs:
- The wire gauge matches the connector rating.
- The terminal was crimped in the correct die.
- The conductor is fully inserted.
- No wire strands are cut or sticking out.
- The barrel is compressed in the right location.
- The connector does not crack or distort badly.
- The wire passes a firm tug test.
If the wire pulls out, if the metal barrel looks crushed in the wrong place, or if the crimp feels loose, cut it off and do it again. Yes, it is mildly annoying. No, it is still better than chasing an intermittent fault for three weekends.
Example: Crimping a Ring Terminal on a 16 AWG Wire
Let’s make this concrete. Suppose you are attaching a 16 AWG stranded copper wire to a ring terminal for a low-voltage accessory.
- Select a ring terminal rated for 16 to 14 AWG wire.
- Use a crimper die that matches that terminal’s size or color code.
- Strip just enough insulation for the barrel depth.
- Insert the wire until the insulation meets the barrel entry.
- Crimp fully until the ratchet releases.
- Inspect the barrel and tug the wire.
- Mount the ring terminal to the screw or stud and tighten properly.
That is it. No drama. No sparks. No mysterious leftover parts.
When You Should Re-Crimp Instead of “Making It Work”
Redo the crimp if you see exposed conductor where it should not be, if strands are missing, if the connector is misshapen, if the wrong die was used, or if the wire can rotate or move in the barrel. A bad crimp does not magically improve with positive thinking. Once it is wrong, replace it and start fresh.
Practical Experiences and Lessons From Real-World Crimping
The funny thing about crimping is that most people do not respect it until a bad connection embarrasses them. That lesson tends to arrive right on schedule. Maybe the trailer lights blink like they are auditioning for a horror movie. Maybe the speaker wire cuts in and out whenever the car hits a pothole. Maybe a control panel that looked perfect on Friday refuses to behave on Monday. In many of those cases, the culprit is not some exotic electrical mystery. It is a bad crimp wearing a very convincing disguise.
One of the most common experiences beginners have is overconfidence after the first successful crimp. The first one works, so every future crimp must also be fine, right? Not exactly. Crimping rewards consistency, not vibes. The second or third attempt is often where shortcuts creep in: stripping a little too much insulation, grabbing the wrong die because it is “close enough,” or using an old terminal from a mixed-parts drawer with the label long gone. That is when the connection may still look okay but fail under stress.
Another common experience is discovering how much the tool matters. People often start with a bargain crimper or a multi-tool that promises to strip, cut, crimp, cook dinner, and improve your credit score. Then they switch to a quality ratcheting crimper and suddenly realize the job became easier and the results became dramatically more consistent. The improvement is not imaginary. A better tool usually aligns the terminal more accurately and delivers the correct amount of compression with less guesswork.
There is also the classic lesson of wire preparation. Many bad crimps begin before the crimper even closes. If the wire was nicked during stripping, if a few strands folded backward, or if the conductor was not inserted fully, the crimp never had a fair chance. Experienced installers tend to slow down at the prep stage because they know the squeeze is only as good as the setup.
People who work on cars, boats, and outdoor equipment often learn one more lesson fast: environment matters. A crimp that survives indoors may fail much sooner in vibration, moisture, or corrosion-prone conditions. That is why sealed connectors, adhesive-lined heat shrink, and corrosion-resistant terminals are worth the extra effort in the right application. Real-world reliability is about more than passing the bench test.
Probably the best experience-based advice is simple: inspect every crimp like you expect it to be the one that gets blamed later. Because if something stops working, it usually will be. That habit alone catches a huge number of mistakes before the wire ever gets installed. The humble crimp may not be glamorous, but done well, it quietly keeps everything working. And honestly, that is the kind of competence we should all aspire to.
Conclusion
Learning how to crimp a wire is one of the most useful hands-on electrical skills you can pick up. It is not complicated, but it does reward precision. Match the wire, terminal, and tool. Strip carefully. Insert the wire fully. Crimp completely. Inspect thoroughly. Tug test. Then enjoy the rare and beautiful satisfaction of a connection that works the first time and keeps working afterward.
If you remember only one thing, remember this: the best crimp is not the one that looks fast. It is the one that looks boringly correct.


