Table of Contents >> Show >> Hide
- Step 1: Identify exactly what roof system you are estimating
- Step 2: Measure each roof section separately
- Step 3: Calculate the flat area of every plane
- Step 4: Determine the roof pitch
- Step 5: Apply the pitch multiplier
- Step 6: Convert square footage into roofing squares
- Step 7: Estimate the main roofing material
- Step 8: Add a realistic waste factor
- Step 9: Calculate underlayment and leak barrier
- Step 10: Measure the linear accessories
- Step 11: Build a final takeoff and double-check the order
- Common mistakes that wreck roofing estimates
- Experience Notes: What real-world roof estimates teach you
- SEO Tags
Estimating roofing materials sounds simple until your calculator starts sweating. On paper, it looks like a little length times width, a little division by 100, and boomyou are a roofing wizard. In real life, roofs have pitch, valleys, hips, ridges, starter strips, drip edge, underlayment, and just enough weird geometry to make you question every decision that led you to this moment.
The good news is that roofing takeoffs become much easier when you break them into a repeatable system. Whether you are planning a replacement roof, reviewing a contractor quote, or ordering materials for a straightforward asphalt shingle job, the smartest move is to estimate in layers. Start with the roof area. Then account for slope. Then convert that number into roofing squares. After that, calculate shingles, waste, underlayment, ice-and-water protection, and the long linear accessories people forget until delivery day.
This guide walks through the process in 11 practical steps, using plain English and real-world logic. No mysterious math rituals. No “just eyeball it” nonsense. Just a cleaner way to estimate roofing materials without accidentally ordering enough shingles for your house, your garage, and possibly your neighbor’s shed.
Step 1: Identify exactly what roof system you are estimating
Before you touch a tape measure, define the scope. Are you estimating a full replacement or just the field shingles? Is the roof a simple gable, a hip roof, or a cut-up design with dormers, valleys, skylights, and multiple transitions? A simple ranch and a complicated two-story roof can have similar house footprints but wildly different material needs.
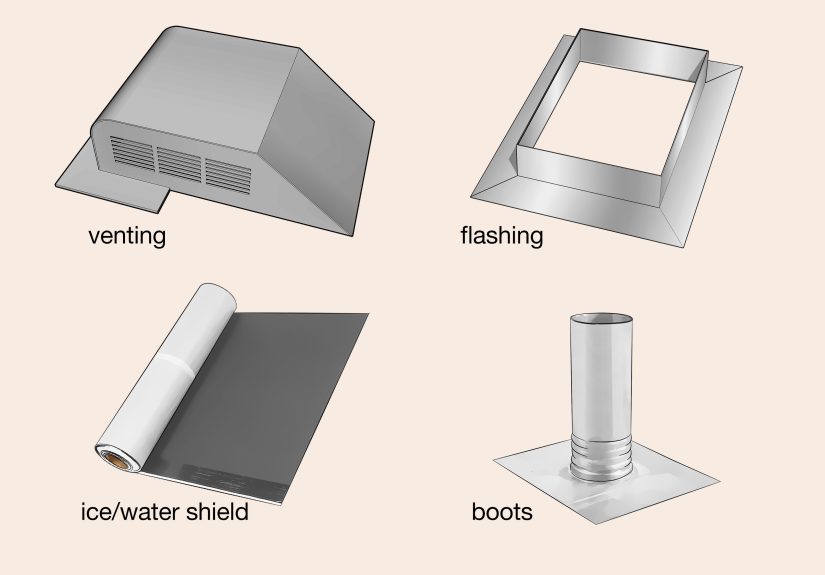
Also decide what “materials” means in your estimate. A complete roofing order usually includes the primary roof covering, underlayment, leak barrier or ice-and-water membrane where needed, starter material, hip and ridge caps, drip edge, flashing-related items, ventilation components, and fasteners. If you only calculate shingles, you do not have a full estimateyou have a shingle estimate wearing a fake mustache.
Step 2: Measure each roof section separately
Do not treat the roof like one giant rectangle unless it actually is one. Break it into manageable roof planes and measure each section on its own. For a simple roof, that may mean two large rectangles. For a more complex roof, it could mean a pile of rectangles, triangles, and trapezoids.
The cleanest way to do this is from plans, previous takeoff reports, or verified measurements taken from the ground, attic, or an aerial measurement service. Sketch the roof first and label every section. Then write the length and width for each plane directly on your drawing. This keeps your math organized and saves you from doing that classic estimator move where you stare at one random number and whisper, “What was 23.5 again?”
Step 3: Calculate the flat area of every plane
Once each roof section is identified, calculate the area of each one as if it were flat. For rectangles, multiply length by width. For triangles, multiply base by height and divide by two. For trapezoids, add the two parallel sides, divide by two, and multiply by height.
Add all those flat areas together to get the total footprint area under the roof planes. This is not yet the true roof surface area on a sloped roof, but it gives you the baseline number you need before adjusting for pitch.
For example, if one roof plane is 30 feet by 25 feet, that section has 750 square feet of flat area. If the other side matches it, your flat total is 1,500 square feet. Nice and tidy. So far, the roof is behaving itself.
Step 4: Determine the roof pitch
Roof pitch matters because a sloped surface has more area than the flat footprint beneath it. Pitch is typically written as rise over a 12-inch run, such as 4:12 or 6:12. A steeper roof means more surface area, more roofing material, and usually a little more drama.
If the pitch is already listed on plans or an aerial measurement report, use that. If not, verify it before ordering materials. For many estimating situations, the pitch multiplier is the bridge between your flat square footage and the actual roof area you need to cover.
A commonly used example is a 6:12 roof, which uses a multiplier of about 1.118. That means every 1,500 square feet of flat roof area becomes roughly 1,677 square feet of actual sloped roof area. Same house. More surface. Sneaky roof.
Step 5: Apply the pitch multiplier
Now convert flat area into real roof area. Multiply the total flat area by the pitch multiplier that matches your roof slope.
Formula: Total roof surface area = flat area × pitch multiplier
Using the earlier example:
1,500 square feet × 1.118 = 1,677 square feet of roof surface
This is the number you should use for most material calculations, not the home’s interior square footage and not the footprint alone. Many quick estimates use a rough “typical roof” factor when no better data is available, but the more accurately you know the pitch, the more accurate your material order will be.
Step 6: Convert square footage into roofing squares
Roofing materials are often sold and estimated by the square. One roofing square equals 100 square feet of roof area. Once you know the sloped roof surface area, divide by 100 to get the number of squares.
Formula: Roofing squares = total roof surface area ÷ 100
For the same 1,677-square-foot example:
1,677 ÷ 100 = 16.77 roofing squares
Why this matters: roofing squares make estimates easier to compare across suppliers, bundles, and material types. Contractors speak in squares because saying “this is a 16.77-square roof” is faster than saying “please allow me to read out four digits and a decimal every time we discuss this house.”
Step 7: Estimate the main roofing material
For standard asphalt shingles, many products cover about one-third of a square per bundle, which means it often takes three bundles to cover one roofing square. That gives you a fast way to estimate bundle count:
Formula: Bundles = roofing squares × 3
For 16.77 squares:
16.77 × 3 = 50.31 bundles
Round up, not down. Roofing is not the place to become an optimist. In this case, you would start at 51 bundles before adding waste.
One important catch: bundle coverage is not identical across every product. Some laminated shingles and premium lines may cover differently, and specialty materials like slate-look asphalt, metal panels, tile, or wood products follow their own coverage rules. Always confirm the coverage printed on the packaging or technical sheet for the exact product you plan to use.
Step 8: Add a realistic waste factor
This is where experienced estimators separate themselves from people who order materials like they are shopping for cereal. Roofs create waste. Shingles get trimmed at rakes, valleys, hips, and penetrations. Some get damaged. Some get sacrificed to the mighty gods of “well, that cut did not go as planned.”
Waste factor depends on complexity. A very simple roof may need only a modest bump, while a more cut-up roof with valleys, dormers, skylights, and multiple intersections needs more breathing room. A practical estimating range is often somewhere between 5% and 15%, with simple roofs near the low end and complicated roofs toward the high end.
Let’s say your roof is a straightforward gable and you choose a 10% waste factor:
Formula: Adjusted squares = roofing squares × 1.10
16.77 × 1.10 = 18.45 squares
Then convert to bundles:
18.45 × 3 = 55.35 bundles
Round up to 56 bundles.
For a more complex roof, a 12% to 15% factor may be the smarter call. Under-ordering a roof by two or three bundles is one of those mistakes that feels cheap at first and expensive by lunch.
Step 9: Calculate underlayment and leak barrier
Underlayment is the protective layer between the roof deck and the visible roof covering. Estimate it using the roof’s actual surface area, then divide by the effective coverage listed on the roll once overlaps are accounted for. Do not assume the label’s total roll size equals usable installed coverage, because overlaps eat part of that number.
If your roof is in a region where ice dams are possible, or if local code or manufacturer instructions call for it, include leak barrier or ice-and-water membrane at eaves and other vulnerable transitions. Low-slope shingle installations deserve extra attention too. On roofs from 2:12 up to less than 4:12, manufacturers typically require special underlayment practices, such as double-layer protection or specified leak-barrier methods. Below 2:12, shingles generally are not appropriate.
That means your estimate should not just say “one roll of underlayment.” It should separate standard roof deck protection from leak barrier areas. Count the eaves and any valleys or critical areas that need upgraded protection. This is one of the easiest places for an estimate to look complete while quietly being wrong.
Step 10: Measure the linear accessories
Roof estimates go sideways fast when the main shingles are right but the accessory pieces are forgotten. This is where you count linear feet.
Drip edge
Drip edge is typically measured along the eaves and rakes. A practical takeoff rule is:
Drip edge linear feet = total eaves + total rakes
Starter material
Starter strip is always part of the system at the eaves, and depending on the manufacturer’s system details, you may also have starter along certain rake edges. Measure the linear feet where the product will be installed, then divide by the coverage per bundle or roll for the exact starter product you are using.
Hip and ridge caps
Measure every ridge and hip separately. Add those lengths together to determine total linear feet of cap material needed. If you are cutting ridge pieces from 3-tab shingles, a bundle may cover roughly 29.5 linear feet, but factory ridge-cap products vary by brand and design. Translation: measure the lineal footage first, then check the packaging before ordering.
Flashing-related items
Valleys, pipe boots, step flashing, chimney flashing, skylight kits, wall transitions, and vents should be counted separately. Do not assume they are magically included in your waste factor. Waste is for field material loss. Flashing is its own category.
Step 11: Build a final takeoff and double-check the order
Once the math is done, organize your estimate like a material list a supplier could actually use. This final check is where you catch missing accessories, incorrect rounding, and “why did I somehow forget the ridge cap?” moments.
| Item | Example Quantity | How It Was Estimated |
|---|---|---|
| Total roof area | 1,677 sq. ft. | 1,500 flat sq. ft. × 1.118 pitch multiplier |
| Roofing squares | 16.77 squares | 1,677 ÷ 100 |
| Shingles with 10% waste | 56 bundles | 16.77 × 1.10 × 3, rounded up |
| Underlayment | Varies by roll coverage | Total roof area ÷ effective coverage per roll |
| Drip edge | Measure actual LF | Eaves + rakes |
| Ridge/hip cap | Measure actual LF | Total hips + ridges ÷ product coverage per bundle |
Then review the estimate one more time and ask four simple questions:
- Did I use the sloped roof area, not just the flat footprint?
- Did I add an appropriate waste factor for roof complexity?
- Did I separate field materials from accessories?
- Did I verify coverage for the exact product, not just “some shingles somewhere”?
Common mistakes that wreck roofing estimates
The first mistake is measuring the house instead of the roof. The second is forgetting pitch. The third is using a one-size-fits-all waste factor on a roof that looks like it was designed during a caffeine emergency.
Other common misses include forgetting ridge cap bundles, underestimating drip edge, failing to separate leak barrier from standard underlayment, and assuming all shingle bundles cover the same area. Another classic error is ignoring penetrations and transitions until installation day, when suddenly the crew needs more pipe boots, more flashing, and more patience.
The best roofing estimate is not the fastest one. It is the one that gets the whole system right the first time.
Experience Notes: What real-world roof estimates teach you
Anyone who has ever helped with a roofing material order learns the same lesson sooner or later: the roof is always a little more complicated than it looked from the driveway. A simple one-story house can feel easy to estimate until you notice the attached garage, the small front porch, two plumbing vents, one chimney, and a ridge line that is not quite where you assumed it would be. Suddenly the estimate that looked “close enough” starts looking like a future headache.
One of the most common real-world experiences is underestimating waste on a roof with valleys. On paper, a valley is just a line. In practice, it creates repeated angled cuts, extra handling, and more off-cuts than people expect. That is why experienced estimators rarely use the same waste percentage for a simple gable roof and a roof with dormers and intersecting planes. The roof does not care that your spreadsheet wanted to save money.
Another lesson comes from accessory materials. Many first-time estimators focus so hard on the bundles of shingles that they treat everything else like a side quest. Then the order arrives and someone realizes there is no ridge cap, not enough drip edge, or the underlayment count assumed perfect coverage with zero overlaps. That is usually the moment when everyone becomes very interested in who made the estimate and much less interested in pretending math is subjective.
Real estimates also teach the value of product-specific verification. Two shingle products may look similar, but their actual coverage, accessory requirements, and installation details can differ. A smart estimator checks the packaging data, the manufacturer sheet, and the accessory coverage before submitting the final list. That extra five minutes can save an extra trip, a delayed crew, or an order correction that costs more than the materials themselves.
There is also a practical difference between a “homeowner rough estimate” and an “order-ready takeoff.” A rough estimate helps with budgeting. An order-ready estimate needs cleaner numbers, rounded quantities, and all the companion materials that make the roof system work. The more complete the estimate, the fewer surprises show up on delivery day.
Perhaps the biggest lesson is that roofing estimation is less about fancy math and more about disciplined thinking. Measure carefully, adjust for slope, convert to squares, add realistic waste, and count the accessories like they actually matterbecause they do. Do that consistently, and estimating roofing materials becomes much less mysterious. It may never become glamorous, but it does become reliable. And in roofing, reliable is a beautiful thing.


