Table of Contents >> Show >> Hide
- Meet Heather: What You’re Actually Growing
- Best Conditions for Growing Heather
- How to Plant Heather Step by Step
- Everyday Heather Care
- Growing Heather in Containers
- Common Heather Problems (and How to Fix Them)
- Design Ideas: Where Heather Really Shines
- Real-World Experiences with Growing Heather
- Conclusion: Heather Is EasyOnce You Learn Its Rules
If you’ve ever seen a hillside covered in fluffy purple clouds and thought,
“I want that in my front yard,” good news: you were probably looking at heather.
These small evergreen shrubs are tough, colorful, and surprisingly low-maintenance
once you understand what they like. The catch? Heather is a little picky about
its soil and sun, so treating it like “just another shrub” is the fastest way
to get crispy twigs instead of a blooming carpet.
In this guide, we’ll walk through exactly how to grow and care for heather,
whether you’re filling a rocky slope, edging a walkway, or tucking a few
plants into containers. We’ll cover the different types of heathers, their
ideal growing conditions, planting steps, ongoing care, common problems,
and some real-world tips from gardeners who’ve actually battled with
stubborn soil and dramatic weather. By the end, you’ll know how to keep
your heather happy, healthy, and showing off for years.
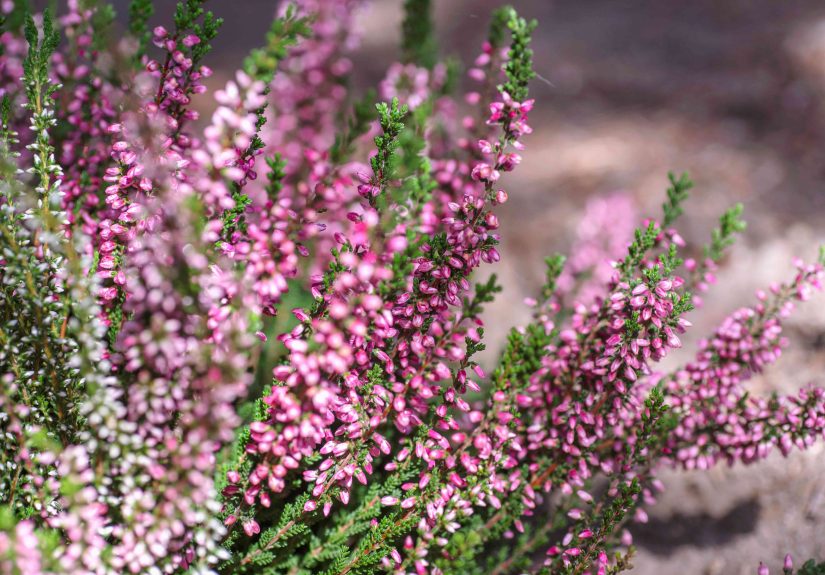
Meet Heather: What You’re Actually Growing
“Heather” is a common name that people casually use for a few closely related
plants. The main players are:
-
Calluna vulgaris – Often called Scotch heather or ling.
This is the classic late-summer heather with tiny scale-like leaves and
flowers in shades of purple, pink, white, and even red. -
Erica species – Commonly called “heath.” Many Ericas bloom
in winter or early spring and have needle-like leaves. -
Daboecia – Sometimes called Irish or St. Dabeoc’s heath,
with larger, urn-shaped flowers and slightly broader leaves.
All three cousins love similar conditions: lots of sun, acidic soil, and
excellent drainage. Think “windy hillside in Scotland,” not “heavy clay
in a wet subdivision.” If you can get the site and soil right, the rest
of the care is pleasantly simple.
Best Conditions for Growing Heather
Light: Give Heather Plenty of Sun
Heather blooms best in full sun, which usually means at
least six hours of direct light per day. In cooler climates, full sun is
ideal. In hot-summer climates, most varieties appreciate a bit of
afternoon shade so they don’t bake, especially in
reflected heat near pavement or south-facing walls.
As a rule of thumb: leggy growth and dull foliage often point to
not enough light. Compact plants with intense flower and foliage
color usually mean you’ve nailed the sun exposure.
Soil: Acidic and Well-Drained (Non-Negotiable)
Here’s where heather gets fussy. These plants are
acid-loving shrubs. They prefer:
- Soil pH roughly between 4.5 and 6.0
- Light, sandy or gritty texture
- Lots of organic matter, but not soggy conditions
If your soil is naturally acidic (similar to what rhododendrons, azaleas,
and blueberries enjoy), you’re ahead of the game. If your soil tends to be
alkaline or chalky, heather is going to sulk unless you create a special
bed with imported ericaceous (acidic) compost or plant in raised beds or
containers filled with a suitable mix.
Heavy clay soil is the biggest enemy. If water sits around the roots,
heather can quickly rot. If you’re stuck with clay, consider:
- Planting on a berm or slope for better drainage
- Building a raised bed filled with sandy, acidic mix
- Using large containers with drainage holes and acidic potting soil
Water: Moist, Not Marshy
Newly planted heather needs consistent moisture while roots establish. Aim
for about an inch of water per week from rain or irrigation during the first
growing season. Once established, many heathers are fairly drought-tolerant,
especially in cooler climates, but they still appreciate deep watering
during prolonged dry spells.
The sweet spot is evenly moist, never waterlogged.
Let the top inch of soil dry slightly between waterings, and always
avoid leaving the plant sitting in a soggy hole or container saucer
full of water.
Climate and Hardiness
Many heather varieties are hardy in roughly
USDA zones 4 to 6 or 7, depending on the species and
cultivar. In colder regions, snow cover can actually protect plants from
extreme cold and drying winds. In warmer climates, choose heat-tolerant
selections and pay extra attention to drainage and afternoon shade.
If you’re unsure what will work in your area, look at what thrives in
local gardens, or check recommendations from nearby garden centers and
your cooperative extension office.
How to Plant Heather Step by Step
-
Test and prep the soil. If possible, do a basic soil
test to check pH. If it’s too alkaline, work in sulfur or acidic organic
materials (like pine bark or peat moss) and avoid liming nearby areas. -
Choose a sunny, open spot. Pick a site with at least
half a day of full sun and good air circulation. -
Improve drainage. Mix in coarse sand, small grit,
or fine gravel along with organic matter to create a loose, free-draining
bed. Raised beds are perfect if your native soil is heavy. -
Dig the planting hole. Make it about twice as wide
as the root ball but only as deep. You want the top of the root ball
level with or slightly above the surrounding soil. -
Plant gently. Loosen circling roots, set the plant
in place, and backfill with your amended soil. Firm lightly to remove
air pockets without compacting. -
Water thoroughly. Give the plant a slow, deep drink
to settle the soil around the roots. -
Mulch appropriately. Add a 1–2 inch layer of pine needles,
shredded bark, or fine gravel around the base (but not touching the stems)
to keep roots cool and conserve moisture.
When planting several heathers together in a bed, space them about
12–18 inches apart, depending on the variety. Over time,
they knit together into a colorful, weed-suppressing mat.
Everyday Heather Care
Watering Routine
After the first year, your watering schedule depends on climate and soil:
-
In cool, rainy regions, mature heathers often need little supplemental
water except during unusual drought. -
In hot, dry areas, plan on deep watering every 7–10 days during summer
if rainfall is scarce.
Soak the root zone, then let the top layer of soil dry out. Constantly wet
soil is the fastest route to root problems, so err on the side of “slightly
thirsty” rather than swampy.
Fertilizing: Less Is More
Heather is not a heavy feeder. In fact, over-fertilizing can harm
the plant and push soft, weak growth. A light spring feeding with
a slow-release fertilizer formulated for acid-loving plants is usually plenty.
In many gardens, a yearly topdressing of composted pine bark, leaf mold,
or other acidic organic matter around the plants gives them all the nutrition
they need without risking fertilizer burn.
Pruning to Keep Plants Compact
Most heathers benefit from a light trim once a year after
flowering. The goal is to remove spent flower spikes and lightly shape the
plant, not to hack it back to bare wood.
Use hand pruners or shears and cut just into the leafy growth, avoiding the
old, woody stems that may not resprout. Regular light pruning keeps the plant
dense, bushy, and smothered in flowers instead of becoming a woody, bare
clump with blooms only on the tips.
Growing Heather in Containers
No yard? No problem. Heather does beautifully in
containers as long as you meet its basic requirements.
In some ways, pots make it easier to control soil pH and drainage.
-
Choose a pot with generous drainage holes, ideally made of frost-resistant
material if you live in a cold climate. -
Use a high-quality acidic potting mix, often labeled
for azaleas or rhododendrons. You can add extra perlite or grit for drainage. -
Water more frequently than in the ground, but always let excess water drain
away completely. -
Protect the container from extreme winter freeze-thaw cycles, either by
grouping pots together, wrapping them, or moving them to a sheltered spot.
Container-grown heathers look great combined with dwarf conifers, ornamental
grasses, and small spring bulbs. They’re perfect for adding a soft, colorful
cushion to balconies, patios, and small front entries.
Common Heather Problems (and How to Fix Them)
Yellowing Leaves (Chlorosis)
If your heather’s foliage turns yellow or pale while veins stay darker,
the plant may be suffering from iron deficiency, often
caused by soil that’s too alkaline. Solutions include:
- Checking pH and adjusting with sulfur if necessary
- Using an iron supplement or chelated iron product as directed
- Switching to an ericaceous compost in containers or raised beds
Root Rot and Dieback
Brown, collapsing stems and poor new growth usually point to
poor drainage. Unfortunately, once roots rot, recovery is
limited. Your best move is prevention:
- Plant only in very well-drained soil or raised beds
- Avoid overwatering and heavy mulches that trap moisture against stems
- Remove and discard severely affected plants and improve the site before replanting
Sparse Flowers or Leggy Growth
If your heather looks like it’s reluctantly existing rather than thriving,
ask two questions:
- Is it getting enough sun? Move or trim nearby shading plants if needed.
- Have you pruned it regularly? Light annual trimming after bloom helps maintain shape and flower power.
Sometimes older heathers simply decline after many years. You can refresh
a bed by layering branches to root new plants or by replanting with young,
vigorous specimens.
Design Ideas: Where Heather Really Shines
Heather isn’t just a “plant,” it’s a design tool. Because
it stays low and fairly dense, it’s fantastic for:
- Rock gardens and slopes
- Front-of-border edging along paths and driveways
- Mass plantings for a soft, colorful ground cover
- Winter interest when paired with conifers and ornamental grasses
Mix varieties that bloom in different seasons and have different foliage
colorsgold, lime, silver, and deep greento keep the display interesting
even when some plants aren’t in flower. A heather bed can look good almost
year-round with the right mix.
Real-World Experiences with Growing Heather
Guides and charts are helpful, but nothing beats the little lessons you
pick up when you actually live with a plant. Here are some practical,
experience-based insights that often don’t make it onto plant tags.
1. Start with the Soil, Not the Color
It’s incredibly tempting to buy heather based purely on flower or foliage
color. Garden centers know thisthat’s why those neon-pink, lime-yellow,
and frosted-white varieties are always front and center. But experienced
gardeners quickly learn that soil beats style every time.
If your soil isn’t acidic and well-drained, even the most stunning
cultivar is going to struggle. Many gardeners have stories of buying a
trunk-load of gorgeous heathers, planting them into regular garden soil,
and watching them fade within a year. The ones who go back, build a proper
acidic bed or raised mound, and replant? Those are the people who end up
with heather carpets instead of heather funerals.
2. Heather Loves Tough SpotsIf You Prepare Them
A fun surprise with heather is how well it performs in places where other
plants give upwindy slopes, poor sandy banks, awkward sun-baked corners.
Gardeners in coastal or exposed areas often report that once established,
heather shrugs off strong winds, light foot traffic along the edges of
paths, and lean soil that would make fussier perennials faint. The key is
giving the plants a strong start: loosen the soil deeply, add organic
matter, and water regularly during the first year. After that, many
gardeners find that heather asks for very little but gives a lot of
color and structure in return.
3. Light Pruning Beats “Oops, I Went Too Far”
One of the most common regrets people share is pruning heather too hard,
cutting back into bare wood that never resprouts. The lesson learned:
treat heather more like lavender than a hedge. Shorten the spent flower
spikes and lightly shape the plant every year, but don’t try to renovate
an old, woody clump with drastic cuts. Gardeners who prune lightly and
consistently tend to have compact mounds that look good for many years.
Those who skip pruning entirely often end up replacing plants sooner.
4. Containers Are a Great Testing Ground
If you’re not sure whether your garden soil is right, growing heather in
containers is a low-risk way to learn its habits. Many gardeners start
with a pot or two on a patio: they get a feel for how quickly the soil
dries, how much sun their site really gets, and how the plant responds to
different watering patterns. If the container heather thrives, you know
your light is good. Then you can either keep building a container
collection or use what you’ve learned to plan an in-ground bed with
similar conditions.
5. Heather Rewards Patience
Heather is not an instant-gratification plant. In the first year, it may
look small and a bit underwhelming, especially in a large bed. But
gardeners who stick with it are often rewarded in year two and three,
when the plants knit together and blooms line up like a soft, colorful
patchwork. It’s one of those shrubs that quietly goes from “Is this doing
anything?” to “Wow, when did this get so beautiful?” If you can resist the
urge to fill every gap with something taller, heather will gradually create
that romantic, moorland feel that first got your attention.
Conclusion: Heather Is EasyOnce You Learn Its Rules
Growing heather successfully really comes down to three rules:
sun, acid soil, and sharp drainage. Get those right,
and you’ll have a surprisingly tough, low-maintenance plant that delivers
months of color, year-round texture, and a calm, naturalistic feel in your
garden or containers.
Start small if you like: a trio of plants in a raised bed, or a single
container near your front steps. Once you see how well heather performs
when its needs are met, you may find yourself planning entire beds around
its soft forms and shifting colorsand wondering why you didn’t start
growing it sooner.


