Table of Contents >> Show >> Hide
- What Is a Hand-Rolled Hem (and When Should You Use It)?
- Tools & Materials (Don’t Overthink ItBut Don’t Underthink It Either)
- Before You Start: Two Tiny Prep Moves That Prevent Big Annoyances
- The 7 Steps to Hand Stitch a Rolled Hem
- Step 1: Trim and clean the edge
- Step 2: Press a tiny fold (or finger press if needed)
- Step 3: Thread your needle the smart way
- Step 4: Hide the knot and start the hem
- Step 5: Roll the edge as you stitch
- Step 6: Maintain tension without stretching the edge
- Step 7: Finish cleanly (no weird thread tails flapping in the breeze)
- Troubleshooting: Common Rolled Hem Problems (and Fixes That Actually Work)
- Pro Tips for a Couture-Looking Hand Rolled Hem
- FAQ: Quick Answers Before You Start Seam-Ripping Out of Existential Dread
- Experience Section: of Real-Life Rolled-Hem Wisdom
- Conclusion
A hand-stitched rolled hem is the sewing equivalent of brushing your teeth and flossing: it takes a little longer, but your future self will absolutely respect you for it. Whether you’re hemming a floaty chiffon skirt, finishing a silk scarf, or trying to keep a ruffle edge from looking like it fought a weed whacker, the hand rolled hem is one of those “tiny detail, huge upgrade” techniques.
In this guide, you’ll learn a reliable, couture-friendly method for hand stitching a rolled hem in 7 clear steps, plus troubleshooting, pro tips, and a longer “what I learned in the wild” experience section at the end. We’ll keep it practical, specific, and mildly entertainingbecause if you’re going to hand sew, you deserve at least one laugh per inch.
What Is a Hand-Rolled Hem (and When Should You Use It)?
A rolled hem is a very narrow hem where the raw edge is rolled into a tiny tube and secured with hand stitches. Unlike a wider turned hem, it adds minimal weight and keeps delicate fabrics draping softly. If your fabric is sheer, slippery, lightweight, or prone to showing every stitch line like it’s gossipingthis finish shines.
Best uses for a hand stitched rolled hem
- Sheer fabrics: chiffon, georgette, organza, voile
- Silk scarves and lightweight shawls
- Ruffles, flounces, and circular hems where bulk ruins the flow
- Curved edges that hate crisp folds
- Couture-style garments where the inside should look as good as the outside
Rolled hem vs. baby hem (quick reality check)
A baby hem is also narrow, but it’s typically a tiny double turn secured with machine stitching (or carefully controlled hand stitching). A hand-rolled hem is a true roll: rounder, softer, and often more flexible. If your fabric is ultra-light and you want that “barely there” edge, the rolled hem is the move.
Tools & Materials (Don’t Overthink ItBut Don’t Underthink It Either)
You can absolutely hand stitch a rolled hem with a basic needle and thread. But the right tools make the work cleaner, faster, and far less likely to end with you whispering “why do I sew” into the void.
What you’ll need
- Fine hand-sewing needle (a slim needle helps avoid visible holes)
- Thread that matches your fabric (fine silk, fine polyester, or quality all-purpose for stable fabrics)
- Sharp scissors (small embroidery scissors are great for trimming close)
- Iron and pressing surface (or finger pressing if the fabric is heat-sensitive)
- Fine pins or clips
- Optional but magical: beeswax (reduces tangles), a thimble, and a seam gauge
- Optional but genius: something to anchor your fabric (a wrapped brick or a pincushion you can pin into)
Thread and needle choices by fabric type
If you’re hemming chiffon or silk, lean toward finer thread and a smaller needle. If you’re practicing on cotton lawn or batiste, quality all-purpose thread is fine. The goal is a stitch that disappears visually and behaves nicely under tension (aka: doesn’t pucker the fabric into a sad accordion).
Before You Start: Two Tiny Prep Moves That Prevent Big Annoyances
1) Stabilize your fabric mindset
Lightweight fabric will try to slither away from you like it has errands to run. That’s normal. Don’t wrestle itcontrol it: press gently, work on a flat surface, and keep your edge trimmed clean.
2) Practice on something friendly first
If you’re new to hand rolled hems, do a short practice run on a crisp, lightweight cotton strip before moving to chiffon. You’re building “hand memory”and it’s a lot easier when the fabric isn’t auditioning for a role as “Most Wiggly.”
The 7 Steps to Hand Stitch a Rolled Hem
This method creates a neat, narrow hem with minimal bulk. Read through once, then stitch along with it. The first few inches are the hardest; after that, you’ll find your rhythm and start feeling suspiciously powerful.
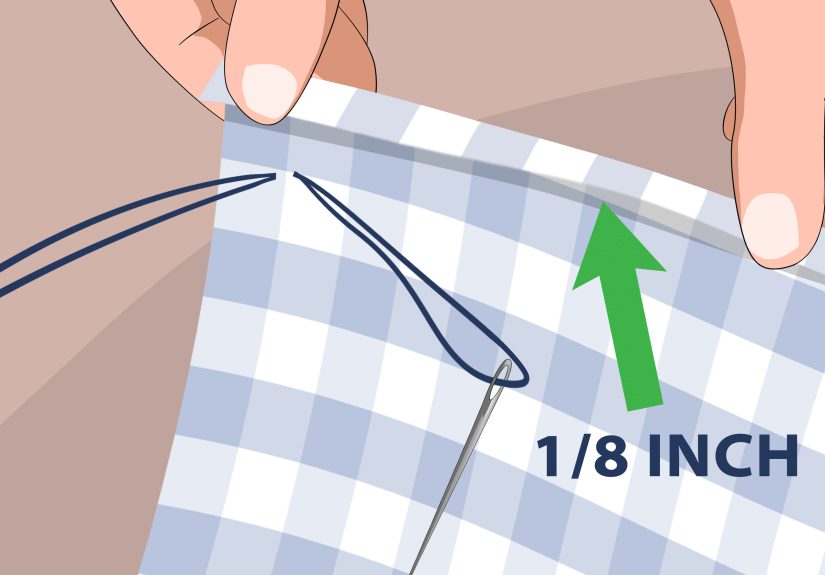
Step 1: Trim and clean the edge
A rolled hem is only as smooth as its edge. Trim away obvious fraying threads and make sure the cut is clean. If your fabric frays easily, work gently and avoid tugging.
- Trim any loose threads.
- If the edge is uneven, re-trim lightly for consistency.
- For very delicate fabrics, consider trimming to a narrow allowance (about 1/8 inch) so the roll stays tiny.
Step 2: Press a tiny fold (or finger press if needed)
Turn the raw edge to the wrong side just a whisperthink 1/8 inch or less. Press lightly. If the fabric doesn’t love heat, finger press and pin sparingly.
This first fold is your “training wheels.” It helps the roll behave and keeps the raw edge from popping out later.
Step 3: Thread your needle the smart way
Cut a manageable length of thread (too long = tangles; too short = constant re-threading). Many sewists prefer a single strand for rolled hems to keep bulk down, especially on sheers. If your thread tangles easily, run it over beeswax and press lightly between paper with a warm iron (optional, but delightful).
- Knot the end (a small knotno “pearl necklace” knots).
- Match thread color closely; rolled hems are tiny, but they still love to show off mistakes.
Step 4: Hide the knot and start the hem
Start from the wrong side so you can bury the knot inside the first fold. Bring your needle up through the folded edge so the knot stays hidden.
If you’re hemming a scarf or a visible edge, take a moment herestarting neatly sets the tone for the whole hem. (This is sewing’s version of making your bed: no one sees it… except you.)
Step 5: Roll the edge as you stitch
Here’s the core move: you’ll roll the folded edge into a tiny tube and secure it with small, consistent stitches. A common approach is a ladder-style or rolled hem stitch where each stitch encourages the fabric to curl into a smooth roll.
The stitch motion (repeat this rhythm)
- Pick up 1–2 threads from the fabric just below the fold (tiny bitethink “polite nibble,” not “full sandwich”).
- Stitch into the fold/roll close to the edge, catching the rolled portion without going through to the right side.
- Pull the thread through gentlyfirm enough to shape the roll, not so tight that the edge puckers.
- Repeat every few millimeters, keeping spacing consistent.
As you continue, use your fingers to keep the roll uniform. If the roll starts getting chunky, you’re either folding too much fabric or your stitches are biting too far in. Adjust by trimming a hair closer or reducing how much you roll each time.
Step 6: Maintain tension without stretching the edge
The secret to a smooth rolled hem is steady tensionnot brute force. If possible, lightly pin the work to an anchor (like a heavy pincushion or wrapped weight) so the fabric stays taut while you stitch. This keeps the edge from bunching and helps your stitches stay even.
Watch for these signs:
- If the hem waves: you’re pulling too tight or stretching the fabric as you stitch.
- If the roll looks lumpy: you’re rolling inconsistent widths or catching too much fabric per stitch.
- If stitches show on the right side: your needle is traveling through the roll and out the front.
Step 7: Finish cleanly (no weird thread tails flapping in the breeze)
When you reach the end, secure the thread discreetly:
- Take a tiny stitch inside the rolled edge.
- Create a small loop, pass the needle through, and snug it into a knot.
- Repeat once for security.
- Bury the thread tail inside the roll for an inch or so, then trim.
Give the hem a final gentle press or steamlightly. Don’t flatten the roll into a sad crease. You want it smooth and round, not crushed like it slept under a textbook.
Troubleshooting: Common Rolled Hem Problems (and Fixes That Actually Work)
Problem: My hem is wavy
- Cause: too much pulling, stretching the fabric while stitching
- Fix: relax your tension, anchor the fabric, and let the needle do the work
Problem: The roll is uneven or bulky
- Cause: inconsistent fold width, too much fabric in the roll
- Fix: trim the edge narrower; roll a smaller amount each stitch; keep stitch spacing consistent
Problem: Stitches show on the right side
- Cause: needle is piercing through the roll to the front
- Fix: keep your needle path inside the roll; take smaller bites; use finer needle/thread
Problem: My thread tangles every 11 seconds
- Cause: thread too long, twist buildup
- Fix: shorten thread length; let the needle dangle occasionally to untwist; consider beeswax
Pro Tips for a Couture-Looking Hand Rolled Hem
Use the “tiny bite” rule
If you can see what you grabbed, it was too much. Aim for picking up just a couple fabric threads at a time. Your future self (and your right side) will thank you.
Match thread color more closely than you think you need to
Even invisible stitches become visible when thread color is offespecially on sheers. A close match helps your work disappear, which is the whole point of this fancy little hem.
Don’t fight curvesmanage them
Curves can be tricky because the edge wants to spread or compress. Keep the roll smaller on tighter curves, and use more frequent stitches so the edge stays controlled. If the curve is dramatic, a tiny stabilizing press fold and close stitch spacing can help.
Consider alternatives when appropriate
If you want a similar narrow finish but need speed (or sanity), a machine baby hem or a rolled hem foot can be great. But for delicate couture drape, the hand-rolled hem remains the gold standard.
FAQ: Quick Answers Before You Start Seam-Ripping Out of Existential Dread
How long does a hand stitched rolled hem take?
Longer than a machine hem, shorter than you fear once you find your rhythm. Plan extra time for the first try; speed comes naturally after the technique clicks.
What’s the best stitch for a rolled hem?
A tiny, consistent rolled hem stitch that catches a couple threads from the fabric and secures the roll is ideal. Many sewists use a ladder-style motion or a roll-and-whip style depending on fabric and preference.
Should I use single or double thread?
For very fine hems, single thread reduces bulk and keeps the roll delicate. For sturdier fabrics or high-wear edges, a stronger thread choice (or careful double thread) can help, but watch bulk and visibility.
Experience Section: of Real-Life Rolled-Hem Wisdom
The first time I hand stitched a rolled hem, I learned a deeply spiritual truth: chiffon is not fabricit’s a mood. I had the bright idea to hem a floaty scarf “real quick” the night before an event. You can already see where this is going. Ten minutes in, my thread had tied itself into a knot that looked like modern art, and the edge of the scarf had frayed into something resembling a tiny feather boa. I stared at it, stared at my needle, and briefly considered taking up pottery instead.
But here’s what changed everything: I stopped trying to bully the fabric into submission. Lightweight fabric doesn’t respond to forceit responds to structure. The moment I trimmed the edge cleaner, shortened my thread, and anchored the scarf so it stayed gently taut, the stitches started behaving. Not perfectly. But enough to keep going. That’s the real win with hand sewing: you don’t need perfection to get a beautiful resultyou need consistency.
I also learned the “two types of tired” rule. There’s the tired where you’re still making decent stitches, and there’s the tired where your stitches get bigger, your tension gets tighter, and suddenly your hem looks like it’s ruffling itself out of spite. If you notice yourself pulling the thread like you’re starting a lawnmower, that’s your cue to pause. Hand sewing rewards calm hands. It punishes “just one more inch” energy.
Another lesson: the rolled hem has opinions about thread. When I used thick thread on a sheer fabric, the hem looked chunky and the stitches were visible from across the room (and probably from space). Switching to a finer thread instantly improved the look. It wasn’t that my technique magically got better; the materials finally matched the job. It’s like trying to write a love letter with a crayontechnically possible, emotionally questionable.
The best moment, though, was the first time someone asked, “How did you get that edge so nice?” I played it cool, of course. I said something like, “Oh, it’s just a hand-rolled hem.” Internally, I was doing a victory lap. Because a neat rolled hem doesn’t just finish a garmentit changes how it moves. The fabric drapes cleaner, the edge feels lighter, and everything looks more intentional. It’s the difference between “homemade” and “handmade,” and yes, those are different vibes.
These days, when I’m hemming something delicate, I treat it like a tiny ritual: clean edge, fine needle, matching thread, slow start, steady rhythm. And if the hem gets weird? I don’t take it personally. I adjust, I breathe, I keep going. Sewing is basically a series of small negotiations with fabricand a hand stitched rolled hem is one of the best deals you can make.
Conclusion
Learning how to hand stitch a rolled hem is one of those skills that quietly levels up everything you makeespecially lightweight garments and accessories. With a clean edge, a fine needle and thread, steady tension, and the 7-step method above, you can get a smooth, flexible finish that looks polished from every angle. Start with a small practice piece, aim for consistent tiny stitches, and remember: your hem doesn’t need to be perfect to be beautiful. It just needs to be yoursand secure.


