Table of Contents >> Show >> Hide
- 1) Decide What Kind of Castle You’re Making (and Why)
- 2) Choose Materials: Cardboard vs. Foam Board vs. Insulation Foam
- 3) Tools & Safety (Important, Especially for Cutting)
- 4) Build the Base: A Castle Needs a “Stage”
- 5) Construct the Main Walls (The Part That Makes It Look Like a Castle)
- 6) Build Towers (Because Every Castle Needs Drama)
- 7) Add the Keep, Gatehouse, and “Castle Personality”
- 8) Texture: Make “Cardboard” Look Like “Stone”
- 9) Paint Like a Pro: Base Coat, Washes, Dry-Brush Highlights
- 10) Finishing Touches That Make People Lean In
- 11) Common Problems (and How to Fix Them Without Crying)
- 12) Three Build Plans: Pick Your Difficulty Level
- Real-World Experiences: What You’ll Learn While Making a Model Castle (Extra 500+ Words)
- Conclusion
Want to build a model castle that looks like it could survive a dragon audit and a picky history teacher?
You’re in the right place. A great model castle is basically three things: a smart plan, sturdy structure, and
finish details that trick the eye into thinking “stone,” “wood,” and “ancient drama.”
This guide walks you through beginner-to-serious-builder optionscardboard, foam board, and lightweight sculpting
tricksplus paint and weathering steps that make your castle look less “shipping box” and more “medieval wow.”
You’ll also get real-world “I learned this the hard way” experiences near the end, so you can skip a few classic
mistakes (like the Tower of Leaning Cardboard).
1) Decide What Kind of Castle You’re Making (and Why)
Before you cut anything, answer one question: what’s the castle for? Your build choices change a
lot depending on the goal.
- School project: Clear features, labeled parts, neat construction, and durability for transport.
- Diorama/display: More detail, realistic textures, and a finished base (terrain, moat, path).
- Gaming terrain: Strong corners, removable roofs/floors, and “hands touching it” durability.
- Kids’ craft: Big shapes, safe materials, and “looks cool fast” decisions.
Pick a simple castle layout that still looks impressive
You don’t need to build an entire medieval kingdom. Choose one of these “high impact, manageable effort” layouts:
- Square keep + curtain wall: The classic “main tower inside a wall” look.
- Concentric walls: Two rings of walls for a “serious fortress” vibe (even if it’s small).
- Gatehouse focus: One big front gate with towers and a short walldramatic and doable.
- Fairy-tale castle: Tall towers + pointed roofs + flags (less historically accurate, more magical).
Quick design trick: sketch your castle footprint on paper, then draw a second line around it for the wall thickness.
Add towers at corners and one gate section. That’s your blueprint. Keep it simple enough that you can explain it
in one sentence, like: “Square keep, four corner towers, one gatehouse, and a moat.”
2) Choose Materials: Cardboard vs. Foam Board vs. Insulation Foam
The “best” material depends on your deadline, tools, and how tough the castle needs to be. Here’s the practical
breakdown (with minimal heartbreak).
Option A: Cardboard (fast, cheap, surprisingly good-looking)
- Pros: Easy to find, easy to glue, lightweight, great for big castles.
- Cons: Can warp with wet paint/glue, edges can look ragged if cuts aren’t clean.
- Best for: School projects, large play castles, quick builds.
Option B: Foam board / foam core (clean edges, neat “model” look)
- Pros: Crisp shapes, great for straight walls, light but stiff.
- Cons: Paper surface can peel; corners dent if handled roughly.
- Best for: Display models and tidy classroom builds.
Option C: XPS insulation foam (carvable “stone,” terrain-friendly)
- Pros: Carves well, takes texture beautifully, ideal for rocky bases and stone walls.
- Cons: Some paints/solvents can damage it; needs sealing for best results.
- Best for: Dioramas, realistic ruins, next-level stonework.
If you’re unsure, a winning combo is: foam board walls + cardboard details +
textured “stone” finish (paint + dry-brush). It’s the craft equivalent of wearing sneakers with a
blazer: oddly effective.
3) Tools & Safety (Important, Especially for Cutting)
Model castles involve cutting and gluing. Keep it safe and stress-free:
- Marking: pencil, eraser, ruler, set square (or a book corner).
- Cutting: scissors for cardboard; if a craft/utility knife is used, an adult should do the knife cutting.
- Work surface: cutting mat or thick cardboard scrap to protect the table.
- Gluing: white glue (PVA), tacky glue, painter’s tape for holding seams while drying.
- Painting: acrylic craft paints, brushes, paper towel, water cup.
If you’re building with a teen or younger student: let them do design, measuring, decorating, and painting.
Have an adult handle any blade cutting, hot glue work, or strong adhesives. The goal is a castlenot a trip to the
“dramatic bandage” aisle.
4) Build the Base: A Castle Needs a “Stage”
A strong base makes everything easier: walls stand straighter, towers don’t wobble, and your finished project
survives being carried like a pizza box.
Base choices
- Simple display base: foam board or sturdy corrugated cardboard, doubled up and glued.
- Terrain base: foam sheets with gentle slopes and rocky edges (great for dioramas).
- School-safe base: a single rigid board with labeled features (gate, keep, towers, wall walk).
If you want a hill, moat, or rocky cliff: shape it now. You can build terrain volume with crumpled paper under a
covering layer (like paper strips and glue), then paint it later. Keep terrain low and stable unless you want your
keep to look like it was built during an earthquake.
5) Construct the Main Walls (The Part That Makes It Look Like a Castle)
Step 1: Cut and assemble wall panels
Measure your wall height first. Then cut wall panels that match your footprint sketch. If your walls are long, add
internal “braces” (strips of cardboard glued vertically) so the wall stays flat.
Step 2: Add crenellations (the toothy top bits)
Crenellationsthose alternating high/low notchesinstantly scream “castle.” Mark a repeating pattern along the top
edge and cut out the gaps. Keep them evenly spaced so it looks intentional, not like the wall got into a fight
with a paper shredder.
Step 3: Create corners that don’t collapse
Corner strength is everything. Use one of these methods:
- Tab method: add glue tabs (folded strips) along edges so walls connect like a box.
- Inner brace method: glue a right-angle strip on the inside corner like an L-shaped support.
- Wraparound method: score (not cut through) the wall panel and fold to form a crisp corner.
Hold seams in place with painter’s tape while glue dries. Tape is basically the “squire” of your build: not glamorous,
but extremely loyal.
6) Build Towers (Because Every Castle Needs Drama)
Towers add height, style, and that “defensible fortress” silhouette. You can make towers three easy ways:
Method A: Cardboard tubes (fastest)
Use paper towel or mailing tubes. Cut to height, then attach to corners. Add a turret top by cutting small notches
around the rim (mini crenellations).
Method B: Rolled cardstock/foam board (clean and customizable)
Roll a rectangle into a cylinder and glue the seam. For larger towers, reinforce with an inner ring.
Method C: Foam blocks (best for carved stone texture)
Cut a square/round tower shape, then carve stone lines into the surface (more on texturing soon). This method shines
if you want realistic masonry.
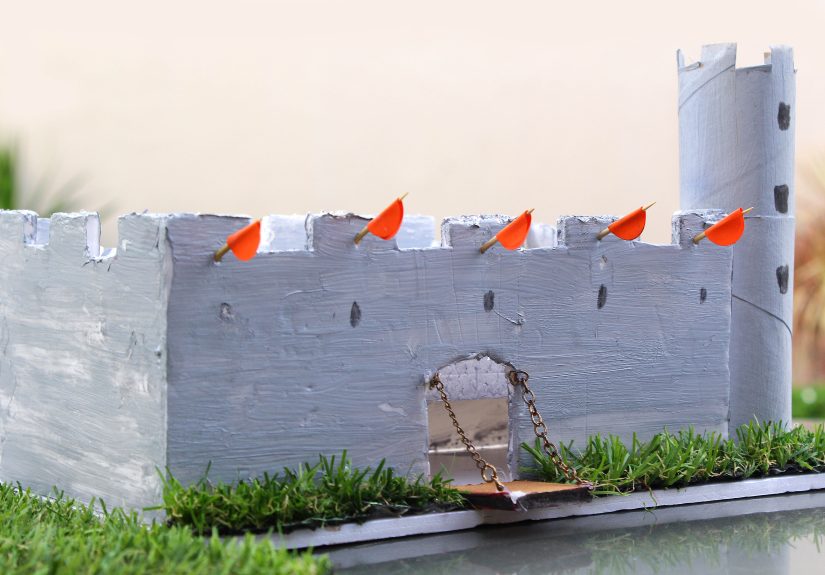
7) Add the Keep, Gatehouse, and “Castle Personality”
The keep is the main central building. The gatehouse is the showpiece entrance.
These two features make your model go from “nice walls” to “oh wow.”
Keep (main tower)
- Make a simple box shape (cardboard or foam board).
- Add narrow vertical windows (arrow slits) and a bigger door.
- Optional: add a roof that lifts off so people can peek inside.
Gatehouse (instant centerpiece)
- Create a wider section of wall with two small towers beside it.
- Add an arched gate opening and a “portcullis” look using thin strips.
- Optional: add a drawbridge using string and a simple hinge (paper fasteners work well).
Want your castle to feel “alive”? Add a courtyard stair, a balcony, tiny banners, or a guard walk behind the
crenellations. Small details do big work.
8) Texture: Make “Cardboard” Look Like “Stone”
Texture is the cheat code. Even a simple castle becomes convincing when surfaces look like materials found in the
real world.
Stone block texture (easy and effective)
- Drawn stone: lightly pencil brick/stone lines, then paint over them so they show subtly.
- Pressed texture: crumple aluminum foil and gently press it onto foam to create random stone grit.
- Raised stone: glue thin “stone strips” (cardboard rectangles) for a chunky, stylized look.
Strengthening with a sealer layer
If your surface feels flimsy or you want tougher walls, apply a thin sealing coat before painting. Brush-on sealers
(like decoupage-style sealers) help reduce warping and give paint a more even surface.
Pro tip: keep liquids light. Flooding cardboard is how you accidentally invent “Castle Lasagna,” where everything
slides around in layers.
9) Paint Like a Pro: Base Coat, Washes, Dry-Brush Highlights
Painting is where the magic happens. The goal is depth: darker color in the cracks, lighter color on raised areas,
and a few dirty “history happened here” marks.
Step 1: Base coat
Paint everything a mid-tone: gray for stone, brown for wood, tan for dirt. Acrylic craft paint works well. Use two
thin coats instead of one thick one so details don’t get buried.
Step 2: Add a wash (the “instant age” move)
Mix a little dark paint with plenty of water. Brush it on and let it settle into lines and corners, then dab the
excess. This creates shadows and grime quickly.
Step 3: Dry-brush highlights (the “wow, that’s stone” moment)
Dry-brushing means loading a brush with a lighter color, wiping most of it off, then lightly dragging the brush
over raised texture so the edges catch the paint. It’s perfect for stone blocks, cracks, and carved foam surfaces.
Important note about foam and strong paints
If you used craft foam or insulation foam, stick to brush-on acrylics or foam-safe primers/sealers. Some solvent
products can damage foam. If you’re ever unsure, test on a scrap first and paint in a well-ventilated space.
10) Finishing Touches That Make People Lean In
These details are optional, but they’re also the difference between “nice” and “photo-worthy.”
- Flags and banners: paper triangles on toothpicks; add simple symbols.
- Moss and vines: tiny bits of green sponge or model foliage glued in corners.
- Gravel paths: sand or fine gravel sealed with diluted glue.
- Moat water effect: painted “water” with a glossy top coat.
- Weather stains: greenish tint near the base (algae), brown streaks under windows (rain grime).
Keep it believable: castles are tough, but they’re also messy. A perfectly clean castle looks like it was built
yesterday by a committee with matching polo shirts.
11) Common Problems (and How to Fix Them Without Crying)
Warping walls
- Use thicker cardboard or foam board.
- Apply paint in thin coats, not soaking wet layers.
- Add interior braces and let glue dry fully before painting.
Wobbly towers
- Widen the tower base with a “foundation ring.”
- Glue the tower to both the wall and base for a triangle of support.
- Add an internal column (rolled cardstock) if the tower is tall.
Paint looks flat and boring
- Do a dark wash to deepen cracks.
- Dry-brush with a lighter shade to bring out highlights.
- Add small weather marks where water would realistically run.
Edges look messy
- Cover edges with thin strips (like trim) or “stone banding.”
- Use a final dark wash to hide small imperfections.
- Remember: medieval construction wasn’t laser-cut either.
12) Three Build Plans: Pick Your Difficulty Level
One-hour “Castle Sprint” (beginner)
- Cardboard base + four walls + two towers + crenellations.
- Draw stone lines with pencil.
- Paint gray and dry-brush a lighter gray.
Weekend “Realistic Fortress” (intermediate)
- Foam board walls + removable keep roof.
- Gatehouse with drawbridge details.
- Textured terrain base with a path and greenery.
- Base coat + wash + dry-brush + weather stains.
“Museum Diorama Energy” (advanced)
- XPS foam stonework carved into walls and towers.
- Layered terrain (rocks, slopes, moat bank).
- Advanced painting: multi-tone stone, soot marks, moss, and chipped edges.
Real-World Experiences: What You’ll Learn While Making a Model Castle (Extra 500+ Words)
Building a model castle is one of those projects that starts as “I’ll just make some walls” and ends with you
carefully debating whether your moat should have algae. That’s part of the fun: castles invite you to keep adding
details because each improvement is visible immediately.
One of the first experiences most builders have is discovering that structure beats decoration.
It’s tempting to jump straight to cool stuffflags, windows, drawbridges, tiny gargoyles that stare into your soul.
But if your corners aren’t strong, you’ll spend the whole project propping walls up with whatever is nearby:
textbooks, mugs, that one candle you never light, and possibly a confused pet. The moment you add interior braces
or corner supports, everything gets easier. Suddenly, your castle stands up like it has confidence.
Another common “aha” moment: symmetry is powerful. Even if real castles weren’t always perfectly
balanced, a model usually looks better when towers align, crenellations repeat evenly, and the gate feels centered.
Many people find that simply measuring and repeating shapessame tower height, same spacing for the wall teethmakes
the whole thing look more professional without adding more work. It’s like giving your castle a haircut.
Painting is where builders often fall in love with the process. The first base coat can be underwhelminggray walls,
flat surfaces, “hello, I am a rectangle.” Then you add a dark wash and suddenly cracks appear. You dry-brush a lighter
shade and edges pop like sunlight is actually hitting stone blocks. It feels like magic, but it’s really just a
reliable illusion: shadows in recesses, highlights on raised texture. People who thought they were “bad at art”
often realize they’re actually great at technique.
You’ll probably also experience the Great Debate: realism vs. fun. A historically accurate castle
might have fewer windows, thicker walls, and a more practical layout. A fantasy castle might have tall spires and
bright banners and a suspiciously dramatic silhouette that screams “plot happens here.” Most builders end up blending
the two: realistic stone colors with a fun roof shape, or a practical gatehouse with a flashy flag.
Transport is another lesson that shows up right at the end, usually when you try to carry the finished castle
somewhere. If the base is thin or the towers are only lightly attached, the “walk to the table” becomes an action
scene. Builders often learn to design for travel: a strong base, towers attached to both wall and base, and a few
removable parts packed separately. That’s why many experienced crafters build a castle like a stage setsolid frame,
then details.
Finally, there’s the best experience of all: the moment someone looks at your model and instantly recognizes the
featurestowers, battlements, gatehouseand says, “Whoa. You made that?” That reaction comes from the combination
of simple geometry and smart finishing. You don’t need expensive materials; you need a clear plan, sturdy joins, and
paint tricks that add depth. And once you’ve built one castle, you’ll notice something funny: you’ll start looking
at every cardboard box like it’s a future fortress. That’s not a problem. That’s a lifestyle.
Conclusion
Making a model castle is equal parts planning, building, and illusion. Start with a clear layout, choose materials
that match your goal, and focus on strong walls and towers before you decorate. Then let paint do the heavy lifting:
base coat, dark wash, and dry-brush highlights for instant “stone” realism. Add a few finishing touchesflags, moss,
a gravel pathand your castle will look ready for legends (or at least for a very dramatic desk photo).


