Table of Contents >> Show >> Hide
- Why Make Homemade Pumpkin Puree?
- Choose the Right Pumpkin (This Part Matters)
- What You Need
- How to Make Pumpkin Puree Step by Step
- Roasting vs. Boiling vs. Steaming
- Homemade vs. Canned Pumpkin Puree
- How Much Puree Will One Pumpkin Make?
- How to Store Pumpkin Puree
- Food Safety Note: Do Not Home-Can Pumpkin Puree
- Best Ways to Use Pumpkin Puree
- Troubleshooting Homemade Pumpkin Puree
- Conclusion
- Experience Notes from Real-World Pumpkin Puree Cooking (Extra 500+ Words)
If you’ve ever stared at a whole pumpkin and thought, “I could totally make my own pumpkin puree,” you are absolutely right. You can. And it’s much easier than people think.
Homemade pumpkin puree is one of those kitchen projects that sounds fancy, smells amazing, and makes you feel like the main character in a fall movie. It’s also practical: you can freeze it, portion it, and use it for pumpkin pie, muffins, bread, soup, pancakes, sauces, and more. The big trick is not making it waterybecause watery puree is how great pumpkin bread turns into pumpkin pudding.
In this guide, you’ll learn exactly how to make pumpkin puree from scratch, how to choose the right pumpkin, how to fix texture issues, how to store it safely, and how to use it in recipes that call for canned pumpkin. We’ll also cover a very important safety note: homemade pumpkin puree is great for freezing, but not for home canning as puree.
Why Make Homemade Pumpkin Puree?
Let’s be honest: canned pumpkin is convenient and very consistent, which is why many bakers still love it. But homemade pumpkin puree has its own charm. It can taste fresher, slightly sweeter, and more “pumpkin-forward,” especially when roasted well. Plus, if you already bought pie pumpkins for decorating, this is a delicious second act.
- Fresh flavor: Roasting builds deeper flavor than boiling.
- Custom texture: You can make it ultra-smooth or slightly rustic.
- Freezer-friendly: Portion and freeze for future baking.
- Less waste: Roast the seeds for a snack while you’re at it.
Choose the Right Pumpkin (This Part Matters)
Not all pumpkins are created equal. For the best homemade pumpkin puree, use a sugar pumpkin (also called a pie pumpkin or cooking pumpkin). These are smaller, sweeter, and less watery than giant carving pumpkins.
Best pumpkins for puree
- Sugar pumpkin / pie pumpkin
- Cooking pumpkin (grocery label may vary)
- Cheese pumpkin (great flavor and texture)
Skip these if possible
- Large jack-o’-lantern pumpkins (often watery and stringy)
- Overripe or bruised pumpkins
- Any pumpkin with soft spots, mold, or deep cuts
A smaller pumpkin is usually easier to cut, roasts more evenly, and produces a silkier puree. In other words: choose the pumpkin that looks like it belongs in a pie, not on a porch with a candle in it.
What You Need
- 1 pie pumpkin (or 2 small ones)
- Sharp chef’s knife
- Spoon or scoop (for seeds and stringy bits)
- Baking sheet or roasting pan
- Parchment paper or foil (optional, but cleanup is happier)
- Food processor, blender, or potato masher
- Fine-mesh sieve or cheesecloth (optional, but highly recommended for baking)
How to Make Pumpkin Puree Step by Step
1) Wash and prep the pumpkin
Rinse the pumpkin and dry it well. You’re not eating the skin, but you don’t want dirt hitchhiking into your puree. Trim the stem if it gets in the way.
2) Cut it safely (the stem is the boss fight)
Place the pumpkin on a stable cutting board. Cut around the stem rather than straight through it, because the stem area is tough. Split the pumpkin in half lengthwise.
Safety tip: If your pumpkin wobbles, shave a tiny slice off the bottom first so it sits flat. A stable pumpkin is a polite pumpkin.
3) Scoop out seeds and stringy bits
Use a spoon or scoop to remove the seeds and fibrous center. Save the seeds if you want to roast them later. You don’t need to remove every last string, but get the big clumps out.
4) Roast the pumpkin
Place the halves cut-side down on a lined baking sheet. Roast until the flesh is very tender and easily pierced with a fork. Depending on pumpkin size and your oven, this usually takes 45 to 90 minutes.
Most reliable methods land somewhere between 350°F and 400°F. If you want a simple default, use 375°F. The exact number matters less than roasting until the pumpkin is fully soft.
5) Cool, then scoop the flesh
Let the pumpkin cool until comfortable to handle. Scoop the soft flesh out of the skin and transfer it to a food processor or blender. The skin should peel away easily once roasted.
6) Puree until smooth
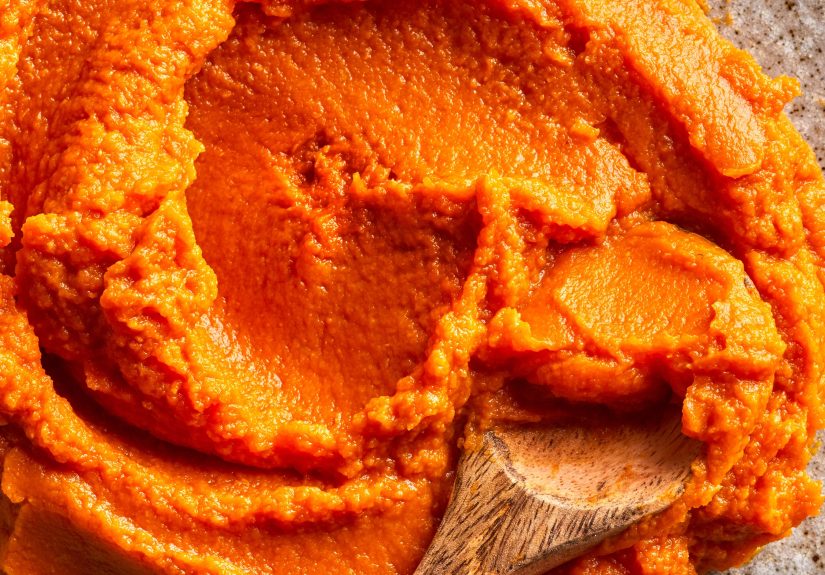
Blend until smooth and creamy. If it looks thick and silky, you’re winning. If it looks wet or loose, don’t panicthis is common with fresh pumpkin.
7) Drain for baking-quality texture (important!)
Homemade pumpkin puree often contains more water than canned pumpkin. For pies, muffins, quick breads, and cookies, draining makes a huge difference.
- Line a sieve with cheesecloth (or use a fine-mesh strainer).
- Add the puree and let it drain over a bowl.
- For thicker puree, let it sit 30–60 minutes.
- For extra-thick puree, gently press with a spoon or plate.
The goal is not “bone dry.” You want it thick enough to hold shape on a spoon, similar to canned pumpkin puree. If your puree is too wet, your recipe may need longer baking time and can turn dense or gummy.
Roasting vs. Boiling vs. Steaming
You can boil or steam pumpkin, and some cooks do. But roasting is usually the best choice for flavor and texture.
Roasting (best overall)
- Pros: Better flavor, less watery, easy hands-off method
- Cons: Takes longer than pressure cooking
Boiling or steaming (works, but wetter)
- Pros: Faster softening once cut into pieces
- Cons: Can absorb water and require more draining
Pressure cooker / Instant Pot (great shortcut)
- Pros: Fast, convenient, good for busy days
- Cons: Often needs draining before baking use
If you’re making puree for soup, a slightly looser texture is usually fine. If you’re baking pie, bread, or cookies, roast and drain for the best results.
Homemade vs. Canned Pumpkin Puree
Here’s the real-world answer: both are good. Use homemade when you want the satisfaction and fresh flavor. Use canned when you want consistency and speed.
Many professional and home bakers prefer canned pumpkin for recipes like pie because the moisture level is predictable. If you use homemade puree in those recipes, just drain or blot it well first.
Important: Pumpkin puree is not pumpkin pie filling
Pumpkin puree should be 100% pumpkin. Pumpkin pie filling (or pie mix) already contains sugar, spices, and sometimes other ingredients. They are not interchangeable in most recipes.
How Much Puree Will One Pumpkin Make?
Yield depends on pumpkin size, variety, and how much moisture you drain. As a rough guide:
- 1 small pie pumpkin often yields 2 to 4 cups puree
- A larger recipe batch may yield much more (some recipes report around 5 cups)
When substituting for canned pumpkin, many recipes treat one 15-ounce can as roughly 1 3/4 to just under 2 cups of puree. To be precise in baking, measure by weight when possible and adjust texture (drain if needed).
How to Store Pumpkin Puree
Refrigerator
Store homemade pumpkin puree in an airtight container in the refrigerator. For best quality and food safety, use it within 3 to 5 days. Some recipe sites allow up to a week, but if you want the conservative answer, use it sooner.
Freezer (best option)
Freeze in recipe-friendly portions (1/2 cup, 1 cup, or 2 cups). Flatten freezer bags so they stack neatly and thaw faster.
- Label with date and amount
- Remove as much air as possible
- Freeze flat for easy storage
- Thaw in the fridge overnight
For best quality, use frozen puree within 3 months, though many home cooks use it longer if well sealed.
Food Safety Note: Do Not Home-Can Pumpkin Puree
This is the part where I save your future self a stressful internet rabbit hole: home canning pumpkin puree (or pumpkin butter) is not recommended.
Pumpkin is a low-acid food, and when pureed it becomes very thick. That thickness makes heat penetration unpredictable in home canning, which raises safety concerns. Tested home canning guidance is for cubed pumpkin, not mashed or pureed pumpkin.
If you want to preserve homemade pumpkin puree safely, freeze it. Your freezer is the hero here.
Best Ways to Use Pumpkin Puree
- Pumpkin pie and mini pies
- Pumpkin bread and muffins
- Cheesecake and bars
- Pancakes and waffles
- Oatmeal and smoothies
- Soup, risotto, and pasta sauces
- Dog treats (plain puree, no sugar/spices)
Troubleshooting Homemade Pumpkin Puree
My puree is too watery
Drain it in a sieve or cheesecloth. For baking, thicker is better. You can also cook it gently on the stovetop for a few minutes to evaporate moisture.
My puree is stringy
Blend longer, then strain. Some pumpkin varieties are naturally stringier than others. This is one reason pie pumpkins are preferred over carving pumpkins.
My pie tastes good but looks pale
Totally normal. Fresh pumpkin puree can be lighter or more yellow than canned puree depending on the variety. Color does not equal flavor failure.
My baked goods took longer than expected
Fresh puree probably had more moisture than canned. Next time, drain more thoroughly or reduce the puree slightly before using.
Conclusion
Making pumpkin puree at home is simple: pick a good pie pumpkin, roast until tender, blend until smooth, and drain if you’re baking. That’s really the whole game.
The process is forgiving, the flavor is lovely, and your kitchen will smell like fall got its life together. Use it fresh, freeze it in portions, and remember the one big safety rule: don’t home-can pumpkin puree.
Whether you’re baking a pie, stirring it into soup, or freezing little portions for future weekends, homemade pumpkin puree is one of the easiest seasonal upgrades you can make.
Experience Notes from Real-World Pumpkin Puree Cooking (Extra 500+ Words)
One of the most common experiences people have when making pumpkin puree for the first time is surprisefirst at how easy it is, and then at how different it looks from canned pumpkin. Fresh puree can be lighter in color, more fragrant, and sometimes noticeably wetter. That difference leads many home cooks to think they “did it wrong,” when in fact they probably did it right. The biggest lesson from real-world cooking is that homemade puree is not a factory-standard ingredient, and that is both the challenge and the beauty of it.
In practice, the texture issue shows up most often in baking. A batch of pumpkin muffins may spread more than expected, or a pie filling may need extra bake time. Usually the culprit is moisture, not skill. Once cooks learn to drain the pureeor even just blot it with paper towels before measuringit changes everything. The next batch behaves better, the crumb becomes more tender instead of gummy, and suddenly homemade puree feels less “rustic experiment” and more “I absolutely meant to do that.”
Another very relatable experience is underestimating how much work the cutting step feels compared with the roasting step. Roasting is easy. Waiting is easy. Scooping is easy. But cutting a round, firm pumpkin can make anyone pause and reconsider their life choices. People who make pumpkin puree regularly often develop a few habits: stabilizing the pumpkin on a towel, cutting around the stem instead of through it, or softening it slightly first. These small technique improvements make the process safer and a lot less frustrating.
There’s also the “I made way more than I expected” experience, which happens all the time. A pumpkin looks modest on the counter, but after roasting and scooping, it can produce enough puree for a pie, a loaf, and still leave you with leftovers. That’s when portioning becomes a game-changer. Home cooks who freeze puree in measured amounts (especially 1-cup portions) tend to enjoy the process much more because future recipes become easy: thaw, stir, use, done. No mystery bowl of orange stuff in the back of the fridge, no guessing whether it’s enough for anything useful.
Flavor is another interesting part of the experience. Some batches taste sweeter and deeper than others even when the method is identical. That variability comes from the pumpkin variety, ripeness, and water content. It teaches a practical kitchen mindset: taste your puree before baking. If it seems mild, lean a little more on spices or consider concentrating it briefly on the stove. If it tastes rich and naturally sweet, let the pumpkin shine and don’t bury it under a blizzard of cinnamon.
Finally, one of the best experiences tied to making pumpkin puree is that it tends to create useful leftovers by accident. Seeds become a snack. Extra puree becomes soup, pancakes, oatmeal, or freezer prep for holiday baking. Even the draining liquid can end up in smoothies or bread dough in some kitchens. In that sense, homemade pumpkin puree is more than a recipeit’s a seasonal kitchen workflow. You roast once, puree once, portion once, and then you have the foundation for multiple meals and desserts. That’s why so many people keep doing it every fall: not because it’s faster than opening a can, but because it turns one ingredient into a week of good cooking and makes the whole kitchen feel a little more alive.


