Table of Contents >> Show >> Hide
- Before We Summon Anything: Safety Rules That Aren’t Optional
- Why This Combo Works So Well
- Supplies Checklist
- Step 1: Choose a Design (So Your Candle Has a Backstory)
- Step 2: Make the Paper Clay Props (Coffins, Bases, Trays, Labels)
- Step 3: Prep Your Silicone Mold Like a Professional (Not a Chaos Goblin)
- Step 4: Melt Wax (Double Boiler Method) Without Turning Your Kitchen Into a Horror Movie
- Step 5: Pour the Candle (a.k.a. The Moment of Truth)
- Step 6: Unmold, Trim, and Cure
- Step 7: Assemble the Spooky Look (Without Making It Unsafe)
- Spooky Finishing Tricks That Look Professional
- Troubleshooting: When the Ghost in the Machine Is Actually Physics
- Scent & Color Ideas (Because Halloween Has a Playlist)
- Extra: 500+ Words of Real-World “What It Feels Like” Experience (So You Don’t Rage-Quit)
- Conclusion
If Halloween had a love language, it would be dramatic lighting. And nothing says “welcome to my haunted humble abode” like candles that look suspiciously like they crawled out of a fog machine. The good news: you don’t need a gothic mansion or a chemistry degree. With silicone molds, you can pour ridiculously detailed shapes (skulls, ravens, ghosts, creepy handsyour vibe, your nightmares). And with paper clay, you can build moody “props” like coffin trays, cracked-stone bases, potion labels, and faux-drippy candle collars that make your finished candles look boutique-level spooky.
This guide combines best practices from U.S. candle suppliers, craft publishers, and fire-safety organizations into one practical, fun, and slightly unhinged tutorial. We’ll cover materials, step-by-step candle making, paper clay embellishments, finishing tricks, and troubleshootingplus an extra section at the end packed with real-world “what usually happens” experiences so you can dodge the classic mistakes (like “why is my skull sweating oil?”).
Before We Summon Anything: Safety Rules That Aren’t Optional
- Hot wax burns. Work slowly, use heat-safe tools, and keep kids/pets out of the workspace. If you’re a teen, have an adult supervise the melting and pouring.
- Use a double boiler setup. Never melt wax directly on a burner. A water bath helps control heat and reduces risk.
- Ventilation matters. Fragrance oils can be strongopen a window or use a fan (aimed away from your pour station).
- Paper clay is not flame-friendly. Treat paper clay like a costume accessory: it can look amazing, but it shouldn’t be exposed to an open flame. Use it as a base/tray/outer sleeve or decoration on the outside of a container candlenot touching the melt pool.
- Never leave burning candles unattended. Yes, even if they’re “just vibing.” Especially if they’re vibing.
Why This Combo Works So Well
Silicone molds = crisp spooky details
Silicone molds are flexible, nonstick-ish, and great at capturing detail. That means you can get sharp teeth on a skull, tiny bat wings, or the folds in a ghost without carving wax like you’re auditioning for a candle-themed survival show.
Paper clay = the “set design” your candle deserves
Paper clay (including papier-mâché style clays) dries lightweight, can be sanded, painted, and sealed. It’s perfect for creating non-burning elements: coffin-shaped drip trays, “stone” pedestals, spellbook platforms, label plaques, and removable decorative collars that sit around a glass container candle like a tiny haunted outfit.
Supplies Checklist
For the candles (silicone mold part)
- Silicone molds (skull, pumpkin, hand, ghost, coffin, etc.)
- Wax formulated for pillars/molds (paraffin pillar wax, beeswax, or a soy pillar blendsomething that releases cleanly and holds shape)
- Wicks (cotton braided or flat braid; size depends on candle diameter)
- Wick tools (wick needle/skewer, wick bar or pencil, wick stickers or a tiny dab of melted wax)
- Thermometer (candy/deep-fry thermometer works)
- Double boiler setup (pot + heat-safe pour pitcher)
- Color (candle dye blocks, liquid dye, or chips)
- Fragrance oil rated for candles (optional)
- Rubbing alcohol in a spray bottle (for surface bubbles)
- Heat gun (optional but handy for smoothing tops)
- Scale (highly recommended if using fragranceaccuracy beats “vibes-based measuring”)
For the paper clay props
- Paper clay (ready-to-use or mixable papier-mâché clay)
- Simple tools (craft knife, sculpting tools, toothpicks, old paintbrush)
- Release agent for molds (a dusting of cornstarch or lightly diluted dish soap for paper clay in molds, if needed)
- Acrylic paint (black, white, gray, metallics, plus one “gross green” for science)
- Sealer (acrylic varnish or craft sealant)
- Optional textures (sand, coffee grounds, tissue paper, gauze, twine, faux moss)
- Adhesive (craft glue or hot gluehot glue only after clay is dry and sealed)
Step 1: Choose a Design (So Your Candle Has a Backstory)
Pick one “hero candle” shape and one paper clay prop. Keeping it to two elements prevents your craft table from turning into a spooky yard sale.
Easy, high-impact combos
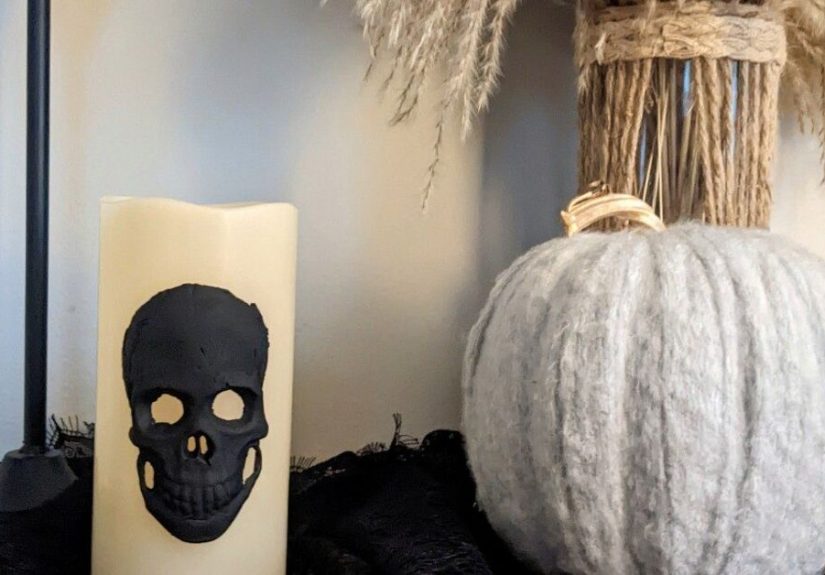
- Skull candle + coffin drip tray (classic, dramatic, hard to mess up)
- Ghost candle + “grave dirt” pedestal (white candle on dark base = instant contrast)
- Pumpkin candle + spellbook platform (cute-but-creepy, like a pumpkin that reads Latin)
- Hand candle + cracked “stone slab” tray (looks like it’s reaching out of the underworld… politely)
Timing tip: Make paper clay pieces first. They need drying time. Candles, by comparison, are impatient and want attention immediately.
Step 2: Make the Paper Clay Props (Coffins, Bases, Trays, Labels)
Option A: Coffin drip tray (beginner-friendly)
- Sketch and cut a template from cardboard: a coffin outline slightly larger than your candle base.
- Build thickness by layering cardboard or crumpled foil under the center (this creates a subtle raised platform).
- Apply paper clay in an even layer (about 1/4–3/8 inch). Smooth with damp fingers.
- Add “stone” texture: press crumpled aluminum foil lightly into the surface, then lift off. Instant tombstone vibes.
- Carve cracks with a toothpick or dull sculpting tool. Keep cracks shallow so the piece stays strong.
- Dry completely (time varies by clay and thickness). Flip partway through drying to prevent warping.
Option B: Decorative candle collar (for container candles only)
This is a removable “sleeve” that sits around a glass jar candle. It should never sit where flame or melted wax can reach it. Think: fashion scarf, not campfire marshmallow.
- Wrap a sheet of paper around your empty candle jar and tape it into a loose tube; slide it off.
- Cover the tube with a thin, even layer of paper clay.
- Add textures: faux stitches, raised runes, little “drips” (purely decorative), or a label plaque.
- Let it dry off the jar, then test-fit. Sand edges if needed.
- Paint and seal, then slip it onto the jar only when the candle is cool and unlit.
Painting paper clay so it looks expensive (even if it wasn’t)
- Prime (optional): A light coat of white or gray paint helps color read true.
- Base coat: Dark gray or black for “stone.” Brown-black for “dirt.” Deep green-black for “witchy swamp.”
- Dry brush highlights: Dip brush in lighter paint, wipe most off, then lightly drag over texture.
- Age it: Add thin washes (watery paint) into cracks. Blot with paper towel.
- Seal: Use an acrylic varnish/craft sealer once fully dry. (Sealing improves durability, but paper clay generally should still be kept indoors and away from water.)
Step 3: Prep Your Silicone Mold Like a Professional (Not a Chaos Goblin)
- Clean and dry the mold. Dust and lint show up in candles like they’re auditioning for a close-up.
- Decide your wick path. Many molds have a wick hole. If yours doesn’t, you can carefully pierce one with a skewer (centered, straight).
- Thread the wick. Pull it through so it’s centered. Keep it taut by tying it to a wick bar, pencil, or skewer laid across the top.
- Seal the wick hole. Use wick putty or strong tape to prevent leaks. (Silicone is flexible, and wax is sneaky.)
- Stabilize the mold. Place it in a cup, small bowl, or a DIY ring of towels so it can’t tip during pouring.
Step 4: Melt Wax (Double Boiler Method) Without Turning Your Kitchen Into a Horror Movie
- Fill a pot with a few inches of water and bring to a gentle simmer.
- Place wax in a heat-safe pour pitcher and set the pitcher in the water bath.
- Stir occasionally until melted. Monitor temperature with a thermometer.
- Remove from heat when fully melted and allow it to cool toward your wax’s recommended add-in/pour temperatures.
Color and fragrance (optional, but fun)
- Dye: Add small amounts and stir thoroughly. Dark colors often need more dye than you thinkadd gradually so you don’t overshoot into “motor oil.”
- Fragrance: Use a candle-safe fragrance oil and weigh it for accuracy. Many makers start around a moderate fragrance load and adjust after testing; more is not always better for burn performance.
Step 5: Pour the Candle (a.k.a. The Moment of Truth)
- Pour slowly down the side of the mold to reduce air bubbles.
- Tap the mold gently on the counter to encourage bubbles to rise.
- Spritz surface bubbles with rubbing alcohol if they appear.
- Let it cool slowly at room temperature. Avoid moving it like it’s a sleeping baby dragon.
Second pour (the secret handshake of molded candles)
Many molded candles form a small sinkhole as they cool, especially around thicker sections. If your candle has a “crater,” reheat a little leftover wax and do a small top-off pour once the first pour is mostly set but still warm. This helps create a smoother finish and reduces hollow spots.
Step 6: Unmold, Trim, and Cure
- Wait until fully set. If it still feels warm or soft, give it more time.
- Peel the silicone away from the candle rather than yanking the candle out.
- Trim the wick to about 1/4 inch before burning.
- Let it cure (especially if scented). Many waxes perform better after resting for a few daysstronger scent and steadier burn.
Step 7: Assemble the Spooky Look (Without Making It Unsafe)
Safe ways to combine candle + paper clay
- Pedestal base: Place your pillar candle on a sealed paper clay base or tray. Keep the tray larger than the candle so wax drips land safely.
- Container candle sleeve: Use paper clay as a removable outer wrap around a glass container candle (never near the flame, and remove it if it warms).
- Decor accents on the tray: Skulls, “bones,” tiny tombstonesdecorate the tray, not the candle’s burn area.
What not to do (your future self will thank you)
- Don’t glue paper clay directly to a pillar candle that will be lit.
- Don’t let paper clay overhang the flame or sit at rim level where heat concentrates.
- Don’t add flammable “cute extras” (like dried moss) close to the wick. Spooky is good; house fire is not the vibe.
Spooky Finishing Tricks That Look Professional
Make it look ancient
- Black wash: Mix black paint with water. Brush it on, then wipe back with a paper towel so it stays in cracks.
- Dry-brushed bone: Lightly dry-brush off-white over raised textures for instant “relic” energy.
- Metallic edges: A tiny bit of bronze or pewter on corners makes details pop.
Make wax look “haunted”
- Two-tone pour: Pour a base color, let it thicken slightly, then swirl in a second color for marbling.
- Frosted look: Some waxes naturally frost (especially some soy blends). If you like the vintage vibe, embrace it as “graveyard patina.”
- Blood drip illusion: Instead of real drips (messy), paint “drips” on the paper clay tray or collar.
Troubleshooting: When the Ghost in the Machine Is Actually Physics
Problem: My candle has lots of bubbles
- Pour more slowly.
- Tap the mold after pouring.
- Warm the mold slightly (room-temp mold is usually fine; very cold molds can trap bubbles).
Problem: The top is sunken or cracked
- Cool more slowly (rapid cooling can cause cracks).
- Plan a second pour/top-off.
- Use a heat gun to gently smooth the surface, then top off if needed.
Problem: The candle won’t release cleanly
- Make sure it’s fully set and cool.
- Try a slightly firmer wax blend intended for molds.
- Clean residue from the mold between pours.
Problem: The wick is off-center
- Tension the wick with a bar/skewer and double-check alignment before pouring.
- For tricky molds, anchor the wick at the bottom and at the top so it can’t drift.
Scent & Color Ideas (Because Halloween Has a Playlist)
- “Haunted Library”: amber + vanilla + a whisper of smoke (deep brown candle, bronze dry-brushed base)
- “Cemetery Flowers”: rose + earth + patchouli (black candle, gray stone tray)
- “Witch’s Citrus”: blood orange + clove (dark red candle, black-green “swamp” base)
- “Midnight Marshmallow”: toasted sugar + cedar (charcoal candle, metallic silver highlights)
Extra: 500+ Words of Real-World “What It Feels Like” Experience (So You Don’t Rage-Quit)
Here’s the part nobody tells you until you’re standing over a silicone skull mold, whispering, “Please be normal,” like you’re negotiating with a tiny wax demon. The first time you make molded candles, the process feels incredibly smooth right up until the moment it doesn’t. You’ll melt wax, pour confidently, and thensurpriseyour candle develops a mysterious sinkhole like it’s trying to swallow its own feelings. That’s normal. Wax contracts as it cools, especially in thick spots (skull foreheads and pumpkin butts are notorious). The “maker move” is to save a little melted wax, wait for the first pour to set, and then top it off. The second pour feels like cheating in the best way.
Another common experience: you’ll become weirdly obsessed with wick centering. You’ll think the wick is centered. You’ll swear it’s centered. Then you unmold the candle and the wick is leaning like it just heard the world’s funniest joke. The fix isn’t magicit’s tension. The wick needs to be pulled taut and held in place with a bar or pencil across the top, and it helps to check alignment from two angles before pouring. If your mold has a narrow tip (like a ghost tail), you may even find it easier to thread the wick first, then gently “massage” the silicone so the wick sits dead center.
With paper clay, the big lesson is patience. Paper clay dries when air can reach it, so thick pieces take longer than your motivation does. The first time you make a coffin tray, you’ll touch it the next morning, feel a hard surface, and assume it’s done. Then you paint it… and a day later it warps slightly or feels cool in the middle. That coolness is a clue that moisture is still leaving the clay. The best experience-based tip: build props in thinner layers or over a lightweight armature (cardboard or foil), flip the piece as it dries, and don’t seal it until it’s truly dry all the way through. Once you do seal it, the transformation is wildly satisfyingsuddenly your tray looks less like “school craft project” and more like “artifact stolen from a haunted museum.”
You’ll also discover that “spooky” is mostly paint technique, not expensive supplies. Dry-brushing is the secret sauce: it takes ten seconds and makes every raised texture look intentional. A black wash settles into cracks and instantly adds depth. And if you accidentally go too heavy with black paint, you can wipe it back while it’s still wet and call it “weathering.” This is one of the only times in life where a mistake can become a vibe.
Finally, you’ll probably have a moment where you consider decorating the candle itself with paper claylike adding a little clay snake or a drippy collar directly on the wax. This is where experience (and common sense) steps in like a responsible adult: paper clay is best kept as a base, tray, or removable sleeve around a container, not on the burning surface of a pillar candle. The win is designing the “scene” around the candle so the flame stays safe and the spooky stays dramatic. When you do it that way, the finished setup looks intentionally styledlike something you’d see in a boutique Halloween displayexcept you made it yourself, and you didn’t even have to barter with a vampire.
Conclusion
Spooky Halloween candles are basically tiny sculptures that happen to glow. Silicone molds handle the crisp details, and paper clay gives you the set dressing that turns “cute DIY” into “haunted centerpiece.” Keep safety front and center, choose a wax that holds its shape in molds, let paper clay dry fully before painting and sealing, and build your spooky look around the candlenot in the flame zone. Do a quick burn test in a safe spot, trim the wick, and enjoy the eerie ambiance you just crafted with your own two hands (and zero cursed artifacts).


