Table of Contents >> Show >> Hide
- Why Peeling Potatoes the Right Way Matters
- Know Your Potato (and When You Don’t Need to Peel)
- The Best Tools for Peeling Potatoes Like a Pro
- How to Peel Raw Potatoes the Classic Way
- The Boil-Then-Peel Hack for Big Batches
- No-Peeler? No Problem: Knife and “Lazy” Methods
- Common Potato Peeling Mistakes (and How to Fix Them)
- How to Peel Potatoes for Different Dishes
- Real-Life Potato Peeling Tips and Experiences
If you’ve ever stood over the sink peeling potatoes and thought, “There has to be a better way,” you’re absolutely right. Peeling potatoes can be oddly relaxing… or it can turn into a slippery, starchy nightmare that leaves you with sore wrists and sad, mangled spuds.
Whether you’re making creamy mashed potatoes, crispy roast wedges, or grandma’s famous potato salad, learning how to peel potatoes the right way saves time, reduces waste, and keeps all 10 of your fingers intact. In this guide, we’ll walk through the best tools, classic techniques, viral hacks that actually work, and smart tips for different types of potatoes and recipes.
Why Peeling Potatoes the Right Way Matters
Potatoes seem simple, but the way you prep them affects everything from texture to flavor. Peel too aggressively and you waste a lot of potato. Peel too shallowly and you’re left with tough spots and eyes that cook up bitter or chewy. Do it the wrong way, and you also risk slips, cuts, and general kitchen chaos.
Peeling properly matters because:
- Texture improves: Evenly peeled potatoes cook more evenly, so you’re less likely to have hard centers or mushy edges.
- Flavor is better: Removing eyes, green patches, and blemishes cuts down on bitterness.
- You waste less: Good technique means more potato on your plate and less in the compost bin.
- It’s faster and safer: The right tool and method keep your hands comfortable and away from blades or hot water.
Know Your Potato (and When You Don’t Need to Peel)
Before you grab the peeler, ask one key question: Do I actually need to peel these? Not every dish demands naked potatoes.
When you can skip peeling
Thin-skinned potatoes like Yukon Gold, red potatoes, and most “new” potatoes often cook beautifully with skins on. The skins add fiber, a little earthy flavor, and they help the potato pieces hold their shape in soups and salads.
It’s usually fine (and delicious) to leave the skin on when you’re making:
- Rustic mashed potatoes or “smashed” potatoes
- Roasted potatoes and sheet-pan veggies
- Potato salads made with waxy potatoes
- Pan-fried potatoes, hash, or breakfast potatoes
You’ll want to peel for:
- Ultra-smooth mashed potatoes or potato purée
- Gnocchi and other potato-based doughs
- Creamy soups where you want a silky texture
- Recipes that call for ricing potatoes (skins clog the ricer)
The Best Tools for Peeling Potatoes Like a Pro
Good tools won’t magically make you a Michelin-star chef, but they will make peeling faster, safer, and a lot less annoying.
1. Vegetable peelers: straight vs. Y-shaped
Most home cooks rely on a vegetable peeler, and with good reason. It removes the thin outer skin efficiently without digging deep into the flesh.
- Straight (swivel) peeler: The blade runs parallel to the handle, like a small knife. It’s great for people who like the familiar motion of peeling away from themselves along the length of the potato.
- Y-shaped peeler: The blade sits perpendicular to the handle. Many cooks love these for their control and speed, especially for round vegetables like potatoes and carrots.
Whichever style you choose, look for:
- A sharp stainless steel or carbon steel blade that glides through the skin instead of scratching and shredding it.
- A comfortable, non-slip handle so your hand doesn’t cramp or slide around when things get wet and starchy.
- A pivoting blade if you deal with lots of irregularly shaped potatoes; it helps follow the contours more easily.
2. Paring knife
A small, sharp paring knife is your backup singeror your star player if you don’t have a peeler. It’s especially handy for:
- Trimming out deep eyes
- Removing bruises or green patches
- Peeling older, knobbier potatoes that confuse a peeler
When using a paring knife to peel entirely, work slowly until you’re comfortable. You’ll sacrifice a bit more potato flesh than with a peeler, but you gain control on oddly shaped or very large potatoes.
3. Helpful extras
- Cutting board: A stable board gives you a safe surface to work over.
- Large bowl for peeled potatoes: Fill it with cold water to keep peeled potatoes from browning while you prep the rest.
- Bowl, bag, or compost bin for peels: Makes cleanup much easier and keeps the sink from clogging with peel “confetti.”
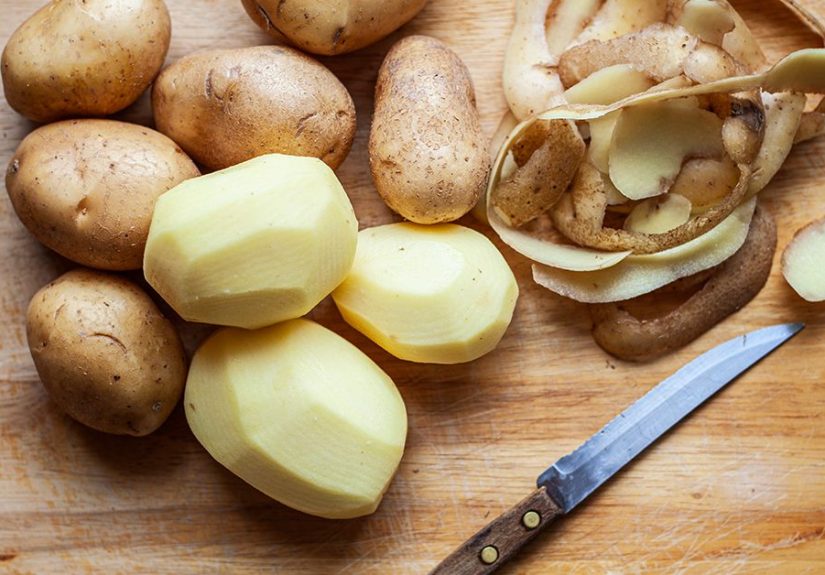
How to Peel Raw Potatoes the Classic Way
This is the standard method you’ll use most often: washing, peeling with a peeler, and trimming any blemishes. It’s ideal when you’re roasting, frying, or boiling chunks.
Step-by-step: Classic raw potato peeling
-
Wash and scrub.
Rinse your potatoes under cool running water and scrub with a vegetable brush to remove any dirt. Even though you’re peeling, you don’t want grit on the surface to transfer to the flesh.
-
Set up your station.
Stand at a comfortable height, cutting board in front of you, trash/compost bowl nearby, and a bowl of cold water ready for the peeled potatoes.
-
Hold the potato correctly.
Grip the potato firmly in your non-dominant hand. Hold your peeler in your dominant hand with your thumb and fingers wrapped comfortably around the handle.
-
Peel in long strokes.
Starting at the end farthest from you, peel away from your body in long, smooth strokes. Rotate the potato a bit after each stroke so you work your way around the whole surface. Keep the blade just deep enough to remove the skin without digging out big chunks of potato.
-
Clean up the ends.
Use short strokes to peel the rounded ends, rotating the potato as you go.
-
Trim eyes and blemishes.
Use the tip of your peeler (many have a built-in eye remover) or a paring knife to dig out dark eyes, sprouts, or green areas.
-
Drop into cold water.
Place peeled potatoes into the bowl of cold water. This slows oxidation (browning) and keeps them fresh until you’re ready to cook.
Safety tip: If peeling away from yourself feels awkward, you can angle the potato so you’re peeling slightly toward a cutting board surface rather than straight toward your hand. The goal is control, not speed.
The Boil-Then-Peel Hack for Big Batches
Need to peel a mountain of potatoes for Thanksgiving, a party, or meal prep? The hottest (literally) trick around is the boil-then-peel method, sometimes called the “slip-off” hack. You score the skin, boil the potatoes whole, and then slide the peels off by hand after they’ve cooled.
Step-by-step: Boil, shock, and slip
-
Score the skin.
Wash your potatoes and, using a sharp paring knife, lightly score all the way around the middle of each potato. You’re cutting just through the skin, not deep into the flesh.
-
Boil whole.
Place the potatoes in a pot of cool, salted water. Bring to a boil and cook until you can easily pierce the center with a knife or skewer. Cooking times depend on size, but whole russets can take 20–30 minutes.
-
Cool quickly.
Drain the potatoes and transfer them to an ice bath or run them under cold water just until they’re cool enough to handle but still warm inside.
-
Slip the skins off.
Hold each potato gently and rub near the scored line. The skin should loosen and slide off in two neat “caps,” one from each end. If needed, pull gently with your fingers to help it along.
This trick is especially handy when you’re making large batches of mashed potatoes, gnocchi, shepherd’s pie, or potato salad. You save time on peeling and get fully cooked potatoes ready to mash or chop.
Note: This method works best with potatoes that have thicker skins, like russets. Very thin-skinned varieties don’t peel as cleanly using this hack.
No-Peeler? No Problem: Knife and “Lazy” Methods
Peeling with a knife (without wasting half the potato)
If you don’t own a peeleror you’ve sworn eternal revenge on the last one that shredded your knucklesuse a sharp paring knife and these tips:
- Cut off a small slice from one end so the potato can stand upright on the cutting board without wobbling.
- Stand the potato on the flat end and hold it steady at the top.
- Slice downward in thin strips, following the curve of the potato. Rotate and repeat until the whole potato is peeled.
- Trim eyes and blemishes as you go.
Yes, you’ll sacrifice a bit more potato than with a peeler, but with practice you can keep the cuts very shallow and waste minimal flesh.
The microwave softening trick
In a hurry? You can microwave potatoes for 1–2 minutes before peeling. This slightly softens the skin, making it easier to scrape off with a peeler or knife. Just don’t fully cook them if you still plan to roast or frythey’ll overcook later.
Common Potato Peeling Mistakes (and How to Fix Them)
Mistake 1: Peeling too far ahead
Peeled potatoes turn brown if they sit out, thanks to oxidation. To prevent this, always store peeled potatoes in cold water if there will be any delay before cooking. You can keep them in the fridge, covered with water, for up to about 24 hours.
Mistake 2: Using a dull peeler or knife
A dull blade forces you to push harder, which is both slower and more dangerous. If your peeler tugs instead of gliding, it’s time to replace it. For knives, sharpen them regularly and hone the edge before you start peeling.
Mistake 3: Keeping your hands in the danger zone
If your fingers are directly in the path of the blade, you’re one slip away from a painful reminder of physics. Instead, grip the potato from behind or from the sides, and keep your fingertips curled inward, away from the peeling motion.
Mistake 4: Tossing everything down the drain
Potato peels can clog your sink and stress out your plumbing. Instead, peel over a cutting board or bowl, then compost or trash the peels.
How to Peel Potatoes for Different Dishes
For ultra-smooth mashed potatoes
Use starchy potatoes like russets or all-purpose potatoes like Yukon Golds. Aim for completely peeled potatoes with no remaining skin or eyes.
- Use the boil-then-peel method if you’re working with whole potatoes.
- For smaller batches, peel raw potatoes thoroughly with a peeler before cutting into chunks and boiling.
Once peeled and cooked, mash with a potato masher, ricer, or food mill for a fluffy, lump-free texture.
For roasted potatoes and fries
Here, peeling is more about preference:
- For classic fries: Fully peeling gives that familiar fast-food style look and texture.
- For rustic wedges or roasted chunks: You can leave the skin on or partially peel for a mix of textures.
If you do peel, try to keep the cuts shallow to preserve sharp corners and edgesthose crisp up beautifully in the oven or fryer.
For potato salad
Waxy potatoes (like red or new potatoes) often keep their skins on in potato salad. If you prefer them peeled:
- Use the boil-then-peel method to avoid breaking up the potatoes while peeling.
- Let them cool slightly before cutting into chunks so they hold their shape in the salad.
For hash browns and breakfast potatoes
For crispy shredded hash browns, most recipes call for peeled potatoes so the shreds cook evenly and don’t have tough bits of skin. For chunky breakfast potatoes, you can decide based on your texture preferencepeeled for softer bites, skins-on for extra chew and color.
Real-Life Potato Peeling Tips and Experiences
Talk to home cooks long enough and you’ll find that everyone has an opinion about peeling potatoes. Some swear by a particular brand of peeler; others proudly use the same paring knife technique their grandmother taught them. Here are some “lived-in” tips and experiences that can help you refine your own potato-peeling style.
Find your “forever” peeler
Most people don’t realize how much difference a really good peeler makes until they try one. A sharp, comfortable peeler can feel almost effortless. Once you find a style that fits your handa Y-peeler that glides or a straight swivel peeler that feels like an extension of your fingersstick with it. Many cooks end up buying two or three and keeping their favorite within easy reach while the others migrate to the back of the drawer.
If your wrist gets tired easily, pay attention to how hard you’re gripping the handle. A relaxed grip and smooth strokes are easier on your joints than trying to power through with a death-clutch. The right tool plus a lighter touch is usually better than muscling through with a cheap, dull peeler.
Set up your “peeling zone” for comfort
When you’re peeling just one or two potatoes, you can do it over the sink without thinking much. But when you’re prepping for a big dinner or weekly meal prep, your setup matters. Many experienced cooks pull up a stool or sit at the table with a cutting board on their lap and a big bowl for peels. This way, you’re not hunching over the sink for half an hour, and your back will thank you later.
Another small upgrade: use a large, light-colored bowl of water to hold peeled potatoes. It’s easier to spot stray peel bits floating on the surface and remove them before you cook. It also lets you see if any potatoes need one more quick pass with the peeler.
Learn your “potato personality”
After you’ve peeled enough potatoes, you start to notice patterns. Russets tend to have thicker, more forgiving skinsyou can peel them quickly and still come away with neat, smooth surfaces. Waxy potatoes often have thinner skins but more eyes and blemishes, which means more detail work with the knife.
Some people naturally peel fast but leave behind lots of small skin patches; others peel slowly but meticulously. Neither is wrong. The key is to know which style you lean toward and adapt. If you’re a speed peeler, build in 30 seconds at the end to inspect each potato and trim missed spots. If you’re meticulous, practice using longer strokes and rotating the potato more often so you cover more area with each movement.
Turn peeling into a team sport
For big holiday meals, smart cooks make peeling a group activity instead of a one-person punishment. Set up a peeling station with several peelers, a big bowl for peels, and some music or conversation. Give each person a specific job: one person washes and passes potatoes, a couple of people peel, and another trims and drops the finished potatoes into water.
Not only does this cut the workload dramatically, but it also turns a boring chore into a social moment. Kids who are old enough and coordinated enough can help wash and transfer potatoes, even if they’re not ready to handle peelers yet. Just supervise closely and give them a stable, non-slip step stool if they’re working at the counter.
Embrace “good enough” peeling
A lot of new cooks feel like every potato has to be perfectly smooth and spotless. In reality, most recipes are forgiving. A tiny bit of peel on a roasted potato? No one will notice. A small eye left in a batch of mashed potatoes? It’ll disappear into the mash.
Experienced home cooks know where perfection matters and where it doesn’t. For a fancy potato purée or special-occasion gnocchi, yes, be picky. For weeknight roasted potatoes, aim for mostly peeled and move on with your life. Your dinner will still taste great, and you’ll spend less time agonizing over microscopic bits of skin.
Make peeling part of your rhythm, not a roadblock
The more you cook, the more you learn to fold prep tasks into your overall rhythm. Instead of treating peeling as an obstacle, treat it as a built-in pauseyou can mentally map out the rest of your dinner while your hands do the repetitive work. Some cooks even find it almost meditative, especially when they’re using a sharp, smooth gliding peeler and working at a comfortable pace.
Over time, you’ll develop your own system: the peeler that fits your hand, the way you rotate the potato, the angle that feels safest, and the setup that keeps your kitchen clean. That’s really what “peeling potatoes the right way” meansnot just copying a technique, but finding the version of it that works best for you, your tools, and your favorite recipes.


