Table of Contents >> Show >> Hide
- Before You Touch Anything: A 3-Minute Prep That Saves Hours
- Tools You’ll Want (So You Don’t Use a Butter Knife)
- Step-by-Step: How to Remove a Car Radio
- Step 1: Identify what kind of radio you’re dealing with
- Step 2: Remove any obvious covers and hidden screw caps
- Step 3: Pop off the trim bezel (the frame around the radio)
- Step 4: Remove the mounting screws or bolts holding the radio
- Step 5: Slide the radio out carefully (support it!)
- Step 6: Unplug the wiring harness and antenna
- If Your Radio Uses DIN Removal Keys (Special Release Tools)
- What Changes With Modern Infotainment Systems?
- Troubleshooting: The 7 Most Common Beginner Problems
- After the Radio Is Out: Quick Next Steps
- FAQ: Beginner Questions (That Everyone Googles)
- Conclusion
- Real-World Experiences: What Beginners Wish They Knew (500+ Words)
Removing a car radio sounds like the kind of thing that should require a secret handshake and a lifetime membership at the
“Why Is This Clip Still Not Releasing?” club. Good news: in most vehicles, it’s a very doable beginner project if you work
slowly, use the right tools, and resist the urge to pry like you’re opening a coconut.
This guide walks you through the basicsfactory radio removal, trim and bezel removal, DIN-release keys (when needed),
unplugging harnesses safely, and the common “gotchas” that make first-timers question their life choices. You’ll also get
real-world tips for modern infotainment setups where the “radio” is basically a touchscreen spaceship that controls half the car.
Before You Touch Anything: A 3-Minute Prep That Saves Hours
1) Make sure you won’t lock yourself out (anti-theft codes + settings)
Some factory radios have anti-theft protection. If yours requires a code after power is disconnected, find it before you start.
Check your owner’s manual, the glove box paperwork, or the dealership/service records. Also expect to reset the clock, radio
presets, and possibly window auto-up initialization on some vehicles.
2) Park smart and protect your interior
- Park on a flat surface, set the parking brake, and turn the ignition off.
- Move the shifter (if needed) to create space around the center stackthen follow your vehicle’s safety instructions.
- Lay a microfiber towel over the console and shifter area so the radio or tools don’t scratch anything.
- Keep a small container for screws. Car dashboards love eating hardware.
3) Disconnect the negative battery terminal (yes, really)
Many reputable install guides recommend disconnecting the negative battery cable to prevent accidental shorts and reduce the
chance of triggering warning lights. It’s a small step that can prevent a very loud, expensive lesson. If your vehicle has special
battery procedures or memory-saving requirements, follow the manual.
Safety note: Be cautious around airbag-related wiring. If you see bright yellow connectors or looms, don’t probe, tug, or test them “just to see.”
Tools You’ll Want (So You Don’t Use a Butter Knife)
You don’t need a garage full of gear, but the right few tools keep trim panels from looking like a raccoon moved in.
- Plastic trim removal tools (panel pry tools) to avoid marring the dash
- Phillips and flathead screwdrivers (a stubby driver helps in tight spots)
- Socket set (common sizes include 7mm, 8mm, and 10mm on many vehicles)
- Torx bits (some manufacturers love Torx fasteners)
- Flashlight/headlamp for locating hidden screws
- Magnetic tray or small cups for screws and clips
- Optional: Radio removal keys (DIN tools) if your head unit uses a keyed release system
- Optional: Painter’s tape to protect edges around the bezel
Step-by-Step: How to Remove a Car Radio
Step 1: Identify what kind of radio you’re dealing with
Most car radios fall into one of these categories:
- Trim bezel + screws: The most common. You remove the surrounding trim, then remove screws/bolts holding the radio.
- DIN-style keyed release: The radio slides out after inserting removal keys into slots.
- Integrated infotainment stack: The “radio” may be part of a larger module tied to climate controls, vehicle settings, cameras, and more.
If you’re not sure, look closely at the radio face and surrounding trim. Visible side slots often suggest DIN keys. A big molded
center stack with climate controls integrated suggests a more complex removal path.
Step 2: Remove any obvious covers and hidden screw caps
Manufacturers love hiding screws behind little plastic caps, inside small cubbies, under rubber mats in storage trays, or beneath
climate control panels. Use a flashlight and your trim tool to gently lift covers. If something feels “stuck for no reason,” there’s
probably a fastener you haven’t found yet.
Step 3: Pop off the trim bezel (the frame around the radio)
This is where beginners accidentally turn a neat dashboard into a modern art project. Do it like this:
- Start at a corner or an edge with a slight gap. Slide in a plastic trim toolnot a metal screwdriver if you can avoid it.
- Gently pry until you feel a clip release. Move a few inches and repeat.
- Work around the perimeter. Don’t yank one side all the way off while the other side is still clipped in.
- If the bezel has switches (hazards, seat heaters, etc.), keep the bezel close and unplug connectors as they become accessible.
Pro tip: Use your phone to take a quick photo after each layer comes off. You’ll thank yourself during reassemblyespecially if
your dashboard has “mystery clips” that only fit one way.
Step 4: Remove the mounting screws or bolts holding the radio
Once the trim is off, the radio is typically secured with four screws/boltsoften one at each corner. Common hardware includes
Phillips screws, 7mm or 8mm hex screws, or 10mm bolts depending on the vehicle and bracket style.
Put each set of screws in a labeled cup (e.g., “bezel screws,” “radio screws”). It sounds overkill until you’re holding two identical
screws that are somehow not interchangeable. Cars are like that.
Step 5: Slide the radio out carefully (support it!)
With the mounting hardware removed, pull the unit straight out. If it resists, don’t force itdouble-check for a hidden screw or
a bracket tab catching on the dash frame. Once it moves, support the radio with one hand so it doesn’t drop and stress the wiring.
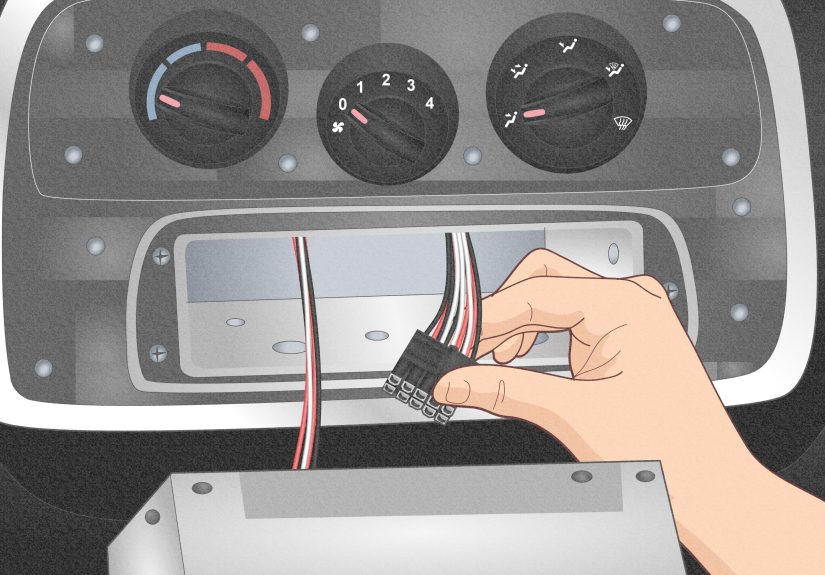
Step 6: Unplug the wiring harness and antenna
Behind the radio you’ll usually find:
- Main wiring harness connector(s): Often secured with a latch tab. Press the tab and pull the connector straight out.
- Antenna cable: Usually a round plugpull straight out (no twisting needed in most cases).
- Extra connectors: USB, auxiliary, satellite radio, factory amp, steering wheel control interface, or camera connections.
Don’t pull on wires. Pull on the connector body. If a connector won’t release, look for a locking tab. Many are designed to be
stubborn on purposebecause “falling out while driving” is worse than “hard to unplug in your driveway.”
If Your Radio Uses DIN Removal Keys (Special Release Tools)
Some factory and aftermarket head units use a keyed release system. You’ll see small slots on the radio face (often two, sometimes
four). The general process:
- Insert the correct removal keys into the slots until you feel them click/engage.
- Apply gentle outward pressure on the keys (or follow the key design) to release side spring clips.
- Slide the radio out evenlydon’t cock it sideways and wedge it.
If you don’t have the keys, don’t improvise with kitchen utensils unless you enjoy buying replacement trim. Correct tools are
usually inexpensive and prevent damage.
What Changes With Modern Infotainment Systems?
In many late-model vehicles, the “radio” is not a standalone box. It may be integrated with:
- Climate controls and seat heat/vent functions
- Factory amplifier and vehicle chimes
- Backup camera and parking sensors
- Steering wheel controls and vehicle settings menus
Removing the unit may still be possible for a beginner, but installing an aftermarket unit often requires additional integration
modules and harness adapters to retain features. If your goal is replacement, plan ahead for the right adapters and interface
hardware rather than cutting factory wiring. (Your future self will be calmer. Your resale value will be happier.)
Troubleshooting: The 7 Most Common Beginner Problems
1) “The trim won’t come offI’m going to break it.”
Slow down and search for hidden screws. Look in pockets, behind rubber mats, under small caps, and along the lower edge of the
center stack. If there’s a single screw still in place, clips can feel impossible.
2) A clip snapped. Now what?
It happens. Many clips are replaceable and inexpensive. Retrieve the broken piece (so it doesn’t rattle forever) and consider
replacing clips before reassembly.
3) Stripped screw head
Use the correct driver size, press firmly, and try a different bit type if the fit is sloppy. If it’s already stripped, a rubber band
trick or a screw extractor may help. Avoid drilling unless you’re comfortabledash plastics do not forgive.
4) The radio slides out but stops halfway
A wire or connector may be snagging. Push it back slightly, reach behind, and free the harness slack before pulling again.
5) “I unplugged something and now I’m not sure where it goes.”
This is why photos are gold. If you didn’t take them, don’t panicmany connectors are keyed to fit only one matching socket.
Labeling with painter’s tape is a great habit for future installs.
6) The dash lights up like a Christmas tree afterward
This can happen if the battery was connected while unplugging components, or if a connector isn’t fully seated. Recheck your work,
make sure all harnesses are clicked in, and follow your vehicle’s procedure for reconnecting the battery. If warning lights remain,
consult the vehicle manual or a professional.
7) Rattles after reassembly
Usually caused by a missing clip, a loose screw, or a wire tapping plastic. Re-open the bezel area and confirm all clips are seated
and screws are snug (snugnot “gorilla tight”).
After the Radio Is Out: Quick Next Steps
- Inspect connectors for bent pins or loose tabs.
- Clean dust from the cavity (lightly) before installing anything new.
- If you’re replacing the unit, use a vehicle-specific harness adapter and dash kit when applicable so you don’t cut factory wiring.
- Test before final reassembly: reconnect the battery and verify power, sound, and basic functions before snapping all trim back in.
FAQ: Beginner Questions (That Everyone Googles)
How long does it take to remove a car radio?
For many vehicles, 30–90 minutes is realistic for a first-timer. If it’s an integrated infotainment system or you’re hunting hidden
screws, it can take longer. The trick is to stay patient, not to speed-run plastic clips.
Do I always have to disconnect the battery?
It’s strongly recommended for safety and to prevent accidental shorts. Some vehicles have specific procedures, so check your manual.
Can I remove the radio without special tools?
Often yesespecially in “bezel + screws” setups. But if your head unit uses DIN-release keys, the right tools reduce the risk of damage
and make removal dramatically easier.
What if my “radio” controls the AC and vehicle settings?
Removal may still be possible, but replacement usually requires planning: interfaces, harnesses, and sometimes professional help to
retain factory features. If your goal is just to access wiring or fix a connection, proceed cautiously and document everything.
Conclusion
Removing a car radio is one of those jobs that feels mysterious until you do it oncethen it’s mostly just trim clips, a few screws,
and connectors that demand respect. Prep properly, disconnect the negative battery terminal, pry with plastic tools, and take photos.
You’ll get the head unit out without sacrificing your dashboard to the clip gods.
Real-World Experiences: What Beginners Wish They Knew (500+ Words)
The first time I helped a friend remove a factory radio, we were confident in the way only beginners can be: “It’s just four screws,
right?” Ten minutes later we had removed exactly zero screws and successfully discovered that dashboards can contain more hidden
compartments than a magician’s jacket. The breakthrough was a flashlight and a willingness to look for the obvious-but-not-obvious:
little plastic caps, rubber mats inside the cubby, and screws hiding where you’d never expect them. Lesson one: if something
doesn’t move with gentle pressure, you’re probably not “too weak.” You’re probably missing a fastener.
Another beginner rite of passage is the “clip pop” panic. The sound of a trim clip releasing can be alarminglike a tiny branch
snapping in a haunted forest. The trick is to learn the difference between a clip releasing (a sharp pop) and plastic cracking
(a dull, crunchy sadness). Working around the bezel evenly helped a lot. When we tried to pull one side off all the way, the
opposite side fought back and flexed the panel. When we moved a few inches at a time, clips released cleanly. And yes, one clip
still brokebecause life is messy. We fished it out, replaced it later, and the dash didn’t rattle like a tambourine, so everyone won.
The biggest “I’m glad we knew this” moment came when the radio finally slid out and revealed the wiring behind it. It’s tempting
to tug the unit out like you’re pulling a loaf of bread from the toaster, but the harnesses don’t love that. Supporting the radio
with one hand while disconnecting with the other prevented stressed wires and bent connectors. We also discovered that some plugs
have locking tabs that must be pressed in a very particular waylike they were designed by someone who doesn’t enjoy human joy.
Once we slowed down and looked for the latch, everything unplugged smoothly.
A different friend had the opposite experience: their radio used DIN removal keys. They didn’t have them, so they tried to “make it work”
with whatever was nearby. This is how they learned that a butter knife is not a precision tool. The radio did not come out, but the trim
got scratched in a way that looked permanent. We ordered the correct removal keys, inserted them properly, heard the satisfying click,
and the unit slid out with far less drama. The moral: the cheap tool is cheaper than the cosmetic regret.
Finally, modern infotainment systems deserve a special mention. A coworker planned a simple upgrade and discovered their “radio” was tied
to climate controls and vehicle settings. Removing it was possible, but replacing it wasn’t as plug-and-play as older vehicles. They needed
extra adapters to retain features, and testing everything before snapping the dash back together saved a lot of rework. That experience
reinforced the best beginner habit of all: take photos, label connectors if you’re unsure, and test functions before final reassembly.
It’s way easier to fix a missed plug when the bezel is still off than when everything is clipped back in like a jigsaw puzzle.


