Table of Contents >> Show >> Hide
- What You’ll Learn
- What “Restore” Actually Does
- Before You Begin: Do These 5 Things First
- How to Restore an iPhone with iTunes on a Windows PC
- How to Restore an iPhone on a Mac (iTunes vs Finder)
- How to Restore Using Recovery Mode (When Your iPhone Won’t Start)
- DFU Mode Restore (Last Resort, Advanced)
- After the Restore: Set Up Your iPhone and Restore Your Data
- Troubleshooting: The Usual Restore Speed Bumps
- Real-World Experiences: What People Run Into (and How to Win Anyway)
- Experience #1: “It’s stuck on the Apple logo… forever.”
- Experience #2: “iTunes says error 4013. Now what?”
- Experience #3: “I restored… and now it wants my Apple Account password. I don’t remember it.”
- Experience #4: “I restored from backup… but my Health data and saved passwords didn’t come back.”
- Experience #5: “The restore finished… but my iPhone feels slow and half-empty.”
- Conclusion
Your iPhone is basically a tiny supercomputer that lives in your pocket, drinks electricity, and occasionally decides
it would rather stare at an Apple logo forever than open your messages. When that happens, a restore can be the
“turn it off and on again” of the iPhone worldexcept with more progress bars and a higher chance you’ll whisper,
“Please don’t make me set up two-factor authentication again.”
This guide walks you through restoring an iPhone using iTunes on a Windows PC and on a Mac that still has iTunes
(macOS Mojave or earlier). If you’re on a newer Mac (macOS Catalina and later), Apple moved iPhone restore features
into Finderbut don’t worry, the steps feel nearly identical. I’ll cover both so you’re not stuck playing “Where did
Apple hide that button this year?”
What “Restore” Actually Does
When you restore an iPhone from a computer, you’re usually doing one of two things:
1) Factory Restore (Erase + Reinstall iOS)
This wipes your iPhoneapps, photos, settings, the whole digital life storyand installs a fresh copy of iOS.
It’s the move you choose when:
- Your iPhone is stuck on the Apple logo or keeps rebooting (boot loop).
- Software is corrupted after an update.
- You’re selling/giving away the phone and want it clean.
- You forgot your passcode and need to reset the device.
2) Restore From Backup (Put Your Data Back After a Reset)
This happens after you erase the phone (or set up a new one). You use a computer backup (or iCloud backup)
to get your apps, settings, and data back. Think of it as “rebuilding the house” (factory restore) and then
“moving your furniture back in” (restore from backup).
Important: A factory restore is not subtle. If you don’t have a backup you trust, restoring means
accepting that some data may be gone. (Yes, I’m looking at you, 14,000 screenshots of receipts you swore you’d organize.)
Before You Begin: Do These 5 Things First
1) Make a backup (seriously)
If your iPhone still turns on and you can unlock it, back up before restoring. You have two main options:
- iCloud Backup (wireless, easiest)
- Computer Backup (iTunes/Finder/Windows device tools)
If you back up to a computer, consider using encrypted backups. Encrypted backups can include
more sensitive data like saved passwords, Wi-Fi settings, website history, and Health datathings you often
miss only after they’re gone. Just don’t forget the encryption password. If you lose it, you can’t use that
encrypted backup.
2) Update your computer and iTunes
Restores fail more often when your computer software is outdated. Update macOS or Windows, then update iTunes
(or the Apple device-management app on Windows, if that’s what your system uses).
3) Use a good cable and plug directly into your computer
Many restore errors are basically “the cable blinked.” Use an Apple-certified cable if possible, and plug it
directly into your computer’s USB portnot a keyboard port, not a hub, not a “mystery dongle you got in 2017.”
4) Know your Apple Account situation (Activation Lock)
If Find My iPhone is enabled, your device is protected by Activation Lock.
After a restore, you’ll likely need your Apple Account email/password to finish setup. If you’re restoring a
device you plan to sell, sign out of your Apple Account and turn off Find My first.
5) Decide what kind of restore you actually need
- Phone works but is glitchy? Try updating iOS first, or a normal factory restore.
- Phone won’t boot / stuck on Apple logo? You’ll probably need Recovery Mode.
- Recovery Mode fails repeatedly? DFU Mode might be your last software-based option.
How to Restore an iPhone with iTunes on a Windows PC
On Windows, the classic method is iTunes. However, newer Windows setups may use Apple’s separate device-management
app for restoring/updating iPhones. The workflow is still basically the same: connect iPhone → select device →
restore.
Step-by-step: Factory restore (erase + reinstall iOS)
- Open iTunes (or the Apple device-management app if your PC uses it).
- Connect your iPhone to the PC with a USB/USB-C cable.
-
If your iPhone prompts you to Trust This Computer, tap Trust and enter your passcode.
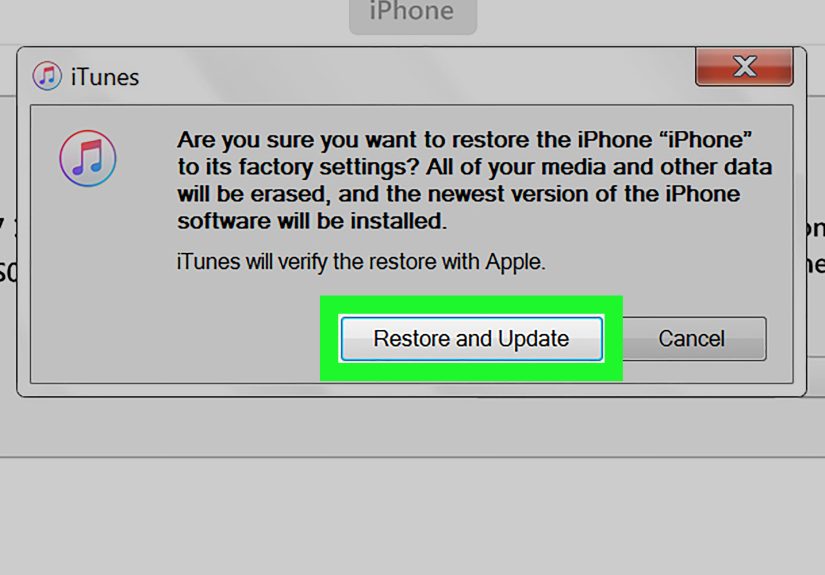
(If you can’t enter your passcode, skip ahead to the Recovery Mode section.) - In iTunes, click the device icon near the top (it looks like a tiny iPhone trying to be noticed).
-
Under Summary, click Restore iPhone.
- If asked, confirm you want to restore.
- If Find My is enabled, you may need to sign out of your Apple Account first.
-
Wait while iTunes downloads iOS and restores the device. Keep the iPhone connected until it restarts to the
Hello/setup screen.
Restore from a computer backup (after a wipe)
- Connect the iPhone to your PC and open iTunes.
- Select the device icon.
- Under Backups, choose Restore Backup.
- Select the backup by date/time, then click Restore.
- If the backup is encrypted, enter the backup password.
Tip: If your iPhone backup is huge, restoring from backup can take a while. This is normal.
This is also a great time to hydrate and pretend you enjoy waiting.
How to Restore an iPhone on a Mac (iTunes vs Finder)
Here’s the deal: iTunes exists on Macs running macOS Mojave (10.14) or earlier. On
macOS Catalina (10.15) and later, iTunes is gone and iPhone management moved to Finder.
The buttons changed location, not meaning.
Option A: macOS Mojave or earlier (iTunes restore)
- Open iTunes.
- Connect your iPhone to your Mac with a cable.
- If prompted, tap Trust on your iPhone and enter the passcode.
- Click the device icon, then go to Summary.
- Click Restore iPhone, confirm, and keep the iPhone connected until the process completes.
Option B: macOS Catalina or later (Finder restore)
- Open a Finder window.
- Connect your iPhone to your Mac.
- In Finder’s sidebar under Locations, click your iPhone.
- Click Trust on the Mac if prompted, and Trust on the iPhone if needed.
- On the General tab, click Restore iPhone and confirm.
Quick reality check: If your goal is “my iPhone is glitchy and I want a clean reinstall,” factory
restore is great. If your goal is “I want my stuff back exactly as it was,” make sure you have a backup first.
How to Restore Using Recovery Mode (When Your iPhone Won’t Start)
If your iPhone is stuck on the Apple logo, shows a “connect to computer” screen, won’t boot, or isn’t recognized
properly, Recovery Mode is your friend. In Recovery Mode, your computer will offer two options:
Update or Restore.
- Update tries to reinstall iOS without erasing your data. Choose this first when possible.
- Restore erases everything and installs fresh iOS. Choose this if Update fails or you need a full reset.
Step 1: Connect iPhone to your computer and open iTunes/Finder
On Windows, open iTunes (or the Windows device app). On newer Macs, open Finder. On older Macs, open iTunes.
Step 2: Put your iPhone into Recovery Mode
The button combo depends on your model:
-
iPhone 8 or later (including iPhone SE 2nd gen and later):
Press and quickly release Volume Up, press and quickly release Volume Down, then press and hold the Side button
until you see the Recovery Mode screen (a cable pointing to a computer). -
iPhone 7 / 7 Plus:
Press and hold the Side (or Top) button and Volume Down together until you see the Recovery Mode screen. -
iPhone 6s or earlier (and iPhone SE 1st gen):
Press and hold the Home button and the Side/Top button together until you see the Recovery Mode screen.
Step 3: Choose Update or Restore on your computer
- When your computer detects an iPhone in Recovery Mode, you’ll see a prompt.
- Click Update first if you’re trying to avoid wiping data.
- If Update fails (or you truly need a wipe), click Restore.
Heads-up: If your computer needs to download iOS and that download takes more than ~15 minutes,
your iPhone may exit the Recovery Mode screen. Let the download finish, then put the iPhone back into Recovery Mode
and try again.
DFU Mode Restore (Last Resort, Advanced)
DFU (Device Firmware Update) Mode is deeper than Recovery Mode. It can help when Recovery Mode
restores keep failing, especially if the firmware/software stack needs a more complete reinstall.
Warning: DFU restores are unforgiving. If your issue is hardware-related, DFU may still fail.
Also, the button timing is pickylike a rhythm game, but the prize is your phone functioning again.
High-level DFU flow
- Connect iPhone to your computer and open iTunes/Finder.
- Enter DFU Mode (varies by model; exact timing matters).
- Your computer should detect an iPhone that needs to be restored.
- Click Restore and complete the process.
If you’re not comfortable with DFU Mode, it’s completely reasonable to try Recovery Mode twice (with a different
cable/USB port) before going DFU.
After the Restore: Set Up Your iPhone and Restore Your Data
1) Complete the Hello/setup screens
Once the restore is done, your iPhone restarts to the setup wizard. Follow the prompts for language, Wi-Fi, Face ID,
and signing in.
2) Restore your backup (iCloud or computer)
- Restore from iCloud Backup: Choose it during setup, sign in, pick the backup.
- Restore from computer: Connect to your computer and choose Restore Backup in iTunes/Finder.
3) Be patient with “gray app icons”
Apps and photos can continue downloading in the background after the initial restore. If your phone looks like
it’s “half restored,” it may simply be finishing over Wi-Fi.
Troubleshooting: The Usual Restore Speed Bumps
Your iPhone doesn’t show up in iTunes/Finder
- Try a different USB port and a different cable.
- Unlock the iPhone and tap Trust if prompted.
- Restart both the iPhone and the computer.
- Update iTunes/macOS/Windows.
You get a restore error code (like 4013/4014, 9, 4005)
These often point to connection issues (cable/port), outdated software, or occasionally hardware trouble.
Try this order:
- Update your OS and iTunes/device app.
- Swap the cable (use a known-good one).
- Switch USB ports (avoid hubs).
- Try a different computer if possible.
- If the error persists, consider contacting Apple Supportespecially if the device repeatedly fails at the same point.
Recovery Mode keeps dropping out
If iOS is still downloading and your iPhone exits the Recovery screen, let the download finish and re-enter Recovery Mode.
This is annoying, yes. But it’s normal behavior when downloads run long.
“Restore” is grayed out or you’re asked to turn off Find My
If Find My is enabled, iTunes/Finder may require you to sign out of your Apple Account first. On the iPhone:
Settings → your name → Find My → Find My iPhone → turn off (you’ll enter your Apple Account password).
Will restoring delete my eSIM?
Typically, restoring an iPhone does not automatically delete your eSIM. If you’re selling your iPhone
or changing carriers, review eSIM removal options during erase/transfer workflows.
Real-World Experiences: What People Run Into (and How to Win Anyway)
The official steps make restoring an iPhone sound like a calm afternoon project. In real life, restores often happen
at 11:47 p.m. when your phone refuses to boot and you suddenly remember you don’t know any of your passwords because
Face ID has been doing all the emotional labor for years.
Here are a few common “field stories” (based on patterns users repeatedly experience) and what they teach you:
Experience #1: “It’s stuck on the Apple logo… forever.”
This is the classic boot loop or failed update situation. Most people try force-restart a few times (reasonable),
then panic-scroll the internet on a friend’s phone (also reasonable), and finally connect to a computer.
The winning move is usually Recovery Mode → Update first. If Update fails, then you Restore.
The lesson: Update is the polite knock; Restore is kicking the door in.
Experience #2: “iTunes says error 4013. Now what?”
Error codes feel dramatic, but a lot of them are basically your computer saying, “I lost the handshake.”
People often fix this by swapping to a different cable, switching USB ports, and rebooting the computer.
One underrated tip: avoid USB hubs and “monitor USB ports” during restores. Plug directly into the machine.
The lesson: your restore is only as strong as your weakest adapter.
Experience #3: “I restored… and now it wants my Apple Account password. I don’t remember it.”
This is where Activation Lock earns its keep. It’s great for preventing theft; it’s less great when it blocks
you from using your own phone because Past You didn’t update the password manager. If Find My was enabled, you’ll
likely need that Apple Account login to finish setup. People who get stuck here usually have to reset their Apple
Account password before they can proceed. The lesson: write down your Apple Account recovery options
before disaster day.
Experience #4: “I restored from backup… but my Health data and saved passwords didn’t come back.”
This one is sneaky. Many users back up to a computer but don’t enable encrypted backups. Without encryption, certain
sensitive items (like saved passwords and Health data) may not be included in the backup. The fix isn’t retroactive
unless you have an encrypted backup alreadybut going forward, it’s worth enabling encryption if you want a more
complete restore. The lesson: an unencrypted backup is like packing for a trip and forgetting your charger.
Experience #5: “The restore finished… but my iPhone feels slow and half-empty.”
After restoring, apps and photos may continue downloading in the background. Users often think something failed
because icons are dimmed or content is missing. Give it time on Wi-Fi and power. Also check storage; low storage
can slow everything down during “re-hydration.” The lesson: the restore is a process, not a single moment.
If you take only one real-world tip from this section, make it this:
Back up before you need the backup. Because the night you need a restore is never the night you’ll
feel like organizing your digital life.
Conclusion
Restoring an iPhone with iTunes (or Finder on newer Macs) is one of the most reliable ways to fix stubborn software
problems, recover a disabled device, or start fresh. The key is choosing the right level of “reset” for your situation:
standard restore when you can, Recovery Mode when you must, and DFU Mode only when you’re ready to go full superhero.
Do the prep (backup, update software, use a solid cable), follow the steps carefully, and remember: the goal isn’t
just a successful restoreit’s getting your iPhone back and getting your data back without surprises.


