Table of Contents >> Show >> Hide
- Why a Sewing Table Makes a Surprisingly Great Planter
- Before You Start: Pick Your Planter Style
- Tools and Materials
- Step-by-Step: Turn a Sewing Table into a Planter
- Step 1: Safety check (the “adulting” part)
- Step 2: Remove the sewing machine and hardware
- Step 3: Clean like you mean it
- Step 4: Repair and reinforce
- Step 5: Sand for success (aka: the step nobody wants, but everyone needs)
- Step 6: Protect the metal base (if you have one)
- Step 7: Protect the wood (this is what makes it last)
- Step 8: Build (or choose) the planter insert
- Step 9: Drainage that actually works (no swampy roots allowed)
- Step 10: Plant like a designer (without saying “bespoke”)
- Placement and Maintenance
- Common Mistakes (and Easy Fixes)
- Fun Variations to Make It Your Own
- Conclusion
- Extra Experience: What I’ve Learned the Hard Way (So You Don’t Have To)
Old sewing tables are basically the vintage equivalent of a “Choose Your Own Adventure” book:
they start as one thing, then suddenly you’re outside wearing gardening gloves, talking to a drill like it’s a coworker.
If you’ve got a tired sewing machine table (or you found one for cheap at a thrift store), you can turn it into a
show-stopping planter that looks like it belongs in a magazine… or at least in your neighbor’s “how is your porch so cute?” daydream.
This guide walks you through a practical, long-lasting conversion: protecting wood, preventing rot, building drainage that actually works,
and choosing plants that won’t treat your new planter like a personal revenge project.
Why a Sewing Table Makes a Surprisingly Great Planter
Sewing tables are built for stability (those old cast-iron bases don’t mess around), and many have a recessed opening where the machine
used to sit. That opening is basically begging to hold a pot, a liner, or a custom planter box. The end result is a conversation piece:
part upcycled furniture, part container garden, part “I’m charming and resourceful” porch flex.
Bonus points you’ll notice immediately
- Built-in structure: You get “plant stand + table” in one.
- Perfect height: Easier watering, less bending, fewer dramatic groans.
- Vintage style: Rustic garden decor without buying “rustic” at full price.
- Flexible design: You can go indoor, outdoor, seasonal, or full cottagecore.
Before You Start: Pick Your Planter Style
There are three dependable ways to convert a sewing machine table into a planter. Your choice depends on whether you want
“easy and reversible” or “built like it’s surviving the apocalypse.”
Option A: Drop-in Pot (Fastest, Easiest)
Place a nursery pot or decorative container inside the opening. Great for indoor use, rentals, and anyone who wants the freedom
to swap plants without emptying fifty pounds of soil.
Option B: Lined Insert Box (Best Outdoor Durability)
Build (or buy) a shallow wooden box that fits the opening, line it, and create proper drainage. This is the “I want it to last”
option for outdoor planters.
Option C: Hidden Tray + Pots (Cleanest Maintenance)
Use multiple smaller pots inside the table opening, sitting in a waterproof tray. If one plant fails (it happens), you can quietly
replace it without hosting a funeral.
Tools and Materials
You don’t need a full woodworking shop. You just need a few basics and a willingness to measure twice (or once, then panic and measure again).
Tools
- Screwdriver set (flathead + Phillips)
- Drill + bits (including a larger bit for drainage holes)
- Sander or sanding block (80–220 grit range)
- Wire brush (for rust on metal base)
- Clamps (helpful if building an insert box)
- Paintbrushes or foam brushes (or spray paint if you’re feeling fancy)
Materials
- Cleaning supplies (degreaser, mild soap, rags)
- Wood filler (for old screw holes or cracks)
- Exterior-rated primer/paint (optional for wood top)
- Clear exterior protective finish (spar urethane or exterior polyurethane)
- Rust-inhibiting primer + exterior metal paint (if metal base needs love)
- Liner: landscape fabric, pond liner, or heavy-duty plastic
- Mesh screen (to cover drainage holes so soil stays put)
- Potting mix (not garden soil) and plants
- Optional: waterproof tray, pot feet, casters/dolly, decorative knobs
Step-by-Step: Turn a Sewing Table into a Planter
Step 1: Safety check (the “adulting” part)
If your table is old enough to have lived through multiple decades of home decor trends, assume there could be old finishes you don’t want
to inhale. Work outside or in a well-ventilated area. Wear eye protection when drilling, and a mask/respirator when sanding.
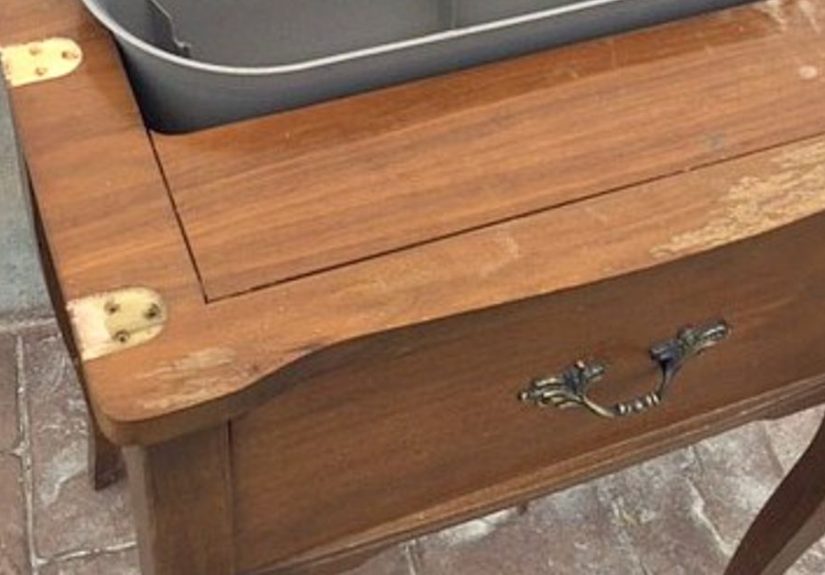
Step 2: Remove the sewing machine and hardware
Unplug anything still attached. Open the machine compartment and remove mounting screws, hinges, brackets, and any loose hardware.
Keep the screws in a cup so you don’t perform the classic DIY ritual of crawling on the floor whispering, “Where did you go?”
If your table has drawers, take them out for easier sanding and painting. If the machine is already gone, congratulations:
you’re starting on third base.
Step 3: Clean like you mean it
Dirt, oil, and mystery residue will sabotage paint and finishes. Wipe everything down with a degreaser or mild soap solution.
Let it dry fully. (Wood and moisture have a complicated relationship, like roommates who “just need space.”)
Step 4: Repair and reinforce
Fill old holes, chips, and cracks with wood filler. Sand smooth once it cures. If the opening edges are thin or wobbly,
add support strips underneath with scrap wood so the insert or pot has a stable ledge to sit on.
For a heavy planting setup (especially outdoors), stability matters. If the table rocks, tighten bolts and check the base.
If it’s missing feet, consider adding furniture levelers.
Step 5: Sand for success (aka: the step nobody wants, but everyone needs)
Sanding helps paint and sealer stick. Start with 80–120 grit for rough areas, then move to 180–220 grit for a smoother finish.
Wipe away dust thoroughly afterward.
Step 6: Protect the metal base (if you have one)
Many vintage sewing tables have cast-iron legs and a treadle base. If there’s rust, use a wire brush and sandpaper to remove loose rust
and flaking paint. Then apply a rust-inhibiting metal primer and follow with exterior metal paint in thin coats.
Spray paint is often easiest for ornate ironwork because it reaches all the scrollwork without turning your brush into a modern art statement.
Step 7: Protect the wood (this is what makes it last)
If your planter will live outdoors, protect the wood top and opening edges like they’re going on a camping trip.
You have two solid approaches:
- Paint + topcoat: Prime and paint, then add a protective clear coat if desired (follow product guidance).
- Clear exterior finish: Use an exterior-rated spar urethane/exterior polyurethane designed for sun and moisture exposure.
Pay special attention to end grain, seams, and the inside edges around the openingthose are the spots most likely to absorb water.
Step 8: Build (or choose) the planter insert
Option A: Drop-in Pot
Measure the opening (length, width, and depth). Choose a pot that fits with a little breathing room. You can hide the pot rim with trim,
or let it show for a clean, modern contrast. If you want a snug fit, add a simple internal ledge so the pot lip rests securely.
Option B: Lined Insert Box
Build a shallow box that fits the opening and rests on support strips underneath. Use exterior-friendly wood if possible.
Drill multiple drainage holes in the bottom. Line the inside with landscape fabric (helps keep soil off wood) and/or a waterproof liner
(pond liner is a popular long-haul option). Cut small holes in the liner where drainage holes are so water can escape.
Option C: Tray + Multiple Pots
Place a waterproof tray or pan inside the opening, then set multiple nursery pots inside. This makes seasonal swaps ridiculously easy:
spring flowers today, herbs tomorrow, tiny pumpkins in fall like you’re auditioning for a cozy movie.
Step 9: Drainage that actually works (no swampy roots allowed)
Plants need water, but roots also need air. If water can’t escape, you’re basically building a root hot tub nobody asked for.
Make sure your planting container has drainage holes, and cover holes with mesh so potting mix stays put.
Use potting mix (container mix), not yard soil. Garden soil compacts in containers and holds water poorlyyour plants will sulk.
If you want extra insurance, raise the insert slightly so water can drain freely (pot feet or small spacers help).
Step 10: Plant like a designer (without saying “bespoke”)
Try the classic container recipe: thriller, filler, spiller.
One tall focal plant, a couple medium “body” plants, and something that trails over the edge.
Sunny porch combos
- Thriller: Upright geranium or dwarf ornamental grass
- Filler: Calibrachoa (million bells) or petunias
- Spiller: Sweet potato vine or trailing verbena
Shade-friendly combos
- Thriller: Fern or upright coleus
- Filler: Begonias
- Spiller: Creeping Jenny (if it suits your climate)
Edible, practical combos
- Basil + parsley + thyme (and a spiller like oregano if you have room)
- Leafy greens for a shallow insert (think salad bowl vibes)
- Compact peppers or patio tomatoes in deeper pots
Placement and Maintenance
Where to put your sewing table planter
Choose a spot that matches your plants’ light needs and your lifestyle. Full sun planters on a scorching concrete patio can dry out fast.
If your table is heavy (it will be, once filled), decide its location before planting or consider a plant dolly/casters.
Watering tips that prevent drama
- Water thoroughly until water drains outthen stop.
- Check moisture with a finger test: if the top inch is dry, water.
- In heat waves, containers may need more frequent watering.
Winter and weather-proofing
If you live where winters freeze, avoid letting your planter sit in standing water. Good drainage matters year-round.
Consider moving the planter to a sheltered area or swapping in cold-hardy plants for winter interest.
Common Mistakes (and Easy Fixes)
Mistake: “I skipped the liner because it looked fine.”
Wood plus constant moisture equals rot. If you’re planting directly into a wooden insert, line it and make sure water can drain.
If you’re using a drop-in pot, you’re already winning.
Mistake: No drainage holes
If your insert doesn’t drain, fix it now. Drill holes, add mesh, and elevate slightly. Your plants want oxygen at the roots,
not a permanent puddle.
Mistake: The table tips in wind
Taller plants can make the setup top-heavy. Use a heavier base (or add weight low), choose compact plants, and avoid placing it
on uneven ground. If needed, anchor it near a wall or railing.
Mistake: Paint peels or finish fails outdoors
That’s usually a prep issue: dirty surface, glossy surface not sanded, or the wrong product for exterior exposure.
Sand lightly, clean well, prime appropriately, and use exterior-rated finishes.
Fun Variations to Make It Your Own
Indoor “plant bar” version
Use a waterproof tray and pots, then add a small grow light underneath the tabletop lip if your room is dim.
It becomes a plant station that also holds a coffee mugbecause hydration matters for you too.
Seasonal porch centerpiece
Spring: bright annuals. Summer: herbs and heat lovers. Fall: mums + mini pumpkins. Winter: evergreen boughs, pinecones, and lights.
Your sewing table planter becomes the rotating star of your front porch.
“No soil mess” faux planter
If you love the look but not the maintenance, use faux greenery in a weighted insert. Zero watering, maximum smugness.
Conclusion
Turning a sewing table into a planter DIY is one of those rare projects that looks impressive but doesn’t require wizard-level skills.
The key is longevity: protect the wood, manage water with real drainage, and choose a planting method that fits your space.
Whether you go with a drop-in pot for easy swaps or build a lined insert box for outdoor endurance, you’ll end up with a vintage
sewing table planter that feels equal parts charming and practicallike a garden accessory with good posture.
Extra Experience: What I’ve Learned the Hard Way (So You Don’t Have To)
Here’s the part nobody puts on the pretty “after” photo: a sewing table planter is not just a craft projectit’s a tiny ecosystem
sitting inside a piece of furniture that did not originally sign up to be damp. The first big lesson is that water always wins unless
you plan for it. If you plant directly into wood without a liner, the wood will eventually start to soften, warp, or stain in ways that
make you wonder if your planter is crying. Even a “sealed” surface can fail at seams and screw holes, because those are the weak points
where moisture sneaks in like it’s late to a party.
Second lesson: drainage is not optional just because the planter looks cute. You can have the prettiest vintage sewing machine table planter
on the block, but if the roots are sitting in soggy soil, your plants will act like you offended them personally. I’ve found the easiest
“set it and forget it” solution is a drop-in pot with drainage, sitting in a tray or on spacers so water can exit. It’s cleaner, it’s
replaceable, and it lets you swap plants whenever the season changesor whenever your basil decides it’s done participating in your dreams.
Third lesson: weight creeps up on you. Dry potting mix feels light. Then you water it. Then it rains. Then you realize your “movable porch
planter” has become a stationary object with its own zip code. If you think you might need to move the table, plan for it early. Put it on a
sturdy plant dolly, install locking casters, or commit to the location before filling it. Also, if your sewing table has ornate metal legs,
remember wind exists. Tall plants can turn the whole thing into a sail. Compact plants and a wider planting footprint help keep it grounded.
Fourth lesson: outdoor finishes are a relationship, not a one-time promise. A clear protective coat helps, but sunlight and weather will still
wear it down. The best approach I’ve seen is treating the wood like outdoor furniture: clean well, prep well, use an exterior-rated product,
and accept that you’ll do quick maintenance coats when it starts looking thirsty. If you ignore it for two years, you won’t “suddenly fix it”
with one magical coat on a humid day. (Ask me how I know. Actually don’tI’m trying to keep my dignity.)
Fifth lesson: the best-looking planters aren’t always the most complicatedjust the most intentional. When you choose plants that match your
light conditions, water habits, and container depth, the planter almost takes care of itself. If you fight your conditions (shade plants in
blazing sun, sun plants in deep shade), you’ll be constantly troubleshooting. I love using the sewing table planter as a seasonal stage:
spring annuals, summer herbs, fall mums, winter evergreen arrangements. It keeps things fresh and lets you reuse the structure year after year
without committing to one high-maintenance planting that requires a daily pep talk.
Last lesson: this project is supposed to be fun. If you’re the kind of person who likes a no-drama setup, choose the drop-in pot method and
spend your energy on the designpaint color, stencils, hardware, and the plant combos that make you smile. If you enjoy building, go for the
lined insert box and make it durable. Either way, you’re saving a piece of furniture from the landfill and giving your plants a home with
actual personality. And honestly? That’s more than most of us can say about our throw pillows.


