Table of Contents >> Show >> Hide
- Before You Cook: Know Your Aroma’s Style
- Meet the Parts (So You Don’t Steam Your Countertop)
- How to Cook White Rice in an Aroma Rice Cooker
- How to Cook Brown Rice (Without Regret)
- How to Steam Food in an Aroma Rice Cooker
- How to Cook Rice and Steam at the Same Time
- Beyond Rice: Quinoa, Oatmeal, and More
- Keep Warm: Helpful, Not a Food Storage Plan
- Cleaning and Care (How to Keep Your Rice From Tasting Like Old Soup)
- Troubleshooting: Fix Common Rice Cooker Problems Fast
- Practical Mini-Recipes to Get Comfortable
- of Real-Life Experience: What Using an Aroma Rice Cooker Actually Feels Like
- Conclusion
There are two kinds of people in the world: those who “just make rice,” and those who have stared into a pot of gummy sadness and whispered, “How did I mess up something that literally grows in water?” If you’re here, you’re either upgrading from stovetop stress… or you’ve got an Aroma rice cooker and you’d like it to stop behaving like a mysterious countertop spaceship.
Good news: Aroma rice cookers are designed to be easy, consistent, and wonderfully forgiving. Even better news: once you learn the basics, you can steam vegetables, cook grains, and pull off weeknight dinners that look like you tried harder than you did. This guide walks you through setup, measuring, cooking, steaming, cleaning, and troubleshootingplus real-world tips so your rice turns out fluffy instead of “wet confetti.”
Before You Cook: Know Your Aroma’s Style
Aroma makes a few common rice-cooker types. The steps are similar, but the buttons (or lack of buttons) vary:
- One-touch “Cook/Warm” switch models: You press a lever down to cook; it pops up to warm automatically.
- Digital models: You’ll see buttons like White Rice, Brown Rice, Steam, Delay Timer, and Keep Warm.
If your unit has only a single switch, you’ll do most things by using that Cook cycle and checking doneness. If it’s digital, you’ll pick a mode and let the machine handle timing more precisely.
Meet the Parts (So You Don’t Steam Your Countertop)
Most Aroma rice cookers and steamers include:
- Inner pot (removable, nonstick in many models)
- Lid (glass or locking, depending on model)
- Rice measuring cup (important: this is usually 180 mL, not a U.S. cup)
- Serving spatula
- Steam tray/basket (or a pop-up steam tray)
- Condensation collector (often on digital/locking-lid models)
Important measuring note: “Rice cup” ≠ U.S. cup
Many Aroma models include a rice measuring cup that equals about 180 mL (roughly ¾ of a U.S. cup). That matters because the water lines inside the pot are calibrated to that rice cup. If you use a random kitchen mug, your cooker will respond with chaos (and possibly mush).
How to Cook White Rice in an Aroma Rice Cooker
White rice is the “hello world” of rice cookersperfect for learning your machine’s rhythm.
Step 1: Measure rice the Aroma way
Use the included rice cup. Fill it to the top and level it off for accuracy.
Step 2: Rinse (yes, it matters)
Rinsing removes excess surface starch so grains cook up less sticky and clumpy. A simple approach:
- Put measured rice in a bowl or the inner pot.
- Add water, swish gently for about 10 seconds, then drain.
- Repeat 2–3 times (until the water looks noticeably clearer).
Tip: Rinse in a bowl/pot instead of a strainer so you don’t lose grains down the drain.
Step 3: Add water using the pot’s water lines (easiest)
Add the rinsed rice to the inner pot, then fill water to the line that matches the number of rice cups you’re cooking. This is the most foolproof method because it matches your exact pot calibration.
Step 4: Start cooking
- Switch models: Close the lid, plug in, press the Cook switch down. It will pop up to Warm when done.
- Digital models: Close the lid, select White Rice (or equivalent), press Start. The cooker will switch to Keep Warm after cooking.
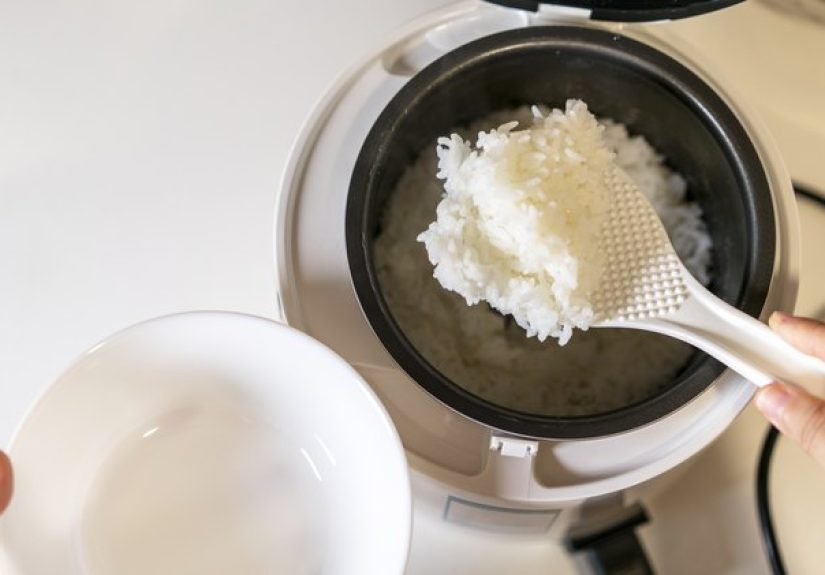
Step 5: Rest, then fluff
When the cooker finishes, let rice sit 5–10 minutes with the lid closed. Then fluff with the spatula to release steam and separate grains.
Quick reference: example chart (common Aroma “rice cup” sizing)
Many Aroma guides show cook time ranges and yields similar to the table below for white rice (times vary by model, rice brand, and room conditions):
| Uncooked White Rice | Water Line in Pot | Typical Cook Time | Yield (Cooked) |
|---|---|---|---|
| 1 rice cup | Line 1 | ~17–22 minutes | ~2 rice cups cooked |
| 1½ rice cups | Line 1½ | ~24–29 minutes | ~3 rice cups cooked |
| 2 rice cups | Line 2 | ~30–35 minutes | ~4 rice cups cooked |
How to Cook Brown Rice (Without Regret)
Brown rice has extra bran layers, so it needs more water and more time than white rice. If your Aroma has a Brown Rice mode, use it. If it doesn’t, you can still make great brown riceyou’ll just rely on the basic cook cycle and a little patience.
Brown rice method
- Measure and rinse brown rice (same as white).
- Add water using your manual’s chart or pot lines (best), or start with a slightly higher water level than white rice.
- Cook. If your unit flips to warm before it’s tender, let it sit covered 10 minutes and check. If still firm, add a small splash of water and run another cook cycle.
Texture tip: Brown rice often improves with a longer rest on Keep Warm (lid closed) to finish steaming.
How to Steam Food in an Aroma Rice Cooker
If your cooker came with a steam tray/basket, congratulationsyour rice cooker just became your low-effort steamer. Steaming is great for vegetables, dumplings, fish, and chicken (as long as you confirm doneness).
Basic steaming steps
- Add water to the inner pot. Many Aroma steaming guides use 1 rice cup of water as a baseline for steaming.
- Insert the inner pot into the cooker.
- Load the steam tray with food in an even layer (don’t pack it like you’re moving apartments).
- Close the lid, plug in, and start the cook/steam cycle:
- Switch model: press Cook down.
- Digital model: select Steam or a basic cook setting if needed.
- Check doneness safely. Open lid carefullysteam is no joke.
- If food needs more time, add water if the pot is dry and continue steaming.
Steaming time guide (use as a starting point)
Steaming time depends on size, thickness, and how full the tray is. Always verify meat doneness before serving.
| Food | Approx. Steam Time |
|---|---|
| Spinach | 3–5 minutes |
| Green beans | 9–13 minutes |
| Broccoli | 10–14 minutes |
| Cauliflower | 10–14 minutes |
| Cabbage | 7–11 minutes |
| Zucchini | 8–12 minutes |
| Squash | 8–12 minutes |
| Carrots | 8–12 minutes |
| Corn | 20–25 minutes |
| Potatoes | 25–30 minutes |
| Fish (fillets) | ~25 minutes |
| Chicken | ~30 minutes |
| Pork | ~30 minutes |
| Beef | ~25 min (medium), 30 min (medium-well), 33 min (well) |
Small pieces tip: If you’re steaming chopped items (like shrimp or diced veggies), place them in a heat-safe dish or create a foil “tray” with small vent holes so pieces don’t fall through.
How to Cook Rice and Steam at the Same Time
This is the move that makes you feel like a competent adult who owns matching plates.
Steam-and-cook method
- Add rinsed rice and water to the inner pot (use your pot lines/manual).
- Place food in the steam tray and set it on top.
- Start the rice cook cycle.
- Timing trick: Add quick-cooking foods (like broccoli) later in the cycle if you can, so they don’t turn into green sadness.
Capacity note: When steaming over rice, some Aroma guides recommend cooking a smaller rice batch because the tray reduces usable space and changes steam flow. If you’re new to this, start with a modest amount of rice and work up once you see how your model behaves.
Beyond Rice: Quinoa, Oatmeal, and More
Your Aroma can handle more than white rice. Many cooking guides include ratios for grains like quinoa and oats. Two practical tips apply to almost everything:
- Rinse grains (especially quinoa, to remove bitterness).
- Use the included measuring cup if your guide references “rice cups.”
Easy quinoa in an Aroma (example approach)
- Rinse quinoa thoroughly.
- Add quinoa and water per your manual (a common guide ratio is about 1 rice cup quinoa to 1½ rice cups water/broth).
- Run the cook cycle; rest briefly; fluff.
Oatmeal tip (don’t boil over your morning)
Some guides recommend cooking oatmeal with the lid open to reduce boil-overs and messy foam eruptions. If your manual says to keep the lid open for oats, follow thatyour future self will thank you.
Keep Warm: Helpful, Not a Food Storage Plan
Aroma cookers switch to Warm/Keep Warm after cooking. This keeps rice at serving temperature, but it’s not meant to hold food indefinitely.
- Many Aroma instructions advise not keeping rice on Keep Warm longer than 12 hours.
- Keep Warm temperatures can vary by model; general guidance often places it roughly in the 158°F–194°F range, but lid opening can reduce temperature over time.
Food safety reality check: For leftovers, the safest habit is to cool and refrigerate cooked rice within 2 hours (or 1 hour if your room is above 90°F). Rice can grow bacteria if it sits too long at unsafe tempsso don’t treat the cooker like a countertop fridge.
Cleaning and Care (How to Keep Your Rice From Tasting Like Old Soup)
After each use
- Unplug the cooker and let it cool.
- Remove the inner pot and wash it with mild soap and a soft sponge.
- Wash the steam tray, spatula, and lid (per your model’s instructions).
- Wipe the heating plate area with a damp clothno soaking, no aggressive scrubbing.
Two critical care habits
- Dry the outside of the inner pot completely before putting it back in the cooker. Moisture between pot and heating plate can cause problems.
- Don’t use the inner pot on a stovetop. It’s designed for the cooker, not for burners.
Troubleshooting: Fix Common Rice Cooker Problems Fast
“My rice is too wet / soggy.”
- Next time: Use slightly less water or a lower water line.
- This time: Fluff the rice and let it sit on Warm for 10–30 minutes, stirring occasionally to release moisture.
“My rice is dry or undercooked.”
- It may need more water, more rest time, or a second short cook cycle.
- For brown rice especially, a longer covered rest can make a big difference.
“My rice is sticking to the bottom.”
- Rinse rice better next time to remove extra starch.
- Don’t leave rice sitting in the pot for long periods after cooking.
- Make sure you’re not scraping the nonstick surface with metal utensils.
“Steaming isn’t working.”
- Confirm there’s enough water in the inner pot.
- Don’t overcrowd the steam tray; steam must circulate.
- Check doneness and add more water if it has boiled away.
Practical Mini-Recipes to Get Comfortable
1) Weeknight “Set-It-and-Forget-It” Jasmine Rice
What you do: Rinse 1–2 rice cups jasmine rice, fill water to the matching pot line, cook, rest 10 minutes, fluff. Jasmine rice loves a little rest timethis is how you get that fragrant, fluffy texture instead of sticky clumps.
2) Rice + Broccoli Steam Bowl (no extra pots)
Cook rice in the pot. When there are about 10–12 minutes left (or once steam is vigorous), add broccoli florets to the steam tray. Close lid, finish cycle, rest briefly, season everything with soy sauce + sesame oil + a squeeze of lemon. Dinner: suspiciously responsible.
3) Simple Steamed Fish and Veggies
Add 1 rice cup of water to the inner pot. Place seasoned fish and sliced vegetables in the steam tray. Start the cook/steam cycle and check at ~20 minutes, then continue until fish flakes easily and vegetables are tender-crisp.
of Real-Life Experience: What Using an Aroma Rice Cooker Actually Feels Like
Using an Aroma rice cooker day-to-day is less like “operating an appliance” and more like gaining a quiet kitchen roommate who’s extremely good at one job and pretty decent at several others. The first experience most people have is the sudden disappearance of rice anxiety. On the stovetop, rice can go from “not done” to “burned” in the time it takes to answer a text. With an Aroma cooker, you rinse, measure, press a button, and walk awayno hovering, no lid-lifting, no dramatic stirring like you’re auditioning for a cooking show called Oops, All Starch.
The second experience is learning that the included cup is not “cute,” it’s “important.” The moment you stop treating the rice cup like a suggestion and start treating it like the law, your rice becomes consistently better. It’s also oddly satisfying to use the water lines inside the potlike the cooker is saying, “I got you,” and for once, something in life actually does. If you’re switching between rice types (say, jasmine one night and brown rice the next), you’ll notice how much easier it is to troubleshoot when your measuring is consistent. Too wet? Drop the water line slightly next time. Too firm? Add a touch more water or let it rest longer. It becomes a simple feedback loop instead of a mystery.
Then there’s steaming, which feels like discovering a secret level in a video game. At first, people steam broccoli and feel smug. Later, they steam dumplings and feel powerful. Eventually, you realize the steam tray is basically a “make dinner look balanced” accessory. Rice below, vegetables abovesuddenly your meal has color and you didn’t wash a second pot. The practical experience here is timing: quick vegetables can overcook if they ride the whole rice cycle, so you start adding them later. That’s the moment you go from “owner” to “operator,” and it’s a very small but real glow-up.
Keep Warm is another real-life lesson. It’s tempting to leave rice sitting there all day like it’s a warm, fluffy pantry. But the best experience comes when you use Keep Warm as a short-term convenience, not a long-term plan. Rice held warm for a few hours is great for busy evenings, second servings, or meal prepping components. Push it too far and the rice dries out around the edges, gets overly soft in the middle, and starts tasting tired. The sweet spot is: cook, eat, refrigerate leftovers promptly, and reheat later with a sprinkle of water.
Finally, the biggest everyday benefit is how the cooker changes your weeknight rhythm. You can start rice, steam something, and use the time you saved to cook a quick stir-fry, shred a rotisserie chicken, orlet’s be honestsit down for five minutes and feel like your kitchen isn’t running you. And that’s the real Aroma experience: fewer decisions, fewer dishes, and a little more “I’ve got this” energy at dinnertime.
Conclusion
An Aroma rice cooker & steamer is at its best when you keep it simple: measure with the included rice cup, rinse for better texture, use the pot’s water lines (or your manual’s chart), rest the rice before fluffing, and steam with enough water plus sensible timing. Once those basics click, you’ll get consistent rice and easy steamed sides with minimal effortno hovering, no guesswork, and far fewer “why is it crunchy?” moments.


