Table of Contents >> Show >> Hide
- What Are Miniature Resin Scenes?
- Why Pins And Tiny Brushes Matter
- The Resin: Clear, Glossy, And Slightly Bossy
- How A Miniature Resin Scene Is Built
- Choosing Colors For Tiny Resin Worlds
- Common Mistakes In Miniature Resin Painting
- Why Miniature Resin Scenes Feel So Personal
- Ideas For Miniature Scenes In Resin
- Experience Notes: What I Learned Painting With Pins, Tiny Brushes, And Resin
- Conclusion
- SEO Tags
Some artists need a wall-sized canvas, a ladder, and the dramatic energy of a Renaissance ceiling. I need a pin, a brush so small it looks like it escaped from a dollhouse, and enough patience to negotiate with a dust particle. Painting miniature scenes in resin is one of those art forms that sounds impossible until you try it, and then it becomes wonderfully, ridiculously addictive.
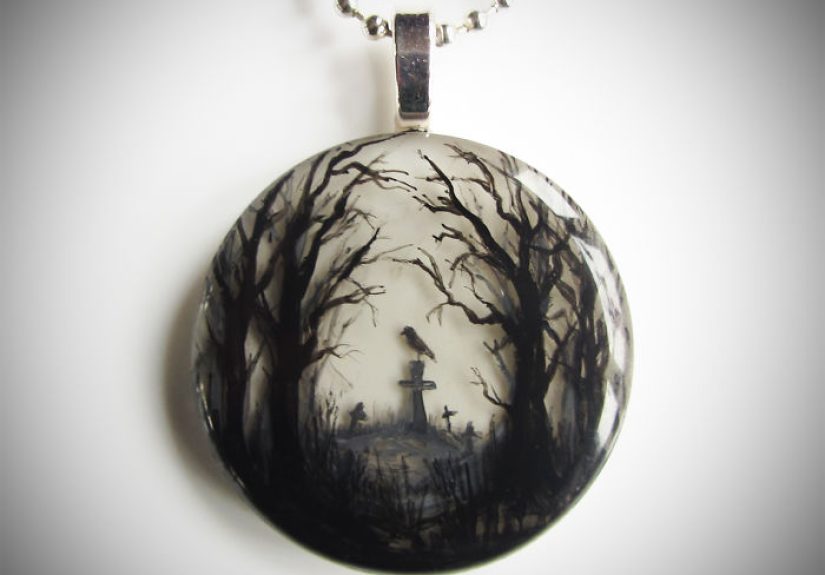
At its heart, this craft is a tiny act of world-building. A moonlit forest can fit inside a pendant. A beach can live inside a paperweight. A galaxy can hover in a resin cube no bigger than a caramel. By layering clear resin and painting between those layers, an artist can create depth, atmosphere, and the illusion that a whole little universe is floating under glass.
The main keyword here is miniature resin scenes, but the real magic is not in the keyword. It is in the moment when a single dot of white paint becomes a lighthouse window, a pin scratch becomes a tree branch, and a speck of blue pigment suddenly looks like distant water. This is art with a magnifying-glass personality: small, intense, and fully committed to making your hands shake at the worst possible second.
What Are Miniature Resin Scenes?
Miniature resin scenes are tiny painted or constructed environments sealed inside clear resin. They may be made in jewelry molds, silicone cabochons, shallow trays, cubes, spheres, bookmarks, keychains, or custom display blocks. Some are flat, like little paintings under a glossy dome. Others are layered in three dimensions, with clouds, trees, stars, waves, buildings, or figures placed at different depths.
Unlike ordinary miniature painting, which usually happens on a figure or model surface, resin scene painting often happens in stages. The artist pours a thin layer of resin, lets it cure or partially set depending on the material, paints or places details, then pours another layer. Repeat this enough times and the artwork gains depth. Repeat it too many times after midnight and you may start apologizing to a speck of glitter for misplacing it.
This layered method is especially useful for scenes that depend on distance. A mountain can sit in the back layer, fog can hover in the middle, and foreground grass can appear closer to the viewer. In ocean scenes, translucent blues and greens create a sense of water depth. In night scenes, tiny white dots become stars suspended at different heights. The result feels less like a flat picture and more like a memory trapped in amber, except shinier and less likely to contain prehistoric mosquitoes.
Why Pins And Tiny Brushes Matter
The tools are almost comically humble. A pin can drag a hairline branch through wet paint, place a micro-dot of color, or tease a pigment swirl into the shape of a cloud. A toothpick, sewing needle, or fine stylus can do similar work, but a pin has a crisp point that makes it excellent for details too small for most brushes.
Tiny brushes bring softness where a pin brings precision. A fine round brush can feather mist, blend sunset colors, or paint the suggestion of tree silhouettes. However, “tiny” does not always mean “best.” Many experienced miniature painters prefer a brush with a sharp point and enough belly to hold paint. A brush that is too small can dry out too quickly, leaving chalky marks or forcing you to reload every three seconds like an exhausted squirrel storing winter supplies.
The Best Brush Shapes For Resin Miniature Art
For miniature resin scenes, a small pointed round brush is the everyday hero. It can handle fine lines, small highlights, and controlled strokes. A liner brush is useful for long grasses, thin branches, and delicate waves. A worn-out brush can be repurposed for stippling texture, making foam, or creating rough foliage. This is the rare art form where a ruined brush does not retire; it simply changes careers.
Brush care matters because dried paint in the ferrule can destroy the point. Rinse often, avoid hot water, and reshape the tip gently on a damp towel rather than using your mouth. It is a small studio habit, but it keeps your tools alive longer and saves your best detail brush from becoming a sad little broom.
The Resin: Clear, Glossy, And Slightly Bossy
Clear resin is what gives miniature scenes their glassy depth. Epoxy resin is popular for art pieces because it cures into a hard, transparent finish and works well for layered pours. UV resin cures quickly under ultraviolet light and is useful for thin coatings or small jewelry pieces, though deeper projects often benefit from slower-curing resin because it gives bubbles more time to rise.
The resin must be measured and mixed according to the manufacturer’s instructions. Resin is not pancake batter; eyeballing the ratio can lead to sticky surfaces, cloudy patches, soft spots, or a piece that remains emotionally unfinished forever. Mixing slowly helps reduce bubbles, and working in thin layers gives the artist more control over depth and clarity.
Safety Comes Before Sparkle
Resin art is beautiful, but uncured resin deserves respect. A safe setup includes good ventilation, gloves designed for chemical resistance, eye protection, covered surfaces, and careful cleanup. Artists should avoid skin contact with uncured resin and read the safety instructions for the exact product they use. Younger artists should work with knowledgeable adult supervision, because “tiny scene inside a pendant” is charming; “mystery rash from careless resin handling” is not.
Dust control is another practical concern. Resin has an impressive talent for attracting airborne lint at the exact moment you feel proud. A clean workspace, covered curing area, and level surface can prevent many disasters. Some artists use a box or cover to protect curing pieces. Think of it as putting your miniature world to sleep under a tiny, very practical roof.
How A Miniature Resin Scene Is Built
The process begins with an idea small enough to fit the mold but strong enough to read at a glance. Good miniature scenes do not need every detail. They need the right details. A single boat on a blue horizon may be stronger than an overcrowded harbor. A cabin window glowing in a snowy forest can tell more story than twenty tiny logs fighting for attention.
Step One: Choose A Scene With Clear Layers
Before pouring anything, I plan the scene in three zones: background, middle ground, and foreground. For a forest, the background might be pale blue haze and distant trunks. The middle ground could include darker trees and a path. The foreground might hold grass, stones, flowers, or a tiny figure. This structure keeps the scene readable even when the final artwork is smaller than a cookie.
Step Two: Pour A Thin Base Layer
A thin clear layer establishes the foundation. If the scene needs a colored atmosphere, a tiny amount of resin pigment, alcohol ink, mica powder, or compatible dye may be added. The key phrase is “tiny amount.” Too much color can make the resin cloudy or prevent the details beneath from showing. Resin rewards restraint, which is inconvenient for those of us who believe glitter is a food group.
Step Three: Paint Or Place Micro Details
Once the layer is ready, small painted details can be added. Acrylic paint is commonly used because it dries quickly, comes in strong colors, and can be thinned for delicate work. A pin can dot stars, scratch reeds, or place tiny highlights. A fine brush can build clouds, silhouettes, reflections, and shadows. At this scale, the goal is not photographic detail. The goal is visual suggestion.
Step Four: Seal With Another Layer
The next resin layer seals the details and creates separation. This is where the illusion grows. A tree painted on the first layer appears farther away after another clear layer is added. A bird painted above that layer appears closer. Three or four careful layers can create convincing depth without needing thick resin or a complicated mold.
Choosing Colors For Tiny Resin Worlds
Color behaves differently at a miniature scale. Strong contrast is helpful because the viewer may only have a few inches, or even a few centimeters, to understand the scene. Dark silhouettes against bright skies work well. Warm lights inside cool landscapes create instant mood. White highlights on water, glass, or stars can bring the whole piece alive.
For natural landscapes, transparent blues, greens, ambers, and smoky grays are useful. For fantasy scenes, metallic pigments, pearlescent powders, and glowing color transitions can make the artwork feel magical. The trick is to keep the palette controlled. A tiny resin scene can become visually noisy very quickly, like a parade marching through a closet.
Light Is The Secret Ingredient
Because resin is glossy and transparent, it interacts beautifully with light. Highlights should be placed where light would naturally hit: the edge of a wave, the side of a moon, the roofline of a cabin, or the top of a mountain. A single bright dot can suggest a lamp. A thin pale line can suggest reflected moonlight. In miniature art, one confident mark often does the work of ten nervous ones.
Common Mistakes In Miniature Resin Painting
The first mistake is rushing. Resin needs time, paint needs time, and your hand needs time to stop trembling after you successfully paint a bird smaller than a comma. Pouring the next layer too soon can smear details or trap unwanted texture. Waiting too long between certain layers can create adhesion challenges depending on the product, so the artist must follow the resin’s instructions and learn its working window.
The second mistake is overloading the brush. At this scale, too much paint becomes a blob with ambition. Touch the brush to a towel before painting, then use the point lightly. The same idea applies to pins. Dip the tip, not the whole pin, unless your artistic vision is “accidental blue crater.”
The third mistake is ignoring bubbles. Some bubbles can be charming in ocean scenes, but random bubbles in a night sky may look like the universe has hiccups. Slow mixing, warm resin bottles when appropriate, thin pours, and careful bubble removal can help. Heat tools should be used cautiously and only according to product guidance, especially around molds and flammable materials.
Why Miniature Resin Scenes Feel So Personal
Miniature art has a long history of fascination because small things invite close attention. Museum dioramas, miniature rooms, scale models, and tiny historical scenes show how powerful a small environment can be when every detail has a purpose. A miniature does not shout across the room; it whispers, and people lean in.
That intimacy is perfect for resin. The clear surface acts like a window. Viewers move the piece under light, tilt it, peer into it, and discover little surprises. A painted moon may appear to float. A fish may seem suspended beneath the surface. A trail may disappear behind a hill that is only a brushstroke wide. The scale turns viewing into exploring.
Ideas For Miniature Scenes In Resin
Nature scenes are a wonderful starting point. Try a misty pine forest, a desert sunset, a snowy cabin, a tiny pond, a beach at low tide, or a night sky over mountains. These subjects are forgiving because organic shapes do not require perfect symmetry. A tree branch can bend. A cloud can drift. A rock can look like a rock even if it began life as a mistake with excellent self-esteem.
For more advanced work, city scenes are rewarding. A skyline can be built with small dark rectangles and dots of yellow light. A rainy street can be suggested with gray layers and white reflections. A tiny window, painted with a pin, can make a whole building feel inhabited.
Fantasy themes also thrive in resin. Floating islands, glowing mushrooms, miniature planets, underwater castles, and dragon silhouettes all benefit from depth and transparency. Resin turns these ideas into little pocket myths.
Experience Notes: What I Learned Painting With Pins, Tiny Brushes, And Resin
The first thing I learned is that confidence matters more than expensive tools. A pin from a sewing kit can paint stars better than a fancy brush if the paint consistency is right. I once spent twenty minutes trying to paint a line with an ultra-fine brush, only to discover that the pin made the mark in one second. Naturally, I congratulated the pin and pretended the previous twenty minutes were “research.”
The second lesson is that every layer changes the scene. A mountain painted too dark on the first layer may soften beautifully once resin covers it. A cloud that looks too bright may become perfect after another transparent pour. Resin adds optical distance, so I now paint background details slightly stronger than I want them to appear in the finished piece. It feels wrong at first, but the final depth usually proves the point.
I have also learned to respect negative space. In a tiny scene, empty space is not wasted space. It lets the viewer breathe. A sky does not need twenty birds. A pond does not need eleven reeds, three frogs, two boats, and a dramatic emotional subplot. Sometimes one reed and a reflection are enough.
My best results usually come from working slowly in short sessions. Miniature resin painting punishes fatigue. When my hand gets tired, dots become blobs, branches become spaghetti, and stars start forming suspicious triangles. Walking away for ten minutes can save an hour of repair work. This is especially true during the final highlight stage, when the temptation to add “just one more detail” is strongest. Those four words have ruined more tiny moons than I care to confess.
Dust has taught me humility. No matter how clean the desk looks, one heroic fiber will attempt to land in the resin like it owns waterfront property. I now cover pieces while they cure and inspect layers before moving on. If dust appears, I remove it carefully when possible instead of panicking. Panic has never improved resin. It has, however, helped me invent several new facial expressions.
The most satisfying part is the reveal. After the final layer cures, the scene gains a polished depth that flat painting cannot fully imitate. A tiny forest suddenly feels sealed in time. A galaxy looks like it is floating. A wave seems to hold light inside itself. That moment is why I keep coming back to this fussy, glittering, patience-testing craft. Painting miniature scenes with pins and tiny brushes in resin is not just about making small art. It is about making small art feel enormous.
Conclusion
Miniature resin scenes combine painting, layering, sculpture, patience, and a healthy respect for ventilation. They are small enough to fit in your hand but detailed enough to feel like worlds. With pins, tiny brushes, compatible paints, clear resin, careful safety habits, and a willingness to make mistakes smaller than sesame seeds, anyone can begin exploring this fascinating art form.
The beauty of resin miniature art is that it rewards observation. You start noticing how fog covers a hill, how light sits on water, how tree branches split, how stars cluster, and how much drama can fit inside a pendant. It trains the eye to find wonder in small spaces. And honestly, in a loud world, there is something deeply satisfying about building a quiet little universe one pin-dot at a time.


