Table of Contents >> Show >> Hide
- Start Here: The 3 Things Every Boys Bedroom Makeover Needs
- Step 1: Measure the Room and Pick Your “Problem to Solve”
- Step 2: Choose a Theme That Won’t Expire Next Tuesday
- Step 3: Pick a Paint Plan That Looks Good and Behaves Well
- Step 4: Choose Furniture Like a Parent and a Future-You Would Agree On
- Step 5: Build Storage That Your Kid Can Actually Maintain
- Step 6: Lighting That Supports Sleep (and Doesn’t Feel Like an Interrogation)
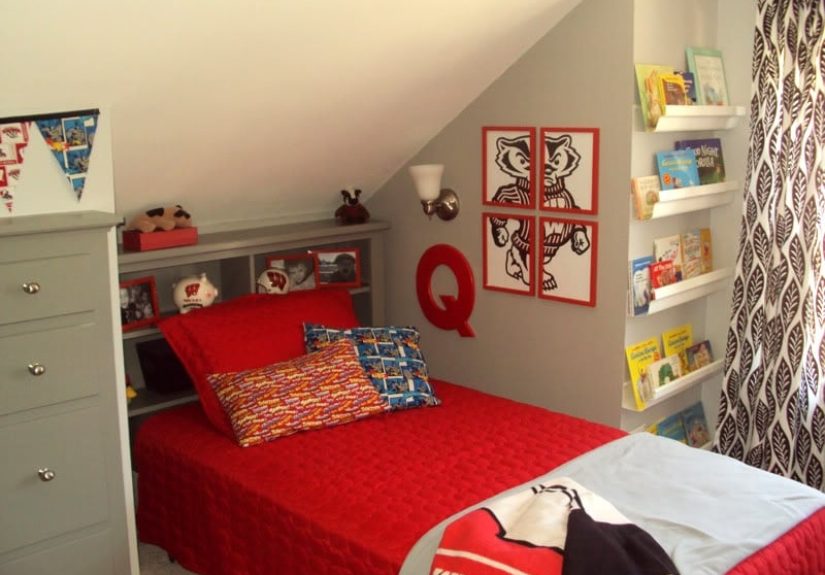
- Step 7: Bedding and TextilesWhere Personality Can Go Wild (Safely)
- Step 8: Create ZonesSleep, Play, Learn, Chill
- Step 9: Wall Decor That Looks Cool and Isn’t Permanent
- Step 10: Safety and Health Checks (Non-Negotiables)
- Budget-Friendly Little Boys Room Makeover Ideas
- Two Complete Makeover Examples (Copy-Paste These Plans)
- How to Keep the Room Looking Good After the Makeover
- Conclusion
- The Part That Feels Like Real Life: of Makeover “Experience” You’ll Recognize
A little boys room makeover is basically interior design meets wildlife documentary. One minute the room is peaceful, the next it’s a LEGO savanna with a rogue sock migrating across the floor. The goal isn’t to create a museum where nobody can touch anything (that will last 11 minutes). The goal is to build a bedroom that’s fun, functional, safe, and flexiblea space that can handle bedtime, playtime, homework time, and the occasional “I need a cape for science” emergency.
In this guide, you’ll get a practical, step-by-step plan with design ideas that actually work for real families: smart storage, kid-friendly materials, lighting that supports sleep, and decor that can grow with your child. Expect specific examples, a little humor, and no “just buy a mansion” solutions.
Start Here: The 3 Things Every Boys Bedroom Makeover Needs
- A layout that makes sense (clear paths, zones for sleep/play/learn).
- Storage that your kid can use (not storage that requires a grown-up engineering degree).
- Design choices that can evolve (because today’s dinosaur phase is tomorrow’s space phase… and both are valid).
Step 1: Measure the Room and Pick Your “Problem to Solve”
Before you buy anything, measure the room: wall lengths, ceiling height, window and door placement, and closet depth. Then choose the main problem you’re solving. Most boys bedroom ideas fall into one (or more) of these categories:
- Clutter chaos: Toys everywhere, nothing has a home.
- Small-space squeeze: The room is tight, but the energy is enormous.
- Growing kid needs: The toddler bed era is ending, and “big kid” is arriving with opinions.
- Shared room challenges: Two kids, one room, zero compromise (at first).
Quick Layout Rule of Thumb
Keep the path from the door to the bed clear. Put bulky storage where it won’t block movement. If the room is small, consider placing the bed on the longest wall and using vertical storage to free up floor space.
Step 2: Choose a Theme That Won’t Expire Next Tuesday
Themes are greatuntil they turn into a full-room commitment to “Construction Vehicles Only” forever. The trick is to build the room on a timeless base, then add the personality with easy-to-swap accents. Think of it like pizza: the crust stays the same, toppings change depending on the mood.
3 “Grows-With-Them” Theme Approaches
- Color-led (most flexible): Choose a palette (navy + white + warm wood, or sage + cream + black accents). Then layer in decor from current interests.
- Collection-led (kid-approved): Build around books, sports memorabilia, toy cars, or action figures but display them intentionally so it feels curated, not like a toy store exploded.
- Story-led (most fun): “Explorer,” “Space Camp,” “Sea Adventure,” “Mountain Cabin,” or “Robot Workshop.” These can evolve without feeling babyish later.
Step 3: Pick a Paint Plan That Looks Good and Behaves Well
Paint is the fastest way to change the vibe in a kids room decor makeover. It’s also the part where you remember ventilation exists (and should be used). Since many products can affect indoor air quality, it’s smart to choose low-odor, lower-emission options and ventilate well, especially for kids’ spaces.
Best Paint Finishes for Little Boys Rooms
- Walls: Eggshell or satin is usually a sweet spotcleanable, not too shiny.
- Trim/doors: Semi-gloss for durability and easy wipe-downs.
- Accent wall: Great for adding personality without painting the whole universe.
Design Ideas That Don’t Overdo It
- Half wall color block: Darker lower half hides scuffs. Lighter upper half keeps it airy.
- Soft mural or simple stripes: Works for sports, space, or “just cool” without being loud.
- Decal wall: Big impact, easy removal when interests shift.
Practical note: after painting, keep windows open when you can and avoid sleeping in a freshly painted room for a couple days if possible especially for young kids or anyone with breathing sensitivities.
Step 4: Choose Furniture Like a Parent and a Future-You Would Agree On
Furniture is where budgets go to do cardio. Focus on the “big rocks” first: bed, dresser, and any desk/reading space. For a little boys room makeover, the best furniture is sturdy, simple, and ready for changing phases.
The Bed: Your Makeover Anchor
- Toddler to big-kid upgrade: A standard twin with a simple headboard can last for years.
- Small room hack: A bed with drawers or under-bed bins adds storage without adding furniture.
- Sleepover-ready: A trundle or daybed gives you options without permanent bunk-bed logistics.
Bunk Beds (If You’re Considering Them)
Bunk beds can be fantastic for shared rooms and small spaces, but safety and setup matter. Use a model that meets current safety standards, follow manufacturer instructions, keep guardrails and ladders secure, use the correct mattress height, and add a night light so the ladder isn’t a midnight obstacle course. Many pediatric safety resources recommend waiting until a child is old enough and coordinated enough for the top bunk (often around age 6+).
Dressers and Bookcases: Make Them Tip-Resistant
Secure heavy furniture to the wall whenever possible. In kids’ rooms, climbing happenssometimes for toys, sometimes for “research.” Store heavier items low, and avoid putting tempting items (like favorite toys or remotes) up high where kids might climb to reach them.
Step 5: Build Storage That Your Kid Can Actually Maintain
The best boys bedroom storage system has one magic quality: it’s easy to reset. If cleanup requires advanced sorting, your room will return to chaos faster than you can say, “Where did that slime come from?”
The “3-Layer Storage” System
- Daily grab: Open bins/baskets at kid height for the most-used toys.
- Weekly stash: Closet shelves or drawers for crafts, board games, extra sets.
- Seasonal storage: High closet zones or under-bed storage for outgrown clothes and occasional items.
Make It Work With Labels (Yes, Really)
Labels aren’t just cute; they reduce decision fatigue. Use words + simple icons for younger kids. Keep categories broad: “Cars,” “Blocks,” “Art,” “Dress-Up,” “Books.” When categories are too specific, everything breaks down fast.
Small Bedroom Storage Moves That Feel Like Cheating
- Under-bed bins: Great for trains, tracks, and bulky toys.
- Back-of-door organizers: Shoes, hats, small action figures, art supplies.
- Wall shelves as “display zones”: Keeps treasures visible without taking over the floor.
- Hook rail: Backpack, hoodie, sports bagoff the floor, instantly cleaner.
Step 6: Lighting That Supports Sleep (and Doesn’t Feel Like an Interrogation)
Lighting is underrated in a boys room makeover. It affects mood, function, and bedtime. Sleep-focused resources generally recommend dimming lights as bedtime approaches and keeping the room darker at night. Translation: bright overhead lights at 8:45 p.m. are not helping anyone.
Use Layered Lighting
- Overhead: General light for cleaning and getting dressed.
- Task light: Desk lamp or reading light with a warm glow.
- Night light: Low, gentle light for nighttime bathroom trips (especially helpful near bunk ladders).
Bonus: If your kid falls asleep easier with a consistent routine, make the lighting part of itswitch to softer lamps before bed, then night light only. The room will feel like “sleep mode,” not “karaoke stage.”
Step 7: Bedding and TextilesWhere Personality Can Go Wild (Safely)
Bedding is the easiest place to commit to a theme without marrying it. Dinosaurs today? Cool. Swap to baseball next year? Also cool. Your wallet remains mostly calm.
Quick Styling Formula
- Base: Solid or simple pattern sheets that work with multiple themes.
- Topper: Themed comforter/quilt for instant character.
- Extras: Two throw pillows max (any more and you’re running a pillow daycare).
- Rug: Adds warmth, absorbs noise, and defines the play zone.
Step 8: Create ZonesSleep, Play, Learn, Chill
Even small rooms benefit from “zones.” Kids do better when the room quietly tells them what happens where. You’re not being bossy; you’re being a benevolent room architect.
Zone Ideas (Pick 2–3 Based on Space)
- Sleep zone: Bed + small nightstand + reading light.
- Play zone: Rug + open bins + low shelf for quick access.
- Learn zone: Small desk + lamp + simple supply caddy.
- Chill zone: Beanbag or floor cushion + book ledge (tiny reading nook energy).
Example: A Small Room Layout That Works
Put the bed on the longest wall, add under-bed storage, place a slim book ledge near the bed, and use a single low storage unit across from the bed. Add a rug in the center to define play space. If you can fit a desk, go narrow and mount a shelf above it for supplies.
Step 9: Wall Decor That Looks Cool and Isn’t Permanent
For boys bedroom decor, think “high impact, low commitment.” Your future self will thank you.
- Framed posters: Easy swap when interests change.
- Magnetic board or cork board: Art display + school notes + “look what I made” pride.
- Peel-and-stick decals: Great for space, animals, sports shapes, or simple geometric patterns.
- Name sign or initial: Personal touch that still works as they grow.
Step 10: Safety and Health Checks (Non-Negotiables)
A makeover isn’t finished until the room is safe. Kids climb. Kids wiggle. Kids invent new ways to test gravity. Do a quick safety sweep once everything is in place.
Safety Checklist
- Anchor heavy furniture (dressers, bookcases, TVs) to reduce tip-over risk.
- Keep cords managed and out of reach; use cord covers or clips.
- Use the right mattress size for the bed frame; avoid overly tall mattresses on bunks.
- Ventilate after painting and give fresh finishes time to air out.
- Choose washable textiles and consider allergen-friendly bedding if needed.
Budget-Friendly Little Boys Room Makeover Ideas
You don’t need a celebrity budget to get a great result. You need a plan and a willingness to avoid buying 14 decorative pillows. Here are high-impact, lower-cost moves:
- Paint + decals: Big transformation with minimal furniture changes.
- New hardware: Swap drawer pulls for a quick “new dresser” feeling.
- Thrift + refresh: Sand and repaint a solid wood nightstand.
- Lighting upgrade: A warm bedside lamp changes the mood instantly.
- Better storage bins: Organized rooms look “designed,” even with the same toys.
Two Complete Makeover Examples (Copy-Paste These Plans)
Example 1: “Calm Adventure” Room (Ages 4–8)
- Palette: Warm white walls + navy accent wall.
- Furniture: Twin bed with drawers, anchored dresser, low toy storage unit.
- Decor: Map print, mountain decals, simple wood shelf for books.
- Storage: 4 labeled bins (Blocks, Cars, Art, Stuffies).
- Lighting: Overhead + warm reading lamp + low night light.
Why it works: It feels “big kid” without being too serious. The theme is suggestive, not overwhelming, and it can pivot later to sports or space.
Example 2: “Space Station” Room (Ages 6–10)
- Palette: Light gray walls + deep blue textiles + pops of neon (small doses).
- Furniture: Simple twin bed, narrow desk, wall shelves for display.
- Decor: Planet decals, framed rocket poster, glow accents used sparingly.
- Storage: Under-bed bins for “mission equipment” (a.k.a. toys), desk caddy for school supplies.
Why it works: The “space” vibe lives in the decor, not in expensive custom furniture. Easy to update as interests change.
How to Keep the Room Looking Good After the Makeover
Design is great. Maintenance is greater. Try a simple reset routine that fits real life:
- 2-minute nightly reset: Toys into bins, clothes into hamper, backpack on hook.
- 10-minute weekly reset: Clear surfaces, rotate books, toss trash, quick vacuum.
- Seasonal reset: Donate outgrown clothes, rotate toys (some “disappear” for a whilemysteriously helpful).
Conclusion
The best little boys room makeover doesn’t chase perfectionit builds a space your child can actually live in. Start with a flexible base, add personality with easy-to-change decor, and invest in storage that makes cleanup doable. Keep the lighting cozy, the layout simple, and the room safe. Do that, and you’ll end up with a bedroom that works now and still makes sense when your kid’s interests evolve (which they will, rapidly, and with confidence).
The Part That Feels Like Real Life: of Makeover “Experience” You’ll Recognize
If you’ve ever started a boys room makeover thinking, “This will be a chill weekend project,” welcome. You’re among friends. The most common real-life experience is that the makeover is never just about decorit’s about habits. The room looks amazing on day one, then day three arrives with a tornado of toy cars, pajamas, and a mysterious collection of rocks your child insists are “important.” The secret is learning that a room stays tidy not because it’s pretty, but because it’s easy to reset. Parents who end up happiest with the result usually pick storage that matches how their kid actually plays.
Another very real moment: the “I didn’t know he cared this much about where the bed goes” phase. Kids who don’t care about throw pillows often care deeply about the direction of their bed, the location of their favorite stuffed animal, and whether their night light makes the ceiling look like a spaceship. Let them have wins. Giving a child a couple of design choices “Do you want the blue rug or the gray rug?”can turn the makeover from a parent project into their room. The funny part is that the choices they make are usually surprisingly reasonable, right up until they request a dinosaur chandelier. (Respectfully decline. Or don’t. Live your truth.)
You’ll also discover that “more” isn’t always better. Lots of families start with the urge to fill every wall and corner, but the room often feels calmer when you leave breathing space. A clear floor area becomes a natural play zone. A single shelf for favorite books can feel more special than a packed bookcase. And if your child has trouble winding down at night, you may notice that a simpler roomless visual clutter, softer light, fewer “activity cues” can make bedtime smoother. It’s not magic. It’s just your brain (and your kid’s brain) getting fewer “go-go-go” signals at 9 p.m.
Finally, there’s the experience of the “after” photo versus the lived-in reality. The after photo is spotless. Real life includes a half-finished LEGO build that “cannot be moved,” three library books, and a sock that has chosen independence. The win isn’t maintaining showroom perfection; it’s creating a room that can bounce back quickly. When the systems are righthooks at the right height, bins that don’t require sorting by thread count, a dresser that opens smoothly, and a routine your kid can doyour child gets something bigger than a cute room. They get a space that supports independence. And you get something even rarer: the ability to walk into the room without stepping on a plastic shark.


