Table of Contents >> Show >> Hide
- Why Pleats Work So Well on Lampshades
- What You’ll Need
- Step One: Choose the Right Shade and Fabric
- Step Two: Measure Like You Mean It
- Method A: The Easy No-Sew Pleat Wrap (Best for Drum Shades)
- Method B: No-Sew Pleated Panels (Great for Tapered Shades)
- Design Choices That Make Your Pleated Shade Look Expensive
- Troubleshooting: Fixes for Common No-Sew Lampshade Drama
- Care and Cleaning Tips
- FAQ
- Real-World Experiences: What It’s Like Making Your First No-Sew Pleated Lampshade
Pleated lampshades are having a serious “wait…why did we ever stop doing this?” moment. They soften light, add texture, and instantly make a lamp look more customlike you have a decorator on speed dial (you do not; you have glue and confidence). Best part: you can get that tailored, vintage-inspired look without sewing a single stitch. If you can measure, fold, and resist the urge to “just eyeball it,” you can make a no-sew pleated lampshade that looks boutique-level.
This guide walks you through two beginner-friendly approachesone for drum shades (the easiest) and one for tapered shades (still doable, just slightly more “math-y”). Along the way, you’ll get fabric tips, pleat-spacing tricks, and a few pro-level finishing ideas that make your DIY look intentional instead of “I fought a hot glue gun and the hot glue gun won.”
Why Pleats Work So Well on Lampshades
Pleats do three magical things for lighting decor:
- Add dimension so a plain lamp doesn’t look flat or forgettable.
- Diffuse light with cozy textureespecially with linen, cotton, or lightweight blends.
- Upgrade the silhouette so even a thrift-store base feels curated.
In design terms, pleats are “movement.” In normal-person terms, pleats are “wow, that looks expensive.”
What You’ll Need
Pick your supplies based on the method you choose. You don’t need everything listed, but you do need a plan (and ideally a snack).
Core Supplies
- A lampshade (drum or tapered). Clean and dust-free.
- Light- to medium-weight fabric (cotton, cotton-linen, linen blends, soft upholstery weight).
- Measuring tape (or a flexible ruler).
- Fabric scissors or rotary cutter + mat.
- Iron + ironing board (pressing = crisp pleats, not sad waves).
- Clips (binder clips or quilting clips help hold folds).
Adhesives (Choose One Primary)
- High-temp hot glue (fast, strong, great for pleat anchoring).
- Fabric glue (slower, more forgiving, less “glue bump” risk).
- Spray adhesive (great coverage for smooth lining or base layer; use in a ventilated area).
- Fusible web tape (optional: for clean hems without sewing).
Finishing Options (For That “Professional” Look)
- Ribbon, bias tape, or handmade fabric trim (top and bottom edges).
- Double-sided fabric tape (quick edge control).
- Fray check (optional, if your fabric frays easily).
Step One: Choose the Right Shade and Fabric
Shade Tips
- Drum shades are the easiest for pleats because the top and bottom circumference match.
- Tapered shades look especially charming with pleats, but they require either a template or panel approach.
- Shade condition matters: if it’s dented, sticky, or shedding old lining, fix that first (or pick another shade).
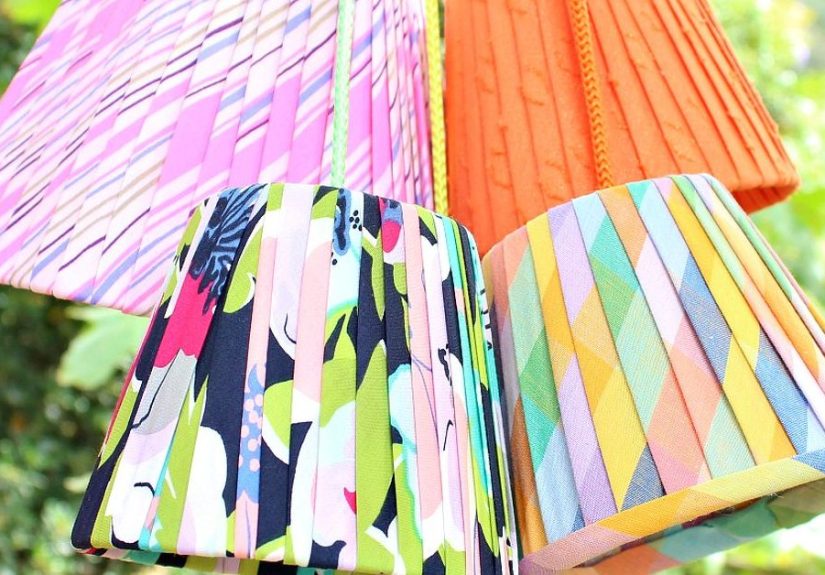
Fabric Tips (Don’t Skip ThisIt’s the Difference Between “Chic” and “Craft Chaos”)
- Best beginners’ fabrics: quilting cotton, cotton-linen blends, light linen. They press well and behave.
- Be cautious with: very slippery satin (wants to slide), thick upholstery jacquard (bulky pleats), stretchy knits (pleats get wobbly).
- Pattern choices: small prints hide tiny mistakes; stripes require commitment and emotional stability.
Step Two: Measure Like You Mean It
Measuring a lampshade is simple, but the “add a little extra” part is where DIYers either win or cry quietly into their trimming ribbon.
For Drum Shades
- Height: measure from the top edge to the bottom edge.
- Circumference: measure around the shade (or calculate using diameter × 3.14).
- Extra allowance: add 1–2 inches to the circumference for overlap; add about 1 inch total to height for turning/finishing (or enough to wrap and glue neatly).
For Tapered Shades
- Measure top circumference, bottom circumference, and slant height (the angled side height).
- If your shade is dramatically tapered, consider the panel/template method below for best results.
Quick reality check: pleats “eat” fabric. If your shade is large and you want lots of tight pleats, plan for more fabric than a smooth cover would require.
Method A: The Easy No-Sew Pleat Wrap (Best for Drum Shades)
This method uses fabric strips and repeated folds to create consistent pleats. It’s fast, forgiving, and gives that classic tailored look.
1) Cut Your Main Fabric Strip
- Cut one long strip the full height of your shade + extra for turning under (about 1 inch total is a good starting point).
- For length, cut enough to wrap around the shade with overlapthen add more for pleating. A safe approach: start with at least 1.5–2× the shade circumference if you want noticeable pleats.
If you’re using a patterned fabric, decide where you want the “front” to be and plan your overlap seam at the back.
2) Press the Top and Bottom Edges
Press a small fold (about 1/2 inch) along the top and bottom edges of your strip. This creates a clean finished edge when you glue. If your fabric frays, you can use fusible web tape inside the fold for extra security.
3) Anchor the First Edge Inside the Shade
Start at the back seam area. Apply a thin line of hot glue or fabric glue near the inside top edge, press your fabric down, and hold for a few seconds. Repeat at the inside bottom edge so the strip is secured at both top and bottom.
4) Make Pleats as You Go
Create knife pleats (all folds going in one direction) for a clean, classic look:
- Fold a small section of fabric over itself to form a pleat.
- Press the fold with your fingers, then clip it temporarily if needed.
- Glue the pleat at the top and bottom edges (you don’t have to glue the whole pleat down the middle).
- Repeat around the shade, aiming for similar pleat depth each time.
Consistency hack: mark small guide points around the bottom ring (every 1/2 inch to 1 inch, depending on pleat size). Your pleats will look intentionally spaced instead of “free-range.”
5) Finish the Overlap Seam
When you reach the starting point, trim the excess fabric so the end overlaps neatly. Fold the raw edge under and glue it down for a clean finish.
6) Add Trim (Optional but Highly Recommended)
Trim is the lampshade equivalent of mascara: technically optional, emotionally transformative. You can use ribbon, bias tape, or a simple fabric band to hide glue points and create a polished edge.
Method B: No-Sew Pleated Panels (Great for Tapered Shades)
If your shade is tapered, pleating a single wrap can get tricky because the top circumference is smaller than the bottom. Panels solve that. The look is charming and more “custom atelier,” less “please ignore the wrinkles.”
1) Create a Quick Template
Use kraft paper, parchment paper, or even thin wrapping paper to trace the shape of one “section” of your shade. If your shade already has vertical supports, you can use those as panel boundaries. Otherwise, divide the circumference into evenly spaced sections (8–12 panels is common for a classic look).
2) Cut Fabric Panels With Allowance
Cut fabric panels using your template, adding a little extra at the sides for overlap. Press edges under for a clean finish.
3) Pleat Each Panel Before Attaching
Make small pleats across the width of each panel. Press them with an iron, then lightly tack them at the top and bottom edges with glue to hold the structure.
4) Attach Panels One by One
Glue each panel to the shade starting at the back. Slight overlaps between panels look intentional and help hide edges. Add trim at top and bottom to unify everything.
Design Choices That Make Your Pleated Shade Look Expensive
Pick a “Base Neutral + Personality” Strategy
- Neutral shade, bold trim: ivory linen with black ribbon trim is timeless.
- Soft print, matching base: a subtle floral on a brass lamp feels vintage without feeling dusty.
- Toile or heritage prints: instant characterespecially in traditional or cottage spaces.
Use Contrast Trim for a Tailored Finish
Contrast trim (like chocolate grosgrain on cream fabric) frames the pleats and makes them pop. It also distracts from any micro-imperfectionslike that one pleat you swear wasn’t crooked until it saw daylight.
Mind the Glow
Light-colored fabrics typically diffuse light better. If you use darker fabric, expect a moodier glow. For bedside lamps or reading corners, aim for a fabric that softens light without blocking it.
Troubleshooting: Fixes for Common No-Sew Lampshade Drama
“My pleats are uneven.”
Pick a pleat size and stick with it. If you’re halfway around and things are drifting, slightly adjust the next few pleats to “steer” back to even spacing. Like parallel parking, but with fabric.
“I can see glue bumps.”
Use smaller dots of hot glue, or switch to fabric glue for the top/bottom edges. Trim is also your best friend here.
“The fabric looks wrinkled.”
Press more. Then press again. Lampshades are basically tiny fashion runways, and wrinkles will show up like uninvited guests.
“The edges are fraying.”
Use fusible tape inside folded hems or apply fray check. Choosing a tighter weave fabric also helps.
Care and Cleaning Tips
Pleated shades collect dust the way throw pillows collect judgment. The simplest routine:
- Dust regularly with a microfiber cloth or a soft brush attachment on a vacuum (low suction).
- Spot-clean gently if neededtest an inconspicuous area first, especially if you used spray adhesive or delicate fabric.
- Keep away from high heat bulbs; use LED bulbs to reduce heat and protect adhesives and fabric.
FAQ
Can I pleat over an existing shade?
Yes, as long as it’s clean and not peeling. If the old shade has texture or damage, a smooth base layer (thin fabric or lining) can help the pleats sit better.
How long does this project take?
Most no-sew pleated lampshades take 1–3 hours depending on size, pleat density, and whether you add trim. Add time if you’re working with a fussy fabric or making panels.
What’s the most beginner-friendly adhesive?
Fabric glue is forgiving and gives you working time. Hot glue is faster and strong, but requires a lighter touch to avoid bumps.
Real-World Experiences: What It’s Like Making Your First No-Sew Pleated Lampshade
Let’s talk about the part tutorials don’t always capture: the “human experience” of pleating a lampshade. Not the highlight-reel versionthe real version. The one where you start confident, briefly consider opening an online shop, and then spend five minutes negotiating with a pleat that refuses to behave.
The first surprise: pleats are strangely soothing…until they’re not. Many DIYers find the early stage of the project calming: fold, press, clip, repeat. It’s almost meditative. Then you reach the halfway point and realize your pleats have slowly become a different size than the ones you started with. This is normal. It’s not a personal failing. It’s just what happens when you’ve been staring at fabric folds long enough to forget what “even” looks like. The fix is simple: pause, step back, and make a tiny adjustment over the next few pleats instead of trying to fix everything at once.
The second surprise: the lamp tells on you. Pleats that looked perfect on your table may look slightly different once the shade is on the lamp and the light is on. A soft glow can hide minor imperfections, but a bright bulb can spotlight every bump like it’s hosting a talent show. That’s why people who love the finished look often recommend doing a quick “lamp test” before you commit to final trimturn the lamp on, rotate the shade, and see where you want the seam and which side deserves to be the “front.”
The third surprise: adhesive choice changes the vibe of your whole day. Hot glue is quick and satisfying, but it can create tiny hardened dots if you use too much or if it cools before you press the fabric down. Fabric glue takes longer, but it gives you wiggle room, which is great when you’re learning. A common strategy is mixing both: use hot glue sparingly to anchor pleats at the very top and bottom edges, and use fabric glue where you want smoother lines or more working time. Regardless of adhesive, people consistently say ventilation mattersespecially with spray adhesivebecause “craft fumes” are not the cozy aesthetic anyone is going for.
The fourth surprise: trim is where confidence returns. The moment you add ribbon or a clean fabric band around the top and bottom, your shade looks instantly more professional. It hides small glue marks. It frames the pleats. It makes everything feel finished. Many first-timers describe trim as the step that turns “DIY project” into “wait, did you buy that?” If you’re unsure what trim to choose, a simple grosgrain ribbon in a contrast color is almost always a win. Or keep it tone-on-tone for a softer, more traditional look.
The fifth surprise: you start noticing pleats everywhere. After making one pleated shade, a lot of people suddenly see pleated details in rooms and catalogson sconces, chandeliers, even tiny clip-on shades. It’s like you unlocked a design filter. And because the no-sew process is so adaptable, it becomes tempting to experiment: a gingham shade for a kitchen corner, a soft floral for a guest room, a crisp stripe for a home office. You may also discover your “pleat personality”: some people love tight, uniform pleats; others prefer slightly relaxed folds that feel more organic and vintage.
Most importantly: your first shade teaches you what your second shade will perfect. The second time around, you’ll press more, glue less, and measure earlier. You’ll know exactly where to place the seam, how dense you like the pleats, and which fabrics behave best. That’s the real charm of this project: it’s not just a lampshade makeoverit’s a skill you can reuse whenever a lamp (or a room) needs a quick style upgrade.


