Table of Contents >> Show >> Hide
There is something deeply satisfying about a stepping stone path. It says, “Yes, this yard has a plan,” even if the rest of the garden is currently improvising. A well-set path gives structure to a landscape, protects grass from being trampled into submission, and turns a plain side yard or backyard into a place that feels intentional. Even better, setting stepping stones is one of those landscaping projects that looks expensive, feels custom, and still fits into real life for homeowners who do not own a private excavation crew.
But here is the catch: stepping stones only look effortless when they are installed with care. If they wobble, sit too high, sink after a rain, or force people to walk like confused flamingos, the charm disappears fast. The good news is that the basics are simple. You need a smart layout, the right stone for the job, a stable base, proper spacing, and enough drainage awareness to keep your path from becoming a decorative obstacle course.
This guide explains how to set stepping stones the right way, from planning and material choices to spacing, leveling, drainage, and long-term maintenance. Whether you want a casual garden path through grass, a more polished gravel-and-stone walkway, or a practical route through a side yard, the same principle applies: each stone should feel natural underfoot and look like it belongs exactly where it landed.
What “Setting Stepping Stones” Really Means
At first glance, setting stepping stones sounds like a glorified version of “put rock on ground.” If only. In reality, it means creating a path that works with the way people move through a space. A good stepping stone path connects two places people actually use, such as a driveway and front door, a patio and garden, or a gate and backyard shed. It should feel intuitive. Nobody should have to stop mid-walk and calculate a landing strategy.
In landscape design, stepping stones are often used for informal circulation. They soften the feel of a yard compared with a solid concrete walk, and they let you preserve more green space between stones. They also work well in lawns, gravel paths, cottage gardens, and side yards where a fully paved walkway might feel too stiff or too expensive.
Function matters just as much as appearance. A front entry route usually needs a clearer, wider, more even surface. A meandering garden path can be narrower and more relaxed. That distinction matters because the best stepping stone path is not always the prettiest one on paper. It is the one people actually use.
Plan the Path Before You Dig
Start With Purpose, Not Just Pinterest Energy
Ask one simple question before buying anything: where are people going? If the path leads to the front door, keep it direct and welcoming. If it cuts through a flower bed to a bench or vegetable garden, it can curve more casually. If it crosses a lawn that gets mowed often, make sure the stones sit low enough to work with maintenance instead of declaring war on the mower.
Think about traffic volume too. A lightly used garden trail can be built with individual stones set in grass or mulch. A route that sees frequent use, muddy conditions, trash can wheels, kids, older adults, or lots of foot traffic will perform better with a more structured base and surrounding material such as gravel, paver base, or edging.
Choose the Right Stone
Stepping stones come in a few common forms, and each has a different personality:
- Natural flagstone: beautiful, irregular, classic, and full of character. Great for organic-looking garden paths.
- Concrete stepping stones: affordable, consistent, and easy to source. Great for beginners and budget-friendly projects.
- Pavers: clean-lined and uniform. Good for modern landscapes or hybrid paths that combine stepping stones and gravel.
- Large cut stone slabs: polished and architectural. Excellent for contemporary yards, though usually heavier on both the wallet and the back.
The best material depends on your style, budget, and patience level. If you love a natural look, irregular stones are hard to beat. If you love predictable measurements and fewer surprises, concrete pavers are your dependable friend. The one thing all stepping stones should have in common is enough surface area to be comfortable and safe underfoot.
Test the Spacing With Real Human Legs
This is where many DIY projects go sideways. People often place stones based on what looks symmetrical from ten feet away, then discover the spacing feels awkward when they actually walk it. A better method is to lay the stones on the ground first and walk the path at a natural pace. Adjust until each step feels effortless.
There is no universal gap that works for every yard, every household, or every stone size. Adults, children, and taller or shorter family members all have different strides. That is why the smartest layout rule is simple: dry-fit first, walk it several times, and fine-tune before you dig. Good design is not just visual. It lives in your knees.
How to Set Stepping Stones Step by Step
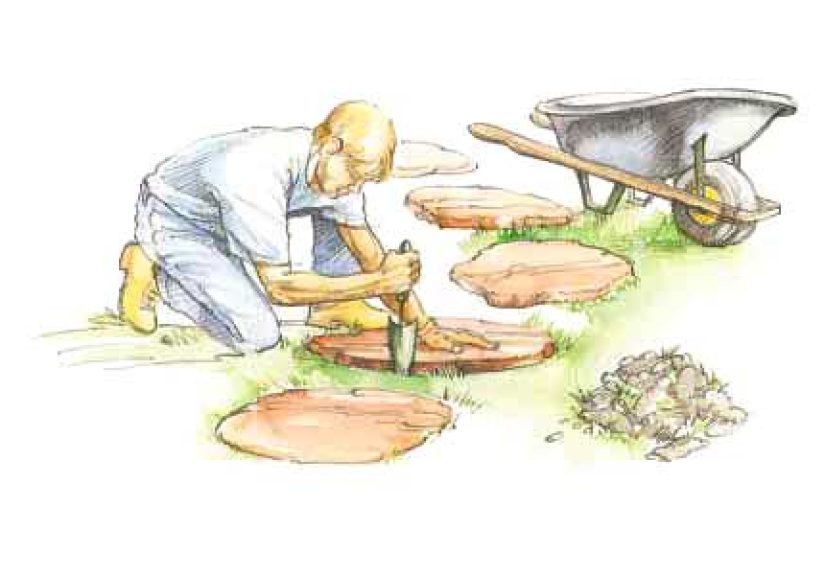
1. Mark the Route and Dry-Fit the Stones
Lay the stones along the intended route. If the path curves, use a garden hose or rope to help visualize the shape first. For irregular stones, rotate them until the arrangement feels balanced and natural. Make sure feet land squarely on each stone. This is not the time for artistic mystery. If people cannot tell where to step, the path is already judging them.
Once you like the layout, trace around each stone with a spade, trowel, or marking paint. This preserves the exact footprint so you can remove each stone and excavate the right area.
2. Excavate to the Correct Depth
For stones set directly into a lawn, remove the sod and soil to a depth that matches the thickness of the stone. The goal is for the top surface to end up flush with the surrounding ground, or just slightly proud before settling. Stones that sit too high become toe-stubbers. Stones that sink too low become puddle collectors.
If your soil is compact, rocky, uneven, or prone to movement, add a layer of builder’s sand beneath each stone. The sand helps support the underside and makes it easier to adjust the level. For heavier-use paths or paths built over a fully prepared bed, excavate deeper to allow for a compacted base layer and leveling material.
3. Build a Stable Base
Not every stepping stone path needs an elaborate foundation, but every path needs stability. The amount of base preparation depends on how formal and durable you want the walkway to be.
For a casual lawn path, a small bed of sand under each stone may be enough. For a path in gravel or for a more permanent installation, use a compacted base of crushed stone or paver base below the stones, then add a thin leveling layer of sand or stone dust. This reduces wobbling, discourages settling, and gives the path a more professional finish.
If you are preparing a wider, fully excavated path rather than individual holes, compact the subsoil first, then install your base in layers. Edging can also help keep gravel and stone in place, especially on curves or in higher-traffic areas.
4. Set Each Stone and Check for Level
Place each stone into its prepared spot and press it firmly into the base. Use a level to check the surface. The stone should feel stable and sit evenly without rocking. If it wobbles, lift it, add or remove sand, and try again. Do not promise yourself you will “fix it later.” Later usually arrives during the first family barbecue.
Also check the pitch. In most outdoor settings, water should not sit on the stone or run toward structures. A subtle slope is often enough to encourage drainage without being visible. On lawn-set stones, keeping the surface level with the surrounding grade and avoiding low spots is usually the most practical approach.
5. Mind the Drainage
Drainage is the difference between a path that ages gracefully and a path that hosts mosquito conventions. Water should be able to move around, between, or away from the stones. In many garden settings, slight gaps between stepping stones improve permeability and help rainfall soak into the ground rather than rushing off as runoff.
This is one reason stepping stones pair so well with gravel, ground cover, or lawn. They create a path without turning the entire area into a hard, sealed surface. In practical terms, that means less standing water, less mess, and often a more garden-friendly look.
If your site already has drainage problems, do not expect stepping stones to solve them by magic. Address low spots, heavy clay issues, or runoff patterns first. On sloped ground, consider terracing, larger landing stones, or steps rather than pretending gravity will suddenly become cooperative.
6. Fill the Gaps and Finish the Edges
Once the stones are set, fill around them with the surrounding material that matches your design. In a lawn, replace soil around the edges and let grass grow around the stones. In a decorative path, use gravel, decomposed granite, mulch, moss, or low-growing ground cover. For tighter paver-style layouts, sand or polymeric sand can help lock joints in place.
Finishing matters. Clean lines around each stone make the path look intentional, while sloppy edges make it look like a geological accident. Even an informal garden path benefits from crisp placement.
Best Design Ideas for Stepping Stone Paths
The beauty of stepping stones is that they can look formal, playful, rustic, or modern depending on layout and material. Here are a few design directions that work especially well:
- Grass-through-stone path: ideal for a soft, traditional garden look.
- Stone-and-gravel path: great for drainage, texture, and a more finished appearance.
- Large rectangular slabs: excellent for modern landscapes with clean architecture.
- Irregular flagstone trail: perfect for cottage gardens, naturalistic beds, and relaxed side yards.
- Stepping stones through a planting area: useful for access without compacting soil or crushing plants.
Try to keep your materials consistent with the house and surrounding hardscape. Too many competing finishes can make a yard feel visually scattered. A path should connect spaces, not start an argument with the patio.
Common Mistakes to Avoid
Bad spacing: If people shuffle or stretch between stones, the layout is wrong. Test first.
No base preparation: Stones placed directly on uneven ground tend to wobble or sink.
Ignoring drainage: Water always wins. Plan accordingly.
Using stones that are too small: Tiny stepping stones are decorative until someone actually tries to walk on them.
Choosing style over function: A path can be lovely and still be miserable to use. Avoid that combo.
Forgetting utilities: Before digging, know what is below the ground. Hidden lines are not bonus surprises.
Maintenance Tips for a Long-Lasting Path
Stepping stone paths are relatively low maintenance, but they are not maintenance-free. Check the path a few times each year, especially after heavy rain or freeze-thaw cycles. Re-level any stone that shifts. Top up gravel or joint material if it washes away. Trim grass or ground cover so the path stays visible and safe.
If moss or algae builds up in shady areas, clean the stones so they do not become slippery. If weeds appear between stones, remove them before they root deeply enough to turn your tidy path into a botanical uprising.
The best maintenance habit is simply observation. Walk the path. Notice where water pools, where stones move, and where foot traffic naturally wants to go. Landscapes talk. Mostly through mud and inconvenience, but still.
Conclusion
Setting stepping stones is one of the most rewarding landscape projects because it blends design, function, and everyday usefulness. A good path looks natural, guides people comfortably, supports the way your yard is actually used, and stands up to weather without becoming a maintenance drama. The secret is not complicated: plan the route carefully, choose the right material, test the stride, prepare a stable base, and respect drainage like the important supporting character it is.
When done well, stepping stones do more than connect one point to another. They create rhythm in the garden, protect the landscape from wear, and make outdoor spaces feel more finished and inviting. In other words, they are small pieces of hardscape with big main-character energy.
Experiences Related to Setting Stepping Stones
One of the most common experiences people have with setting stepping stones is realizing that the project is less about stone and more about movement. On paper, it seems like a material choice. In real life, it is about the human body. Many homeowners discover that a layout that looks perfectly balanced from a patio chair feels strangely awkward when walked. The first lesson usually comes fast: visual symmetry is not the same thing as walking comfort. That is why dry-fitting stones and physically testing the path tends to be the moment the project starts making sense.
Another frequent experience is the surprise of how much difference one inch can make. A stone that sits just a little too high feels annoying every single time someone crosses it. A stone that tips slightly underfoot instantly makes the whole path feel cheap, even if the material itself was beautiful. People often begin the project focused on color and shape, then end it fully converted to the religion of level surfaces. The glamorous part may be picking stone, but the satisfying part is stepping on a finished path and feeling absolutely no wobble.
Rain also teaches lessons quickly. A path that seems perfect on a sunny afternoon may reveal poor drainage after the first storm. Homeowners often notice where mud forms, where gravel shifts, or where a stone settles unevenly because water keeps moving underneath it. In that sense, setting stepping stones can feel like a conversation with the site. The yard tells you where water wants to go, where feet want to travel, and where your original plan was a little too optimistic. The best outcomes usually come when the installer listens and adjusts instead of forcing the landscape into a rigid idea.
There is also a strong emotional side to this kind of project. A stepping stone path is practical, but it also changes the way a yard feels. A side yard that once felt forgotten starts to feel intentional. A vegetable bed becomes easier to reach after rain. A garden bench feels more inviting when there is a clear route to it. Families often experience these changes in small, everyday ways. Children hop from stone to stone as if the path were built for adventure. Guests naturally follow the route without needing direction. Even routine tasks like taking out compost or watering pots feel more pleasant when your shoes are not sinking into wet ground.
For many DIYers, setting stepping stones becomes the project that builds confidence for larger landscape work. It introduces layout, excavation, leveling, drainage, and finishing details without requiring a full-scale hardscape installation. By the end, people usually understand their yard better than when they began. They know where the soil is compacted, where the slope changes, where the grass struggles, and where a future border, bench, or light might belong. That is one reason the experience sticks with people. You start out trying to build a path, and you end up seeing the whole garden more clearly.


