Table of Contents >> Show >> Hide
- Why Rings Get Stuck (It’s Not Personal)
- Quick Safety Check: When to Skip DIY
- What You’ll Need
- Prep That Makes the String Method Work Better
- The String Ring Removal Method: 9 Steps
- Step 1: Choose your string (and go longer than you think)
- Step 2: Add a tiny bit of lubricant around the ring
- Step 3: Thread the floss under the ring
- Step 4: Wrap the long end snugly around your finger
- Step 5: Pause briefly and re-lubricate (optional but helpful)
- Step 6: Start unwinding the short tail (the magic part)
- Step 7: Help the ring “walk” with a wiggle
- Step 8: If it stalls, don’t force itreset
- Step 9: After it’s off, do a quick finger check
- Troubleshooting: What If the Ring Still Won’t Move?
- When to Get Professional Help (Even If You Love DIY)
- How to Prevent This From Happening Again
- Experience Corner: Real-World Lessons (About )
- Conclusion
A ring that won’t budge can turn a normal Tuesday into a tiny, sparkling crisis. Your finger swells, the ring laughs, and suddenly you’re negotiating
with inanimate objects. The good news: there’s a classic, ER-approved “string method” (often done with dental floss) that can help slide a stuck ring
off without cutting it. The better news: you don’t need wizard powersjust a little patience and a plan.
Below, you’ll get a practical, step-by-step guide (9 steps exactly), plus tips to reduce swelling, avoid common mistakes, and know when it’s time to
wave the white flag and get professional help.
Why Rings Get Stuck (It’s Not Personal)
Rings don’t usually “shrink.” Fingers, however, can change size like they’re auditioning for a shape-shifting role. Common culprits include heat,
exercise, salty meals, minor injuries, pregnancy, arthritis, water retention, or simply wearing a ring that’s a tad too snug.
Swelling matters because a tight ring can act like a tiny tourniquetcompressing tissue and sometimes reducing blood flow. That’s why safe removal is
about two goals: reduce swelling and help the ring slide.
Quick Safety Check: When to Skip DIY
Before you try any ring removal trick, take a 10-second look at your finger. If you notice any of the following, don’t spend 30 minutes
battling it at homeget urgent help (ER/urgent care, or sometimes a fire department/jeweler with proper tools):
- Color changes (blue, gray, very pale) or the finger feels cold compared to others
- Numbness, tingling, or severe throbbing pain
- Rapid swelling after injury (possible fracture/dislocation)
- Open wounds, signs of infection, or the ring is embedded into skin
- You tried swelling-reduction + lubrication and it’s getting worse
Translation: if circulation seems compromised, the priority is protecting your fingernot preserving the ring’s pride.
What You’ll Need
The Essentials
- Dental floss (waxed is often easier) or a thin, smooth string
- A lubricant: soap, hand lotion, cooking oil, or petroleum jelly
- Scissors (to cut floss when you’re done)
Nice-to-Have Helpers
- Floss threader (the little plastic loop) or a thin ribbon/tape to help “feed” floss under the ring
- Ice pack or a bowl of cool water
- A friend (not mandatory, but extremely helpful when you only have one free hand)
What to Avoid
- Anything sharp against your skin (no kitchen knives, please)
- Leaving tight floss wrapped for long periods (compression is temporary, not a lifestyle)
- Brute-force yanking (this is a “slow and steady” situation)
Prep That Makes the String Method Work Better
The string method is most successful when swelling is minimized first. Think of it like trying to get jeans off after Thanksgiving dinner:
technically possible, but way easier if you pause, breathe, and stop fighting physics.
Try this 5–10 minute mini-routine
- Elevate your hand above heart level. Let gravity help drain fluid.
- Cool the finger with an ice pack (wrapped in cloth) or cool water for a few minutes.
- Remove other rings on that hand if you candon’t let the stuck ring recruit friends.
Once you’ve done that, you’re ready for the main event.
The String Ring Removal Method: 9 Steps
This is the classic “wrap-and-unwind” technique used in many clinical settings. The idea is simple: the floss compresses the swollen tissue, then the
ring “walks” over the floss as you unwind it.
Step 1: Choose your string (and go longer than you think)
Cut a generous length of dental flossabout 18–24 inches is usually enough. Too short is the #1 reason people end up doing an awkward floss-extension
mid-procedure (which is a sentence nobody expected to read today).
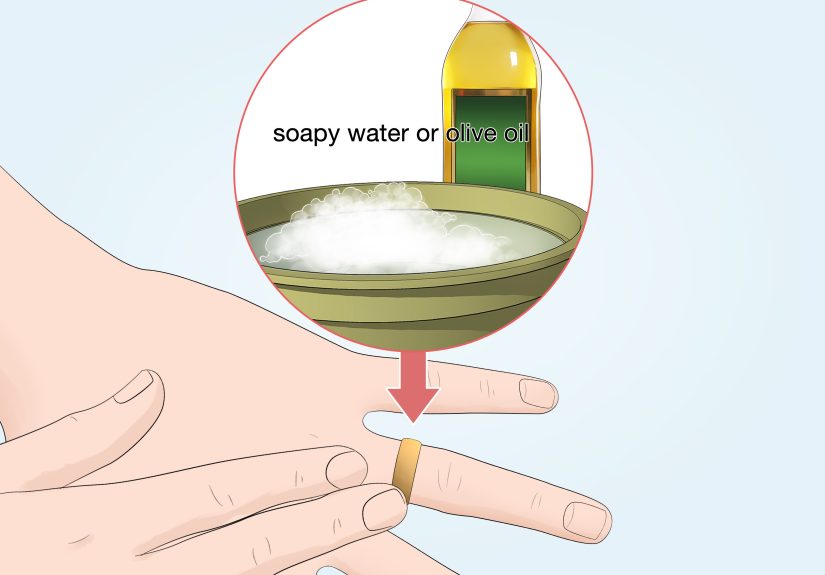
Step 2: Add a tiny bit of lubricant around the ring
Apply a small amount of soap or lotion around the ring and the skin right next to it. You want “slippery,” not “can’t-grip-the-ring-with-your-fingers”
slick. A little goes a long way.
Step 3: Thread the floss under the ring
Slide one end of the floss under the ring. The easiest direction is from the hand side (closer to your palm) toward the fingertip. If it’s tight, use
a floss threader or a thin piece of plastic (like a clean, flexible loop) to help pull it through.
Goal: you’ll have a short “tail” of floss coming out on the palm/hand side, and the longer remainder pointing toward your fingertip.
Step 4: Wrap the long end snugly around your finger
Using the longer end (the part toward your fingertip), begin wrapping the floss around your finger starting right above the ring. Wrap in neat, tight
coils moving toward the fingertip and over the knuckle area. Each wrap should sit next to the previous wraplike a tiny, temporary compression sleeve.
Snug matters. Painful, purple, numb “I can’t feel my fingertip” tight does not. If your fingertip starts to tingle or discolor, loosen and restart.
Step 5: Pause briefly and re-lubricate (optional but helpful)
Give the compression 30–60 seconds to do its thing, then dab a little more lubricant on the wrapped area near the ring. This helps the ring glide as it
moves.
Step 6: Start unwinding the short tail (the magic part)
Grab the short tail that’s on the palm/hand side of the ring and begin to unwrap it in the same direction you wrapped. As the floss
unwinds, the ring should slowly advance over the compressed, wrapped finger toward the fingertip.
Go slowly. If you yank, you risk snapping floss or turning this into a finger tug-of-war. Gentle, steady pulling wins.
Step 7: Help the ring “walk” with a wiggle
While unwinding, use your other hand (or a helper) to gently rock the ring side-to-side and rotate it slightly. This reduces friction and helps it
pass over the knuckle. Imagine coaxing a stubborn jar lidfirm but not furious.
Step 8: If it stalls, don’t force itreset
If the ring stops moving or it becomes very painful:
- Stop and check your fingertip color and sensation.
- Unwrap everything immediately to restore normal circulation.
- Re-elevate/ice for a few minutes, add lubricant, and try again with slightly less tension.
It’s normal to need two attempts, especially if swelling is significant or the knuckle is the main obstacle.
Step 9: After it’s off, do a quick finger check
Once the ring is free (congrats, you just won an argument with jewelry), wash your finger and look for lingering indentation, broken skin, or ongoing
numbness. If pain or swelling persists after an injury, consider getting checked for a sprain or fracture.
And yes: consider resizing the ring. Your finger has clearly filed a complaint.
Troubleshooting: What If the Ring Still Won’t Move?
The knuckle is the problem
Many “stuck ring” situations aren’t about the base of the fingerthey’re about the knuckle being wider or swollen. That’s why wrapping over the
knuckle is key. If you skipped wrapping past that joint, try again and make sure the wrap extends beyond the widest point.
The floss keeps breaking
Use waxed dental floss, nylon thread, or a stronger, smooth string. Avoid thin sewing thread that snaps easily. You want strong enough to pull, but not
so thick it adds bulk under the ring.
Your skin is “bunching” under the ring
Add lubricant and use a gentle twisting motion. Sometimes pulling a small amount of skin from above the ring downward (toward the fingertip) can help
the ring move over folds rather than grabbing them.
You have arthritis or chronic swelling
Compression-style approaches are still used in clinical settings for swollen or arthritic fingers, sometimes with medical-grade self-adherent wrap and
lubricant. If home attempts are painful or ineffective, professional removal is often the safer route.
When to Get Professional Help (Even If You Love DIY)
If swelling is significant, circulation looks questionable, or multiple attempts fail, it’s time to stop experimenting. Medical professionals can use
ring cutters and specialized techniques to remove rings while protecting your skin. In many cases, a cut ring can be repaired later by a jewelerfingers
are harder to “repair.”
Tip: if your ring is made of very hard materials (like certain steels or tungsten), cutting/removal methods can differ. Don’t try to MacGyver it with
tools at home.
How to Prevent This From Happening Again
- Resize the ring if it’s consistently tight, especially during normal daily activities.
- Remove rings before workouts, long flights, or heavy lifting (swelling can sneak up).
- Avoid wearing snug rings in heat or after very salty meals if you’re prone to fluid retention.
- After an injury, remove rings earlyswelling often increases over the next several hours.
- Store a floss threader in your travel kit. It’s a weird hero, but a hero nonetheless.
Experience Corner: Real-World Lessons (About )
If you’ve never had a ring stuck, you might assume it happens only to people who “did something wrong,” like forcing a too-small ring on a finger.
Reality is much more relatable (and slightly more annoying). One common scenario is the post-gym surprise: you lift, your hands swell a bit, you drink
water, and suddenly your ring fits like it was shrink-wrapped by a mischievous elf. People often try twisting harderbecause that’s what we do with jar
lidsonly to discover fingers are not jars and pain is not progress.
Another classic: the “it fit this morning” trap. Temperature changes, hormones, and hydration can all make your finger fluctuate. Someone washes dishes
in warm water, their hands puff slightly, and the ring goes from “cute accessory” to “permanent roommate.” This is where the string method shines,
because it doesn’t rely on brute force; it relies on gentle compression and controlled movement. The first time people try it, they’re often surprised
by how slow it feelsuntil they realize slow is what keeps the finger from getting more irritated.
A surprisingly helpful experience tip: do it when you’re calm. Stress makes you grip harder, twist more aggressively, and rush steps like icing and
elevation. The people who succeed fastest are usually the ones who take five minutes to elevate their hand and cool the finger first. It feels like
“wasting time” until you see the swelling visibly decrease and the ring suddenly has room to move. In other words, patience is a swelling-reduction
tool.
If you have a friend helping, the process gets easier (and less comedic). One person can keep the finger steady and gently rock the ring while the
other unwinds the floss. Helpers also notice things you might miss, like a fingertip turning pale or the wrap being too tight. If you’re doing it solo,
take micro-breaks to check sensation and colorespecially if you’re wrapping snugly over the knuckle.
People also learn what not to do: leaving the floss wrapped while searching for scissors, taking photos, or narrating the moment to your group
chat. Compression works quickly, but you shouldn’t “set it and forget it.” If it stalls or hurts sharply, unwrap and reset. The method is repeatable;
your finger’s patience is not infinite.
Finally, many folks walk away with a practical conclusion: rings are emotional objects, but fingers are functional ones. Plenty of people who ended up
needing a ring cutter later said the same thing: “I wish I’d gone in sooner.” The string trick is a fantastic first attemptjust keep your ego out of
it. The goal is a healthy finger and a good story, not a medal for stubbornness.
Conclusion
The string (or dental floss) method is one of the simplest ways to remove a stuck ring without destroying it: reduce swelling, compress the finger with
a snug wrap, and let the ring glide forward as you unwind. If your finger shows signs of circulation problemscolor change, numbness, severe painor if
repeated attempts fail, don’t gamble with your hand. Get professional help. Rings can be repaired. Fingers are kind of a big deal.


