Table of Contents >> Show >> Hide
- Why Basting Turkey Does Not Make It Juicier
- The Food Science of Crispy Turkey Skin
- What to Do Instead of Basting
- Roasting Strategies for Juicy Meat and Crisp Skin
- Cook to Temperature, Not to Panic
- Resting the Turkey Without Ruining the Skin
- Common Turkey Mistakes to Avoid
- A Simple No-Baste Turkey Game Plan
- Experience Notes: What Actually Happens When You Stop Basting
- Conclusion: Retire the Baster and Roast Smarter
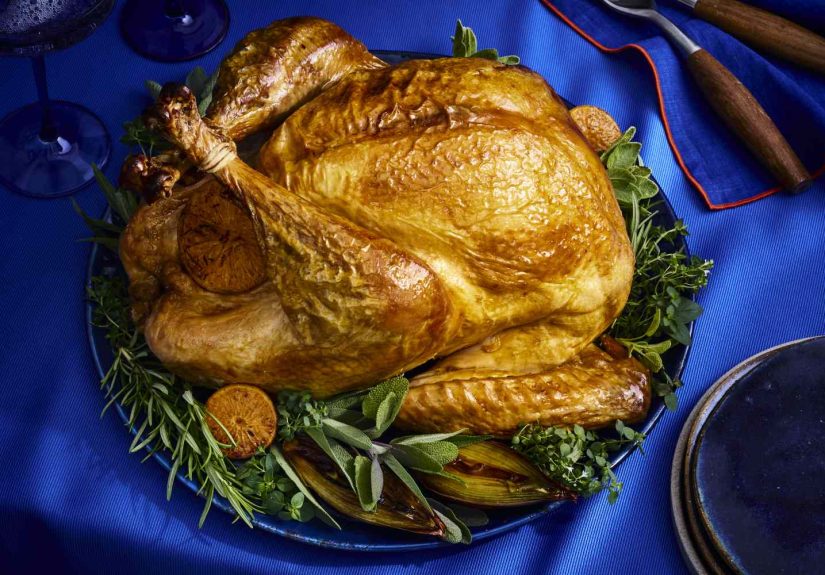
If your Thanksgiving ritual involves opening the oven every 30 minutes, fogging your glasses, dodging a blast of poultry-scented sauna air, and lovingly spooning hot pan juices over a turkey, it may be time for a tiny holiday intervention. Basting feels productive. It looks dramatic. It makes you seem like the kind of cook who owns three thermometers and knows where the good platter is hiding.
But here is the crispy-skinned truth: basting is not the secret to a juicy turkey. In fact, it can work against you. Food scientists, test kitchens, butchers, and roasting experts increasingly agree that the best turkey strategy is not “keep it wet.” It is “season it early, dry the skin, control the heat, and cook to temperature.” Less hovering, more science. Your oven door can finally enjoy some privacy.
The reason is simple: crispy turkey skin needs dryness and heat, while juicy turkey meat needs salt, temperature control, and rest. Basting adds surface moisture, drops oven temperature, slows browning, and does almost nothing to season the meat beneath the skin. If the goal is a bird with crackly golden skin and tender slices of breast and thigh, there are better ways to get there.
Why Basting Turkey Does Not Make It Juicier
Basting sounds logical because we associate moisture with juiciness. But turkey skin is not a sponge with a direct pipeline to the breast meat. Most of the liquid you spoon over the bird rolls right off the skin and returns to the roasting pan, like a tiny gravy-themed waterslide. Very little penetrates beyond the surface.
The juiciness of turkey meat depends far more on how much moisture the muscle fibers retain during cooking. That is influenced by salting, brining, roasting temperature, final internal temperature, and carryover cooking. A turkey can look glossy on the outside and still be dry inside if the breast meat is overcooked.
The Oven-Door Problem
Every time you open the oven to baste, heat escapes. That temperature drop means the oven must recover before it can continue roasting efficiently. Longer cooking increases the risk of drying out the lean breast meat, especially in large turkeys. In other words, basting may make you feel like a hero while secretly making the bird spend more time in the danger zone of dryness.
There is also the skin issue. Crispy skin depends on evaporation. The surface must lose water before browning reactions can really take off. When you repeatedly pour liquid over the turkey, you rehydrate the very surface you worked so hard to dry. That is like blow-drying your hair and then stepping into a light drizzle every 30 minutes. Technically possible, emotionally exhausting.
The Food Science of Crispy Turkey Skin
For turkey skin to become crisp, two things need to happen. First, surface moisture must evaporate. Second, the skin must get hot enough for browning reactions to create that deep golden color and savory roasted flavor. Water slows both steps because it absorbs heat and keeps the surface temperature lower until it evaporates.
This is why a dry turkey skin browns better than a wet one. It is also why uncovered refrigerator drying, dry brining, and a light coating of fat are more effective than repeated basting. The goal is not to soak the bird; the goal is to create the right surface conditions for browning.
Dry Skin Is the Beginning of Great Skin
After thawing the turkey, remove it from its packaging, take out the neck and giblets, and pat the bird thoroughly dry. Then let it rest uncovered in the refrigerator on a rack set over a rimmed baking sheet. One day is helpful. Two days can be excellent if you have space. The refrigerator’s dry air helps the skin lose excess moisture, making it much easier to brown and crisp during roasting.
This step may look underwhelming. There is no sizzling, no bouquet of herbs, no dramatic butter massage. But it is doing important work. The turkey is quietly becoming the bird it was meant to be: seasoned, dry-skinned, and emotionally ready for the oven.
What to Do Instead of Basting
The best alternative to basting is a simple system: dry brine, air-dry, oil lightly, roast smart, and use a thermometer. This approach improves flavor, helps the meat hold moisture, and gives the skin a better shot at turning crisp instead of rubbery.
Step 1: Dry-Brine the Turkey
A dry brine is simply salt applied directly to the turkey, sometimes with pepper, dried herbs, sugar, or spices. Unlike a wet brine, it does not involve a bucket of salty water threatening to flood your refrigerator at 11 p.m. The salt initially draws moisture to the surface, then dissolves and moves back into the meat. Over time, it seasons the turkey more deeply and helps the muscle fibers retain moisture during cooking.
For a plain turkey that has not been pre-salted, enhanced, koshered, or self-basted, use about 1 tablespoon of kosher salt for every 4 to 5 pounds of turkey. Sprinkle it evenly over the outside and inside the cavity. For even better seasoning, gently loosen the skin over the breast and thighs and apply some salt directly to the meat. Go slowly; turkey skin is stretchy, but it is not a yoga instructor.
Refrigerate the salted turkey uncovered for 24 to 48 hours. If you only have 12 hours, do it anyway. Some salting is better than no salting. If your bird is already labeled “enhanced,” “self-basting,” or “contains a solution,” reduce or skip the salt to avoid a turkey that tastes like it spent spring break in the ocean.
Step 2: Use Dry Seasonings, Not Watery Add-Ons
Fresh herbs, whole citrus, and raw aromatics can be lovely in the roasting pan, but wet ingredients packed under the skin can introduce moisture where you do not want it. For the crispiest skin, lean on dry seasonings: black pepper, paprika, garlic powder, onion powder, dried thyme, dried sage, or a small amount of baking powder mixed with salt.
Baking powder is a popular crispy-skin trick because it raises the surface pH and encourages browning. It can also create a more textured surface that crisps nicely. Use it sparingly: about 1 teaspoon per tablespoon of kosher salt is enough. Too much can taste metallic, and nobody wants a turkey with the personality of a loose penny.
Step 3: Add Fat Once, Not Every Half Hour
Fat helps browning and improves the appearance of the skin. The key is to apply it once before roasting rather than repeatedly basting. Use a thin coating of neutral oil, olive oil, clarified butter, or melted turkey fat. Regular whole butter contains water and milk solids, so it can brown beautifully but may not be as ideal for maximum crispness as clarified butter or oil.
Brush or rub the fat over the dry turkey skin just before roasting. Think “light jacket,” not “spa treatment.” A slick, even coating is enough to promote browning without making the skin soggy.
Roasting Strategies for Juicy Meat and Crisp Skin
There is more than one right way to roast a turkey, but some methods make success easier. The biggest challenge is that turkey breast and turkey legs are different meats attached to the same bird. Breast meat is lean and dries out if pushed too far. Thighs and drumsticks contain more connective tissue and taste better when cooked to a higher temperature. This is why a whole turkey can feel like trying to cook a chicken, a roast, and a committee meeting at the same time.
Option 1: Spatchcock the Turkey
Spatchcocking means removing the backbone and flattening the turkey before roasting. It may sound like something invented by a pirate butcher, but it is one of the most reliable ways to cook turkey evenly. Flattening the bird exposes more skin to direct heat, shortens roasting time, and helps the breast and thighs finish closer together.
You can ask a butcher to spatchcock the turkey for you, which is an excellent move if you prefer your holiday prep without a wrestling match. Save the backbone for stock or gravy. A spatchcocked turkey will not have the classic upright Norman Rockwell look, but it delivers more crispy skin and easier carving. Beauty fades; crispy skin is forever.
Option 2: Roast on a Rack in a Shallow Pan
If you want to keep the bird whole, roast it on a rack set in a shallow roasting pan or rimmed baking sheet. Air circulation helps the skin brown more evenly. Deep roasting pans can shield the lower parts of the turkey from heat, creating pale, soft skin around the thighs. A rack also keeps the bird lifted above the juices, which helps prevent the underside from steaming.
Add onions, carrots, celery, garlic, or the turkey neck to the pan for flavorful drippings, but do not pile wet aromatics so high that they touch the skin. You want aroma below, dry heat above, and no vegetable steam bath sneaking up the sides.
Option 3: Shield the Breast if Needed
If the breast is browning too quickly, loosely tent it with foil after it reaches a nice golden color. Do not wrap the whole turkey tightly, or trapped steam can soften the skin. A loose foil tent protects the lean breast without turning the crispy surface into a sad raincoat.
Cook to Temperature, Not to Panic
The most important turkey tool is not a baster. It is a reliable thermometer. Roasting times are only estimates because bird size, oven accuracy, pan shape, stuffing, starting temperature, and even how often the oven door is opened can change the timeline.
For safety-first home cooking, the USDA recommends turkey reach 165°F as measured with a food thermometer. Check the thickest part of the breast and the innermost part of the thigh without touching bone. If the turkey is stuffed, the center of the stuffing must also reach 165°F. Many cooks prefer to bake stuffing separately because it is easier to cook safely and keeps the turkey from overcooking while waiting for the stuffing to catch up.
For best texture, many chefs aim for breast meat that finishes lower during roasting and rises during rest through carryover cooking, while dark meat benefits from a higher final temperature. The key for everyday cooks is accuracy. Use an instant-read thermometer or a leave-in probe, and do not rely on the plastic pop-up timer. Those little buttons are better at creating suspense than guaranteeing perfectly cooked meat.
Resting the Turkey Without Ruining the Skin
After roasting, let the turkey rest before carving. Resting gives carryover cooking time to finish the job and makes carving easier. A large turkey can rest for 30 to 45 minutes, and often longer, while you finish gravy and side dishes. This is not wasted time; it is the calm before the mashed potato stampede.
To protect crisp skin, tent loosely with foil instead of sealing it tightly. If the skin softens during resting, you can use a quick high-heat finish. Heat the oven to about 450°F, brush the skin lightly with oil or melted fat, and return the turkey for a few minutes just before serving. Watch closely. The goal is glossy and crisp, not “we met the broiler and things got complicated.”
Common Turkey Mistakes to Avoid
Do Not Wash the Turkey
Rinsing raw turkey can splash bacteria around the sink, counters, and nearby dishes. Pat it dry with paper towels instead, then discard the towels and wash your hands thoroughly. Clean and sanitize any surfaces that contacted raw poultry.
Do Not Stuff the Bird Unless You Measure the Stuffing Temperature
Stuffing inside a turkey must reach 165°F to be safe. Because stuffing sits deep inside the cavity, it often lags behind the meat. By the time the stuffing is safe, the breast may be overcooked. For better texture and easier food safety, bake dressing in a casserole dish and spoon turkey drippings into it for flavor.
Do Not Carve Too Early
Carving immediately after roasting sends juices across the board and makes slicing harder. Give the turkey time to settle. Use that window to make gravy, warm rolls, toss salad, or stare proudly at the bird like you just completed a culinary triathlon.
A Simple No-Baste Turkey Game Plan
Two days before serving, thaw the turkey fully if needed, remove the giblets, pat it dry, and apply a dry brine. Place it uncovered in the refrigerator on a rack over a rimmed baking sheet. One day before serving, check that the skin is drying well and rotate the pan if one side is pressed near the refrigerator wall. On roasting day, let the turkey sit at room temperature briefly while the oven preheats, brush the skin lightly with oil or clarified butter, and roast without basting.
Use a thermometer to monitor doneness. Tent the breast loosely if it browns early. Rest before carving. Make gravy from the drippings. Accept compliments with grace, even from the uncle who once claimed microwaving the turkey “would save time.”
Experience Notes: What Actually Happens When You Stop Basting
The first time a cook skips basting, the experience can feel suspiciously easy. There is a strange quietness to it. You put the turkey in the oven, close the door, and then do something radical: leave it alone. No timer screaming every 30 minutes. No frantic search for the baster. No oven mitts getting soaked in poultry juice. The turkey simply roasts.
That hands-off feeling is not laziness. It is control. When the oven stays closed, the temperature remains steadier, which helps the bird cook more predictably. The skin dries and browns instead of being repeatedly cooled and moistened. The kitchen also becomes less chaotic, which matters on a holiday when four burners are occupied, someone is asking where the cranberry sauce went, and the dog has developed a suspicious interest in the cheese board.
In practical experience, dry-brining makes the biggest difference. A turkey salted the day before tastes seasoned all the way through, not just on the surface. The breast meat has a firmer, silkier texture, and the pan drippings taste richer because the bird itself has been properly seasoned. When dry-brining is paired with uncovered refrigerator drying, the skin changes visibly. It looks tighter, slightly matte, and less damp. That may not look glamorous, but it is exactly what you want before roasting.
Another helpful lesson is that less butter is often better than more butter. Many cooks assume a thick blanket of butter under the skin guarantees moisture. It can add flavor, but if the skin is loaded with watery ingredients or the surface is not allowed to dry, crispness suffers. A thin coating of oil on the outside and seasoning under the skin often produces a cleaner, more reliable result. Save the butter for mashed potatoes, where it can live its best life without sabotaging the turkey skin.
Spatchcocking is also a revelation for anyone who values results over ceremony. The first time you serve a flattened turkey, someone may ask why it looks like it lost a bar fight. Then they taste it. The breast is juicy, the thighs are done, and there is more crisp skin to share. Carving is easier, too, because the bird is already arranged in a more accessible shape. If you love the classic whole-bird presentation, keep it whole. But if your priority is even cooking, spatchcocking is a serious upgrade.
The final experience-based lesson is to trust the thermometer more than the clock. A turkey can look done long before the thickest parts are safe, and it can also become overdone while you wait for a recipe’s estimated time to expire. Temperature tells the truth. Check both sides of the bird, especially the thighs. Ovens have hot spots, turkeys are irregularly shaped, and holiday confidence should be measured in degrees, not vibes.
When you stop basting, you do not lose tradition. You gain a better one: a calmer cook, a hotter oven, drier skin, juicier meat, and fewer chances to splash yourself with molten turkey drippings. That is not just good science. That is Thanksgiving self-care.
Conclusion: Retire the Baster and Roast Smarter
Basting turkey is one of those kitchen habits that survived because it feels useful, not because it delivers the best results. For a crispy, juicy turkey, focus on the steps that actually matter: dry-brine early, air-dry the skin, use dry seasonings, apply fat once, roast with steady heat, and cook to temperature. A food scientist would point to moisture control and browning reactions. A butcher would point to good seasoning, smart prep, and respecting the bird. Your guests will point to the platter and ask for seconds.
So this year, put down the baster. Close the oven door. Let the turkey roast in peace. The skin will thank you by crackling, the meat will thank you by staying juicy, and you will thank yourself when you realize you did not spend half the afternoon giving a turkey a hot bath it never asked for.


