Table of Contents >> Show >> Hide
- What Does It Mean to Turn Your Car Into a Simulator?
- Why Use a Real Car as a Simulator Cockpit?
- The Safe Way to Start: Build Around the Car, Not Through It
- Core Components You Need
- Choosing the Right Simulator Software
- Can You Use the Car’s Real Controls?
- How Much Realism Is Enough?
- Step-by-Step Planning for a Practical Build
- Common Mistakes to Avoid
- Who Should Build a Car Simulator?
- Experience Notes: What It Feels Like to Turn a Car Into a Simulator
- Conclusion: Build the Simulator Your Garage Deserves
There are two kinds of car people in the world: those who say, “I should really sell this old car,” and those who look at a parked vehicle, a steering wheel, a laptop, and a suspicious pile of cables and whisper, “What if this became a simulator?” If you are in the second group, congratulations. You are either a genius, a hobbyist, or one YouTube rabbit hole away from reorganizing your garage forever.
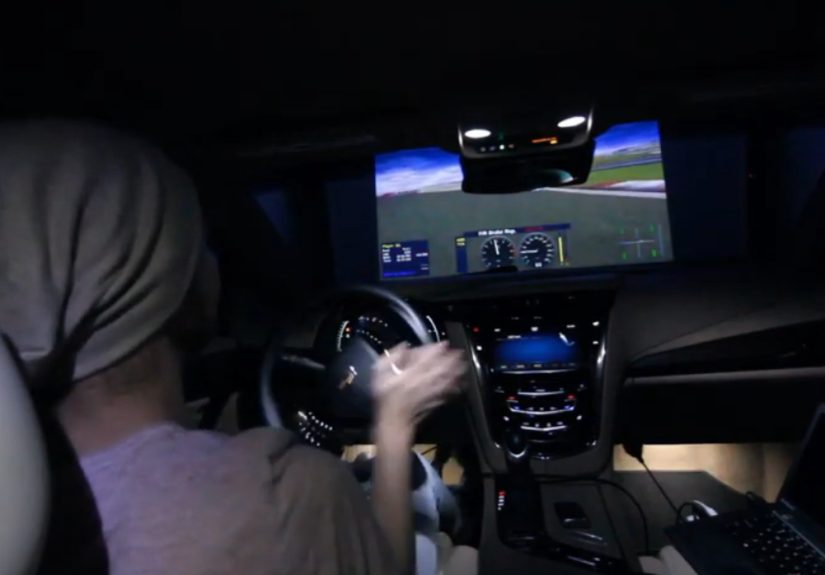
Turning your car into a simulator can mean several things. For some people, it means using a real car seat, real dashboard parts, and a racing wheel to build a more immersive sim racing cockpit. For others, it means using a retired vehicle shell as a full driving simulator, complete with screens, pedals, steering input, force feedback, and maybe even motion. At the extreme end, professional companies and research labs use real vehicle cabins inside high-fidelity simulators to study driver behavior, road safety, vehicle design, and training scenarios.
But before we go full “garage scientist in socks,” here is the big rule: a simulator setup belongs in a parked, secured, non-road-use environment. Do not install gaming screens, controllers, cables, or experimental interfaces in a car that will be driven on public roads. Distracted driving is not a quirky mod; it is dangerous. The best car simulator is the one that stays safely in the garage, not the one trying to run Assetto Corsa at a stoplight.
What Does It Mean to Turn Your Car Into a Simulator?
At its simplest, the idea is to use real automotive ergonomics to make virtual driving feel less like a desk job and more like, well, driving. A real car already has the basics that sim racers chase: a seat, pedals, steering position, dashboard sightline, cabin feel, and a sense of physical enclosure. Even a stripped interior can feel more natural than a folding chair sliding backward every time you brake. Anyone who has tried to heel-and-toe while their office chair slowly escapes understands the struggle.
There are three practical levels of “car simulator” builds. The first is the beginner-friendly cockpit build, where you use a real car seat or salvaged interior parts with consumer sim racing hardware. The second is the stationary vehicle build, where a whole parked car or shell becomes the cockpit. The third is the advanced integrated build, where steering, throttle, brake, displays, haptics, and sometimes motion are linked into simulation software. That last category can get expensive, technical, and complicated quickly, so most home builders start with level one and slowly become the person their neighbors call “interesting.”
Why Use a Real Car as a Simulator Cockpit?
The biggest advantage is immersion. A real cabin changes how your brain interprets the experience. The steering wheel sits where your hands expect it. The seat holds your body in a familiar driving posture. The pedals are positioned like a vehicle, not like a yoga pose invented by a printer repair technician. Even the dashboard, door panels, and windshield frame help create the illusion that you are inside a machine instead of controlling one from a desk.
Research and professional simulator design support this idea. High-end driving simulators often use real or full-size vehicle cabs because driver posture, visibility, steering feel, pedal behavior, and workload all matter. The more closely the simulator matches real vehicle inputs and sensory cues, the more useful it becomes for training, research, and evaluation. That does not mean your garage build needs a million-dollar motion dome. It means that small realism upgrades, done safely, can make a big difference.
The Safe Way to Start: Build Around the Car, Not Through It
The smartest approach is to avoid modifying the systems that make a real car safe or roadworthy. Airbags, steering columns, brake systems, electronic control modules, and factory wiring are not playground equipment. If the vehicle still has any chance of returning to the road, do not turn it into a science project. Instead, build a simulator setup that sits inside the parked vehicle or uses removable components.
A beginner-friendly version could use a sturdy wheel stand, a force feedback racing wheel, a pedal set, a monitor or VR headset, and a seat position that feels natural. If you already have an old car seat, you can mount it to a wooden or metal frame and pair it with sim hardware. This keeps the project simpler, cheaper, and less likely to end with you holding a mystery connector and asking an online forum, “Is this important?” Spoiler: it probably is.
Core Components You Need
1. A Stable Seat and Frame
The seat is the foundation. A real car seat can be excellent because it is designed for long sessions, proper back support, and repeatable positioning. However, the seat must be mounted securely. The goal is zero movement when braking, steering, or shifting. If the seat rocks, the pedals slide, or the wheel flexes like a pool noodle, the simulator will feel cheap no matter how fancy the software is.
For a whole-car build, the vehicle must be parked on a stable surface, with the parking brake secured and wheels chocked if necessary. For a seat-only build, use a rigid frame. Aluminum profile rigs are popular because they are adjustable and strong, while DIY wood frames can work if built carefully. The golden rule is simple: your simulator should not become a simulator of furniture failure.
2. A Force Feedback Steering Wheel
A basic controller can get you on track, but a force feedback wheel transforms the experience. Force feedback lets the wheel communicate tire grip, bumps, curbs, weight transfer, and loss of traction. Entry-level gear-driven wheels can be fun and affordable. Belt-driven wheels tend to feel smoother. Direct drive wheels connect the wheel more directly to the motor and can offer stronger, more detailed feedback.
Direct drive is popular among serious sim racers because it removes much of the mechanical delay and softness found in gear or belt systems. However, stronger is not automatically better. A powerful wheel needs correct settings, a rigid mount, and sensible force limits. You want the wheel to tell you what the virtual tires are doing, not arm-wrestle you into questioning your hobbies.
3. Pedals That Feel Consistent
Pedals are often more important than beginners expect. A good brake pedal helps build muscle memory, especially in racing simulators where braking consistency can matter more than top speed. Potentiometer pedals measure travel, while load cell pedals measure pressure. Load cell brakes are popular because they feel closer to how drivers naturally judge braking force in a real car.
If your goal is realism, prioritize a solid brake pedal and stable mounting. Pedals that slide away during hard braking are the enemy of both lap times and dignity. A load cell brake mounted to a weak frame can feel worse than a cheaper pedal set mounted properly. Rigidity wins.
4. Displays, Triple Screens, or VR
The screen setup controls your field of view, sense of speed, and ability to judge corners. A single monitor is simple and affordable. Triple screens create strong peripheral vision and are popular for racing because they help with side-by-side battles. VR can be extremely immersive because you can look into corners, check mirrors naturally, and feel more present in the car.
Each option has trade-offs. Triple screens require space and graphics power. VR can cause motion discomfort for some users and may be less convenient for long sessions. A single ultrawide monitor is a nice middle ground. Whatever you choose, correct field-of-view settings matter. An unrealistic FOV can make corners look strange, braking points feel inconsistent, and your virtual car seem like it is traveling through a fishbowl.
5. Audio and Haptics
Sound is underrated. Engine note, tire scrub, curb strikes, transmission whine, and wind noise all help your brain understand what the car is doing. Good headphones or speakers can make a modest setup feel far more alive. Some builders add bass shakers or tactile transducers under the seat or pedals to simulate vibration from road texture, gear shifts, and curb hits.
Haptics do not replace motion, but they add useful feedback. A small vibration when the rear tires begin to slide can help you react earlier. A kick through the seat when you hit a curb can make the experience feel physical. It is not magic, but it is the kind of not-magic that makes you grin like you just discovered a secret menu.
Choosing the Right Simulator Software
The best software depends on your goal. If you want organized online competition, iRacing is known for structured racing, licensing, and serious multiplayer. If you want GT racing immersion, Assetto Corsa Competizione focuses on real-world GT-style racing behavior, tire modeling, aerodynamics, electronics, and weather. If you enjoy sandbox vehicle physics and crash behavior, BeamNG.drive is famous for soft-body physics and detailed vehicle deformation. If you want a more accessible console-friendly experience, Forza Motorsport and Gran Turismo-style titles can be enjoyable gateways into wheel-based driving.
The trick is to match the software to the build. A real car cockpit paired with a casual arcade racer can still be fun, but if your goal is realism, choose software with strong wheel support, proper force feedback, adjustable field of view, and detailed input calibration. Also, do not underestimate setup time. A simulator is not “plug in and become Max Verstappen.” It is more like “plug in, calibrate, test, adjust, overdrive Turn 1, sigh, repeat.”
Can You Use the Car’s Real Controls?
Technically, some advanced builders have used real vehicle inputs as simulator controls. Projects have connected steering, throttle, brake, and other signals from a parked car into a computer so the car acts like a game controller. This is fascinating, but it is not the best starting point for most people. Modern vehicles use complex networks, and each model can communicate differently. Reverse engineering signals, interpreting data, and safely isolating systems requires real technical skill.
For most home users, consumer sim hardware is safer, easier, and more reliable. A racing wheel and pedal set can be mounted inside a vehicle shell without touching factory systems. That gives you the feel of a real cabin while avoiding the risk of interfering with critical vehicle electronics. If you want to integrate actual vehicle controls, treat it as an advanced electronics project for a non-road-use vehicle and involve qualified help.
How Much Realism Is Enough?
Realism is not one thing. It is a stack of small details. Steering torque matters. Brake pressure matters. Seat position matters. Field of view matters. Audio matters. Software physics matter. But chasing perfect realism can become expensive and, frankly, a little silly. At some point, you may find yourself explaining why your garage needs three screens, a hydraulic platform, and a fan that simulates wind. This is when your family will stare at you the way people stare at a raccoon opening a lunchbox.
The better question is: what experience are you trying to create? If you want better racing practice, focus on wheel, pedals, seating position, and consistent software settings. If you want immersion, add dashboard pieces, tactile feedback, and a wider field of view. If you want a showpiece, a full car shell can be amazing. If you want driver training, remember that simulators can help with awareness and practice, but they do not replace supervised real-world instruction.
Step-by-Step Planning for a Practical Build
Step 1: Decide Whether the Car Is Road-Use or Simulator-Only
This is the most important decision. If the vehicle will ever be driven again, keep the simulator removable and avoid modifying factory systems. If it is a retired shell, you have more freedom, but still need to manage electrical safety, structural stability, and ventilation.
Step 2: Measure the Driving Position
Sit in the car and note the distance from seat to wheel, wheel to pedals, and eye level to screen position. Comfort matters because sim sessions can last longer than expected. “Just one race” has a funny way of becoming “Why is the sun coming up?”
Step 3: Mount Hardware Rigidly
The wheelbase should not flex. The pedals should not move. The seat should not wobble. Rigidity makes force feedback clearer and braking more consistent. Many disappointing sim builds are not underpowered; they are simply too flimsy.
Step 4: Calibrate Inputs Carefully
Once the hardware is installed, calibrate steering rotation, throttle range, brake pressure, clutch travel, shifter input, and force feedback. Set reasonable steering strength, especially with direct drive wheels. Too much force can reduce detail, cause fatigue, or become unsafe.
Step 5: Tune Field of View and Seating
Correct field of view makes distance, speed, and corner entry feel natural. Place the display where the windshield view would be, or use VR if that suits your space. A beautiful simulator with incorrect FOV can feel like driving from the back row of a movie theater.
Step 6: Test, Adjust, and Keep Notes
Drive a familiar car on a familiar track. Adjust one thing at a time. Make notes on brake feel, steering weight, seating comfort, and screen position. The best simulator builds evolve through small improvements rather than one dramatic garage explosion of enthusiasm.
Common Mistakes to Avoid
The first mistake is spending everything on the wheel and ignoring the frame. A strong wheel on a weak mount is like putting racing tires on a shopping cart. The second mistake is using unrealistic force feedback settings. More force can feel impressive at first, but detail and control matter more than brute strength. The third mistake is poor ergonomics. If your knees, wrists, or back hurt after twenty minutes, your setup needs adjustment.
Another mistake is forgetting safety. Do not run cables where people can trip. Do not overload outlets. Do not leave electronics baking inside a closed car on a hot day. Do not mount screens where they could fall. And again, do not create a setup that encourages screen use while driving a real vehicle. The simulator should separate fun from risk, not combine them into one terrible idea wearing a racing glove.
Who Should Build a Car Simulator?
A car simulator is perfect for sim racing fans, automotive hobbyists, track-day drivers, driving instructors, content creators, and anyone with an old project car that has been “almost done” since approximately the invention of Wi-Fi. It can also be useful for practicing racing lines, braking points, car control concepts, and focus. While no home simulator perfectly recreates real driving, it can help build rhythm, consistency, and familiarity with performance driving ideas.
It is not ideal for people who want a quick, tiny, portable setup. A full vehicle cockpit takes space. It can also become a never-ending project. That is part of the charm, but be honest about your budget, garage space, and patience. If you cannot find your 10 mm socket now, adding a simulator project may not improve the situation.
Experience Notes: What It Feels Like to Turn a Car Into a Simulator
The first thing you notice when sitting in a real car-based simulator is how quickly your brain accepts the cabin. Even before the software loads, the environment feels familiar. Your hands fall naturally toward the steering position. Your feet search for the pedals. The seat holds you in a way a desk chair never quite manages. Then the screen turns on, the wheel centers itself, the engine sound starts, and suddenly the parked car feels awake. Not road-awake, thankfully. More like “weekend hobby monster” awake.
The biggest improvement is confidence. In a normal desk setup, your body sometimes feels disconnected from the virtual car. You steer, but your posture says spreadsheet. You brake, but your chair slides backward like it has somewhere better to be. In a real cockpit-style setup, the relationship between your body and the controls feels more believable. You can brake harder without bracing against your desk. You can steer with smoother inputs because the wheel is properly supported. You can drive longer because the seating position is closer to what your body expects.
Another experience that stands out is how much small feedback matters. A well-tuned force feedback wheel does not simply shake. It talks. It tells you when the front tires are loaded, when the rear is getting light, when a curb is too aggressive, and when your heroic late braking attempt has become a formal invitation to visit the gravel trap. Add better audio and tactile vibration, and the car begins to feel like a living object instead of pixels wearing a paint job.
There is also a funny emotional effect. Using a real car shell or real car parts makes the simulator feel personal. A generic rig can be excellent, but a simulator built from an old seat, a retired dashboard, or a beloved project car carries a story. Maybe the car no longer runs. Maybe it is waiting for an engine. Maybe it was too rusty to save as a daily driver but too cool to scrap. Turning it into a simulator gives it a second life. It becomes useful again, even if its new racetrack is made of software.
The learning curve is real. At first, you may spend more time adjusting than driving. The brake feels too stiff. The wheel feels too strong. The screen is too high. The field of view is weird. The shifter mount wiggles. Something rattles. Something else squeaks. This is normal. A simulator is a tuning project, not a toaster. The reward comes when the setup disappears and you stop thinking about hardware. You brake at the marker, turn in, feel the tires load, catch a small slide, and exit cleanly. That is the moment the build makes sense.
The best experience, though, is accessibility. A car simulator lets you drive cars and tracks you may never experience in real life. You can practice in the rain without paying for tires. You can crash without needing a tow truck. You can learn consistency without renting a track. You can race friends online without asking your insurance company to remain calm. It is not a replacement for real driving, but it is a smart, safe, and wildly entertaining way to explore the joy of cars.
Conclusion: Build the Simulator Your Garage Deserves
Turning your car into a simulator is part engineering project, part racing hobby, and part excuse to spend more time in the garage with a very serious expression. Done safely, it can create a deeply immersive driving experience that blends real automotive ergonomics with modern sim racing technology. Start with a stable seat, rigid mounts, reliable wheel and pedals, accurate calibration, and a display setup that gives you a believable view of the road. Then upgrade slowly.
The goal is not to build the most expensive simulator on the block. The goal is to create a setup that feels convincing, comfortable, and fun. Whether you use a single car seat or a full retired vehicle shell, the magic comes from making the virtual car feel physical. Keep it safe, keep it parked, and keep your sense of humor nearby. You will need it when you spend two hours adjusting brake pressure and then miss Turn 1 anyway.


